A variety of devices for smoking foods can help you pamper yourself and your loved ones with delicacies or prepare aromatic delicacies for future use. They can be purchased or made independently from metal or brick. The most practical homemade option was a smokehouse made from a gas cylinder, and here's why.
It is known that brick absorbs odors, for example fishy, and transfers them to the products being cooked after it. Building a brick smokehouse, purchasing a modern smoker, or making a thick-walled metal smokehouse yourself will not be cheap.
But you can find empty gas containers and experiment with them, adapting them for a home smokehouse.
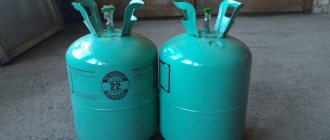
50 L and 27 L propane cylinders are most suitable.
Homemade products from a balloon
The large volume and metal walls make the cylinder suitable for the manufacture of various devices, inside which you can smoke and fry various products.
Craftsmen are already ready to share proven manufacturing schemes:
Stoves for a cauldron - you need to cut the cylinder or make a hole in it of the required diameter, and then weld the legs to the bottom of the container.
Barbecue - a lid is cut out of the cylinder, which will have to be installed back later using hinges, holes are also drilled in the walls for attaching skewers, and the container itself is placed on the legs.
Smokehouse with barbecue and barbecue - made like a barbecue, but with the addition of a second container for storing and igniting fuel (the firebox transfers heat to the barbecue through a pipe).
The listed devices are good because they are hollow, and therefore they have little weight. It is advantageous to attach wheels to their load-bearing legs for mobility.
Cold and hot smoking
Before making a smokehouse, you need to decide on the smoking method, which can be:
- Hot – food is cooked under high temperature (plus 40-120 degrees Celsius);
- Cold – products are treated with smoke at temperatures below 40 degrees Celsius.
It must be said that the latter option contributes to the long-term storage of ready-made dishes, while a hot smokehouse from a gas cylinder makes the food beautiful and aromatic. At the same time, the taste in both cases is excellent.
How does a balloon smokehouse work?
Unlike a barbecue, a smokehouse requires two containers. The use of a pipe is also encouraged. At the output, the design has:
Note!
- DIY induction heater ♨️ - reviews of the best manufacturing options. Varieties of homemade device designs + step-by-step master class (160 photos)
- Do-it-yourself Gauss cannon: TOP-130 photos of the best ways to create it yourself. Design features + master class for beginners
- DIY clamps - a step-by-step master class for beginners. Schemes for manufacturing different designs + 170 photos
- Firebox;
- Smoking chamber;
- Smoke exhaust.
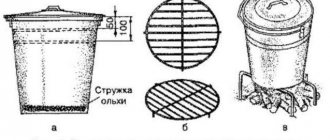
If the smoking chamber is a long cylinder in a lying state (the container lies on legs), then the firebox is a small container in which firewood is burned.
The firebox is connected to the smoking chamber through a pipe that transmits heat. The connection occurs through the bottom of the smoking chamber. The second semicircular end is used to cut into the chimney pipe. As a result, the dimensions of a cylinder smokehouse exceed the dimensions of a traditional barbecue in the form of a metal box.
Before assembling a thematic structure, you need to take care of its supporting part. It is made from angles or rods of reinforcement.
DIY technology
Constructing a multifunctional fireplace with your own hands from a 50 liter gas tank should begin with design. Ideally, it is better to draw a smokehouse-barbecue in 3D in any available graphics editor. The obligatory minimum is a sketch on paper by hand, in order to at least roughly understand how much additional rolled metal of various assortments will be needed (angle, round and profile pipes).
Safety precautions
The basic requirements when working with pressure vessels containing flammable gases are:
- bleeding the propane-butane mixture if it remains inside the cylinder;
- carefully unscrew the valve;
- filling the internal space with water for at least 12 hours.
The liquid should be drained in areas of the site not intended for planting. In 90% of cases, the cylinder is cut with an angle grinder with metal accessories; the tool should be used correctly:
- the grinder disk should be located to the left of its body so that the abrasive equipment runs onto the workpiece from above, and sparks fly out at the operator’s feet;
- the direction of the cut is away from you in the direction of rotation of the disk;
- When grinding welds and edges, the plane of the angle grinder equipment must be at least at an angle of 15 degrees to the surface being processed.
Otherwise, an uncontrolled rebound is guaranteed, fraught with injury to the limbs. For fragments of a disk bursting at high speeds, special clothing is practically no obstacle, so it is forbidden to remove the protective cover during operation.
Making a barbecue
For a roaster that is operated alternately in the barbecue mode and the food chamber of the smokehouse, you will need a whole 50 liter propane cylinder. It is marked and cut as follows:
- cover - the length along the entire height of the tank from the thickening ring near the bottom to the beginning of the rounding of the neck, the width is approximately 1/3 of the circumference of the cylinder, welded on the side on hinges to the cylinder;
- seating surfaces for skewers - vertical slots on one side of the resulting bowl, through holes opposite them;
- chimney hole - it is better to cut it in the upper part from the neck side;
- inlet hole - with the hot smoking method, the smoke generator cuts into the body of the grill from below, the hole has an oval shape, elongated horizontally, for the pipe extending from the smoke generator; with the cold smoking method, the hole has a round shape and a smaller size.
For ease of operation of the valves, corners are welded onto the tank bodies, which will become guides for the valves equipped with handles.
Construction of a smoke generator
The design of the smoke generator is a little more complicated:
- the cylinder should be cut to 0.5 m in height, the bottom or neck should be welded back;
- make a hole in the upper part for joining with the barbecue;
- install a sawdust grid;
- cut out the cover to gain access to the inside of the smoke generator.
Attention: When smoking food, the grill must be airtight, and when frying meat on coals, access to air is necessary for combustion. Therefore, instead of the classic holes on the sides of the body, a hatch is cut out from below, and a piece of the body becomes a shutter-scraper.
Chimney and support device
The legs of a universal roasting pan can be made in several ways:
- lay out with bricks;
- weld classic goats from a corner or profile pipe;
- use a used sewing machine stand;
- cut out semicircular-shaped seating surfaces in a vertically installed 50-liter cylinder to match the diameter of the fryer;
- lay several automobile metal rims on top of each other and weld them together.
In addition to the existing schemes of racks, legs and support units, the home master can use his own version.
Steel pipes of suitable diameter are suitable for the chimney. The main nuances are that it is not recommended to cut the chimney into the hole from which the cylinder valve was unscrewed; it is better to install the pipe at the top point of the cylindrical structure; when the grill lid is open, the chimney becomes ineffective; it is used only when smoking delicacies.
Attention: The minimum height of the pipe to ensure draft is 1.5 m from the smoke generator firebox, which contains moistened sawdust.
Assembling a grill with a smokehouse, grill and barbecue - step-by-step video instructions
At the last stage, the smokehouse is assembled from the resulting blanks:
- The brazier is installed on legs or stands;
- a smoke generator is welded to it from below, also resting on its own legs or feet;
- A chimney is welded into the grill from above.
Unlike a brick barbecue oven or barbecue, the structure is ready for immediate use, and the draft can be checked immediately.
Well, here are a couple of step-by-step video instructions:
Cylinder selection
To make a smokehouse, you need to use two cylinders - large and small-medium diameters. The grill welcomes only one container. The cylinder itself must be:
- Unworn - no dents, rust, dirt;
- Sufficiently capacious - at least 20 liters.
Although you will have to get rid of the gas remaining in the cylinder, blue fuel indicates that its container does not have holes and is working.
Note!
Do-it-yourself electric scooter - a master class with step-by-step instructions for doing it yourself. Tips and simple patterns for beginners + the best photo reviews
DIY rocking chair: TOP-120 photos of the best manufacturing options. Master class on creating a rocking chair at home
- Do-it-yourself compressor: TOP-130 photo reviews of finished compressors. Step-by-step instructions + diagrams and drawings
What cylinders can be used?
A product of the AG-50 brand of the corresponding displacement is best suited. Its height is 640 mm, diameter – 300 mm, weight – 17 kg. From such a cylinder you can make a grill of a size sufficient to store a large amount of food. The model has a cylindrical shape.
To make a relatively small barbecue, a propane-butane mixture cylinder with a volume of 27 liters is suitable. The advantages of such a roaster are its compactness and ease of storage.
It is advisable to select a cylinder without traces of corrosion on the body.
To make a stove for a cauldron with a rounded bottom, you can limit yourself to a model with a volume of 20 liters. Such cylinders are installed in vehicles and used for storing and supplying medical oxygen. The wall thickness of such products is 3 mm or more.
How to remove gas
The newer the cylinder, the greater the likelihood of retaining gas in it. It is recommended to eliminate it in one of the following ways:
- Filling the container with water through a hose and then draining it;
- Immersion of the balloon in a bath filled with water;
- Laying the container at the bottom of a 1.5-2 meter hole, followed by igniting the wick going inside the container itself.
In the latter case, it is necessary to keep a distance and partially fill the cylinder with soil so that it does not fly up in the event of a possible explosion (although for such an explosive force the container must have a large volume of gas) and after a couple of days you do not have to watch a video of a thematic emergency incident.
Necessary equipment
After the gas has been removed, you can take up the tools. Their type depends on the condition of the cylinder. But in any case, you will have to have on hand:
- Welding machine;
- Bulgarian;
- Electric drill;
- Locksmith and wrenches.
From here a list of necessary consumables emerges - electrodes, bolts, nuts, discs and metal drills. Moreover, the drills must be of different diameters.
Sawing a cylinder
Regardless of the position of the finished product, the instructions on how to make a smokehouse from a gas cylinder require cutting an opening on the side of the container. The remaining sheet of metal will later serve as a lid door.
But before you take up the grinder, you need to make markings:
Note!
- Do-it-yourself wind generator: TOP-170 photo reviews of finished devices. Detailed DIY instructions for beginners
- Do-it-yourself spot welding - the best master class on making homemade spot welding with step-by-step photo diagrams of do-it-yourself work
- Do-it-yourself tennis table: TOP-150 photos of the best manufacturing ideas. Master class on creating a tennis table at home
- Firstly, the opening for the future door must have straight lines so that the density of the rebate is of high quality, and the skewers and mesh are not tilted;
- Secondly, the cut should occupy no more than half the diameter of the container, so that there is space under the skewers and mesh for burning or smoking.
After making the opening and getting the door, you can move on to the remaining parts of the structure.
Rules for making a smokehouse
To make a smokehouse from a gas cylinder, you do not need to make preliminary drawings, since there are very few steps to create the structure. Usually the smokehouse is made from material that was found in the yard. However, if the product is more complex and has various elements, for example, wheels for transportation or an electric stove, then in this case it is advisable to make simple diagrams. In general, a device for smoking products is made in stages:
- Initially, markings are made on the body for the future door. All you need to do is use a pencil and a ruler. If this is not the case, then chalk and a flat board are used. It is not allowed to make a crooked cut. On the sides of the future door, you should leave a space unfinished by at least 10 cm - this is necessary so that the cut out part does not fall inside.
- Next, metal loops are taken and adjusted along one drawn line. The parts have been adjusted and the tack welding is now done. The hinges may move a little, but since they are held in place by spot welding, they will not fall off. Using a hammer, the loops are finally aligned. After which they must be scalded on both sides. The resulting slag is removed with a hammer, and the seam is cleaned with a metal brush. Before welding, it is advisable to clean the work area from paint and rust.
- The second way to secure overhead hinges is with rivets and bolts. The method is labor-intensive, because you will have to make holes in the wall of the cylinder with a drill, and this is not an easy task. After the holes are made, bolts and nuts are taken and tightened to the limit. In any case, after the final installation of the hinges, the remaining uncut sections of the door must be completely cut off. This way you will get a perfectly straight door.
- At the next stage, an elbow is made from two pipes. Two pipes are taken, one of them is 100 cm long, and the second piece is no more than 20 cm. On both products, lines are drawn at an angle using a square. And then the intended areas are cut off with a grinder. After this, the two elements are welded. The shape of such a chimney pipe is necessary for better draft, and the wood chips will smolder much more efficiently. To control the draft, a damper is used that covers the upper end of the chimney. For ease of use, a slot is made in the pipe into which the damper is inserted.
- The chimney pipe is attached to the place where the valve was previously. The work is done by welding. Initially, tacks are placed. The chimney is installed strictly vertically. Next, the joint is completely scalded.
- When smoking products, high temperatures may cause deformation of the structure. To minimize the likelihood of deformation, the smokehouse is given additional reinforcement. In this case, a pipe with a diameter of 3 cm, which is welded along the internal axis of the cylinder, will help. This pipe can also be used to hang meat products for smoking. To prevent the lid from falling inward, a limiter in the form of a small tube or corner is welded to the edge.
- To seal the door, narrow metal strips are welded. They are attached to the lid. In this way, cracks can be avoided. The stripes will also serve as an auxiliary limiter, since the lid will not fall through when closing.
- In such smoking structures, a special tray is always placed at the bottom, designed to collect fat. It is advisable to place foil on top of the tray - this will help avoid contamination of the container. A mesh is installed near the door. If there is no such product, then the mesh can be made from reinforcement. The main thing is that it is removable, therefore, corners are welded under the mesh to hold the structure. In addition to the mesh, there is also a place for skewers. On the sides of the cylinder it is enough to make 6 holes into which the skewers will be installed.
Additional items
It is clear that for the smokehouse you will have to cut another small cylinder lengthwise or crosswise. The choice of sawing depends on the position of the future firebox. The main thing is that its hole allows not only to lay firewood, but also to clean the combustion chamber from coal.
The firebox does not need to be welded to the smokehouse. It is better to embed the pipe so that the structure is suitable for quick assembly and disassembly. As a last resort, an external thread is cut at the ends of the pipe connecting the smokehouse to the firebox.
Accordingly, a do-it-yourself smokehouse made from a gas cylinder along with the firebox must have holes with internal threads. The same applies to a chimney in the form of a vertical pipe.
A simple barbecue welcomes only the load-bearing part. But it can also be supplemented with a chimney. True, you will have to maintain the center of gravity so that the finished structure does not collapse under the weight of the side pipe. This requirement especially applies to a smokehouse that comes with a firebox.
To prevent the latter, being filled with firewood, from tilting the food preparation section, the following points must be observed:
- Firstly, the smokehouse must be in a horizontal position, i.e. lie;
- Secondly, the weight of the firebox should not exceed the weight of the smokehouse (that’s why the latter goes big);
- Thirdly, legs or other load-bearing elements must be installed below the structure.
Balancing is also facilitated by cutting in the chimney from the other side and installing stiffeners on the smokehouse cylinder.
The door-lid deserves special attention. It should fit snugly against the walls of the opening and have a handle, as shown in many photos of a gas cylinder smokehouse.
Moreover, the handle ends with a wooden plate, which must first be impregnated with fire retardant. As a last resort, the metal handle is wrapped with insulating tape or covered with a piece of rubber hose.
And of course, before assembling the structure, you need to make holes in the recumbent cylinder for the grill. To ensure that drilling does not cause difficulties, access to the internal space must be large. This requirement is met by first sawing a large opening for the door-lid.
Assembly and welding of units
To add rigidity, the smokehouse from a cylinder must be reinforced with stiffening ribs. For this purpose, metal corners are welded on the inner surface. The assembly procedure is performed in the following sequence:
- The smokehouse is placed on a stand or legs are welded to it.
- The firebox and smoking chamber are connected together.
- The chimney is connected.
After welding all structural elements, a draft check is carried out. If the device does not function properly, you should check that it has been reassembled correctly.
Smokehouse stand
If the unit is stationary, then it is safer to build a stand for it.
Metal corners are used for this. They are attached by welding to the cylinder perpendicularly. To make the structure more stable, the profile at the bottom is reinforced with additional metal corners. The quality of the seams is checked, since the smokehouse must withstand a lot of weight. The advantage of a stationary design is that additional shelves can be built on the stand to accommodate firewood and kitchen utensils.
Manufacturing and welding of legs
If you assemble a smokehouse from a gas cylinder yourself as a portable structure, then it is rational to make removable legs.
To be able to remove the parts, they are not welded to the smokehouse, but are bolted.
To do this, holes are drilled in the bottom of the container, and nuts are welded on the legs.
Making a chimney and firebox
In some cases, it is possible to light a fire directly in the smokehouse body.
It is more practical to build a separate firebox, since in this case it will be possible to use the unit for both cold and hot smoking. To make a furnace, you will need another cylinder with a smaller capacity. The firebox is made according to the following principle:
- There are 2 holes made in the cylinder: for the blower and for loading fuel.
- A grate is fixed inside between the firebox and the ash pan to prevent fire from entering the chamber.
- Regardless of the type of smoking, it is necessary to build a chimney. In the case of hot smoking, it can be short. For cold cooking, a longer pipe is used to ensure high-quality cooling of the smoke.
In order for the design to be transformed, the chimney connection between the chamber and the firebox must be removable, then it will be possible to use the unit for cold and hot smoking.
Installation of grate and tray
A grate for food and a tray for collecting fat are installed in the smoking container. Ready-made devices can be used as a grid:
- racks with legs from microwaves or ovens;
- improved devices from dumpling molds, etc.
If the diameter of the finished grates does not fit the smokehouse, then it is better to build a stand for the food yourself. Metal rods are used for this. If you place a pipe inside the smokehouse, chicken or fish carcasses can easily be hung using hooks.
At the bottom of the food chamber, a removable metal tray is installed to collect fat with sides so that the accumulated liquid does not flow into the container and spoil the taste of the food. To make cleaning easier, the tray should be lined with food foil before each cooking.
Painting and decorating the finished structure
The right approach to decorating the finished structure will turn the smokehouse into a unique element of the exterior.
Forged parts will help add originality: legs, handles. To make it easier to move the device around the area, wheels are installed. Installing an additional countertop and stands for food, firewood and dishes will speed up and simplify the cooking process. For a gas tank that has been in use for a long time, painting is important. This will not only make the appearance attractive, but will also extend the life of the structure. Using heat-resistant paint, you can hide welds and protect the surface from corrosion and high temperatures. For painting, heat-resistant paint and varnish compositions are chosen. There are no restrictions on color, but it is more practical to use black paint. It hides traces of burning and soot well.
Assembly
To attach the smokehouse to the firebox, an intermediate pipe is used, which serves as a heat main. But this pipe is not enough to guarantee high-quality assembly. Therefore, two cylinders often have to be attached to each other using 4-6 mm metal sheets.
For the appropriate fasteners, you will have to first make holes through which the bolts will later be inserted. The latter are fixed with nuts.
In general, drawings for smokehouses made from gas cylinders often include two small sections of pipe welded to the sides of the cylinder. These sections should be slightly larger than the pipes for the chimney and firebox, respectively. Otherwise, the two channels will not cut into the smokehouse.
Bolts and nuts are also recommended for attaching hinges under swing doors. But there is another option - welding canopies with electrodes. By the way, welding will be needed to attach the legs or corners to the lying “barrel”.
The good thing about corners is that they can be used to assemble a rigid frame with wheels. But it is almost impossible to attach discs and tires to the fittings.
How to make a smokehouse from a propane tank.
Products for inventors Link to the store.
I've put together a few smokers, but most of them take up a lot of space. I wanted to create something larger in size, I have a 14.5″ range cooker that works amazing but is a bit small if I want to do any volume of smoked meat. So I decided I could create a larger version from an old propane tank.
I have a propane tank that is past its expiration date and thought it would be useful to use for a project. My idea for this smoker is to have two fuel sources and also have the option of being powered by an electric element or a propane burner, but I will build those later. This instructable will focus on building a fire smoker using either charcoal or wood. What I like about the propane tank option is that it is vertical, I can smoke long items vertically and hang them like fish and sausages, or put food grates on them, smoked pork butts and brisket (with the point and flat).
Step 1: Materials
DIY electronics in a Chinese store.
Step 2: Video
Here's a video of the assembly from start to finish.
Step 3: Cut the Propane Tank
**** Warning: cutting a propane tank is not acceptable. I took precautions before attempting this task, so I do not accept any responsibility if you injure yourself or your property if you try to crash into a propane tank. Do this at your own risk. ***** Do any search on the internet about how to cut a propane tank and you will get all sorts of recommendations on how to do it, but I have no idea which one is the right way. Some say to fill it with detergent and water to dislodge the propane fumes or to flush the tank with nitrogen. I decided the best way to slice the tank was to fill it with water and then slice it. The water ensures that any residual propane vapor that may be in the tank is displaced. One option was to take the valve out and then fill it with water, but removing the valve is easier said than done since it is actually pulled into the tank and I didn't want an explosion trying to remove the valve. I ended up opening the valve all the way, gradually filling the tank with water, because the tank will be sealed with air, it will take a while. I'd rather take the extra time to fill it with water than blow myself up. Once I filled the tank to 1/4 full, I flipped the tank over and drilled a small hole in the top of the tank, then flipped the tank back over. The hole allows air to escape while water is filled into the valve for the remaining 3/4 of the tank. I then attached a hose to the valve to quickly pour water into the tank. Also, a 100 pound tank is a lot of space to fill with water. Instead of using tap or drinking water, I collected water from my gutter to fill the tank. There is no point in wasting clean water. Once the tank was full, I drilled another hole where I wanted to cut into the tank to release some water. Then, using an angle grinder, I cut just above the drain hole to remove the top of the tank.
Step 4: Creating the Doors
I wanted the top to be removable so it could be cut in the previous step. Now I needed to add two doors to the tank, the top door would be for the cooking area and would be larger than the bottom one. The bottom door is designed to provide access to the firebox for firing. I marked out the two doors on the tank, I just marked the approximate size and then turned them out using a measuring tape. First I cut out the side of the door where the hinges will be located using an angle grinder with a thin cut disc. I then welded it to the hinges, this makes it easier to align the doors. I also used regular door hinges as they are inexpensive and work well. Once the hinges were welded, the door was then cut using an angle grinder. If everything works out, the doors will be perfectly aligned with the body of the propane tank. The doors then had a 1/8" x 1" piece of steel welded to the outline of the door, this serves two purposes, it makes the door rigid and closes the sanding disc gap from the cutout. Depending on how the doors fit to the tank body, a felt spacer may be needed, I didn't bother to put one in. I also made sure the bottom door opened first, as the overlapping top of the bottom door prevented the top door from opening. Because it is more useful to be able to tend the fire from the bottom door. To keep the doors closed and ensure security, the locking mechanism was made from 1/8" stock steel. First the 8" piece was bent into the shape of a tank, a 3/8" hole was drilled at one end, this piece of metal will be the latch. A spiral handle from a welding hammer was welded onto the latch. The welding hammer handle is ideal as it doesn't get hot when using the smoker and looks cool. On the tank body, a small piece of billet steel was cut with a "V" notch and then welded in place. A hole was drilled into the door and then the latch assembly was installed using a 3/8″ bolt and washers. A V-shaped notch welded to the tank holds the latch and door tightly to the tank body, the further you push the latch down the more it pulls the door.
Step 5: Creating a Vertex
I made the top of the smoker from a propane tank removable, this allows me to clean and check the food from above if necessary. The handle was removed from the top of the tank and a 4 inch hole was cut, this will be for the chimney or vent. I made a flange around the perimeter of the 4-inch hole using 14-gauge steel. I started by pre-bending the steel for the flange, then spot welding it in place and continuously bending and welding gradually until it was a full circle. A 4" piece of air duct was used as a chimney. To make the top fit against the bottom of the smoker, I bent and welded a 1/8" x 1" piece around the outside. This created a lip that creates a good seal and adheres to the bottom of the smoker. The handle was then welded on, I like to keep the propane tank look.
Step 6: Create the Inlet
The intake is necessary to control the air flow into the smokehouse. It was easy to make, but required some pre-bending of the sheet metal and bar stock. First a hole was cut into the bottom of the door, I wanted it to be as close as possible to where the fire would be burning. The rail system was created by bending approximately 1/8" x 1/2" rod and welding a piece at the top and bottom of the hole, leaving 1/4" at the top and bottom of the hole. The two doors were made from 14 gauge sheet metal. The 14 gauge sheet metal is thinner than 1/8" rod which allows the doors to slide once the rail is completed. A piece of 1/4" round stock was welded onto each door; these would be the handles. The doors were set in place and then a 1/8" x 1" bent piece was bent and welded into place. This creates truly smooth and reliable consumption. The bottom of the tank, which sits on the floor, was very rusty in some places, so I bent and welded about 14 sheets of metal in place. Then about 1" corner was welded to the bottom of the leg tank.
Step 7: Making Food Grids
Since the tank is round, it makes it interesting to make grates to hold the smoked food on. Ideally, a ring roller would be useful for this project as it involves bending a rod and a round piece into arcs. To build the food grate, use a 1/4" round piece and bend it around the container, then bend it inside the container to measure the outer ring, one inch at a time, until the ring is the size you want, this would be the frame of the grate. I left about a 1/4" gap between the outside of the frame and the inside of the tank. The actual grill was made from 1/8" x 1" chicken wire. What I like about this material is that after using it for a while it will eventually get a good seasoning because it is mild carbon steel. The wire mesh was welded to the 1/4" steel ring, this took a while as each piece of wire mesh was welded to the ring. Although it is not necessary to weld each wire, I did so as it removes the sharp ends, making the grates easier to clean when wiping them down with a scrub sponge. Depending on what you want to smoke, determine how many grates you need to make. I use one to hold the fire, one to hold the water bowl and at least 3 for the grates. I also made a few extra ones in case I needed to smoke a lot of small things. Hold posts in place approximately 1/8" x 1"
Step 8: Finishing and Painting
The inside and outside of the smokehouse was washed with plenty of soap and water. Once dry, a coat of high heat paint was applied to the surface. The thermostat was installed on the door approximately in the middle of the smoker, where most of the food would be placed, in order to get the most consistent reading. Ideally, several more thermostats could be installed in different locations. I was going to put casters on the smoker to make it easier to move around, but instead I made a platform with casters to accommodate the smoker. Placing the casters directly on the smoker will make it too unstable since it is so narrow and tall. The platform makes it more stable and allows me to move it around or leave it in one place if I wish.
Step 9: Cooking
For my first cook I made pork ribs.
The smoker performed like a champ and I had plenty of airflow to keep the fire burning nice and clean. I hope you enjoyed this build. Source
Checking traction
Although it is recommended to complete the finished structure with painting, before applying the decorative layer it is necessary to check the traction. The fact is that after connecting all the elements, smoke may not come out of the chimney.
It happens that no heat gets into the smokehouse. Therefore, you have to disassemble the structure in order to:
- Place the firebox 20-30 cm below the smokehouse;
- Increase the pipe diameter;
- Clean the chimney and connecting line from possible deposits;
- Install the product outdoors.
The last point is explained by the fact that trees and other tall objects located next to the structure impair traction.
With high-quality traction, you can move on to processing elements from the outside and inside.
Processing of finished elements
If you look at the drawing of the smokehouse, you can only notice the component elements and their dimensions. But the barbecue and smokehouse should also be smooth and painted in order to look good against a country background.
In addition, mechanical processing eliminates rust, which causes explosions during combustion and food spoilage due to specific smoke. Therefore, it is recommended to treat the cylinder and other parts after assembly:
- A drill or grinder with a brush attachment;
- Heat-resistant paint for metal (the paint must be applied to a smooth surface in two layers).
It is clear that the latter is only relevant for external use. Dali and High Heat products have proven themselves to be excellent colorants. Of course, for a mobile metal fire source it is recommended to choose matte black paint.
Firebox for cylinder
Some owners prefer a barbecue built from a cylinder, which does not include a smokehouse. In this case, there is no need for a firebox. But if the owner of the dacha decided to equip his cylinder for a smokehouse, then he cannot do without a special container.
To make an additional container for igniting wood chips, you will need a sheet 4 mm thick. The metal sheet must be cut so that identical parts are obtained from which a compact box can be made.
Another cylinder can serve as a firebox, but it must be cut, marking a third of the entire length. The resulting cavity in the future firebox is closed with a sheet, secured by welding. Or you need to cut off the top of the cylinder and weld it to the segment. You should get a small balloon. The procedure is the same as for making a smokehouse. The door is cut out. A handle is attached.
Such a barrel must be attached to the main cylinder. Metal is removed from the end parts of both products. It is necessary to make a strip 2-3 cm wide. Next, the firebox is welded to the bottom of the smokehouse so that the two slots on both cylinders are located opposite each other. A damper is made in the same place.
The design can be made differently. One hole is made in both products. A corrugation is attached to the holes, connecting the firebox and smokehouse. This way, the smoke will enter the container with the food, and there will be no danger of open fire getting into the smokehouse itself.
Useful ideas
The smokehouse can be horizontal or even vertical. The second option is a tall multi-tiered pipe, at the very bottom of which there is an ash pit, higher up is a firebox, and even higher is a smokehouse or a section for a cauldron.
The advantage of a vertical grill-smokehouse is the absence of a pipe. The latter will not be needed, because There is already a hole at the very top of the structure. Also, the vertical product is quite compact and therefore does not take up much space.
A ready-made barbecue-smokehouse made from a gas cylinder is not only a magician of savory dishes, but also a potential hearth for heating small structures:
- Household block;
- Greenhouse;
- Garage;
- Alcove.
But before placing a brazier inside the shelter, you will have to install a fireproof screen. True, such walls will not be needed if the utility block or gazebo is already built of brick.
If the thematic design stands on a platform made of corners, then in this platform you can provide a department for firewood (woodshed). Sometimes, below the cylinder there is an ash pan into which the ash is poured. This section eliminates the need to turn the cylinder over after each barbecue. However, when making an ash pan, you will have to make holes at the bottom of the cylinder through which the ash will fall down.
Working with a cylinder
After selecting a cylinder, it is necessary to visually check it for the presence of deep corrosion. Next, you will need to get rid of the condensate and gas remaining in it. First, take the container out into the open space in the yard or other area. It is preferable to carry out work in dry, sunny weather. There should be no open source of fire near the work site.
Unscrew the valve as much as possible. After the intensive phase, turn the container over to remove residues. You can check whether the gas has completely escaped using ordinary soap paste. Lubricate the valve with it. When bubbles stop appearing, it means that the pressure inside is equal to the outside.
From the top of the future barbecue-smokehouse from a gas cylinder, we cut off the neck together with the tap with our own hands using a hacksaw.
When cutting off the top, do not allow a spark to appear. In this case, it is necessary to periodically water the treatment area to eliminate the risk of fire. The cut must be wet.
We rinse the opened cavity with running water to get rid of the smell. It is convenient to fill the volume with water using a hose. If it does not fit into the hole formed, then pour everything through a funnel.
Adding ammonia to water will be effective. Leave the container with this solution to settle for several hours. You can stir the liquid periodically. After draining the residue, wash it again with running water.
Making the base for the smokehouse
It is unlikely that any preliminary drawings will be needed to make a smokehouse with your own hands from a gas cylinder. Most often, manufacturers calculate the final result from the material that is available.
In general, this design of a vertical smokehouse can be useful, where you can use an electric stove.
Marking the cuts for the door is done using a long ruler and a pencil. You can duplicate the stripes with thin white chalk.
The cuts will need to be made carefully without displacements, not reaching 100-150 mm along the axis before the rounding of the balloon ends (“top” and “bottom”) begins. There is no need to open the slots right away.
Having made long axial grooves with a grinder, we try on the hinges in place. We clean the surface to be welded with a metal brush fixed to a drill. Some craftsmen clean the area under the hinges with a grinder. The method is practical, but aesthetics are not always preserved. We “grab” the overhead loops by welding.
You can also subsequently secure these with rivets or bolts. However, no coating is allowed on rivets or other fasteners in order to prevent harmful fumes from near food. A more popular option for attaching hinges is final welding with electrodes. When the hinges are welded, we open the grooves separating the door from the frame completely.
From the side to which the tap was attached, we weld an elbow made of pipes onto the barbecue smokehouse from a gas cylinder with our own hands.
The height of the vertical section must be at least a meter. This will ensure high-quality traction and effective smoldering of the chips during the process. A damper covering the upper end of the vertical pipe will help control the draft. In some designs, the damper fits into a cut groove in the pipe.
The second end is connected to the firebox for the smokehouse. To do this, cut out the lower half of the end diameter using a grinder. When using such a smokehouse as a barbecue, the draft in the former gas cylinder will be regulated using this cut-out sector.
During operation, thermal deformations of the manufactured container are possible. Tightening the structure will help reduce their influence. To do this, along the axis of the cylinder in the middle of the hole closed by the lid, we weld a tube with a diameter of 20-30 mm from the inside. It will also serve as a limiter to help prevent the lid from falling deeper. Another function of the pipe is to hang food products from it for smoking. This can also be done through holes drilled in the frame.
Welded strips of metal along the perimeter of the lid will help ensure the tightness of the cavity. They can also serve as a closing stop. A horseshoe-shaped loop on the outside can prevent the lid from falling back sharply.
At the bottom of such smokehouses made from self-made gas cylinders, a special tray is installed, which serves as a container for collecting fat. To avoid smearing the container, it is advisable to cover the tray with food foil. The bases for a removable metal grill are attached above the pallet. You can make it yourself with your own hands from rods of stainless steel wire or use a ready-made unnecessary grill left over from an old refrigerator.
Making a stand (legs or support)
A smokehouse made from a gas cylinder, made by yourself as in the photo, must be stable so as not to tip over the coals and food. To do this, legs are attached to it. If you intend to use the device as a portable product, then it would be wiser to make them removable. Their convenient length will be 80-100 cm.
To do this, we weld bolts to the base of the former cylinder, and weld nuts to the prepared legs from a corner or construction profile. Before transportation, we unscrew the legs and return them to their original position upon arrival.
More often the base is not removable, but is rigidly welded to the base of the cylinder. For greater convenience, you can replace a pair of legs with a pair of wheels. Transportation within the immediate area will be simplified. Comfort for stationary legs will be added by several crossbars or a full-fledged shelf under the cylinder. In the cooking process, useful space always comes in handy.
Smokehouse firebox
If this unit is intended to be used not as a smokehouse, but only as a barbecue from gas cylinders, then an additional firebox will not be needed. If the owner intends to engage in smoking, then the fire will need to be lit in an additional container.
Additional firebox made of welded steel sheets
To make a firebox, you will need to cut a sheet of metal 3-4 mm thick. It is also possible to cut another cylinder of smaller volume. Two holes are left in the opposite end walls for connection with the smoking chamber and for installing a damper. The third hole is necessary for laying wood chips that form smoke smoke.
Additional firebox from another cylinder
Even a slight distance from the smoking chamber from the sawdust firebox will help prevent open flames. This is done by cutting into the pipe. In some designs, its role is played by a special corrugation.
Conclusion, reviews, tips
The length of the finished smokehouse will help determine the final result, because hot smoking uses smoke at a higher temperature. For cold smoking you need almost cooled smoke.
The most important thing is that before the first smoking you should definitely let the unit go idle - heat it with wood, but without meat.
The video shows an example of a barbecue grill, smokehouse, made by hand from three 50-liter gas cylinders.
The supports can be made from the legs of an old sewing machine made in the USSR. The material is so durable and heat-resistant that it couldn’t be better.