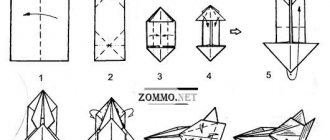
The prototype of the wall bars is an ordinary utility ladder. It was invented by Finnish peasants, and it got its name because Finland was then under Swedish rule. But that's not the point. The important thing is that even the simplest exercises on the wall bars (see figure below) allow you to completely avoid health disorders due to a sedentary lifestyle. Only the Scandinavians could think of such a use for stairs: winters in Fennoscandia are long and harsh. The land is not very fertile, the agricultural season is short, and there are also exorbitant taxes. Without winter auxiliary crafts it is impossible to survive at all. It was in no way possible to lie on the stove in the winter and yawn and stretch for a long time in the spring before harnessing Sivka-Burka to the plow.
The simplest exercises on the Swedish wall
The conditions of modern urban life place approximately the same demands on the physical condition of people, but for different reasons. And a do-it-yourself wall bars are not a complicated product; There are options that can be made at home in 2-3 hours, see below. But the wall bars are still a sports equipment, and not household equipment or household utensils, so it must be made in compliance with certain, albeit simple, rules. Which ones - this is what is discussed in this publication.
Primary requirements
For simple exercises on the wall bars, you can tie an ordinary ladder to an eaves or ceiling beam, as the Finns of old did. But the Swedish wall for an expanded and full range of physical exercises is designed differently.
The dimensions of the sports and fitness wall bars should be as follows:
- Span along the crossbars (crossbar length) – 800-900 mm;
- For home and children's wall bars, if there is not enough space in the room, it is possible to reduce the length of the crossbars to 600 mm;
- The distance between the axes of the crossbars in height is 150 mm;
- If only a limited number of adults will exercise on the wall, the distance between the axes of the crossbars in height can be increased to 220-260 mm depending on the size of the users. The range of 150-220 mm is anatomically and physiologically “deaf”, it will be inconvenient to practice;
- The diameter of the crossbar is 40 mm for adults and 24-30 mm for children of different ages (for more details, see the materials on setting up a home sports corner);
- The distance of the bottom crossbar from the floor is 150-220 mm;
- Number of crossbars – 12-18 for adults and 10-15 for children;
Even with the simplest exercises at a slow pace, the sports equipment is subject to dynamic loads that greatly exceed the weight of those exercising. Static loads from children are less, and dynamic loads relative to the child’s body weight are greater than from adults. Therefore, a wall bars for a full range of exercises for adults must withstand for 20 minutes, without damaging its own structure or attaching it to building structures, a load suspended from the middle of any of the crossbars (or, upon commissioning and annual inspection, to all of them in turn) a load weighing:
- 180 kg – for a full range of regular exercises for adults in 2-3 or more shifts daily.
- 150 kg - at home or for children's sports competitions.
- 120 kg - children's home.
Installing a ready-made sports corner
Now that you have made a sports corner with your own hands, you can install it. As stated at the beginning of the article, it will be installed on spacers. To bring this to life, these same spacers are screwed into the upper and lower parts of the wall bars, the structure is installed in the right place and the spacers are screwed in to the limit. This way the sports corner will be absolutely motionless.
Note! It is better to check the quality of the spacers from time to time by tightening the nuts. This also applies to the bolts in the sidewalls that hold the horizontal bar to the wall.
If you need to perform installation in a different way, you can do this:
- If the wall is made of brick, then the sports corner is secured with dowels.
- If the wall is made of concrete, then the sports corner is secured with anchors.
- For plasterboard walls, only spacers are used.
That's all, all that remains is to buy the mats and install them in their places. Then you can minimize all injuries to the child. Children's sports corner for apartment photo.
Almost like an ancestor
Technologically, the wall bars can be made of wood, metal and durable plastic. The wooden one is nice to handle. The steel one is more suitable for an enhanced set of exercises with emphasis, see below. Plastic - for children of preschool and primary school age. Let's start with a wooden wall bars, as the least labor-intensive and universal.
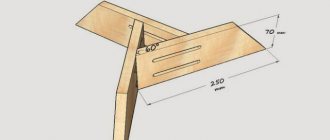
Drawings and construction of a simple wooden wall bars
Drawings of a typical wooden wall bars are given in pos. 1 pic. The crossbars will be made from cuttings for garden tools made of oak, beech, hornbeam, etc. hard, dense, fine-grained wood without defects. Since they are not always exactly round in cross-section, you need to grind the ends of the cuttings cut to size to a diameter of 35 mm (pos. 2) in any carpentry shop with a lathe or in a metal lathe. Groove length – 20 mm; the depth of the hole is the same. This will allow you to select holes for cuttings in the bowstrings using the most common Forstner furniture drill, the so-called. looped (but see also below).
For the bowstrings (sidewalls) of a home wall bars, an ordinary building board without defects that weaken its overall strength will do. Cross-cut without rot and mold, small knots that do not fall out are acceptable. Fastening the crossbars - at the end using a self-tapping screw or confirmat (furniture screw) 6x80 (item 3). It is highly desirable immediately after drilling holes for metal fasteners, but before installing it, glue the PVA parts together without holding them until they are tack-free, this will greatly increase the overall strength and reliability of the wall, see below. That is: we assemble the wall dry, tie it together with something, e.g. rope, drill installation holes for hardware, disassemble everything, apply PVA to the joints, assemble it, tie it together with steel. While the glue has not dried, we check and correct the overall evenness and along the horizon (so that the “propeller” does not work out).
We’ll talk about fastening the projectile tightly later, but in general, a typical wall bars are quite strong in themselves and, using hooks made of steel 40x4 or 30x6 (item 4), can be suspended on a traverse (rod, item 5) installed in the spacer between the walls. or a low (flat) U-shaped bracket from a pipe from 40x2. To the bracket you need to weld thrust bearings - “nickels” each under 3-4 self-tapping screws of 6-8 mm in propylene dowels. You cannot bury the ends of the supporting bracket into the wall! It will definitely loosen! Assembly - lying on supports with alignment in a plane and the horizon on a dry or, better, on a plaza - a flat surface covered with film. Recessing the steel part of the hardware into the load-bearing wall (in addition to the thickness of the finish):
- In concrete - from 60 mm.
- In brick - from 70 mm.
- In wood – from 90 mm.
Note: how to make a simple wall bars like a wooden staircase, see also the video below.
Video: example of making a simple Swedish wall
Details and options
The most seemingly un-homely operation - turning the ends of the crossbars - in fact usually does not cause any difficulties. In any tool store or iron bazaar they will tell you where there is a lathe nearby, where they can turn the crossbars inexpensively before your eyes. Perhaps the seller himself will do this. Much more difficulties arise when searching for material for bowstrings and choosing a method for attaching the projectile to supporting structures. Also - how to place a hanging gymnastic bar (horizontal bar) on the wall and handrails for hand-support exercises (they are often called a support, a manual support, or, less commonly, half-bars). The stop and horizontal bar have become indispensable accessories of the home wall bars; the horizontal bar is often made an integral part of it.
Bowstrings
A regular construction board for wall bars will not work without a choice: it is not designed for such a large number of points of concentrated load. The seller will either allow you to choose or not, and most likely there will be nothing to choose from: lumber of the highest standard (and this is what is needed for sports equipment) is selected by the manufacturer when sawing and goes on sale at a price that is several times more expensive. Glue strings from plywood? It is labor-intensive and not at all cheaper - plywood is also expensive compared to industrial wood.
However, there is a way to strengthen cheap packaging plywood to the desired degree. It also allows you to make bowstrings for a wall bars from completely waste waste. You will have to spend no less labor on gluing, but the costs will hardly be more than buying ordinary boards. And the strength of the finished product will be greater than that of selected products of the highest standard.
This method is pre-impregnation of plywood blanks with a water-polymer emulsion (WPE). This inexpensive, harmless, safe and easy-to-use material completely eliminates delamination of the crappy plywood and increases its strength several times. In addition, there is no need for an expensive and highly specialized Forstner drill - all the holes are through, they can be drilled even with a hand brace using an ordinary feather drill for wood. 3-4 liters of VPE is more than enough for a wall bars.
How the wall bars are assembled in bowstrings glued from plywood impregnated with high-precision polyethylene foam (VPE) is shown in Fig. below and (together with a number of designs given below) are described in the article on the home sports corner.
How to assemble a wall bars using strings glued together from waste plywood
For a wall where adults regularly practice, the thickness of the internal parts of the bowstrings should be increased to 28-32 mm; then all layers can be assembled from pieces fitted end to end. The complete “technical map” of the assembly is as follows:
- Prepare the crossbars (see above);
- The plaza is being prepared;
- They prepare loads for oppression;
- Cut and adjust the pieces for the internal parts. Don't forget to number or mark which one connects to which one;
- All workpieces are impregnated with EPE on 2 sides;
- The blanks are immediately laid in layers on the plaza without waiting for complete drying and glued together;
- Having laid and leveled the pieces of the first layer, apply the next PVA onto and onto the mating surfaces of the pieces;
- Without waiting for the glue to dry to a tack, lay the 2nd layer on top of the first;
- Repeat paragraphs. 7 and 8 until the workpiece is of the required thickness;
- Place pressure on the workpiece - at least 5-6 weights of 2 kg evenly along the length;
- Using a metal square, the ends of the ribs of the workpiece are trimmed, and the “creeped” pieces are corrected;
- According to paragraphs. 4-11 re-glue the second string blank;
- After 3-4 days (to dry the workpieces), through holes are drilled for the crossbars;
- External bowstring linings are prepared (impregnated with EPE), glued under pressure onto the internal parts and the entire package is fastened with small self-tapping screws (the distance from the edges of the strings is 20-25 mm);
- Assemble the projectile dry and drill installation holes for fastening the crossbars;
- Coat the sockets under the crossbars with PVA and assemble the projectile on the plaza without waiting for the glue to dry;
- Align the structure on a plane (remove the “propeller” if it is found) and fasten it with 6x45 self-tapping screws for a children’s wall in Fig. or 6x60 for an adult;
- Dry the wall lying on the plaza for 5-7 days. It is highly advisable to load it in the corners so that it does not lead.
Typesetting option
Another option for a convenient and quite economical, although quite labor-intensive wall bars for an apartment is a modular and collapsible combined one in the doorway: bowstrings made of ordinary planks or 15 mm plywood, steel crossbars made of pipes, crossbar earrings - oak, beech, hornbeam.
Drawings of a collapsible Swedish wall in a doorway are shown in the figure:
Drawings of a collapsible wall bars in a doorway
Since there are already 32 points of attachment to the supporting structure, the fasteners are small, 3 mm self-tapping screws; their penetration into the door jamb is from 20 mm. The crossbars must be steel: wooden ones, not included in the overall strength scheme, will not hold up. Fixing the earrings on the crossbars is done with M4-M6 screws with countersunk heads. The diameter of the parts of the crossbars for adults to grip can be increased by putting plastic covers on them, for example. from 2-3 layers of heat-shrinkable tube (HERE); This will also increase the roughness of the crossbars to “wooden”.
The advantage of this wall bars is that by removing some of the bars, you can perform exercises with a wide swing of your legs. Disadvantages: the passage is blocked during the exercises, the door jamb and the appearance of the opening are damaged. In addition, it is impossible to obtain an optimal crossbar height spacing of 150 mm, while 240 mm is close to the maximum permissible.
Wooden Swedish stack at home
For manufacturing you will need the following materials:
- board more than 4 m in length; about 2 cm thick and 10 cm wide;
- cuttings for a shovel or broom 4 pcs. 120 cm each;
- set of tools;
- glue or liquid nails for wood;
- screws.
Preparing the racks and crossbars
The board is sawn in half, measuring the required length of the stand. The ends of the beams are rounded using a jigsaw, sawing off the excess. Initially sanded with a plane, then treated with sandpaper or a sanding machine. Measure the distance for future crossbars (about 30 cm), mark the locations of the holes using a thin drill.
Preparation of the crossbars begins with determining their length. Usually it is 60 cm, so the cuttings are cut in half. If they were not sanded at the factory, you will have to carry out this process yourself. Any roughness or chipping of wood products can turn into a thorn in your hands in the future. The bars and crossbars are treated with stain, then varnished or painted, depending on the desired appearance.
Video: Swedish wall in 3 hours
Assembly of the structure
After drying, holes are made in the bars. To do this, either a pen of the required diameter or a crown is used as a drill attachment. The hole should be made blind so that it remains possible to further strengthen the steps with screws and glue. Also, the smooth surface of the rack, without traces of indentations, has a more aesthetic appearance. Then the structure is put together: the ends of the crossbars are treated with glue, inserted into one rack, then the second is secured on top. Additional fastenings are provided with self-tapping screws, connecting the rack and the step with them.
Fastening to the wall is carried out using metal corners. To do this, mark holes at the required height, guided by the building level. Select dowels of the required sizes and parameters, and fix the ladder to the wall.
Making a removable crossbar
Removable horizontal bars are made in several versions: solid sidewalls are cut out; assembled from two planks, connecting them at an angle; welded from metal pipes, bending the ends into hooks. . If it is possible to make blanks on a milling machine, or the manufacturer has the skills of figure cutting with a jigsaw, then cutting out the necessary spare parts from thick plywood (more than 18 mm) will not be difficult. You will need to make two identical sidewalls of a triangular or smooth “L” shape with cut out hooks with which the horizontal bar is hooked to the crossbar.
The distance between the hooks should be taken into account; it should correspond to the gap between the crossbars. The sides are fastened at the back using a strip of plywood, the size of which is slightly smaller than the length of the crossbars. This is necessary for firmly inserting the crossbars into the grooves, without interference from the side posts.
At the end of the protruding part of the sidewalls, holes are prepared and a crossbar is inserted, strengthening it with self-tapping screws. It should be noted that this design is designed primarily for the weight of a child: for an adult, it is more reasonable to make a removable horizontal bar from metal.
Horizontal bar and stop
A simple crossbar for pulling up and holding the angle with your legs in weight significantly expands the functionality of the wall bars. A children's wall bars without a horizontal bar generally lose most of their developmental qualities. It’s easy to add a simple staircase wall with a hanging bar holder for pull-ups and other static exercises (without sudden movements).
Drawings of a wall bars with a wooden hanging horizontal bar holder are shown in Fig. (the upper holder bracket is at the top right; the lower one is at the same place below).
Drawings of a wall bars with a hanging wooden horizontal bar holder
Other options for the mounted horizontal bar and manual stop for the wall bars are shown in the following. rice.:
Design options for a hanging horizontal bar and a hand rest on a wall bars
The manual emphasis allows already very experienced and physically developed users to practice on the wall bars, pos. 4 and 5. For a wooden hinged stop, you need to take a tree that is ideally homogeneous without defects, especially durable species: teak, etc. The dimensions of the hand rest mounted on the wall bars are given on the right in Fig.
However, the most functional are hand stops combined with the crossbar, see another figure:
Hand rests mounted on the wall bars, combined with the crossbar
The main structural materials of the load-bearing parts are pipe 40x2, corrugated pipe 60x60x2. For jibs, couplers and blades of cap grips - professional pipe 60x(20-30)x1.5 or (on the right) pipe 20x1.5. For hooks there is also a 30x6 strip. “Cape” on the wall bars on the right in Fig. it is the most functional, but it is not certified for sports equipment for general use: hooks in the user’s area of action pose a risk of injury.
Note: the advance of the horizontal bar crossbar forward is 60-65 cm.
A stationary (tightly attached) horizontal bar on a wall bars is required for moderate intensity or intense exercise by adults, especially since it does not prevent children from using the hanging horizontal bar, or adults from using the palm rest. However, in this case, fastening the horizontal bar consoles (brackets holding the crossbar) with 3 or 4 bolts (pos. 1 and 2 below in the figure) is a gross mistake, as are parts made of clearly defective wood (shown by red arrows in pos. .2). Fastening with a square is permissible if the sockets for the bolts are through screws, and the projectile parts are made of high-quality laminated hard wood, pos. 3. In any other case, the centrally symmetrical fastening may collapse “all of a sudden” if the permissible load is exceeded or due to fatigue.
How to attach a stationary horizontal bar to a wall bars
It is best to attach a stationary horizontal bar to the wall bars on gussets made of plywood with a thickness of 24-32 mm. The scarves are attached to the bowstrings with at least 4 through bolts M10-M12, pos. 4. Gussets can be re-glued from plywood as described above. If there are at least 4 layers of the workpiece (6 mm plywood), then the pieces for assembling the layers are suitable from approx. 100x150 mm. The main thing is that the seams in the layers do not coincide and converge in parallel no closer than 5 thicknesses of plywood.
Fastening straight consoles made of high-quality wood with a wedge using 5 bolts is somewhat less reliable. It loosens faster than a scarf, but is not capable of sudden destruction: first it loosens, which will be noticeable.
Metal wall bars
It is recommended to practice on a metal wall bars for strong people who have mastered fairly complex exercises (see at the end). Their palms are more grippy than those of beginners, and advanced users create greater loads. In this case, the step of installing the crossbars in height is taken closer to the maximum possible in accordance with one’s anthropometry.
Drawings of 2 versions of a wall bars made of metal (mainly male and female) are shown in Fig; “Women’s” sizes on the right – in cm.
Drawings of metal wall bars
Bowstrings and crossbar consoles here and there - professional pipe 80x40x3. Crossbars – pipe 40x2. Spacers-"legs" for mounting to the wall - professional pipe 40x40x2. It would not hurt to make struts from the same pipe for the consoles of the right version: then welding can be done using conventional welding with a consumable electrode from a portable welding machine.
Note: how to make a metal wall bars at home, also see the video:
Video: metal wall bars with horizontal bar and parallel bars
Types of sports stairs for the home
Wall bars can be intended for children or adults. The difference between these complexes is in the equipment with projectiles and in size. Both options are a permanent permanent structure or a mobile complex with certain functions.
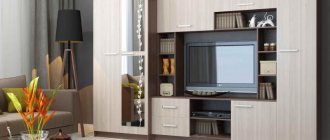
| Wall type, photo | Description |
Wall type wall mount | Stationary type. The structure is permanently attached to the wall with brackets. The main rigidity is set by bowstrings and wall supports. Thanks to this fastening system, the wall is able to withstand heavy loads while maintaining stability. The wall should be mounted on solid foundations. Plasterboard partitions are definitely not suitable. Mortgages are required in frame walls, but you should be prepared for the fact that the exterior finish will be regularly damaged. |
Telescopic spreader ladder | Fixation occurs due to rigid support in the floor and ceiling. The strings of these ladders have strong retractable spacer locks, which allows for high reliability in fixation. The main load goes on the side racks, so they are made of durable aluminum pipes. There are also steel ones, but they are much heavier. This option is suitable when it is impossible to attach to the wall. Spacer structures can be single, as shown in the photo on the left, or double. The latter are children's complexes. They are particularly stable and can easily withstand large swinging loads. This option is unsuitable for use if the ceiling in the room is suspended and the floor is made of boards that bend under pressure. |
DSC without fixation | If the room does not have strong walls for installing a ladder, and there is no suitable floor and ceiling, you can install a mobile DSK (children's sports complex), which does not require fastenings. This is a large frame structure with at least 4 supports. The larger the wall, the more stable it is. This pattern is a disadvantage, since the complex takes up a lot of space. However, it is completely collapsible and mobile. The structure can be moved even to the yard. |
Transformable staircase | When arranging a children's room, you should pay attention to folding wall bars. They are more difficult to manufacture, but owners can install a variety of sports equipment while saving space. Another advantage is the presence of a horizontal ladder along which you can crawl using interceptions. When folded, the complex represents a simple wall structure. |
Suspended sports complex | Such walls come in different sizes: from miniature, as in the photo, which are intended only for adults, to full-size. The structures are supported only by the wall, so the requirements for its strength are even higher than for wall ones. Having mortgages doesn't help. The advantage of the solution is its compactness. With small dimensions, the complex may include a ladder, rings, a horizontal bar and parallel bars. |
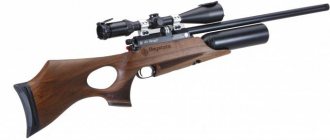
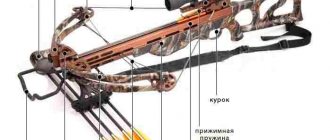
Portable complex for adults | Such a simulator bears little resemblance to the classic Swedish ladder, but is an example of its evolutionary development. Such equipment is used to pump up the muscles of the abs, back, core and arms. |
Read on our website: tips on choosing children's playgrounds.
Wall mount
It is wrong to fasten the wall bars to the wall with steel corners and self-tapping screws, as amateur craftsmen often do. As soon as one corner breaks due to metal fatigue (which is most likely just during training), the entire fastening can come off at once. Fastening an adult wall bars to a load-bearing wall is possible at 4 or 6 points. It is advisable to attach the nursery at 2 points, see below.
At 4 points, the wall bars are fastened with thrust bearings on 3-4 screws in dowels each, see above. This mount is mainly for people of light weight (up to 70 kg). The lower pair of thrust bearings is located in the middle between the first and second crossbars, and the upper one - between the 2nd and 3rd from above.
When fastening to 6 points, the bottom two are located closer to the floor, but not less than 0.75 of the width of the bowstring from its lower edge. If, say, the string is 150 mm wide, then the distance of the lower attachment points from the floor is 100 mm. The upper points are marked in the middle between the last and penultimate crossbars, and the middle ones - in the middle between the lower and upper ones, but so that they also fall in the middle of the distance between the crossbars.
A Swedish wall with 6 points is usually secured with anchor bolts from M10, but the diameter along the body of the bolt is no more than 1/3 of the thickness of the bowstring and no more than 1/2 of its thickness for the head with a washer. Stepped through holes are drilled in wooden bowstrings for bolts and washers. The depth of the larger hole (under the head) is half the width of the bowstring. Smooth holes are drilled in steel bowstrings for the body of the bolt. Recessing anchors into a load-bearing wall (in addition to the thickness of the finish):
- In concrete - from 100 mm.
- In brick - from 110 mm.
- In wood – from 130 mm.
Preparing individual elements
The classic wall bars configuration is L-shaped. To make it you will need a jigsaw, a drill, a feather drill or a cutter for holes, emery cloth, a drill and a confirm key, a screwdriver or a screwdriver.
The first stage is preparing the racks. Non-through holes are drilled on the bars every 200-230 mm with a depth of about 20 mm. It is better to drill the holes not in the middle, but closer to the outer edge, so that when used, the leg fits on the step and does not rest against the wall. At this stage, you can screw the corners to attach them to the wall. The surface of the bars is cleaned with emery cloth. Then two blanks are cut out of plywood to attach the top crossbar. They are somewhat reminiscent of the letter “G” in shape. Therefore, the wooden one has an L-shaped configuration. Shovel cuttings are cut into pieces 500-600 mm long. These are the future crossbars. All structural parts are carefully sanded; to reduce labor costs, you can use a grinder. To give a specific color, parts can be treated with stain.
For children
It has already been said above that the static loads from children on the wall bars are low, but dynamic children can create incredible ones. And they will climb the wall en masse, and even fight on it. At the same time, the height of the children's wall bars is quite small, 140-160 cm. Accordingly, the arm of the lever tending to tear the projectile from the wall will also be smaller.
Secondly, children grow up. When the baby outgrows the nursery wall, it will need to be replaced with a “real” one or removed. It is highly desirable that no or minimal renovation of the children’s room is needed. And at the same time, the children's wall bars, while in use, should remain in place like a glove, no matter what its owners do on it.
Based on all this, the wall bars for children need to be firmly fixed in the load-bearing wall at 2 points. How to ensure sustainability? In two ways: into the space between the wall and the upper fastener or against the dead center between the wall and the floor. In the latter case, the upper fasteners serve only as clamps (stoppers) that keep the projectile from tipping over. This does not at all reduce the requirements for its reliability.
Note: an alternative option is a children's wall bars that actively absorb dynamic loads, see below.
In stride
To fasten the children's wall bars into the spacer, the elasticity of the structure is used. In this case, the bowstrings must be straight, strong and stable in transverse directions, i.e. thick enough: wooden ones with a thickness of 30 mm; glued plywood – from 24 mm.
Drawings of a wall bars for children with spacer fastening at 2 points are shown in Fig. (Also see the article about the sports corner for more details).
Drawings of a children's wall bars with fastening with two points in the spacer
The installation procedure is as follows:
- rigid pads 3-4 mm thick are temporarily attached to the heels of the bowstrings;
- the projectile is placed firmly on the floor at the installation site;
- on the load-bearing wall, holes for self-tapping screws in dowels are marked in place, see above;
- The heel pads are removed and the wall is attached to the wall. Her heels will be hanging in the air;
- thrust bearings are prepared from microporous rubber with a thickness 2 mm greater than the thickness of the temporary gaskets;
- one person uses a pair of pry bars to pry up the lower crossbar at the very bowstrings and lift the projectile up (item 4 in the figure);
- an assistant lubricates the rubber bearings with mounting glue and slips bowstrings under the hanging heels;
- the first worker removes the pressure from the prybars.
After an hour and a half, even a physically strong adult is unlikely to be able to move or tear off the projectile.
Point blank
Fastening a children's wall bars point-blank at 2 points has proven to be more reliable than fastening them into a spacer. It does not require an assistant to perform it, damages the load-bearing wall and floor less, and also allows you to give the projectile a playful look. The point-blank mount operates on the principle of a lever stuck at a dead point. Therefore, its upper attachment points must be absolutely rigid in all 3 planes, and the bowstrings must be somewhat curved. The thickness of the board bowstrings is from 24 mm; plywood impregnated with HPE from 16 mm, i.e. plywood bowstrings can be solid and not re-glued.
The conditions for the reliability of this method of fastening are, firstly, the supporting surfaces must fit into a right angle (highlighted in red in the figure below). To make the wall and floor rub less, thin silicone gaskets are glued to the supporting surfaces (rubber leaves marks). Secondly, the toes of the heels of the bowstrings must protrude forward at least a distance equal to the distance of the axes of the crossbars from the load-bearing wall. If novice athletes are very nimble and playful, it is better to move the toes of the heels forward by half the extension of the horizontal bar or more, i.e. by 25-30 cm. Third: fastening to the wall - with anchor bolts from M8. Laying anchors in the wall from 80 mm, from 90 mm and from 100 mm for concrete, brick and wood, respectively.
Method of fastening a children's wall bars between the floor and the load-bearing wall
However, take a closer look at what is on the right in Fig. The similarity is only external, but the power scheme turns out to be completely different. Due to the inevitable gaps in the fastening of the “ear” brackets to the bowstrings, such a projectile must be attached to the wall at 4 points, which is less reliable and spoils its appearance.
On self-absorption
A plastic wall bar for adults is a very, very questionable question. Household plastics do not withstand static loads well and quickly get tired of them. Special ones (for example, carbon fiber) are very expensive and, when overloaded, are prone to sudden destruction. But a children's wall bars made of polyisopropylene (simply propylene) is a very good solution, because... propylene perfectly absorbs dynamic loads. You just need to attach the propylene children's wall bars to the wall like an adult, at 3 or 4 points on M6-M8 anchors with 90, 100 or 120 mm embedded in the wall for concrete, brick and wood. How to assemble a wall bars from soldered propylene water supply parts, see next. plot:
Video: children's wall bars made of plastic pipes
Note: do not forget to plug the holes for the bolts in the bowstrings - a child’s finger can fit through them!