In this article, I am not going to take one side in the eternal confrontation between PC gamers and console players, but will only talk about a convenient way to organize your home streaming service.
Many people prefer to use a powerful PC or gaming laptop for games, but displaying images on a large screen may be a problem. In order not to be tied to the installation location of the system unit, not to drag expensive HDMI cables throughout the apartment and not to carry your laptop between different TVs, you can set up a special gadget for streaming games.
This thing is suitable for quickly “forwarding” a picture to any TV panel in the house, it will be convenient for working with a projector, and in some cases it will even allow you to go play with your neighbors.
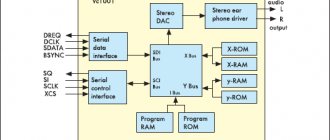
Let's take as a basis the long-running Steam Link and its official software package for the Raspberry platform. This way you can play any of thousands of game projects, and if necessary, you can even launch a third-party application not from the Steam catalog for online streaming.
What you need to set up your streaming service
◼ Single-board Raspberry . The Pi 3B/3B+ or Pi 4B models will fit. We do not recommend using weaker versions of your computer.
On topic: The complete history of the development of Raspberry Pi
◼ Power supply 5V/3A minimum.
◼ memory card of 8 GB or more, not lower than class 10.
◼ Any game controller . It is better to use a joystick with a radio receiver; for Bluetooth models, additional software settings may be required.
◼ Don’t forget about a high-quality HDMI cable to connect the “raspberry” to your TV or projector.
This minimal set of components will allow you to display the image from your gaming PC to any other device in the house and play without restrictions. For a better connection, we recommend setting up a wired network connection for the Raspberry Pi or, at a minimum, using a model with 5 GHz Wi-Fi.
How to make buttons for Pubg mobile
There are several variations of making remote buttons for playing games on a smartphone; let’s look at the best working options in order.
It is important to understand that buttons for playing Pubg mobile and other shooters, created independently, may be somewhat glitchy and may not immediately work well with the buttons on the screen.
To dock triggers, you may need to debug the buttons on the screen.
This is done in the game settings or manually by customizing the control buttons.
Option 1 . Gamepad buttons for a smartphone made of foil and ice cream sticks
To assemble game buttons you will need:
- foil (clean and not wrinkled),
- 4 wooden ice cream sticks (straight)
- glue second,
- thin double-sided tape,
- felt-tip pen (not permanent).
- We take 2 wooden sticks and apply them to the side panel of the smartphone, trying on the joint for further gluing. One stick should be on the side of the smartphone, the second will be a holder on the back.
- Apply a thin strip of glue to the side of the stick (the narrow part) and glue it to the edge of the second wooden stick. The angle should be 90 degrees.
- When the part sticks together (just wait a minute), apply it to the smartphone. Now you need to note the length of the buttons and their places of gluing.
To do this, we take the remaining sticks one by one, launch the game on the mobile and make marks on which we will focus (based on the actual location of the buttons), cutting off the sticks and gluing them to the base (see the attached photos for gluing details).
When the wooden gamepad for a smartphone with buttons is glued together, it’s the conductor’s turn.
- Cut off the foil and a piece of double-sided tape that matches in size, glue it to the foil, and set it aside.
- Next, cut off pieces of double-sided tape that match the size of the button and glue them to the inside (glue them indented from the base by 1/3 of the button).
- We cut two strips of foil with adhesive tape, the width corresponding to the buttons and the length - 2 sides of the buttons plus the top of the gamepad. Remove the protective layer from the tape on the button, glue a strip of foil (first from the bottom, then wrap it on the outer part). Smooth out so that everything is even.
- We put the gamepad on the mobile phone. You can play, additional buttons are ready.
How to Set Up Steam Link on Raspberry Pi
1. Download and install the official Raspberry Pi Imager utility for downloading and unpacking raspberry images. The application is available for MacOS, Windows and Linux.
2. Launch Raspberry Pi Imager and select the appropriate OS version in the Operating System field. We will need a Debian Buster based system from the Raspberry Pi OS (Other) section. This could be Raspberry Pi OS (Legacy) or Raspberry Pi OS Lite (Legacy) . Please note that the latter does not have a graphical interface and is configured exclusively via the command line.
3. In the Storage field, indicate the connected memory card and click the Write button.
4. When the Raspberry Pi Imager has finished recording and checking the image, you can install the memory card in the Raspberry and connect it to a monitor/TV/projector for setup.
5. Next, we perform the initial settings of the Raspberry Pi. To do this, you will need to connect a keyboard and mouse to the microcomputer or establish an SSH connection.
To download and update all the necessary components in the Terminal, enter the following commands one by one:
sudo apt-get update sudo apt-get upgrade
We are waiting for the download and update process to complete.
6. After updating the components, enter the command to install the Steam Link service:
sudo apt-get install steamlink
7. When the installation is complete, launch the utility using the desktop shortcut or the “steamlink” command. This will ensure that the application is working and will reload all the necessary components.
8. Now you should set Steam Link to autoload every time the system starts. This is done using the command:
sudo nano /etc/xdg/lxsession/LXDE-pi/autostart
After which the autostart file will open for editing. You need to add the following line at the very end:
@steamlink
Press the keyboard shortcut Control+X and confirm making changes to the file.
9. The last setting will be to activate the Wait for network connection at Boot option. Activating the setting is necessary so that the system first connects to the network, and only then launches applications and services from startup. This ensures that all necessary services start correctly and Steam Link works correctly.
You should enter the command:
sudo raspi-config
Then, in the main settings section, find the specified option and activate it.
10. Enter the command to reboot the device and apply all the settings made:
sudo reboot
If everything is done correctly, the Raspberry will reboot and the Steam Link application will automatically start. All that remains is to connect the gamepad you are using to the Raspberry Pi. Although the single-board device has a built-in Bluetooth module, from my own experience I will say that radio joysticks interact best with it. The USB receiver is automatically recognized by the system and everything starts working without the need to adjust parameters.
In the case of a Bluetooth gamepad, you will have to tinker with finding and installing the necessary components for each specific model.
So, it’s decided - let’s get started
If you still decide to at least clean the inside, then, armed with attentiveness, accuracy and calmness, let’s get started and sort it out:
- We turn the joystick with the keyboard down, select a screwdriver and unscrew all the screws, there are 4 of them. The screwdriver must be selected not only according to the size of the screws, but also according to the diameter of the screwdriver shaft itself; if it is too wide, it may not fit into the depth of the screws, in any case not you need to push the screwdriver down with force, you will damage the passage to the screws.
- When all the screws are unscrewed, we carefully loosen the case and remove it, before our eyes we see the battery in the fixing frame.
- We take out the battery connector and remove the frame, unscrew the two screws securing the frame from the board.
- During the disassembly process, we carefully note the location of all the parts; in no case should we forget “where and what used to be,” although there will be few parts.
- Next, unscrew the screw securing the electronic board and the two screws holding the motors on the right and left.
- Carefully pulling out the connector, we remove the structure - the board plus two motors.
- We got to the keyboard.
- Now you can check the condition of the rubber keys, wipe them and the entire internal space, and replace them if necessary.
Completely disassembled joystick
After assembly, you can start cleaning the outside of the gamepad. For these purposes, use only a cloth slightly moistened in a soap solution, and no drips, just lightly moisten, but the movements are confident, not giving dirt the slightest chance.
Gentlemen, please help me repair the joystick. I really like to put pressure on the keys)) the “fastening” of the button is broken, I don’t even know what to do, the button doesn’t hold on now. I glued it instantly, but it certainly didn’t help. MB do you have an effective way to hold this button?
No duplicates found
MB do you have an effective way to hold this button?
Don't try to hold it back. If she's meant to go, she'll go. And no amount of deduction will help. Resign yourself and move on with your life
God. on the same or these buttons - like shit at the bathhouse ..
general description
The simplest design of the device is a handle that can deviate from both axes, as a result of which the game hero or some other object is manipulated. In addition, the body and handle of the PC joystick have special buttons that help you perform certain actions. Despite all this, its shape remains constant - it “looks” like an airplane steering wheel. This similarity is not at all accidental, because in most cases the joystick is used in games such as aviation and space simulators. It’s true that it’s quite easy to use it for use in other types of games, although in such cases a gamepad would be a more convenient device.
Designing homemade pedals
Anyone who likes to drive in car simulators knows how important it is to have pedals in addition to the steering wheel. They allow you to free up one hand and give your legs some work, increasing the realism of control while simplifying some maneuvers.
This design is very reliable and easy to manufacture. The base and pedals are made of plywood and attached to each other using pieces of furniture hinges. A hole (about 10mm) is drilled in the base under the pedals for free movement of the lever.
The lever is made of a metal rod and bends in one direction on both sides, as seen in the figure. You can secure it to the pedal with a small nail bent into a U-shape.
Springs are necessary to return the pedals to their original position and must provide increased pressure. It is not necessary to fasten them, because... they will be sandwiched between the pedals and the base.
Variable resistors (100k) are attached to the base via L-brackets on the back of the base. A handle is inserted onto the resistor shaft. It is made from wood or plastic.
Use whatever material you have. Two holes are drilled in the handle. The resistor shaft is tightly inserted into one, and the lever into the other, so that it rotates freely.
The handle will also act as a backstop, so make it stronger.
In the same way, you can additionally add a clutch pedal to the pedal unit if your car simulator fully supports three pedals.
Electronics
In order for the computer to identify the gaming device, it is enough to connect two resistors to the gameport on the X and Y axis. In our case, these are variable resistors of the gas pedal, the Y axis (6). The brake pedal uses axis X1(11). And the remaining Y1(13) axis can be used for the clutch pedal.
The resistors should be linear (not from volume controls!) from 50k to 200k (it’s better to take 100k).
The red wire (+5V) always goes to the middle contact of the resistor, but the axis (3, 6, 11 contacts) can be connected to any of the side ones, depending on how the resistor is installed.
If when you turn the steering wheel to the left the cursor goes to the right, you just need to swap the external contacts of the resistor. It's the same with pedals.
A standard joystick plug with 15 pins can be purchased at any electronic store or radio market. It is better to immediately choose resistors from expensive ones, they will last longer. Cheap ones will start to make noise within a couple of months (the steering wheel will twitch). In this case, cleaning and lubricating them (for example WD40) can help.
It is better to take a shielded 10-core wire.
How I became a virtual racer. Part 2
In the previous post I told how I assembled the cockpit using the dendro-fecal method. You can read it here https://pikabu.ru/story/kak_ya_stanovilsya_gonshchikom_virtu.
For LL: I wanted to play racing games with a steering wheel on my computer, I bought a steering wheel, got a chair, welded a structure from a 20*40 profile and started riding.
In this post I will tell you what modifications were installed on my creation. So what do we have?
I visited flea markets and dismantling shops. Still no cheap and good option. My father-in-law helped out: he is closely associated with car repair and from somewhere he fitted me with a seat from a Mazda3 (at least according to the code from this particular car)
Looks much better. The comfort cannot be particularly appreciated, since the chair cannot be placed level due to the difference in height on the Zhiguli chair (and who even came up with that?), so additional support is in the way.
By the way. In the old version, the fastening of the chair consisted of a bolt welded to the frame, and a nut had to be screwed through the seat rails. What a pleasure it was, it took about 20 minutes. In the new version, I already drilled the frame and welded nuts on top of the holes. This way you can tighten the hex bolt in the head, which is much faster and easier.
So, sir, everything seems to be okay with the chair for now. What else was there to complain about? Oh yes, to the pedals. Let's blow up the pedals and see if it's possible to remake them? TWAYUM! The seller said he has barely used the steering wheel, but the pedals are inside.
Well, we clean it, lubricate it and go into production.
As you can see, in the current version the pedals are on the floor and pressed “down”. In cars, the pedals are attached to the engine shield and are pressed forward, with the exception of the gas pedal. Turn on your wits and put the pedal to your nose
Looks like the right setup. Let's invent.
We take two profiles 20*40*600 and drill many holes to be able to adjust the position of the pedals in the horizontal plane.
We combine the pedals with the bracket
And we attach it to the cockpit
Great. We drill several holes in the frame to allow height adjustment and fasten it.
The length of the bolts was not enough to install the nut outside, so I cursed for a long time while twisting it inside the profile. Then an idea came to mind: weld it! This is how I got my first cage nut, albeit a little peculiar.
The public is happy, I'm happy. In the current configuration, you can flexibly configure the seat and pedals (including removing the clutch pedal altogether, since it is not used in F1).
There is now a whole cloud of future modifications in my head, including simulating the movement of the car by tilting the cockpit, but this is completely in the future.
Then you will have to redo the mount of the steering wheel itself. Since in fireballs it stands almost perpendicular to the horizon.
I also want to put a vibration speaker in the chair, like alphamods did. I wanted to put a regular 12″ subwoofer speaker under the chair, but I liked the alphamod option better.
At the moment, I disassembled the steering wheel base and gearbox, cleaned and lubricated everything. There was much less dirt than in the pedals, but the steering wheel was used quite actively.
Soon I will post a post about how I made a subwoofer to play games well and listen to engine sounds, as well as a post about how I made a children’s kitchen, and then we’ll see what we can make from the upcoming modifications.
Yes, they also asked for a video, but, strangely enough, it doesn’t exist yet. But I promise to film it and post it.
PS: Bayanometer compared this post to a strawberry.
Thanks to everyone who finished reading, to those who read, commented and rated the previous post. I didn't expect such a rush
Joystick assembly process
- First of all, we draw a joystick on cardboard, or, more precisely, its shape.
- Then we begin to cut out exactly according to the drawn office. When the form is ready, you can move on to the next step.
- To the cut-out shape of the gamepad you need to attach a control chip, a battery and an on/off key and, of course, a fan.
- The peculiarity of such a joystick is its low cost, which means accessibility. When the shape of the future gamepad is almost ready, you need to cut out a small “window” in one of the edges of the shape to install a fan; it will be needed to cool the mobile phone during the game.
- Using special hot glue, you need to install two small pieces of metal wire to the base of the fan on both sides. When the wire is securely fastened, attach an elastic band exactly in the middle of the fan.
- At the end of the work, you need to glue two plywood pieces on both sides of the joystick, onto which the fan rubber bands will be attached, and after that you can install the battery in the place prepared for it, the microcircuit and the buttons for turning it on and off.
How to connect a joystick to a PC
Connecting the joystick to your computer is easy. We connect it with a USB cable. For the wireless option, you need to insert a Bluetooth adapter. As a rule, the device is initialized automatically in the system. If the option is wired, then the kit should include drivers, as well as all the necessary software.
Setting up a joystick for a PC involves first installing drivers. As a rule, the system does this automatically. If this fails, do not forget that the kit includes a software disc. When it is missing, or it has been lost, or it is a Chinese “noname”, then there is nothing left to do but find the driver on the global network.
It is not always possible to configure the joystick right away. This happens especially often with some Chinese models from brands that are little known on the market.
Finding a driver and licensed software for such a joystick is not easy. The Xpadder program can help, which can redefine joystick commands so that they create an imitation of pressing on the keyboard and pointing device.
Setup is easy. You just need to select the type of joystick, and then for each key mark its real analogue on the device.
IMPORTANT! More recently, the program became paid. Those who do not want to pay can download an older version
There is another similar program - MotionJoy, which is capable of emulating the connection of a wide variety of game controllers to a computer. Its setup is simple. The program has many settings and options. This means you can use any joystick you like.
Choosing a joystick for a flight simulator
Perhaps this article is more suitable for beginners who decide to experience the thrill of playing a flight simulator. The article discusses several successful entry-level models and information on choosing currently relevant joysticks.
First of all, I advise you to carefully read the previous article about the design and characteristics of a joystick for flight simulators. Perhaps, after reading the article, you will understand exactly what you want and how much money you are willing to pay for new gaming experiences.
Price category when choosing a joystick for a flight simulator
Logitech Flight System G940
Good flight simulators appear on the computer games market very rarely, even space simulators come out more often. This probably explains the small selection of manipulators of this type. Take a look at the number of gamepad models - there are 10 times more of them! On the other hand, the smaller the choice, the easier it is to choose.
MaxFighter F-17
It’s difficult to recommend anything under $30 even to beginners. At some points, with such manipulators, you can become disappointed in the avisimulators, for example, when there is no “hut” (side-to-side visibility) like the Genius MaxFighter F-17. Therefore, it is best to set the lower price limit from $30-35. But even among inexpensive joysticks there can be quite interesting options for a beginner.
IL-2 Sturmovik
In general, if you like to play realistic flight simulators, for example IL-2 Sturmovik, then choose a joystick with many buttons. If you are going to play Hawk or World Of Warplanes, then these are mostly arcade simulators and the number of buttons will be sufficient when choosing any joystick manipulator of this type.
Thrustmaster USB Joystick
From the price category of joysticks up to $30, I can recommend the Thrustmaster USB Joystick, although it has a real problem with the number of buttons, but the manufacturing quality of the manipulator is excellent and with intense gaming it can easily last a year.
Logitech Attack 3
There is another choice for flight simulators: the Logitech Attack3, the most expensive of the cheapest, if you'll excuse the pun. What we have? USB connection, 11 programmable buttons.
The handle design will not suit everyone, so try your hand on in store. The small gas lever is also not very convenient. In general, it’s a pretty tolerable joystick, considering that it’s Logitech and isn’t that expensive.
There’s probably nothing more to offer.
All joysticks in this price category have resistor position sensors, so sooner or later they will fail, but this is not a problem, since by then you will already become a professional and want something functional and realistic. Also, cheap manipulators do not have a yaw axis, that is, they cannot rotate around their own axis.
More expensive models
F-35
And now everything is limited only by your financial appetites. Why does a beginner need a $500 joystick? Maybe you are going to join NATO and therefore need daily training and flights in the F-35. No, most likely you want to play World of Warplanes with friends.
For beginners, I can recommend only two models and these are not the top-end Thrustmaster Hotas Warthog or Saitek Pro Flight X-65F. I didn’t think that I would offer someone to buy Defender products, but in this situation, the Defender Cobra M5 USB model has no competitors, especially for that kind of money.
Defender Cobra M5 USB
The cost of Defender Cobra M5 USB is only about $50-60 and this is very little for such a joystick and I will explain why:
- Very realistic design
- Heavy base, can be fixed with screws
- Precise, soft and smooth stroke of the handle
You can immediately feel that the joystick was created by gamers. The most important advantage is the use of Hall sensors, that is, magnetic ones. This means that there will be no wear and the position detection system will function in a year just like when it was new. This is one of the models that I recommend for beginners to purchase.
Of course, this model also has minor drawbacks: there is no full-fledged throttle (engine control handle) and therefore, if you want to have a real HOTAS (translated into Russian.
: one hand on the engine control handle, the other on the main handle), then perhaps I can advise you on another model, and you will have to pay only $10-15 extra.
Thrustmaster T.Flight Hotas X
So, another model that can be recommended for choice as your first joystick: Thrustmaster T.Flight Hotas X. Probably, this is one of those popular manipulators that combines both price and quality. Getting a full-fledged HOTAS for that kind of money is just a fairy tale for a fan of flight simulators. This joystick has it all:
- A large number of buttons
- Comfortable handle
- Great design
- Precise Control
- Separate engine control handle
- Shared base
The only thing missing here is magnetic Hall sensors, so with frequent use, it may not last for a couple of years (that’s how long the manufacturer gives a guarantee). On online forums you can find notes on replacing resistor sensors with magnetic ones, and then this manipulator will have no price.
Conclusion: it is obvious that the one who reads such articles is new to the field of flight simulator games, which means that the joystick you should choose is not very expensive, the experience will come on its own. When you appreciate all the subtleties of the gameplay with this manipulator, then buy a professional one.
- TAGS
- flight simulator
- joystick
Connect PS3 Controller to PC Using SCP Driver Pack
Get drivers
Visit the PCSX2 thread and download the latest and updated version of the SCP DS driver. The folder will be in 7-zip format, so be sure to download and install a file archiver utility for Windows software such as WinRAR if you don't already have it.
Extract the downloaded latest version and the latest updated zipped folders.
Open the unzipped folder with the latest updates, go to ScpServer\bin and copy all the files there.
Paste and Replace
Open the extracted folder of the latest version, navigate to ScpServer\bin and paste all the files you just copied there. Replace the files in the target folder if a warning appears.
Delete source files
Now that we're set up, you can go ahead and delete the original zipped folders: the latest updates and the latest version folders. You can also remove the unpacked version from the latest updates folder. From here, all we'll use is the latest version folder.
Open ScpServer in the latest version folder and copy the bin folder.
Rename folder
Go to C:\Program Files, create a folder and call it Scarlet.Crush Productions (since they made the software anyway) and paste the bin folder inside.
When prompted for administrator rights, click Continue.
Run as administrator
Open the pasted bin folder, right-click the ScpDriver application and run it as administrator.
Configure and install
Before clicking Install, make sure the boxes next to Bluetooth Driver (for Bluetooth configuration) and Configure Service are checked. If you want to run the PS3 controller on a PC running Windows 7 or earlier, click the "Force installation" button. This will install drivers that are already pre-installed in Windows 8 and 10.
Define your controller
Once the installation is complete, click Exit and open the ScpMonitor application. Your controller should be detected by default since it was connected to begin with. You can also use your PS3 controller in Steam games if the game supports console controllers. This may require you to play in Steam's "Big Picture Mode".
Disconnect and reconnect the controller if the controller is not detected. If "Charging" is displayed instead of "Reserved", the controller is detected and working. Restart your computer if your controller is still not detected. If the host address shows "Disabled" in the SCP DS3 Monitor software after following the steps above, it means Bluetooth is not supported.
How I became a racer (virtual)
I'm not much of a welder; in general, I'm a programmer, but here, as they say, it's stuck. I welded the main frame, figured out the seat, it’s not clear yet.
Added a mount for the gearshift knob. Well, we need to test it. They took me to the second floor (yes, my garage has two floors) and launched aCorsa
It's gone. Everything is very monolithic, forcefeedback worked differently. The pedals are tightly screwed and do not go anywhere. I'm really pleased.
BUT! The screen is far away. I want to see better. I looked at the average size of a 32″ TV on the market and assembled it from wood. My father looked at me wryly when I wrote to him that I had created a television from wood. It turned out something like this:
Well, then painting and moving to the dacha. There is a spacious veranda, and in the summer you can put it there
Even for children in size. Learn to drive and ride according to the rules. Well, this is what it looks like in first person:
In general, it turned out, as my friend said, “a gun race.” But the epic of this cockpit did not end there. To be continued.
Source
Gamepads from Xbox 360 for PC
1) Wired Xbox 360 joystick.
×It is better to use the original controller if you already have one. But you can save money and buy a high-quality third-party gamepad for the Xbox 360.
On Win10, drivers are installed automatically, there should be no difficulties.
On Windows 7, 8 or 8.1, you may have to install the software yourself:
- We go to the Microsoft store, look for the gamepad you need, and click “Downloads”.
- Select the desired version of the operating system (7, Vista or XP).
- Download, install and reboot the PC;
- We connect the Xbox 360 gamepad and check.
For Windows 8 and 8.1, use Win7 compatibility mode. To do this you need:
- Download software for 7;
- After downloading, right-click on the file and select “Properties”;
- “Compatibility” tab and check the “Run this program in compatibility mode” checkbox;
- Select the OS “Windows 7” and the “OK” button;
- We start installing the drivers, then connect the gamepad and check the settings.
2) Xbox 360 wireless joystick.
×Xbox360 Wireless Controller will only work with your computer through a special wireless receiver for this gamepad.
- We connect the receiver to the USB-2.0 input on the PC.
- The driver installation will begin automatically, but you can install them from a disk or from the Internet.
- We turn on the controller from XBox 360.
- Press the button on the Receiver, and then press the “Connect” button on the Gamepad 360 (on top between the triggers).
- The connection will be established when the lights stop blinking and turn solid green.
×Instructions for manually installing drivers are described in the previous paragraph.
Five questions to choose the type of flight simulator
Once you've figured out the layout of the machine, it's time to browse the Internet for suitable technical solutions. To do this, you can use the “Useful Resources” section. Investing time at this stage will pay off: the more thorough the review, the greater the chance of finding the optimal solution, and construction is also encouraged.
To decide on the type of exercise machine, ask yourself five questions:
- What skills do you have and what skill do you want to develop? You can use ready-made simulator components, or you can develop them from scratch. If you use the components of a specific aircraft, then in the end it will turn out. And if you develop something yourself, then the choice of nodes to copy increases and you can choose. You can improve some programming skills and improve the level of realism of the aircraft model. Creativity can be in everything, the question is the budget and time for the project.
- What is the time limit? How long before you want to fly the first version of your flight simulator? For your own satisfaction and motivation, it is better to take small steps and be able to fly each of them at any given time.
- Housing issue. Someone builds a machine in the corner of the room and is forced to share the living space of their hobby with members of their family. Others have an entire workshop for construction. The available space will help determine the size of the machine that can be built and this will influence other factors.
- Your Level of Ambition What level of realism do you want to achieve? What's the budget? How many computers will be involved?
- What aircraft are you going to fly on? Some people choose popular large and small aircraft. In such cases, off-the-shelf components are usually available for sale, and MFS contains models of these aircraft. If a person decides to do everything on his own, then he has a wider choice of aircraft, but in any case it is better to look at the list of aircraft from popular flight simulators.
Do-it-yourself 6-speed manual transmission for PC for next to nothing. — DIY community on DRIVE2
Hi all! In my free time, I like to play car simulators like Euro Truck Simulator 2 or Spintires, but playing with a regular steering wheel and pedals has become boring)) I recently came across a video on YouTube of how someone made a gearbox out of shit and sticks) I saw how different people do it, I took something from each little by little, added something myself and away we go. Of course, I was more interested in the very essence of collecting something worthwhile from the “garbage.” I’ll say right away that the result exceeded all expectations tenfold. There were several design options; after walking around the store, looking at the prices for “raw materials,” it was decided to think about how to make the design cheaper, and in the end, this is the configuration: 1. Poker! I made the base for the handle from an old ball joint from a classic, which a friend gave me (I need the old one, the more it dangles, the easier the lever will move!) At work, I broke a wooden pallet, took a box and part of a board from it, assembled it, I sawed it off by eye, cut out a seating hole for the ball in the container using improvised tools, screwed it on with self-tapping screws through washers. Then I sawed off an iron handle from an old snow shovel, which sat tightly on the support pin, knocked with a hammer, pressed the pipe tightly, it turned out like this:
Budget at the moment - 0r
Full size
almost ready
2. Case! I thought for a long time about what to make the case out of, and found an old speaker from a mini music center at home, cut out one wall and immersed the lever there, screwed everything in with self-tapping screws and made a stand out of chipboard, so that when switching, my box would stand stable on the floor. I also found chipboard at home.
Probably the most difficult and time-consuming thing was to make the box lid with slots for the lever stroke. How many destinies were ruined and nerves were damaged, but it seems I managed)) First I cut it out on cardboard, then I transferred it to plywood and cut it out with a jigsaw, I found 6mm plywood in the garage, the tool is there. Budget at the moment - 0r
Full size
The reverse gear turned out to be sideways, because there is not enough travel due to the thick pipe, but I didn’t bother changing it, it’s also convenient
3. Electrical part! This is where the most interesting and expensive part begins.
So, as in essence, the gearbox is the same buttons, only scattered in their own way, which means the easiest way is to make it from an old game joystick that has been lying around for several years without use (bought 4 years ago for 250 rubles in M-video).
We disassemble it, throw out the case and leave the board, where everything has already been prepared for us. On the spots where the buttons used to be, we solder wires on both sides, closing which we simulate pressing the button.
I needed to use 8 buttons (6 gears + reverse + divider/multiplier), soldered, etc.
The joystick was Chinese and flimsy - I poured hot glue on top of all the wires with the board and wrapped it with electrical tape (unfortunately there is no photo of soldering)
Next, we purchased MSW switches with a foot with a wheel for 32 rubles per piece * 7 pcs. (Any other buttons without locking are also suitable, but these seemed to me the most convenient, with the foot you can adjust the moment when the gear is turned on. We connect the switches instead of the joystick buttons to wires soldered to the board via terminals mother 3r * 14 pcs. I also took a small round button with fixation for the divider - 30r
The current budget is 296 rubles
We connect the USB to the computer and check the functionality of all buttons in the device manager. Everything is working! The electrical part is ready!
Next we need to introduce this part into our body and push the buttons, this is where complete improvisation begins. I placed the buttons on construction sheds and secured the whole thing inside the box.
I assembled everything, closed the lid, engaged the gears - everything works, but there is not enough tension on the stick. I went to the nearest auto store, bought a jig handle - 80 rubles, drilled a hole in it, inserted a divider button, brought out the wires and again somehow miraculously hunched it it on the pipe.
That's essentially all!
The project budget was 346 rubles, which is ten times cheaper than buying ready-made shifters or a steering wheel with a box, which I would never buy. And in addition to everything, the gearbox lever turned out to be long and comfortable; when sitting on a chair, the lever is at a level just above the knee. All that remains is to somehow design the collective farm look of this design)
We would also like to make a clutch pedal, but this is more difficult)) Let's think about it!