To make a scooter you will need
- Workbench or saw sawhorse
- Fixed square for carpentry work
- Electric drill with drills with a diameter of 0.6 cm and 13 mm.
- Two adjustable wrenches
- Tape measure
- crosshead screwdriver
- Pencil
- Sharp saw
- Hammer
- Treated pine wood for longitudinal bars, handle and handle post 3.8 cm x 5.1 cm
- Treated pine wood for connecting neck 5.1 cm x 7.6 cm
- Plywood for the deck-footboard, 1.9 cm thick
- Four ring bolts: two bolts 0.6 cm thick, 5.1 cm long, with a ring hole diameter of 1.6 cm and two bolts 0.6 cm thick, 7.6 cm long, with a ring hole diameter of 1.6 cm [J]
- Four carriage bolts, 0.6 cm thick, 4.4 cm long, with washers and nuts for each [B1]
- Two hex bolts, 0.6 cm thick, 7 cm long, with nuts for each [B2]
- Six carriage bolts, 0.6 cm thick, 4.4 cm long, with washers and nuts for each [B3]
- Two carriage bolts, 1.3 cm thick, 12.7 cm long, with washers and nuts for each [B4]
- One hex head bolt, 1.3 cm thick, 15.2 cm long, with two nuts (screw in the opposite direction) and four washers. This is a pain for the front axle of the wheels [B5]
- One hex head bolt, 1.3 cm thick, 15.2 cm long, with two nuts (counter-tightening) and four washers. This is a bolt for the rear wheel axle [B6]
- One carriage bolt 1.3 cm thick, 20.3 long, with two nuts (screw in the opposite direction). This bolt fits into the O-ring bolt holes and acts as a swivel rod [B7]
We will build a scooter like this
- Measure, saw off, drill holes and arrange: a) Saw off pieces of wood in accordance with the indicated dimensions. b) Carefully measure and mark the centers of the holes to be drilled. c) Then we drilled the holes. Please note that they are of two different diameters. The holes for the axial bolts and the bolts that secure the longitudinal bars [A] to the connecting neck [C] have a diameter of 1.3 cm. All other holes have a diameter of 0.6 cm. d) Lay out all the parts on the floor.
- Assemble the scooter handle: Attach two corner brackets [I] to the top of the handlebar post [E]. Then bolt the handle [F] into place.
- Assemble the front wheels of the scooter: Assemble the front wheels using a 1.3 cm thick bolt as the wheel axle. Place a washer on each side of each wheel. After checking that the assembled axle is not too tight to allow the wheels to spin freely, tighten the two nuts opposite each other to create a “lock nut.” This will help ensure that the assembled axle does not vibrate during constant movement. Place the two O-ring bolts in the corresponding holes in the steering column [E].
- Assemble the platform frame: Attach two longitudinal bars [A] to the connecting neck [C]. Place the remaining two O-ring bolts into the corresponding holes in the connecting neck [C].
- Attach the Deck: Attach the deck [D] to the two side rails [A] with six carriage bolts.
- Attach the steering: Align the collar bolt rings [C] with the steering column bolt rings [E]. Place a carriage bolt through the ring bolt holes to act as a kingpin—the pivot pin for the swivel joint. Check that the swivel joint can turn freely, and then tighten the two nuts on the carriage bolt to create a “lock nut.” This will ensure that the rod does not fall out and does not vibrate with constant movement.
- Install the connecting neck: Attach the corner bracket to the connecting neck [C] and deck [D] with screws. This is done to strengthen the structure.
- Assemble the rear wheels of the scooter: Assemble the rear wheels in the same way as the front wheels in step 3. Make sure there is a washer on each side of the wheel and that the wheels rotate freely before tightening the “lock nut” on the end of the bolt.
- Add Brake: Screw the T-Loop to the back of the deck [D].
Manufacturing methods
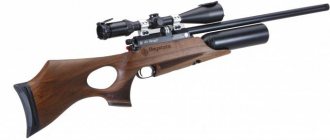
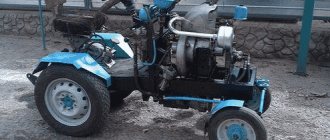
There are many different diagrams and instructions for making any model of vehicle available in the public domain. In some cases, a homemade electric scooter can consist of 80% of the usual one. You can also borrow components from an old bicycle. Such models are the easiest to assemble and do not require complex welding work. You can get a convenient vehicle even without using an electric generator if you have a simple electric motor from a drill. The battery capacity of the screwdriver is quite enough for a 1.5-hour trip. A more complex upgrade involves the creation of a finished frame structure from metal corners, sheets of steel, hot welded together. As a rule, the steering and wheel drive are taken from old bicycles or scooters.
To make the ride easier, improve cross-country ability and basic characteristics, you can install large-diameter wheels; they require an additional set of shock absorbers.
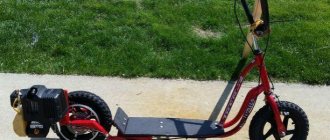
Conversion from a regular scooter and bicycle
The technically simplest way to create an electric scooter with your own hands is to remake a foot-type device or an old bicycle. To make the product yourself, you need:
- Choose a frame from an ordinary mechanical scooter. It is important to consider the width of the wheelbase and the size of the planned battery compartment. A case from any classic model can be suitable here.
- Take the suspension and steering from an old mountain bike. The spring force of 250–300 kg/cm is quite enough for a comfortable ride. Bicycle or disc brakes can also be used as brake pads. There is no need to invent something new here. It is enough to attach old or new brakes to the wheels.
- To fix the wheels selected in advance, make a homemade axle from threaded rods and nuts that match the size. Manufacturers of electric scooters rarely worry about unifying elements, so the choice in this case may be limited.
- To ensure smooth operation even when going uphill, prepare a small gearbox. It will reduce the output speed, increasing the engine's traction power.
- Install the chain tensioner. It is necessary to ensure smooth transmission of torque from the gearbox to the wheel through the chain. Moreover, on any bump without a tensioner, the last element can simply fly off.
- Install the steering wheel. Here again, old bicycles, for example, mountain bikes, will help out (the part can be removed from them).
- Connect the electronic “filling” and do the final installation. It is better to place the electric motor controller with a set of fuses closer to the steering wheel so that there is more space for installing the battery pack. Its diagrams can be found on the Internet, but it is better to purchase a new element. The electric scooter can be equipped with a CIM type motor. As batteries, you can take prefabricated Li-On blocks of standard power. For a basic 600 W assembly, 6 pieces are enough.
- Install the battery box. It can be assembled from thick-walled plywood on the steering rack, thus freeing up the platform below. It is allowed to install the box from below. The main task here is to remove the battery as quickly as possible if necessary.
General diagram of a homemade scooter
A homemade scooter is easy to make, and its cost is minimal.
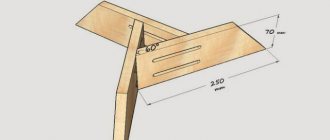
All scooters have 2 main parts - a footrest and a steering column. Manufacturing begins with the footrest. Cut a piece of board 80-90 cm long. A groove for the rear wheel is cut out in the back. The depth of the cut should be 2 cm greater than the sum of the wheel radius and the thickness of the axle. If ball bearings are used, then the axis for them is a wooden rod.
The axis, which should be on the plane of the board facing the ground, is attached with screws. The wheel from a children's bicycle is attached to a wooden boss using nuts. The boss is attached with screws from below to the footrest. The corners on the front of the footrest are cut at 45°. A block is attached to the top, the width of which is equal to the width of the footrest. The front corners of the bar are also cut at 45°.
Now, to get a wooden scooter, remove the iron wire from the window latch and bend the bracket in the shape of the letter P. It should rotate freely in the latch. Cut threads for nuts at the ends of the bracket, insert it into the recess of the latch and secure it vertically to a wooden block of the footrest with screws.
The steering column is made in the same way. The difference is that at the end opposite the wheel, a transverse wooden strip is nailed, which serves as a steering wheel.
In the board of the steering column, at the junction with the footrest, 2 holes are drilled for attaching the steering bracket. Screw a nut onto the ends and insert washers. The rods are inserted into the holes of the steering column. The structure is secured using nuts and locknuts.
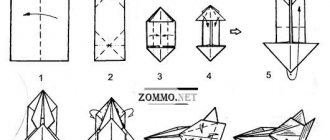
Drawings made in advance will make manufacturing easier.
Required tools and drawings
To make a wooden scooter, you will need the following tools:
- workbench or saw sawhorse;
- fixed square for carpentry work;
- electric drill;
- 2 adjustable wrenches;
- tape measure;
- crosshead screwdriver;
- pencil;
- sharp saw;
- hammer.
To make a vehicle out of wood, you will need:
- treated pine wood for longitudinal beams;
- pens;
- handle stands;
- connecting neck;
- plywood for the deck-footboard;
- bolts.
First of all, you should make a drawing. Pieces of wood are sawn off according to size and the centers of the holes being drilled are carefully marked, which should be of 2 different diameters:
- for axial bolts and those to which the longitudinal bars are attached to the connecting neck - 1.3 cm;
- all others - 0.6 cm.
Now you should lay out the parts according to the drawing on the floor. To assemble the scooter handle, you need to attach 2 corner brackets with bolts to the top of the handlebar post. Then the handle is bolted into place.
The front wheels are assembled using a 1.3 cm thick bolt as an axle. A washer is placed on each side of the wheels. Now you need to check whether the assembled axle is overtightened. After this, tighten the 2 nuts opposite each other, which will ensure that there is no vibration during constant movement. 2 bolts with rings are placed in the corresponding holes in the steering column.
The platform frames attach 2 longitudinal bars to the connecting neck. The remaining 2 bolts with rings are placed in the corresponding holes in the connecting neck. The deck is attached to 2 longitudinal beams with carriage bolts.
What is needed to make a motorbike?
A homemade bicycle from a trimmer must be assembled from a certain list of parts and mechanisms.
To construct a motorbike from a lawn mower with your own hands, the manufacturer will need:
- A fully functional 2-wheeled bicycle with a strong frame with no visible rust on the surface. If they are, then the problem areas must first be coated with a primer and several layers of paint;
- working power unit from a gasoline trimmer. The rated engine power should be 3–6 hp. With. It is not advisable to use more powerful engines, as they will require more fuel mixture;
- belt or drive chain;
- tension roller for a bicycle from a trimmer;
- sprocket - must match the motor used. If possible, you can turn a star on a lathe with your own hands;
- clamp – necessary for stable mounting of the motor on the bicycle frame. You can make the clamp yourself using an all-metal piece of steel;
- a cable that will serve as a connecting link between the power unit and the throttle handle of the bicycle;
- several fuses and a controller;
- exhaust pipe - the length of the standard exhaust pipe from the trimmer will not be enough, so you need to take an additional piece of pipe of the appropriate diameter and weld it to the element of the brush cutter;
- screws, washers, bushings and other fasteners.
Along with the motor from the brush cutter, the manufacturer will need the entire fuel system along with the carburetor, factory clutch, ignition and gas tank. All internal mechanisms must be carefully prepared for assembling the bicycle - their faulty components must be washed and replaced.
How to make a scooter from plywood?
You can make a scooter out of plywood. For this you will need the following materials:
- plywood 10 mm thick;
- furniture board 28 mm thick;
- front fork from a bicycle (20-inch wheel);
- rear wheel (12 inches).
Self-tapping screws and furniture corners can be used as fasteners. In addition, all parts should be glued with PVA glue. More ground clearance needs to be designed. At the end, the product must be varnished, then the wooden scooter will last a long time.
Instructions on how to make a scooter from a children's bicycle
Making a scooter from a children's bicycle is quick and easy. To do this you will need the following materials:
- 2 forks from a children's bicycle;
- 2 wheels;
- water pipe 1.5 m long, wall thickness - 2.5 mm, diameter - 35 mm;
- pipe 1.5 m long, 2.5 mm thick, 20 mm in diameter;
- a piece of plywood;
- spanners;
- screws;
- welding machine;
- drill;
- Bulgarian;
- dye.
In order to assemble a children's scooter, you will need basic skills in working with the tool.
- Let's disassemble the bike. Using a grinder, we cut off the frame from the front fork. You will also have to work with a grinder on the rear fork.
- Fabrication of the frame and welding of the structure. To create a frame, take a pipe and bend it. One end of the pipe is welded to the front fork, and a metal plate is welded to the other. Now the rear fork is welded to the plate, which makes the structure more reliable. A bicycle brake is attached to the handlebars.
- Attach a board or plywood. To make it comfortable to stand while riding a scooter, a board should be screwed to its frame. To do this, first weld 2 plates and drill holes in them. The board is attached using screws with nuts or self-tapping screws; a cut is made in it so that the frame fits into it.
- Painting. You can use spray paint. For example, paint the front wheel with matte black, and the back wheel and the board with pink fluorescent paint if the vehicle is intended for a girl.
A wooden scooter or a scooter made from bicycles, made by yourself, will be inexpensive and will serve for a long time.
DIY world
For leisure
- Homemade sled from skis
- Homemade float
- Fishing tackle - Boat
- Christmas tree made from plastic bottles
- Homemade sled-scooters
- Homemade sled
- Homemade folding boats
- Homemade water skis
- Water monoski
- Homemade tourist hatchet
- Sleds for winter fishing
- Homemade ski scooter
- Drawing device
- Universal tourist hatchet
- Paper boat
- Underwater glider - aquon
- Homemade pedal boats (review)
- Catamaran for swimmer
- DIY snow scooter
- Very catchy spoon
- Homemade electric guitar
- Homemade table football game
- Aquaped amphibian
- Table basketball
- Pedal snowmobile
- Rocking horse