Types of hangers
Standard designs with hooks for storing outerwear can be made:
- Made of wood (chipboard, solid wooden boards, etc.);
- Made of metal (aluminium, copper, bronze);
- Made of plastic (less common than other materials, since plastic models are very lightweight).
Wooden hangers have a greater advantage. They are environmentally friendly, wear-resistant and have a beautiful design. Metal structures are very durable because metal is a durable material. Cast forged models look especially good.
Modern furniture factories most often produce combined models with a wooden frame and metal/plastic hooks.
At home, the following materials are used to make hangers:
- Pallets (pallets);
- Old and new boards;
- Perforated sheets;
- Old leather belts;
- Tree branches.
There are several types of products in terms of appearance and functionality:
- Wall-mounted vertical (they won’t support too much weight);
- Wall-mounted horizontal (able to hold heavy objects);
- Floor-standing (tripods).
Hangers are used in a single version: a base and hook-holders. Or they are equipped with shelves and mirrors.
Purpose and features of hangers
A hanger is a functional design that can be used to place clothes, linen and bath accessories, and also as a decorative element that can emphasize the individual style of a bathhouse.
Bath hangers differ in type of design, dimensions, installation method and purpose.
The following types of hangers can be used for baths and saunas:
Floor hangers are either stationary or portable. Stationary products are distinguished by their impressive weight and dimensions, so they are installed in a specific location. They can be equipped with shelves for hats and accessories, as well as a shoe stand. Mobile products have a lightweight design, not weighed down by additional elements, which allows you to move it from one place to another.
Corner hangers can be mounted on the floor or on the wall; they are used for small baths.
The hangers are intended for installation in the dressing room, locker room, rest room, washroom and hallway. Some products are used for personal items and clothing, others for underwear and bath accessories.
Tools for work
Since the structures are attached to the wall and are made of different building materials, it is impossible to do without special devices and tools.
For work you may need:
- Hammer;
- Screwdriver;
- Saw or hacksaw for wood;
- Jigsaw with attachments for metal and wood;
- Hammer;
- Self-tapping screws, screws, dowels;
- Pencil and tape measure for marking;
- Building level;
- Paint for wood and metal;
- Brushes;
- Sandpaper (grit No. 60) or grinder attachment.
Before work, it is necessary to prepare the material: clean the dirt and sand the wood, wash the metal from contamination, paint the frame made of boards or punched sheets, etc. And also clear the place chosen for the hanger in the hallway.
How to choose material for making hangers
Even at the development stage, the master must decide in advance which materials are best suited for the hanger. For example, hooks are easily mounted to wooden surfaces and beams. Attaching hooks to wooden surfaces is quite easy. In metal cases and rods, you will have to carefully drill through holes for fastening hooks or weld them in place. With a metal case, you will have to drill holes for fasteners. Plastic elements (hooks, bars) are well suited for the bathroom. They are able to withstand the light weight of towels, but the plastic is indifferent to the conditions of a humid environment. In contrast, wood and rusting metal are afraid of moisture. Hangers with plastic elements are great for the bathroom.
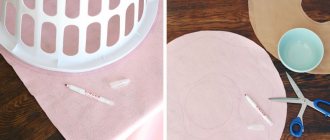
From perforated sheet
For work they take:
- Metal sheet with holes of the required size;
- Special hooks for holes, fastenings (dowels, screws, profiles);
- Screwdriver;
- Tape measure and a simple pencil;
- Metal scissors (jigsaw, multi-cutter);
- Threads for floss, wool or jute (threads will be needed for “embroidery” on perforated fabric).
Process of creation:
- If the sheet is large, then it is necessary to cut the sheet of the required size using an electric jigsaw with a metal attachment, a grinder or metal scissors.
- If desired, threads can be used to create “embroidery” in the form of an inscription or design at the top of the product. The hooks will be located just below.
- Next, you need to attach the panel to the wall. This is done using a puncher, dowels and self-tapping screws (or screws), if the perforation is large enough in diameter, so that you can then simply hang it on top of slightly unscrewed screws.
- First, the sheet is applied to the wall and the drilling points are marked with a pencil. Or they do it in another way. First, they construct a frame from metal profiles or wooden slats, screw the frame to the wall and then hang a perforated metal sheet on it. Ready-made sheets with side fastenings and corresponding profiles for them are available for sale.
- The profile is attached to the wall, and then the structure itself is put on using special fasteners. If the wall is made of plasterboard or wooden panels, then the screen can be secured with self-tapping screws through the holes in the metal panel.
- In the same way, install individual single or double hooks made of metal or plastic through the perforations. Heavy things cannot be hung on such fasteners.
The next step is to attach special hooks for perforation. The hanger is ready for use!
Unfortunately, you cannot hang heavy clothes on such a structure (or the hooks must be mounted deeper into the wall). A hanger made of perforated sheet is suitable for storing light accessories: scarves, scarves, belts, summer clothes and keys.
Weapons of the ancient ship: harpach, grappling hook, ram, catapult.
The most effective weapons of ancient ships were the ram, harp and grappling hook, and catapult. This device (ram) was available on the ancient ships of the Dorians, who in 3000 BC. came from the north to the coast of the Aegean Sea and decorated vases of that period with images of their ancient ships.
Weapons of the ancient ship: harpach, grappling hook, ram, catapult.
Phoenician warships on Assyrian bas-reliefs from 700 BC. also equipped with rams, the same applies to the Athenian triremes of Phormion at the battle of Patras and Naupakges (429 BC). Pliny attributes the invention of the ram to the legendary Etruscan sailor Pisaius, but this, of course, is implausible. Herodotus, in his History, speaks of the ram, recounting a battle that took place in 535 BC, when the allied fleet of Carthaginians and Etruscans opposed the Greeks in the Tyrrhenian Sea between Corsica and the mouth of the Tiber.
The ram had to be aimed at the side of the enemy ancient ship, which required unusually high maneuverability on the part of the attacking ship. Equally high maneuverability was required to survive the threat of a ram. The ram, therefore, was a weapon most suitable for small ships that were easy to control.
Harpagon or Harpach. The result of the development of the “iron hand”. It was a wooden rod with an iron tip, launched by a throwing machine at the enemy ship in order to hook it. When the iron tip pierced the hull, it opened and held the ship tightly.
Since naval battles in ancient times usually ended with boarding followed by hand-to-hand combat, devices designed to hook an enemy ship and allow one to jump on board were of great importance.
One of these weapons was the “iron hand” (tapi5 Geggea), which was a sharp hook mounted on a wooden stick. In a more improved form, it became a “cat”, which was used for boarding throughout the existence of sailing ships.
As a result of the evolution of the “iron hand,” the hapago, or grappling hook, arose, consisting of a wooden rod with an iron movable tip and hooks to which ropes were attached. It could be thrown onto an enemy ship using a military weapon similar to a crossbow. The iron tip had four blades, which, after it pierced the body, prevented it from coming out. With such a device it was possible to hook an enemy ship from a greater distance than the “iron hand” - a grappling hook - allowed.
During the First Punic War, the consul Gaius Duilius equipped his ships with the “raven” he invented, the use of which in the battles of Milazzo (260 BC) and Ecnomus (256 BC) was a decisive factor in ensuring victory for the Romans. It was a kind of bridge that was thrown onto an enemy ship so that soldiers could move from ship to ship, so that the battle turned into a regular battle, as on land. The Raven was abandoned after the Battle of Ecnomus as it was too heavy and made the ship unstable. On the contrary, the “iron hand” remained in use until the end of the era of sailing ships. In Roman times, its use was documented at the Battle of Navloch in 36 BC. during the civil war between Octavian and Pompey.
Other weapons carried on board were catapults, crossbows and the like, designed to throw stones, arrows and even incendiary arrows, as was the case at the Battle of Actium.
The guns were mounted on the deck or on turrets. Initially, the turrets were located only at the bow and stern, but later they were placed in various places on the deck of larger ships, such as the "eights" and "nines". These towers were not an integral part of the hull; they could easily be dismantled before a long journey, or, if necessary, thrown into the sea. In practice, as Vitruvius writes, “heavy things are doomed to the sea when there is war.”
The weapons discussed so far were used in battles between oared ships, in other words, the masts on the ships were lowered and the sails furled. However, Roman ships also had to fight against ships under sail, as Caesar mentions in his book “On the Gallic War”. In 56 BC. they encountered the Veneti at Dariorium Venetorum, in Brittany (now Vannes), as well as in Condivicum (Nantes on the Loire) and Porte Itia (Boulogne on the English Channel). To fight against these ships, a special device was used, called a falx, which consisted of cuttings with curved blades at the ends, like scythes. They were used to cut the sailing rigging of enemy ships, especially the halyards, and thereby force the yard to collapse on the deck.
In addition to weapons made of metal, the ships of classical antiquity also had weapons known since the 2nd century. BC. and called “fire corvus” or “fire pot”. Polybius gives a description of this weapon, and Livy and Appian also speak about it. It consisted of containers filled with a flammable substance, which hung from two arrows protruding on either side of the ship’s bow; they were thrown into the enemy ship. Wall paintings discovered on the island of Pharos at the entrance to the port of Alexandria depict the bow of a ship, on which stands a tower with an arrow carrying just such a projectile. The fire corvus, which also, according to Livy, was used at the Battle of Cape Myonnes (September 190 BC), should not be confused with the Greek fire used in naval affairs later in the Middle Ages. Tradition holds that the Greek fire of the Byzantines was invented by a Syrian architect named Kallinikos and was a mixture of saltpeter, coal, tar, gum, lime, petroleum and possibly phosphorus. This oily liquid poured out of the siphon onto enemy ships. Something like a flamethrower was also known, but in more ancient times. It is believed to have been invented by a Greek named Ctesibius, who lived in the 3rd century. BC. With the help of this weapon, a flammable liquid was sprayed onto enemy ships: oil, petroleum and some kind of easily flammable mixture.
Another weapon of ships of antiquity, more often used on merchant ships than on military ships, was the "delphnn". It was a large mass in the form of a stone or piece of metal, which was pulled to the yard and then dropped onto the enemy ship with the aim of breaking the hull or deck. The "Dolphin" is mentioned by Thucydides, Diodorus Siculus and other historians as a weapon that hangs from a yard, but cannot be used in sea battles, during which, as already stated, the masts and sails were removed.
From pallets
Pallets are one of the favorite materials for making home furniture with your own hands. Old or new pallets make wonderful clothes hangers, stylized as antique or to match another interior style.
To create you will need:
- Pallet;
- Screwdriver;
- Hammer;
- Two dowels with self-tapping screws;
- White (or black) metal hooks - 4 pieces;
- A jigsaw with a wood attachment (or a handsaw);
- White wood paint for interior work and brush.
How to make:
- First, cut off the excess boards from the pallet with a saw or jigsaw. There should be four vertical boards and two or three horizontal ones left. The height can be set to any desired height.
- Cut a separate board for the top shelf.
- Sand and clean the wooden frame.
- Using self-tapping screws and a screwdriver, attach a shelf on top.
- Attach eyelets on the wrong side on the right and left at equal distances, on which the product will be hung on the wall.
- Open a can of white paint and use a brush to go over the entire product, but without painting over the entire base, but creating a light tone with strokes, giving the effect of antiquity. Allow the product to dry.
- Clear space in the hallway for installation of the structure. Place a hanger with loops against the wall and mark the drilling locations with a pencil.
- Drill two holes. Insert the dowels using a hammer and screw in the screws. Using a screwdriver or screwdriver, slightly unscrew the screws and hang a hanger on them (by the hinges).
If you wish, you can make a set for the hallway if you make a shoe rack (shoe rack) from a pallet and paint it in the same style. This design will look very original and stylish.
Models made from pallets in brightly colored multi-colored colors also look interesting. Drawings or inscriptions are made on the boards using a stencil. It turns out to be a beautiful designer hanger.
Instructions for making a wall structure with a shelf
The design, the manufacture of which we will describe, is a board or shield with metal hooks. They are made independently or bought in a store. There will be a shelf on top. Drawings of a hanger for the hallway are not required. You can limit yourself to a diagram indicating the size and location of parts, drawn by hand.
Manufacturing process and mounting to the wall
The shield is cut with a hacksaw according to the markings. There are two ways to protect the ends of chipboards: melamine tape and PVC strip - it is more resistant to loads.
The shelf is mounted on the base using corners. Forged products with a pattern look good. Craftsmen can make sidewalls according to the customer’s sketch.
Hinges are screwed onto the back of the structure using screws. They are easy to find in the store.
The wall must be strong enough to support a clothes rack. If the dowels fall out, you need to hammer wooden plugs into the holes in the wall. Sometimes this does not help, and then the holes are filled with cement mortar and, until it sets, the dowels are immersed in it.
There are also more complex systems for fastening shelves and sides. They are fixed using dowels - small pins at the ends that are inserted into the grooves intended for them.
In the case where homemade hooks are used instead of factory hooks, you need to make sure they are reliable. If they are of significant thickness, the screws are screwed through the base from the back. In metal parts it is necessary to drill holes for them and cut threads inside.
Branch hanger
To complete the work you will need:
- Branches of different sizes;
- Self-tapping screws;
- Screwdriver;
- Boards;
- Wood paint and brush;
- Hanging rounded hooks;
- Strong rope.
Process of creation:
- The branch is made to the required size by sawing off the extra centimeters on the sides.
- If the branch is then painted with wood stain, you can strip it of bark and sand it. The original appearance of the tree is left as planned.
- The trunk is tied on both sides with a rope of the required length.
- Hang the structure by the middle of the rope to a hook on the wall. Metal hanging hooks for things are hung on a branch.
On such a hanger you can place not too heavy clothes, umbrellas, hats, scarves and scarves.
As an option: You can hang a board on the wall, and secure sections of tree branches to it with self-tapping screws. Or make a frame from boards, and place parts of sawn branches with cut branches inside, which will act as hooks.
The branches are painted in the same tone as the board or frame or left in their original form (you can use a special stain).
A hanger for bags and hats made from a thick cut branch also looks interesting.
Hangers for the hallway, created with your own hands and with soul, will delight their owners with their originality and create a special, unique home flavor.
Making the top part
When the lower part is done, you can move on to making the upper part and attaching the hooks. It is advisable not to screw hooks to the trunk. It is better to attach a small square to it that already has hooks. Or go another way. Stepping back a little from the top, attach 4 bars to the trunk, aligned with corners and sawn through using a fitting. If during operation the product will constantly carry a large weight of clothing, for strength, drill a hole under each screw and fill it with transparent glue. All that remains is to give the hand-made clothes hanger some neatness - treat it with stain and varnish it. Go over the entire surface of the product again with fine sandpaper, then dry it. The stain will highlight the natural grain of the wood. Finally, open with varnish. So you made a hanger for the hallway with your own hands!
Photo of a homemade hanger
Types of roof ladders
Note! An installation ladder for working on the roof is required for any type of roof; even, at first glance, durable polymer materials on hip roofs sag under local mechanical stress, and protective stone chips fall off on bitumen shingles. All this leads to deformation of the protective layer and disruption of waterproofing.
The most common types of roofing ladders are:
- wall-mounted - the design is made in such a way that the main part of the staircase has a continuation. After the ladder is placed against the wall, the continuation goes onto the roof and you can safely move along it;
- attic - originate inside the house (in the attic), and end on the roof itself;
- stationary - made of wood or metal, mounted on the roof, and non-removable.
Such mounting devices, made of steel, aluminum or wood, are designed for installation on hip roof types. The simplicity of the design allows you to independently (without involving a specialist) assemble the staircase from individual parts. A do-it-yourself staircase to the roof is an interesting and, most importantly, useful construction project, which in the future will definitely justify the money, time and labor spent.
Important! During the installation of a wall ladder, it is necessary to comply with all safety requirements. The distance from the top step to the eaves should not exceed 10 cm, and the gap between the stairs and the wall should be at least 20 cm. In the place where the stairs meet the roof, reinforced handrails must be installed to facilitate the process of climbing onto the roof.
The installation ladder on a gable roof type is fastened using reinforced brackets, which are passed through the roof for more reliable fixation. Rubber gaskets must be placed at the joints; they can also be replaced with any other sealant. The sections are connected in series and attached to the roof, the final element is securely fixed to the ridge. Not only the aesthetics of the house, but also the life of the person who climbs onto the roof depends on the quality work carried out on the installation of a roofing ladder.
Making a metal staircase
The main structural material of such stairs is aluminum. Its advantage is that it does not corrode, does not create additional load on floors and roofs, and does not require special maintenance. An aluminum ladder for working on the roof is sold in any hardware store in disassembled form. The owner of the house only needs to assemble it and securely fix it using the existing fasteners.
Monolithic
Also, metal stairs are made from heavier materials, and they are rarely stacked. They are usually welded from pipes of the same or different diameters, covered with a protective layer of paint and mounted on the roof. The disadvantages of such designs include their large weight, which precludes their use on roofs made of corrugated sheets, ondulin or roofing felt. In addition, the iron ladder must be periodically sanded and re-painted, otherwise it will quickly rot. Iron stairs can have a special wall design: they originate on the wall of the house, rise up and then go along the entire roof to the very “top” of the house. Along the transition of the wall to the roof, safety handrails are installed; they facilitate the lifting process.
Note! The great advantage of a wall-mounted iron staircase is its use as an emergency exit. But to do this, it is necessary to equip the roof from the inside (be it the attic or the second floor) with a special hatch, which in extreme cases can be easily dismantled and serves as an emergency escape. In this case, you can go down the stairs and escape from the fire.
Important accents that must be taken into account when installing stairs
Having figured out how to make a roofing ladder with your own hands, you need to dwell on the features of its installation and operation:
- It is very important to understand that the staircase on the roof, especially with sharper angles of the roof slope, must have increased reliability and reinforced fasteners. For greater safety, you can create a wooden counterweight from heavier types of boards on the hook on the opposite side.
- Also, experts categorically do not recommend attaching any hooks to the stairs, which, in the opinion of the house owner, will help with tools in the future. This opinion is erroneous from a safety point of view, since a person can accidentally get caught on one of these hooks and get hurt, and as you know, lacerations are very painful and take longer to heal.
- You should not carry out the work of assembling and securing the roof ladder alone. This can complicate the procedure; in addition, working at height without insurance is life-threatening. The creation of the staircase takes place at the bottom, and its ascent is carried out using scaffolding, this will keep the structure intact and protect yourself from danger.
In addition, you need to remember the most important rule (unwritten) of the builder: “If one of the fasteners is deformed or worse, fails and there is no way to replace it, or the place for fastening is too flimsy, then the ladder must be moved to another more reliable place " At one of the “responsible” moments, this can save a life.