Tic Tac Toe
Everyone knows this game from school. However, you thought that it needed a pen and a leaf, but it can be made from wood, fabric, magnets, stones, buttons and other figures. Just get creative and create a playing field, for example, on the refrigerator or pieces of fabric in the shape of a heart.
I recommend watching the video master class!
DIY game for children TIC TAC TOE / DIY
The most important thing is the idea
Before you start creating a board game, you need to determine its theme and idea. Of course, first we need to present the game in its final form, think through its details and scale, and develop fair rules.
To do this, let's look at the main types of board games and answer the question of what board games you can make yourself:
“Walker-Wanderer” - the essence of the game is to move players’ pieces to the finish line. The first one to reach the finish line is considered the winner.
"Monopoly" - the main idea is to correctly manage the game's "finances" and earn as much profit as possible. The winner status is assigned to the only player from the company who has not gone bankrupt.
Puzzles are the most “peaceful” board game, to complete which you just need to assemble the scattered parts of the picture into one whole.
Gambling board games - cards, chess, backgammon, checkers, and so on. In this type of game, the rules have already been invented, so all you have to do is create your own version of the game design.
Travel around the world walking game
This game can be played by 2 to 6 people. You will need a "card", a die and chips. Each player rolls a digital die in turn, gets a number and takes the required number of steps along the map. The winner is the one who gets to the finish line first, and the catch is that there are numbers on the map that return the player a few steps back, or move him forward.
The main process is to create a map. Lay out 8 A4 sheets in 2 rows, leaving half a centimeter gaps so that you can fold the card later. Place a weight on each sheet to prevent it from moving, then tape the sheets along each row. Draw a route of moves with a pencil and arrange stops, for example (1-60 or 1-90), between each stop, make a distance of 2-3 cm. Mark bonus and penalty steps, indicate the direction with arrows. Fill in the empty spaces on the map with pictures. A digital cube can be purchased at an office supply store or made from cardboard. For chips, use small Kinder Surprise toys, buttons, small cookies...
I recommend watching the video master class!
DIY board game “walker”. Master class for parents
Celebration of creativity - creating adventure games
For those who like to draw, write stories and generate ideas, creating a walking game with cubes and chips will be an inexhaustible source of inspiration. Sometimes the collective, noisy work on its production can be even more interesting than the game itself. It is advisable to use as many different materials as possible:
- cardboard, whatman paper or oilcloth (for the field)
- pencils, paints, felt-tip pens
- rulers, patterns
- scissors
- eraser
- glue
- color printouts, stickers, magazine clippings
There are ready-made chip board games on the Internet; it would be useful to print them out to understand the principle and gain ideas. For our walker, we come up with a theme: where and why the characters are going, what surprises and dangers they will encounter along the way. Whether the plot is based on fairy tales, favorite films, pirate adventures or a trip in a time machine, in any case we start by building a path from numbered points.
Almost all children know how to play chips and what usually happens on the path of heroes: good luck moving forward and annoying delays and returns. The number of “good” and “bad” points should be balanced and distributed more or less evenly, each event should be justified according to the plot.
The path can be straight, winding, twisted, long or short. In the artistic design we try to expressively present the chosen theme. For such board games, pictures are very important; they display the plot and set the mood. We draw arrows, glue them, draw them, make inscriptions.
An excellent idea is to take a geographical map as a basis and plot a travel route along it, accompanied by useful information. The role of the characters will be played by buttons, Kinder Surprise figurines, and plasticine crafts. It is not necessary to buy a cube; you can take a regular one from the set and write numbers on it, or make a top from a match and a cardboard hexagon.
There is another advantage to the ability to create beautiful board games with your own hands: they are a pleasure to give to relatives and friends.
Puzzles
You can create a geographic puzzle to explore the country. Buy or print an outline map, color each area with a different color (in addition, you can indicate clues - sea, mountains, attractions...), then glue the map onto a thick sheet of cardboard, cut it into squares or other shapes.
It is also very easy to create another puzzle. Collect 7-10 popsicle sticks and cut out a suitable picture from a magazine or draw it yourself. Place the sticks on a flat surface next to each other, stick the picture, wait until the glue dries and cut the sticks. Attach Velcro to the back of each stick so you can later attach the puzzle to the felt.
I recommend watching the video master class!
DIY | How to make a puzzle from a photograph | How to make a photo puzzle
DIY family board games for children 3-5 years old
A 3-5 year old child is actively exploring the world, so well-designed board games, made with his own hands, help him in this. Kids of this age are not particularly persevering, so entertainment should be both exciting and uncomplicated.
The obligatory moment is developmental. Training logical thinking, repeating colors and simple geometric shapes is what a young researcher needs.
How to make children's board games for the whole family with your own hands: step-by-step instructions
Making board games yourself is an activity that will never get boring, since each entertainment has its own individual characteristics. So, let's get ready to work with our own hands, and detailed instructions on how to make children's board games will help you.
Labyrinth
This game will appeal to both preschoolers and elementary school children. You will need:
• plastic straws for cocktails; • a box made of paper or cardboard with side walls; • scissors; • small plastic balls or parts from unnecessary beads; • marker or felt-tip pen; • hot glue.
Using a felt-tip pen, draw the path of the ball. Coat small areas with glue.
Cut the tubes to the length of the lines and glue them to the cardboard base. It is advisable to alternate colors. The game will be more colorful and interesting.
They take turns playing against the clock to see whose ball will overcome the maze the fastest.
Unusual puzzle
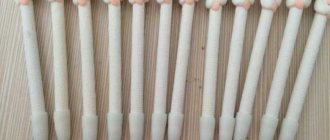
One of the most pleasant materials to work with is wood. It is not at all necessary to have any special skills. For crafts, you can choose materials and master classes that are accessible even to a child. Let's do a puzzle using ice cream sticks.
To work you will need:
• ice cream sticks - 7-10 pieces; • a picture - you can draw it yourself (a suitable activity for a baby!), cut it from a children's magazine or print it from the Internet; • glue.
You can do it another way: cut out an image (house, bird, animal) from felt.
Procedure: - place ice cream sticks on a flat surface;
- carefully stick the picture on top of the sticks;
- After the glue has dried, cut the sticks.
The puzzle is ready.
Another version of puzzles that is suitable for the little ones. These are felt products. Making figurines is very simple. You will need:
• images of plants, vegetables, fruits, animals, printed on paper sheets; • pieces of multi-colored felt; • base fabric; • a simple pencil; • scissors; • needle, thread.
Now - the master class itself:
- cut out a figure from paper. You can print according to the templates provided or draw it yourself;
- place the resulting template on a piece of felt of a suitable color (chicken - yellow, apple - red, cucumber - green) and carefully trace along the outline with a pencil;
- cut the figures into pieces, sew each of them to a fabric base.
This creates small fragments that need to be put together to make an image. If the child does not immediately understand what is required of him, help him.
DIY board games at home made from paper: print and play
An interesting option is board games from the “print and play” series, made with your own hands at home. An interesting entertainment for the whole family is a puzzle. This simple geographical map will suit kids:
Print the card, carefully glue it onto cardboard and cut it into pieces. Of course, the baby himself may not be able to cope with such a difficult task, but with the help of adults the task is quite accessible. A 4-5 year old child is already interested in the names of countries, so this activity will be useful for him.
Another printable game option is “whose baby?” This is a sorting game. Help the cubs find their mothers. This is just one option. You can sort cards by other criteria:
• adults - kids; • predators - herbivores; • wild - domestic.
The baby develops speech, learns to clearly express his thoughts, and masters onomatopoeia.
Making a game is very simple: download a picture, stick it on a base made of cardboard or thick paper, and then cut along the contour.
Dominoes are a great option to keep your baby busy. For older children, the classic version is suitable, and for children 3-4 years old - bright and colorful pictures with animals, fruits or vegetables.
Alias
Another name for the game is “say otherwise.” The idea is simple: from 4 to 16 people play. Participants are divided into teams. A team can have 2,3,4 people. One of them pulls out a card on which 8-10 words are written, each word must be explained in other words, you can use sounds (for example: woof-woof, meow...) you cannot show and use words of the same root. You have 1 minute for 1 card, you need to quickly guess as many words as possible. You can make add-on cards on which emotions or instructions will be written. During the explanation, the person must be happy, or vice versa, sad, and the team must additionally guess the emotion and action that the explainer is doing. The team with the most guessed words wins. This game perfectly develops logical thinking and increases vocabulary.
Cut out cards from cardboard and beautifully write commonly used words, for example: soup, ice, monkey, enemy, sweet, photograph... There should be at least 30 cards with 10 words written on them. Words should not be repeated.
You can create a playing field for aliases. Mark the steps on it and make chips. The principle of creation is described in the game around the world. However, you can play without a field, just appoint a judge who will count the points and record the time.
Make a tray for the balls
1. From a 12 mm plank, cut a blank measuring 146 * 305 mm for the bottom of tray J. Check how this workpiece is inserted into the tongues of the guide rails H. If necessary, adjust it to the runners using a plane and sandpaper - the tray should slide out and insert easily.
2. Insert a semicircular cutter with a diameter of 12 mm into the collet of the router fixed in the table and position the longitudinal stop at a distance of 25 mm from the axis of the cutter. Set the routing depth to 5 mm. Select one groove on the face of Tray J. Then turn the workpiece 180° at the ends and make a second groove along the opposite edge. Repeat the operation to select two more pairs of grooves, moving the stop to a distance of 45 and 65 mm (Fig. 2).
3. Using a dial-type groove disk and an anti-splinter insert, use a saw to select a groove 12 mm wide and 6 mm deep J (Fig. 2) .
Slide the assembled ball tray into the body along the guide rails H. Secure it with a clamp and attach the stop L with screws without gluing it.
4. Cut out a separator block K L from the previously set aside trim . Glue the front wall I to the bottom of the tray J (Fig. 2) . Then glue the divider into the groove, lining it up in the middle of the width.
5. Drill and countersink mounting holes in stop L (Fig. 2). Place the stop in place, secure with clamps and drill guide holes for screws through the mounting holes in the rear end of the bottom J. Remove the clamps and check how the tray I, J, K, L is into the tongues of the guide slides H. Then finally install the stop L into place, without gluing it, but using only screws (photo H).
Fleas
This is a very fun game played by 2 people. I press the edge of the bean with a coin and it jumps like a flea. The main task is to hit the enemy's goal with the flea, then you get a point and the flea is removed from the field. If a flea lands on your field, you can pick it up and use it next time; if a flea lands on your opponent’s field, the point is not counted and it simply remains lying there until the next turn. If the flea hits its own goal, the point is awarded to the opponent. The game continues until someone runs out of fleas.
To make a playing field, take a candy box, colored paper and thick fabric. Cover the inside of the box with colored paper and make fabric sides to prevent fleas from flying away. Use beans as fleas and don’t forget about large coins.
We make funny “Checkers and bugs” from chestnuts with our own hands!
Hello everyone! I invite you to a fun master class, from which you will learn how to make checkers with your own hands from the most ordinary chestnuts. And not simple black and white, but funny and bright “Checkers and Bugs”. Ready? Then let's begin!
What do we need for work?
- Chestnuts - 24 pieces, approximately the same size (if they are not found in your region, you can use halves of walnut shells).
- 2 sheets of paper to make the playing field; we used wallpaper that was left over after the renovation (whatman paper would also work).
- Ruler, pencil (pen), brushes for paints, glue and varnish.
- Scissors
- PVA glue.
- Acrylic gloss varnish (available at craft stores).
- Paints, gouache is possible, but we prefer to use acrylics.
Using a brush, we cover our chestnuts with PVA glue on all sides, and then let the glue dry.
When the glue dries, paint the future checkers white. This is necessary to make them look brighter.
While the chestnuts are drying, let's take care of the playing field. On a piece of wallpaper (whatman paper) draw a square with sides of 42 cm and cut it out with scissors. For beauty, we will provide a frame 1 cm wide and draw it on a square.
Color the playing field. Since checkers are not classic, the field will not be black and white. We chose bright orange as the main color, and red for the frame. Very beautiful! But only checkers are missing. And it’s impossible without them.
On the wrong side of the second sheet of wallpaper (whatman paper) we draw a grid of squares with sides of 5 cm. We will need 32 such squares. But we are in no hurry to cut them out.
We turn the sheet of wallpaper (whatman paper) over to the front side and paint it in a color that contrasts with the main color of the playing field. We chose green.
When the paper dries, cut the sheet into squares.
We lay out the resulting squares on the playing field for the purpose of fitting. Everything turned out smoothly, but somehow boring.
Let's try to embellish our field. Using scissors, we make openwork checkered patterns.
Another example! Looks more interesting already!
We transformed exactly half of the cells. We lay them out on the field and admire them. Glue the cells to the “board”.
In the process of making openwork checkers, we formed these small green leaves. We won’t throw them away, we’ll put them in a box, they’ll be useful for future crafts.
Let's return to our chestnuts. The white paint has long since dried. And now the fun part. Color: one half yellow and the other half blue. You can of course choose your favorite colors.
On the yellow ones we use black paint to depict bugs. After drying, we cover the figures with acrylic varnish to protect them from water and make them bright, shiny and smooth.
We paint the blue bugs with white paint and put yellow dots on the backs. We also varnish it.
The team of yellow bugs for the game has been built! The blue team accepts the challenge! Lead your team to victory, and at the same time train your thinking and attentiveness!
Friends, I hope that you liked the master class and that it will definitely be useful to you. Make these “Checkers-Bugs” yourself, and they will take their rightful place among your home board games next to tic-tac-toe made from stones. And also training your thinking will help you develop your attentiveness.
If suddenly I didn’t explain something clearly, ask in the comments, don’t be shy. I will answer everyone!
And before starting the game, I suggest watching a motivational video. Experienced and passionate checkers players) True, their checkers are not as beautiful as ours.
I wish you and your children pleasant creativity!
All the best!
Always yours, Evgenia Klimkovich!
Memory game
This game involves from 2 to 10 people. 16 cards are produced. Every two cards contain the same images. One person lays out the cards in a square in a chaotic order with the pattern facing up, while at the same time the person who will play stands with his back turned. He turns for exactly 5 seconds and tries to remember the images. It is turned away and the cards are turned over to the other side. Now he must turn over the cards and find pairs within a minute. The person who guesses the largest number of pairs with the same pictures wins. Cards can be made from cardboard and any drawings can be drawn.
Walking walker
One of the simplest board games, suitable even for the youngest participants, will capture the attention of players from the first move. How to make this type of board game yourself? It’s very simple, you just need to choose the right materials for it.
Let's try to create a standard layout for this game:
- We select a thick piece of cardboard;
- We draw out our canvas with multi-colored pencils;
- We find chips, the number of which is equal to the number of players, and a dice that you can assemble yourself or according to an Internet sample;
- We come up with the rules of the game and invite our family and friends to enjoy a wonderful evening playing an exciting game.
Labyrinth
To create this game you will need a cardboard candy box, cocktail straws and a small ball, you can use a bead. Think over and draw a labyrinth. Glue the cocktail tubes. Place the ball and start the game.
I recommend watching the video master class!
Making a labyrinth with your own hands, a board game for children
Available materials
In order to make board games at the right time, when there is no light or the moment comes when you want to do something interesting, you need to acquire the necessary materials in advance. Actually, they are very cheap, so the main thing here is to remember what we need to create games, so as not to throw away a good thing. And we will need:
- two cardboards, and the size of one of them should be 17 x 17 cm, and the second - 6 x 17 cm, although of course, they can be larger, because in order not to think about where to get them, you can simply use a cardboard pizza package ;
- scissors;
- felt-tip pen and simple pencil;
- compass;
- a printed stencil with chess pieces, although you can do without it and just paint checkers and chess by hand.
Domino
For dominoes, create 28 pieces, they can be made by coloring pebbles, ice cream sticks, sewn from felt...
Chip scheme
Dominoes made of pebbles Dominoes made of felt
Popsicle stick dominoes
"Tabletop" fantasy
In conclusion, I would like to say that creating board games is great entertainment for a large and small circle of friends, for the whole family or even for solo leisure.
A little inspiration - and you have created an absolutely innovative entertainment, the main ingredients of which are a pinch of vivid imagination and improvised means.
Monopoly
When creating this game with your own hands, you can use your city - it will be more interesting. Think about the colors of the districts, print out almost “real” money and come up with realistic tasks, for example: paying utility bills. Create your own exciting original game.
I recommend watching the video master class!
Do-it-yourself monopoly. Master Class
Gambling board games
This type of leisure, so popular among adult groups, does not require any special explanation.
Here we will give just one piece of advice: use your creative abilities. Your hands can even build a gambling board game from Lego - by the way, this construction set makes amazing modern chess and checkers.
Action games
Photo: pinterest.com/bookwidgets: UGC
An adventure game is suitable for children of any age. She has simple rules that even a preschooler can learn. You just need to roll the dice, make the number of moves across the squares corresponding to the number on the dice, and complete a specific task. To create a game you need:
- Choose a topic.
For example, a trip around the world or the adventures of cartoon characters.
- Draw a playing field on a large sheet of cardboard.
To do this, draw squares or circles. Think in advance and draw arrows that can take the player back or move forward. Some cells can be made into penalties or prizes. For example, if a player stands on the red circle, he skips a move; if he stands on the green circle with the number 5, he moves another 5 cells forward.
- Make chips and cubes.
They can be thematic or ordinary. It all depends on your imagination.
The game must have a start and finish. The winner is the one who reaches the finishing cell first, having overcome all obstacles.