Chainsaw snow blower
Large manufacturers of gardening and harvesting equipment offer consumers a wide range of products designed to make work in the garden, field or garden easier. But often high prices scare off potential buyers and make them think about an alternative option.
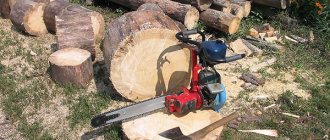
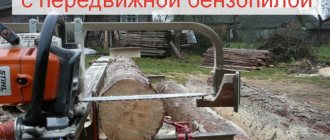
For example, during winter, especially in snowy areas, snow blowers are very popular. In order to clear the snow from the local area by hand, it will take a lot of time, but with the help of a small-sized tool the job will be more fun. A walk-behind tractor with special attachments can come to the rescue. However, some craftsmen make their own snow blowers from a chainsaw and get a small but functional workhorse, which is much cheaper in cost.
Electric power generator with internal combustion engine from a chainsaw
Most modern devices are powered by electrical energy. Away from power lines, it is obtained mainly from electric generators. Such portable equipment, together with batteries, is also used in field conditions. To save money, you can make your own generator from a chainsaw. Its design is shown schematically below.
In the photo above, the numbers correspond to the following structural elements of a portable electric generator:
- gasoline saw;
- transmission gearbox;
- drive belt;
- tension bar;
- electric generator;
- control Panel;
- clamps;
- saw stop;
- fastening nut (designed for attachment to the gearbox frame);
- drive pulley
Homemade mini-power plants are equipped with alternating or direct current electric generators (for example, from a car at 12-14 V). The value of the output voltage and its other current characteristics depend on this.
Theoretical aspect
Proceed to work only after preliminary development of the plan and complete readiness to make a snow blower. Planning is the main stage at which all the necessary parts and drawings are prepared according to which the assembly will be carried out. With the help of a correctly drawn up drawing, it is almost impossible to spoil the design or fail to make a working unit. It is the diagram that will allow you not to miss an important node and secure everything in the right place.
The design of the snow blower consists of:
- Gas tank;
- Engine;
- Wheelbase;
- Cardan shaft;
- Bearings;
- Leading star.
Pros and cons of a homemade snow blower
You need to decide in advance whether it is worth starting such a project, or whether it is better to abandon it. There are several options:
- clear by hand using a shovel;
- buy a factory snow blower;
- assemble the equipment with your own hands.
Shovel and manual labor have their pros and cons. But there is no point in considering this option. A shovel is still needed to clear hard-to-reach places and small areas. For most of the work you need a snow blower.
By deciding to assemble the equipment yourself, you get the following advantages:
- significant financial savings compared to purchasing factory equipment;
- most materials for assembly are easy to find at home or can be bought for little money in specialized stores;
- if you have a working and unnecessary chainsaw, the costs will generally be minimal;
- The resulting unit has compact dimensions, which allows you to clear snow in small areas and in hard-to-reach places.
Plus this is experience for your piggy bank and new skills.
As for the shortcomings, they are subjective. Firstly, it is low power. But do you need a snow blower with the power of industrial equipment is a rhetorical question. Secondly, the design is not as well thought out as the factory model. But it depends on you, as well as the circuits and assembly principles used. A homemade snow blower can be as good as even top-end factory units in terms of safety and ease of use.
Which chainsaw is suitable for a snow blower?
In order to make your own snow blower from a chainsaw, you will need, in fact, a saw. You can take any brand and model that is in stock. Craftsmen recommend using the Druzhba, Ural or Shtil saws, as they are most suitable in terms of technical characteristics and differ in the quality of their engines.
Friendship
The advantage of the Druzhba saw is its simplicity of design and therefore it is very convenient to disassemble. In addition, the tool does not have any unnecessary bells and whistles that modern saws can boast of and which only interfere with the assembly of the snow blower. But there are also disadvantages - the Soviet saw is heavy and outdated.
Chainsaw "Friendship"
Its technical characteristics are as follows:
- power – 1 kW;
- weight - up to 12 kg;
- 2-stroke engine;
- tire length – 45 cm;
- gasoline as fuel.
Design and operating principle
By deciding to start assembling a snow blower from a chainsaw, you gain additional experience, skills, and also the opportunity to get an excellent device for clearing snow in winter with minimal investment.
Structurally, the snow blower will include several basic elements.
- Moving part. This is the engine. Here you can take an internal combustion engine running on gasoline from almost any chainsaw. Be it Druzhba, Ural, Husqvarna or Stihl. The main thing is that the motor is working, and the chainsaw itself is not required to perform direct duties. Still, sacrificing a chainsaw for a snow blower is not always worth it.
- Ladle. It will be located on the front side of the equipment. To make a bucket, you can take sheets of metal or durable plastic. But metal is more reliable and durable.
- Screw. This is a module for collecting snow, which is located in the cavity of the bucket. Needed for collecting, crushing, and moving snow along the outlet chute. The screw rotates due to the operation of the engine.
- Outlet chute. For its manufacture, the same materials are used as for the ladle. Necessary for redirecting snow masses to the thrower. That is, it moves the snow towards the outlet.
- Chassis. This is what will allow the snow blower to move. Here you can use regular wheels or tracks. Start with what you have at your disposal;
- Handles. Responsible for managing and changing operating modes.
Having decided on the main nuances, you can begin work on assembling a snow blower based on an internal combustion engine from a chainsaw.
Operating principle based on circuits
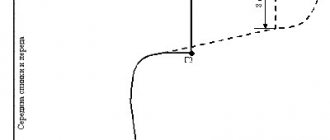
The figure shows a drawing of the simplest snow blower.
Diagram of the main parameters of a snow blower
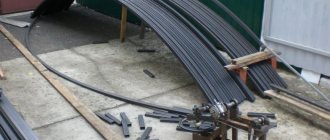
To produce a snow blower, in the example given, a Ural chainsaw is used. To avoid distortions and the snow blower to drive smoothly, it is necessary to place the engine on an axis located longitudinally. You can use all the necessary parts of the chainsaw, such as the tank. It must be attached to the steering support. To control the throttle, use a regular motorcycle throttle.
Square pipes made of metal are used to construct the frame. Externally it should look like a bucket with two levers and a steering cross member. The lower part is 20x20x1.7mm, and the top is 10x10x1.7mm. Use galvanizing to cover the bucket. Moreover, choose a thickness of at least 0.5mm. All sheets are secured to the frame using rivets with a diameter of 5mm.
To facilitate the sliding of the bucket, you need to weld a sheet of metal measuring 600x40x4mm to the bottom.
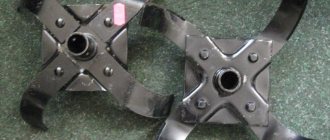
The main part of a snow blower is the shaft
Shaft
Thus, the rotor consists of:
- Vala;
- Star mounted on the shaft (z=33);
- Bearings attached to the housing itself – 2 pcs;
- The rotor “wing” is a metal plate measuring 30x4 mm;
- Two rotor blades;
- Eight auger blades.
Making a snow blower - algorithm of actions
The manufacture of the unit should begin by creating or studying existing drawings. This will allow you to prevent possible errors in advance and complete the work as quickly as possible.
The correct procedure is as follows:
- First of all, you need to prepare the frame. The reliability of the machine depends on its quality, so you should choose reliable materials for its manufacture. First you need to take several identical pipes and weld them to each other. In this case, pay special attention to two longitudinal pipes, which not only serve as part of the frame, but also act as skids of the unit;
- The front parts of the pipes must be cut at an angle, and then the resulting holes must be welded to prevent snow from getting into them. If this is not done, melted snow inside the pipes will lead to corrosion. At the same time, you won’t even notice it;
- Weld two transverse pipes to two longitudinal pipes. In this case, the latter should be located in the rear part of the structure, since the unit’s motor will be supported on them. The distance between the transverse pipes should be about 20 cm;
- Next, you need to remove the engine from the chainsaw. Instead of the standard motor drive sprocket, which serves to tension the chain, you need to install an ordinary small sprocket. It can be taken from an old Voskhod or Minsk motorcycle. The sprocket must be fixed motionless by welding it. However, before this the part will need to be centered;
- After manufacturing the frame, you need to move on to creating a working element - the auger of the unit. To do this, take a small diameter pipe or shaft, 80–85 cm long. These dimensions are needed for mounting the drive in front of the main part of the structure. Particular care should be taken in selecting suitable bearings;
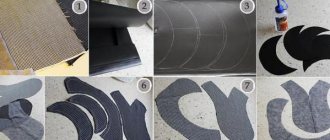
- Next, take a metal sheet 2 mm thick and cut out 4 identical circles with a diameter of 30 cm in it. You need to cut holes in each circle with a diameter of 22–23 cm. Then each of the circles will need to be trimmed to make turns out of them;
- Then you need to determine the central part of the shaft and weld 2 metal plates, 13 cm long and 15 cm wide, to it. Place the sheets strictly parallel to each other. They will serve to throw snow to the sides when operating the snow blower;
- Weld screw strips to one side of the blades. Next, install the spacers on the shaft and weld the other ends of the screw bands to them. In this case, all 4 screw plates should be directed towards the center of the auger. The entire manufactured structure must fit into a 70-centimeter section of the shaft, since the drive will be installed on the rest of it;
- The next step is to move on to manufacturing the body. To do this, you need to take 2 round sides, the size of which should be 7 cm larger than the auger. After this, you will need to weld a metal sheet no more than 1 mm thick to the circumference of the sidewalls. As a result, you should end up with a semicircle of metal plates. Make holes in the central parts of the sidewalls and install the auger in them;
- Before attaching the auger, you need to install bearings on the shaft and press them securely. Remember that the auger must be centered. Use cages to secure the bearings;
- Next you need to assemble a snow disposal. For this you will need an aluminum pipe with a diameter of 15 and a length of 10 cm. You will also need a metal sheet from which you need to form a box. To install the snow drain, you need to make a hole in the back of the auger blades. A pipe is inserted into it and secured with ordinary bolts. Place and secure the box on top of the pipe;
- Then put a sprocket from a domestic motorcycle on the drive section of the shaft;
- At the last stage of manufacturing, you need to assemble the entire existing structure. To do this, the housing and auger must be installed and welded to the longitudinal pipes of the frames. Install the chainsaw engine on the transverse pipes so that the drive and driven sprockets are located strictly in the same plane;
- Install a chain on the drive and make a handle from leftover metal pipes. Don't forget to move the throttle control lever to the handle.
Upon completion of assembly, you need to test the unit. To do this, walk around the yard with him, removing freshly fallen snow, and then move on to removing the accumulated snow masses.
Features of designs with different motors
Chainsaws of various manufacturers and models are equipped with motors with different characteristics. For the most efficient operation, when assembling a homemade snow blower, these features must be taken into account. For example, the Druzhba and Ural chainsaws stand out among other models due to their high engine power, which causes vibration and noise during operation.
Vibration can be avoided by installing a thick piece of rubber gasket between the engine and the frame.
In addition to installing a gasket on the housing, you can equip the engine with a muffler. To do this, the cavity inside a solid metal pipe must be filled with a rubber gasket, and the entire resulting structure must be attached to the motor with bolts or by welding. This will reduce the noise level during constant operation of the device. In addition, high operating power comes with high structural loads. To prevent early failure of a snow blower based on Druzhba and Ural chainsaws, you will need to equip it with a high-strength chain.
The increased reserve of torque and thrust of the engines of devices of the Ural and Druzhba brands allows, if desired, to increase the volume of the bucket and the power of the auger, thereby increasing the overall productivity of the unit. The motor from a Stihl brand household chainsaw is not very powerful. Thanks to this, a snow blower based on it will have a relatively small size and increased maneuverability. The dimensions of the bucket for such a device should not exceed 50 cm in height and 60 cm in width. A device assembled in this way can remove snowdrifts up to half a meter high from both dry and sticky snow.
Schematic and assembly of the screw unit
An auger is an essential element of any snow removal equipment.
Structurally, it is a drum with twisted legs rotating in a spiral. At the base of the spiral there are metal blades, which, when rotating, rake snow from the sides to the center, after which they push the mass through the nozzle. In order to make an auger with your own hands, you will need a shaft - it is made of a metal pipe with a diameter. The length is determined by the planned capture area. On average, this is from half a meter to 80 cm. Less is ineffective, more - the equipment will be difficult to move.
Two rectangular steel plates are welded to the center of the pipe - these are the future blades of the structure. The legs can be made from steel, the sidewalls of used tires or conveyor belt. Next, cut out 4 disks with a diameter of 28 cm from the metal sheet and cut a circle in the center along the diameter of the shaft. The rings are sawn on one side and carefully stretched to the sides - these are spiral turns, which, as indicated in the diagram, are welded to the shaft towards the blades.
Screw machine drawing
Trunnions are welded along the edges of the shaft, onto which closed type bearings No. 305 are placed. This is necessary so that during cleaning the drum does not become jammed with a stone.
For the ladle you will need a 2 mm sheet of the same length as the auger + 2-3 cm at the edges. Bend it in a spiral so that the radius is 2 cm larger than the diameter of the knives. It is better to make the side walls also metal, but thick plywood will also work. The hubs are inserted in the center and the made auger is placed. First, a belt drive pulley is placed on the axle. On the top of the bucket you need to make something like a sleeve with a visor to direct the thrown snow in the right direction.
Screw base
Now it’s time to connect the electric motor, for which a frame measuring 48x70 cm and 50 cm wide with jumpers for installing the engine is prepared.
The runners are screwed along the lower edge of the frame (pre-cut 2 corners and bend the edges). Now all that remains is to install the motor, make a pulley and connect the cable.
Before the first start, turn the auger by hand and check that it moves freely. If there are no obstacles, you can start cleaning.
VIDEO: Converting a trimmer into a snow blower
Snow blower with blade
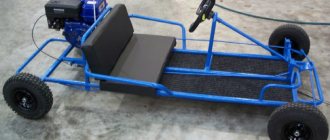
The easiest thing is to assemble a motorized snow blower from an already finished product, slightly altering it. But you can do it differently and do it yourself.
In the first case, the basis of this unit is a conventional industrial-style manual cleaner with two or four wheels. In the second, all the parts are obtained or made by hand.
Materials for assembling a snow blower
- metal sheets 2, 3 or 4 mm;
- pipes with a caliber of 50-70 mm;
- bearings (local);
- frame squares;
- wheels;
- axles;
- washing machine tank, boiler or pan;
- sprockets or gears;
- chains or belts;
- bolts, nuts;
- electrodes.
Snow blowers from industrial designs
The unit is made from mobile rather than hand-held devices. There are two options for such devices. The first of them has a stationary axis, and the second has a rotating axis. Both devices (or the rotating rod) have a fixed blade.
It is better to choose an option with one or two axles that rotate, and the wheels are rigidly fixed to them. Then minimal modification will be required.
Step-by-step instruction:
- One or two wheels are removed (front ones if the snowplow is biaxial).
- A sprocket, for example, from a motorcycle, is welded (or otherwise strengthened) onto the freed axle. It is advisable to install it closer to the hub of one of the wheels.
- The structure is being put back together.
- A plate is screwed to the handle (if the option is single-axis) or to the frame. A chainsaw is attached to it so that the chain draped over the welded sprocket is properly tensioned.
If the axle is welded tightly, you need to do the following:
- Remove the wheels.
- Choose an axle or a thick rod for them.
- Grind the hubs or cups so that the wheels “sit” tightly.
- Weld metal corners with holes for the new axle to the frame.
- Strengthen the driven sprocket (from a motorcycle, for example).
- Assemble the structure - insert the axle into the corners (you don’t have to cut off the old one if it doesn’t interfere) and install the wheels.
- Attach the chainsaw to the frame or handle.
When operating such a unit, you will not need to waste a lot of energy. The saw motor will create the required force.
Homemade bulldozer type cleaner
This option repeats the previous two. The difference is that most of the parts and components are made independently.
To make it you need to get the wheels. You can borrow them from an old bicycle. Or remove one or two complete wheelsets from a wheelbarrow or any end-of-life vehicle. Then select an axis for them on which they will be permanently mounted.
The whole job is as follows:
- A single or biaxial frame is welded from ordinary or profile pipes.
- Corners with holes are welded to it.
- An axle with a pre-fixed sprocket is inserted into them.
- The wheels are being put on.
- Weld stationary pipes or a rotating mechanism for the blade.
- Install the plate with a chainsaw.
Making a homemade blade
This part of the purifier is made of metal sheets, a barrel, a large-diameter pipe or some kind of tank (from an electric heater, for example).
The main dimensions are selected independently depending on the power of the chainsaw. It is not recommended to make a blade more than a meter long, since the engine may not be able to withstand such a load.
When making a dump from sheets, they are pre-lined. Then the parts are cut out and welded together. This snowblower assembly can have any shape.
When making a blade from a cylindrical blank, it is cut as shown in the figure. If the unit is made from a pipe, then sides are installed on the sides. At the bottom (for rigidity) a knife made of a long, pointed strip of metal is riveted.
Useful tips
To prevent the snowplow from crashing into the ground, the edge of the blade is sheathed with metal. This will also strengthen the strength of the manufactured product. If the dimensions of the blade are 45x25 cm, then it will have the shape of a bucket. To extend the life of the snow blower, during the first check, you need to inspect all fastenings of the elements every 20 minutes, and then continue working. You should also check the condition of the V-belt and other important elements and systems of the manufactured structure.
Regularly tighten screw connections. To avoid metal corrosion, you need to treat metal surfaces with special solutions to protect against rust. If these conditions are met, your snow blower will operate efficiently for many years. People who have made their own snow blower leave positive reviews about its performance.
If you make snow blowers with your own hands, following all the above rules, the tool will be durable and reliable. Always before starting to assemble the device, make drawings with precise indications of the dimensions of the parts and components of the future unit. If you do not have welding skills, then you need to invite a professional to join the parts.