A right angle between walls is necessary quite often. For example, to correctly install a bathtub, kitchen sink or table. But most people simply do not take this need into account, and then regret it when a centimeter gap appears between the bathtub and the wall. Also, an indirect angle is revealed by floor tiles when the cutting on the sides is different. And there are even worse situations. Therefore, take this material seriously.
Builders constructing modern houses, contrary to the opinion of the majority, do not care about the proximity of the corners in apartments to 90 degrees. All they care about is the amount of work, and often they are not even given any measuring equipment. Just a trowel and a trowel. “Way, Rovshan!”
How to make a right angle between the walls after such a hack? There are two options here: either we plaster on the beacons, or we level the walls with plasterboard. And if in the second case no difficulties should arise - we just twist the profiles along the square, then everything is a little more complicated. By the way, the option “I’ll level everything with tiles” won’t work either. Practice shows that all those who try to make a right angle by smoothly building up a layer of tile adhesive invariably mess up. Moreover, their angle is not straight, and the tiles lie crooked. If you find the strength and courage to plaster on beacons, then you can make a perfect right angle without any problems. On which you can quite calmly lay the tiles “under the comb”.
The first fundamental principle of right angle plastering is to first plaster one wall in the usual way.
Usually the longest. Entirely. It is much easier and faster to build an angle from a finished plane.
What's next? You will need two plastering rules. Preferably the length of the entire wall. Often bathrooms have dimensions around 175x175, so in this case, take two two-room apartments and shorten them with a grinder or a hacksaw.
Let's assume that you have already plastered one wall, ideally. And the adjacent one has dimensions of 175x275 cm. In this case, two beacons will be needed. Let's mark them. Everything is as it should be, at a distance of 30 cm from the walls. But there is one important nuance here. The pair of lower screws must be strictly at the same level. Accordingly, the top pair too. A little later you will find out why. It is also recommended to mark a line on the plastered wall that lies at the same level as the bottom pair of screws.
Next, holes are drilled and dowels and screws are driven into them. Now what? Of course, you can’t do anything with a simple half-meter square. The solution lies on the surface - you need a larger square. It is made from two rules. But how to make sure that they form a strictly 90 degree angle? Not on a small square, that makes no sense. Everything is much simpler.
There is the Pythagorean theorem. Which unambiguously establishes the ratio of the sides of a right triangle. The root of the sum of the squares of the legs is equal to the hypotenuse. Remember your school geometry course. What this all means is that if you can build a triangle on the floor whose sides are related in the same way, one of its angles will be exactly 90 degrees. The simplest case is the so-called. Egyptian triangle, whose sides are in a ratio of 3:4:5. It is usually convenient to take 120:160:200 cm in practice.
So, a line is drawn on the floor with a pencil. It is not advisable to use a marker; accuracy is important here. Two points are placed on it: one at the edge, the second at a distance of 120 cm from the first. Then take a piece of the lighthouse, or you can use a tape measure. It will be necessary to set aside 160 cm from the first point, and 200 cm from the second. It would be more precise to construct fragments of circles of the indicated radii. The intersection point of these figures will be the third vertex of the triangle. All that remains is to connect the vertices. That's it, you have constructed a right triangle with high accuracy.
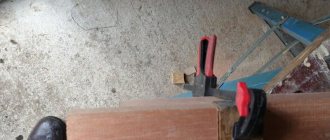
The next step is to place two rules on the floor exactly along the lines. Since they will lie with their beveled edges facing outward, this will not be so easy. You'll have to use a square. So, the rules are combined with the lines:
Now you need to securely fasten them together. This is usually done with self-tapping screws with a press washer or black metal screws. The main thing is to prevent the rules from shifting relative to the lines under the influence of vibration from a screwdriver or drill. It is enough to consolidate the rules at two points:
But, in general, this is not enough. You need to use an additional strip from a Knauf protective corner, for example. We fasten it as shown in the figure:
Now you have a huge, hard, and most importantly, accurate square. You return to the room where you will have beacons. There is already a line marked along which you will apply the square. Yes, you need to place it strictly in a horizontal plane, otherwise there will be an error.
You should have already previously assessed the degree of deviation of the angle from 90 degrees, so you know which screw from the bottom pair to take as a basis. Let's assume that the angle was obtuse, so the screw closest to the already plastered wall is unscrewed to a minimum (7-8 mm). And the far one will already twist around the square. Apply it to the line on the already finished wall and to the exposed screw of the bottom pair on the marked one. Look. Let's say the farthest self-tapping screw does not reach the square by about 4 mm. Unscrew it approximately this distance and again assess the situation with a square. You may have to apply it several times, but, in general, the installation process of the self-tapping screw will take you no more than a couple of minutes. If the angle was initially sharp, install the farthest self-tapping screw first. And the neighbor - along the square.
It is inconvenient to set the top pair of screws with the same square - it is heavy, it is difficult to lift it, it constantly slides off the heads. Therefore, it will be easier to simply set them vertically relative to the bottom pair. By plumb line or bubble level. In any case, if your first wall is perfectly aligned, you will get a perfectly right angle both above and below, automatically.
If you need to set a right angle on the opposite wall, then no problem, do everything exactly the same. This may be necessary, for example, if the dimensions of the bathtub are close to the walls. At the same time, cutting the tiles on the floor will work out perfectly. It is recommended not to place all the beacons in advance and then plaster them. It would be much better, although it would take longer, to mark and plaster each wall one at a time. But you will know for sure that you have not made a mistake anywhere.
Now you know how to make a right angle between walls when plastering. By spending a couple of hours laying out the tiles, you'll save more on your tile installation costs and get a professional quality finish much easier.
Jun 6, 2014 ADMIN
Many builders are faced with this problem - how to find a 90 degree angle using a construction tape and a pencil?
Let's look at how in practice anyone can, within a few minutes, use a construction tape and a pencil to make an accurate square with a right angle, that is, 90°.
DIY rope square
- Georgy Menshikov January 15, 2018
- Useful tips
A homemade rope square is simple and accurate!
A square is always needed. It is difficult to imagine the modern world without the simplest measuring tool, a square. Wherever something needs to be placed or strengthened perpendicular to each other, a square is required. It is necessary, for example, to set the wall at right angles to the floor. A small square cannot do this. The longer the mating parts, the larger the square must be to ensure the required orientation accuracy.
Large angles are available, but they are expensive. Square size 1050x500 mm. sell for 9800 rubles! Probably some kind of shed costs less. But in small-scale construction, even such a square does not solve the problem. There you already need squares with a side of several meters. What to do?
Solving the problem is easy if you know the “magic” numbers 3,4 and 5!
Our square will be foldable and can fit in your pocket.
So, the manufacturing process:
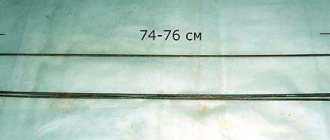
- We drive two nails into a long board at a distance L = 5 meters from each other. This distance must be done accurately. It is better to mark with a metal tape measure.
- We put two rings on the nails, for example from keys, and tighten the rings tightly with strong twine or rope. The rope or twine must be securely fastened to the rings.
- We drive two nails into the board at a distance of L = 4 meters and repeat the operation according to point 2.
- We repeat the same thing for L=3. All. The square is ready.
Let's check the perpendicularity of the vertical beam to the horizontal platform. Using nails, we fix one of the cables, for example a three-meter one, on a vertical beam at points 1 and 2. We put rings of five and four-meter cables on the same nails, bring the free ends together and tension the structure. If point 3 coincides with the horizontal platform, everything is in order. Angle 90 degrees.
Of course, you can make a square not from three separate cables, but from one, made in a triangle. Then you only need three rings, correctly positioned on the rope.
A similar option for checking the frame is shown in the photo. Here’s another option for checking the same frame, if you don’t have a square, but have a metal meter.
Measure two legs of 60 and 80 centimeters from the corner of the frame, attach a ruler to the marks. If the legs are measured accurately and the ruler meter matches the marks, then the frame is made correctly. The angle is right.
And finally, we will correctly install the fence on the plot.
Stretch one of the legs of our square along the fence and secure it with pegs. Stretch our square and drive in the third peg. You've got a right angle. You can put up a fence.
All these tricks with a rope square are based on the school formula: “the square of the hypotenuse is equal to the sum of the squares of the legs.”
The integers three four and five that satisfy this condition are easy to remember. These numbers can be changed multiple times.
You can, for example, make segments 1.5 2 2.5 meters long, or 0.6 0.8 1 meter and even 0.3 0.4 0.5 meters. You just need to take into account that the smaller the size of the segments, the more accurately you need to determine their length.
The calculation shows that under the most unfavorable circumstances, when the error in the length of all cables is 1 cm, then for a square with lengths of 100 80 and 60 centimeters, the angle will not be 90 degrees, but 93 degrees. For lengths of 3 4 and 5 meters only 90.059 degrees.
The rope triangle, despite its primitive simplicity, gives very good accuracy results.
Author of the article “Do-it-yourself rope square” Georgy Menshikov
Round corner welding process
A rounded corner is formed by special bending of one pipe, and not by welding two like a standard straight one. To do this, you need to draw a transverse line on it using a square.
Then, on the side of the future internal corner from this line, a point is marked at a distance of the width of the pipe. In this case, it is 5 cm, so the mark is placed with an indentation of 5 cm. Now you need to move the compass apart by 5 cm, and connect the point and the edge of the line, drawing a quarter circle.
Next, you need to mark a second one behind this point, at a distance from the line equal to the distance of the drawn circle. You can simply take a grinder disc with the same rounding, attach it to the drawn arc, and put marks along its edges. Then it is installed at one point at the beginning of the line, and rolled along the pipe. The mark we need is placed at the point where the second point touches it.
This distance can also be calculated mathematically using the circumference formula “P=2πr”. Where r is the radius of the circle, which in our case is always equal to the width of the pipe. The distance that needs to be retreated from the line will be equal to a quarter of the circle calculated by the formula.
At the last mark on the pipe, another transverse line is drawn under the square. Now you need to shade part of the pipe, as in the picture. Do the same on the other side of the pipe. You will also need to shade the short rectangle on the side wall.
The marked shaded part of the pipe is cut off.
The edges of the cut need to be sanded.
After this, the pipe is bent.
It will resist, so you can knock it out with a hammer and hold it for tack welding.
Next, the joint is welded with a continuous seam.
How to use it correctly
Drawing lines on workpieces using a tool is easy. Even a schoolchild can master the technique. The principle of using a square depends on the task at hand.
Review of squares in my workshop. Which square to choose?
| Target | Mode of application |
| Drawing a perpendicular | The device is placed on the workpiece, aligning the acute angle with the edge of the part. Use a pencil to draw a line along the wall of the square from the side of the right angle (the square part of the device). |
| Checking right angles, connections at ∠ 90° | The right angle of the tool is applied to the joint or part being tested. A control mark is applied when discrepancies are detected. |
| Creating lines at ∠ 45° | The boundaries of a right angle are indicated on the working surface. The interval between the protruding points should be divided in half and a mark should be placed. All that remains is to connect it to the center. |
| Creating Parallels | The tool is placed to the edge of the part, markings are made at the required distance. Rearrange the square, observing a certain interval. Draw a straight line. |
| Drawing different angles | The reference point is a right angle. First, a mark is made at the desired value, then a straight line is drawn from the center to the set point. |
| Marking for cutting wood | The device is placed on the workpiece and secured with a clamp. Using a pencil, draw a line parallel to the leg, indicating the future cut. |
Use of Swenson's invention
The rules for using a Svenson square are somewhat different from a conventional tool. To measure the degree of inclination in degrees, focus on the hypotenuse. To use it as a protractor, you should install a stop in the part, determine the desired angle, and apply markings.
Use as a guide involves fixing the tool to the part with a clamp. After this, the saw is used to pass along the control line.
To create a circle, place a square at the starting point and fix it. Place a pencil lead in the plane with the desired value. In the process of turning the Svenson device, a circle of a given size is formed.
If you lack experience, it is recommended to seek help from a professional. A few minutes is enough for a visual overview of the ways to use a carpenter's square.
Methods for determining a reversal
Previously, a common solution was how to create a 90-degree angle, for example, there was a regular construction corner on the foundation. The main thing is that it has been tested and corresponds to 90 degrees. Today, professionals use laser levels to simplify the process and speed up installation work. The third option is to use a regular measuring tape.
Regular construction tape
Pythagorean theorem
Anyone who attended school is familiar with this proven theorem. It applies only to triangles in which one of the angles is necessarily right. The sides adjacent to it are legs a and b, the connecting segment is the hypotenuse (c). The formula looks like this: a²+b²=c².
The convenience of using this method of finding a right angle during construction is that markings can be applied in any room of any size. The presence of foreign objects is even acceptable here. The main thing is that there is access to the corner and walls, so that the connecting hypotenuse can be freely extended. Additionally, you only need a calculator to quickly make the necessary calculations.
Checking the verticality of the walls
Now that we have built our rectangle, let's check the walls. The point here is that the resulting square may not work out due to the curvature of the walls and you will have to move its edges away from the wall. We check using a rule with a bubble level or a rule with a bubble level or plumb line leaning against it, which is not entirely convenient. Let's see how to check a wall with a rule and a bubble level.
From the edges of the rectangle we look at the possibility of vertically aligning the walls
The bottom edge of the rule is placed on the edge of the rectangle. The rule is set vertically, the bubble level is closely adjacent to the rule. It is important that the rule and level are clean, that there are no layers of dry plaster - this is a priori.
We walk along the walls, especially in the corners, and look at the possibility of leveling them. If somewhere it is impossible to set the rule vertically from the edge of the rectangle, because a wall is in the way, the edge of the rectangle must be moved to the distance required to level the wall and install the beacons.
It should be remembered that the beacons are 6 mm thick. Look through the walls based on the fact that beacons will need to be placed on it.
The edge is moved away from the wall parallel to the opposite edge by the same distance at both ends.
The main thing
In the interior, it is often necessary to place right angles under furniture or plumbing equipment.
Using a tape measure, you can check a 90-degree turn in three ways: the sides are equal to 3/4/5 parts, if the connecting segment between meter walls is 141.4 cm, applying the Pythagorean theorem.
Also, a tape measure is enough to form three angles of 30, 45 and 60 degrees.
Additionally, you may only need a calculator and a pencil for marking.
90 angle between walls
In the bathtub I leveled the walls 1.7 x 2.6. I used a square made from three rules. First, I adjusted one of the long walls, then I adjusted the second long one so that it was parallel to the first, and using a square, I adjusted the remaining two. It turned out well. The bathtub and large corner sink fit together without any gaps.
the diagonal can be made shorter than 210 cm, the main thing is that between the edges of the triangle at the moment of attaching the last screw there is exactly 210 Good afternoon, everyone! Tell me or describe the method for making a 90-degree angle between walls using the Rotband leveling technology? I’m self-taught, but I haven’t found a clear explanation of the technique anywhere: I’m interested in how to measure this angle, and then how to attach the beacons (which wall to start with). It is convenient to work with an assistant - he holds the square horizontally, pressing it against the long wall, but (IMPORTANT.) leaving you the freedom to press - move it towards / away from the short wall while you twist the screws. It’s convenient to adjust the self-tapping screw farthest from the corner and “pump” the angle so that it rests against the one closest to the wall, and the head of the farthest one is slightly “scraped” Denken, I don’t consider myself a pro, so you can do it too. If you need details, ask, I’ll try tell me if I missed something
Methods for aligning internal and external corners at 90 degrees
To level vertical foundations, the construction market offers a wide range of materials and tools. Let's look at ways to level a wall corner at 90 degrees with your own hands, what you need to use for this, and whether you can cope with the task with only a tape measure with a marker on hand. Let's get acquainted with the rules and subtleties of the work. After reading the article, both experienced and novice masters will be able to implement their plans.
Where you need a 90 degree angle between walls
Floor or ceiling tiles, pieces of furniture, and a classic bathroom have a strict rectangular geometric shape. Installation of such items is usually carried out close to the walls. In the case of a plumbing room, additional steps must be taken to fill the discrepancies between the edge of the equipment and the vertical surface when the angle is not 90 degrees apart.
Curvilinear gaps along the cabinet or tabletop force you to be careful in use, do not look aesthetically pleasing and attract unnecessary attention. The same applies to tiled layouts. At the same time, it will be impossible to hide the significant narrowing of the masonry even visually.
The way out of the situation involves only three solutions. This is visual camouflage with materials that fill the void, the manufacture of furniture to individual sizes with its overall increase in price, or the alignment of wall corners with wallpaper, tiles, panels, and objects. The last option is considered the most effective, since it is durable, greatly simplifies the choice regarding finishing and furnishings, and you don’t have to adjust or seal anything else.
How to choose the right angle
The unlimited choice of tools for measuring angles can be misleading and lead to the incorrect selection of a low-quality tool.
At the moment, there are several parameters by which you need to make a choice.
Among them:
- Manufacturing materials. When choosing a device, you can find steel, wooden, aluminum and plastic models.
- Purpose. One of the most important criteria, because some angles simply cannot be used in everyday activities.
- Functional and design features. Some specialties require special types of tools.
- Dimensions. To operate small items, you do not need to purchase huge varieties.
- Mass indicators. Not a very important criterion, which sometimes still needs to be taken into account. Heavy models will not deform, and light ones are easier to use.
Right Angle Tool
The easiest way to make a 90-degree angle on a wall is to use a ready-made bench square with a minimum short side of 30 cm. Before purchasing this tool, it is important to check its accuracy. To do this, you can use a similar object and insert one into the other along the plane, or use a sheet of paper with a pencil - applying a square on both sides of the line drawn perpendicular to the base should be a complete coincidence. Next, use the same tool to check the internal and external corners of the room.
Another method is relevant in the absence of a special verified square. Here builders use the rule of the so-called “Egyptian” triangle. If the legs of a figure are equal to 3 and 4 conventional units, then the hypotenuse will be 5 similar units. It's easy to remember this approach: 3/4/5. A triangle is drawn on the floor for subsequent installation of vertical beacons, or according to the drawing, a handmade square is made from hard materials at hand: profiles, rules, timber, boards.
The third method is more convenient than others, but it will require a laser level with a function for constructing an angle. Classic inexpensive devices cannot perform this task, since they are limited by the vertical and horizontal levels. At the same time, the search for a budget universal level may come down to deviations from the parameters specified in the passport. The result will one way or another require checking with a simple square.
You can make a right angle when plastering walls not only with a square. There are special spatulas for removing internal or external seams. But craftsmen rarely work with them, since it is almost impossible to obtain strict geometry in this way - the junction of adjacent planes turns out to be round in shape and requires modification.
Subscription
Category: Repair Walls Drywall Date: 2012-02-16 10:24:17 In order to quickly and easily cover your walls, you need to use plasterboard.
The material is very high quality and comfortable to use. The issue of installing drywall is quite well known, but some of the nuances are known only to some professionals in their field. It often happens that setting an angle of 90 degrees between plasterboard frame profiles is not an easy task. But this problem can be easily solved if you know how. First of all, when installing, you need to pay attention to how the plasterboard wall profile is installed. Check how accurately each profile is aligned vertically. If they are installed correctly, then setting the jumpers at an angle of 90 degrees is not difficult. To do this, you need to measure a distance of 600 mm on the profiles from bottom to top, then the angle will form on its own.
But what to do if the vertical profile is not level. This can happen due to a wooden beam that was also not leveled due to some structural obligations. And this happens quite often.
What to do if the floor in the room is not level
First of all, pay attention to the surface of the floor; if it is uneven, then first of all you will have to deal with it, since after all the work is completed, the floor surface must be made level. It is better to immediately level out all the unevenness and potholes, make a screed or use another method, otherwise setting a 90-degree angle between the plasterboard frame profiles simply will not work. If you level the frame and the floor is not level, the frame will end up crooked. That is why it is necessary to install the frame level, both vertically and horizontally. Since a correctly positioned and screwed wall profile will simplify the work, and you will be able to quickly install the plasterboard sheets.
To begin, install the first line of jumpers; to do this, use a washer, but only if the wall is flat. If not, then you can take a regular long stick and install it between the ceiling and floor in a vertical position. Place a mark on the wall, then measure 800 mm from the wall to the stick and place a mark on the stick. Then, you need to measure 600 mm upward from the bottom point on the stick and also make a mark. After that, check that the distance from the top point and the bottom mark on the wall is 1000 mm, and also place another point. Having made accurate measurements, you can install the metal profile to the wall at the desired angle and check it with a level. Next, we secure the frame profile well. In those places where there is an opening, you can insert a small wooden board, which will give stability to the future frame and it will not wobble. Then install the first line of jumpers and the next part of the frame.
You can install jumpers both between the wall profile and the crab, and between the crabs themselves. To install one jumper you will need four metal screws. Having installed the entire frame, proceed to lining the walls with plasterboard. If the profiles are installed horizontally, then the slabs must be mounted horizontally. They need to be installed one after another, from left to right and from bottom to top. Only when you have installed one slab can you proceed to the next sheet of drywall. For installation, you will also need a screwdriver and metal screws, their length should be 25 mm.
How to properly install insulation in plasterboard walls.
You can install the insulation in the spacer between the beams, and you need to fix it with small long nails; to do this, do not drive them all the way in, but bend them when you drive half the nail into the wall. To ensure that the nails are easily hammered into the wall, drill small holes in the concrete wall with a hammer drill and plan out small wooden caps, which will then need to be inserted into the cracks. Now hammering nails will be easy and simple.
You can also install insulation by gluing it; to do this, coat the ends with glue and simply glue the material to the wall. If there is still free space in the connectors, you can use sheets of plywood or leftover profiles. The material must be installed as a heat-insulating material, making sure that it fits snugly against the wall and that there are no gaps anywhere.
Having exposed all the crabs, install the jumpers. Using a measuring tape, measure the dimensions between the edges of the profiles. This size will be the required length for the jumper. The jumpers themselves are mounted from a frame profile, after which they are cut to the required sizes using a grinder or metal scissors. Having installed all the components, including insulation, you can begin installing plasterboard slabs. With correct measurements, this process will take a minimum of time, and the result will be excellent.
Construction portal about repairs AllRemont for Moscow and all of Russia The site is intended for those who are planning to make repairs with their own hands...
Stroyobzor.info
Stroyobzor.info - the site provides a complete description of building materials used in both low-rise and industrial construction
- home
- Site Map
- Materials Zero cycle Piles
- Brick, stone, blocks
- Concrete, mortar, cement, additives
- Bulk materials
- Concrete products
- Construction fittings
- Foundation
- Window
- Facade materials
- Insulation materials
- Roof
How to align 90 degree corners
The main task of rough finishing work is to create a level base for subsequent finishing. It is at this stage of work that the correct geometry of the room is laid out, so mistakes made at the beginning of work will undoubtedly become noticeable in the future.
In most cases, a living space is a regular parallelepiped, all of whose faces are rectangles. In order for the room to correspond to this geometric shape, it is necessary to ensure that all angles (between walls, between walls and floor and between walls and ceiling) are equal to 90 degrees.
Tools and materials
In addition to the usual tools for plastering walls, when leveling corners in a room, additional tools will be required. Below is an approximate list of tools needed for the job:
- Spatulas of different widths. The minimum set for work will be spatulas with a width of 10, 20 and 40 centimeters;
- Plastering rule. The length of the rule can vary from one to three meters. The longer the rule, the more accurately you can deduce the plane of the walls, but working with a long rule requires more physical effort. The optimal rule is 2m long;
- Corner plastering rule. It is a reinforced corner profile with a handle, which can be used both for plastering and for checking corners;
- A building level or plumb line is necessary to determine the verticality of the walls. A building level must be at least two meters long to ensure measurement accuracy;
- Construction tape;
- A nylon cord and dowel-nails will be needed to extend the outline of the room along the floor;
- Corner spatulas for final leveling of corners.
The type of plaster mixture is selected depending on the thickness of the plaster layer, the type of existing walls and the type of finishing. In addition, for plastering walls you will need the following materials:
- Primer;
- Plaster mesh;
- Wall beacons - beacons for leveling the plane of walls, have a T-shape and are made of galvanized perforated metal or plastic (to learn how to level walls by plastering using beacons, read the article here);
- Corner beacons are designed to strengthen the corners of walls, preventing chipping and cracking. Available in two versions: a simple perforated corner and a corner with a plaster mesh attached to it.
Types of squares
In repair, construction and any “do-it-yourself” work, the following types of squares are often used:
- Carpentry. As a rule, its size depends on the type of activity. For carpentry work to produce, for example, frames, huge tools of 7.3x4.9 m are used. For small crafts, more convenient ones are used - 20x15 cm or 30x20 cm.
- Marking. It has a wide graduated blade with slots for a pencil, the length of which is 5-30 cm. It is indispensable in the production of furniture - it is used to check perpendicularity, mark lines, and calibrate other tools.
- Universal or combined. It has a movable, adjustable ruler and a multifunctional handle with a built-in bubble level and holder for drawing work. This is a whole set of tools. In one bottle - erunok, thicknesser, malka, ruler and others.
This is already a professional tool, which is a mandatory attribute of any carpentry workshop, especially one that produces furniture. With it you can:
- check the horizontal and vertical markings;
- use as a miter box;
- mark internal and external corners;
- measure the depth and mark the holes for the screws;
There are a number of rare special types of squares for non-standard tasks.
- Erunok - combined from two plates fixed at an angle of 45° (135°).
- Malka - with the help of hinged plates allows you to move any angle.
- A center finder helps determine the center of cylindrical parts.
Surface preparation
Before starting work, the surfaces to be plastered must be freed from the old coating. Layers of poorly adhering plaster must be knocked off with a chisel; the remaining parts should be notched for better adhesion to the new plaster.
Next, the surface is dusted with a damp brush or construction vacuum cleaner. Dust settled on the walls will prevent reliable adhesion of the plaster to the walls, so the surfaces must be cleaned as much as possible. In damp rooms it is also necessary to treat the walls with an antifungal compound.
The primer for the surface is selected depending on the material of the walls. Brick walls absorb moisture poorly, so to treat them it is enough to use a universal acrylic primer. Concrete walls, due to their porous structure, on the contrary, strongly absorb moisture from the plaster mixture and for their treatment it is necessary to use special adhesive primers of the concrete-contact type. For porous and fragile gas silicate walls, mineral primers are suitable, they fill pores and cracks, creating a resistant film on the surface.
Priming the walls is a mandatory step when plastering walls! The primer provides better adhesion of the mixture and the working surface, reduces material consumption and facilitates the application of plaster.
To protect the plaster layer from cracks, a plaster mesh is used, which acts as a reinforcing material. Plaster mesh differs in type of material (metal, basalt, polymer) and cell size. If the planned thickness of the plaster layer does not exceed 2-3 cm, you can use basalt or polymer mesh. If the layer thickness is more than 3 cm, it is necessary to use a metal mesh, which is attached to the walls with dowel nails and a wide washer.
How to align wall corners at 90 degrees with your own hands. Step-by-step instruction
The easiest way to build verticals and horizontals in a room is to use a laser plane builder. Such a device, when installed in a corner of a room, projects laser beams that form geometrically regular rectangular planes of the floor and walls. It is enough to make marks with a marker, according to which the plaster beacons will be placed in the future. The disadvantage of this method is the high cost of such a device: prices for the simplest devices start from 5-8 thousand rubles.
The work of building walls manually is quite labor-intensive and requires great care, but it is quite possible to do it yourself.
Video that describes the main stages of work:
The first thing you need to do is check the walls of the room for verticality and find out where the walls are covered. If the wall is tilted outwards (the distance from the building level to the wall in the ceiling area is greater than at floor level), then the planned plane must be brought closer to the wall at floor level. If the wall, on the contrary, is piled inward, then when marking the room on the floor, it is necessary to make an indentation from the wall by the size of the maximum deviation of the wall.
The next step is to mark the correct rectangle on the floor. It is necessary to select the wall from which the countdown will begin (for this it is better to choose the longest wall), dowel-nails are driven into two corners of the wall (the distance from the wall should be equal to the smallest thickness of the plaster layer). A nylon cord is stretched between the dowel-nails, which will mark the first edge of the rectangle. Using a cord is convenient because the tightly stretched thread forms a perfectly straight line. Next, you need to mark a parallel line on the opposite wall, for which the same distance is set off from the dowel-nails using a tape measure and the second pair of dowels is driven in.
Now it is necessary to draw perpendicular lines, for which a square is applied to the first dowel-nail, combining one of its edges with a nylon cord, and a two-meter rule is combined with the second edge, thereby lengthening the resulting line. Having thus brought the line to the opposite wall and, having checked the resulting intersection for compliance with 90°, the nylon cord is pulled. The last face is marked in a similar way.
To check the resulting rectangle to ensure that all its angles are 90°, you can use the property of diagonals: in a rectangle, the lengths of its two diagonals must be equal.
Plaster beacons begin to be installed at a distance of 10-15 cm from the corner and are leveled from bottom to top: the working edge of the beacon is combined with the cord and secured. Next, using a building level or plumb line, the beacon is installed strictly vertically and attached to the wall. The beacons are fastened with a plaster mixture, and the installation step of the beacons is chosen slightly less than the length of the rule used.
After the plaster layer has dried, the beacons must be removed and the resulting grooves must be plastered again. In some sources you can find information that galvanized beacons do not need to be removed since they are not susceptible to rust, however, the possible occurrence of corrosion is not the only drawback of this method. Due to the different properties of plaster and metal, temperature and humidity expansion of the plaster layer leads to the appearance of cracks in the area where the beacons pass. Also, with further drilling of the walls, if the drill hits the lighthouse, it will result in the formation of a crack along the entire length of the lighthouse.
After installing the beacons on all the walls of the room, they begin to apply plaster to the walls and level it according to the rule. The internal corners of the room are “stretched” using the corner rule; this is why it is necessary to install plaster beacons with a slight indentation from the corner.
How to create corners in a bathroom: all corners are 90 degrees or just two
Now that we know what threatens us, we can try to make markings at 2 angles and see what threatens us in this case. We do everything the same, only for the main, first wall we take the one opposite the opening (the wall parallel to the bathtub).
- Draw a line parallel to the first wall.
- We set the square and the rule at two corners.
- Draw lines to the wall with the opening.
Let's see what happens if we align 2 corners
This is what happened. We place the wall with the opening and the wall opposite only in the vertical and 2 corners of 90 degrees, where the bathtub is. The consumption of plaster and labor costs is less. The corners adjacent to the wall with the opening are not so scary. If there is a gap, it is small.
Deciding on the angles
Let’s decide whether we will draw right angles only where the bathtub is or in all corners. We pay attention to the other side of the wall, which is in the corridor. If the wall with the opening is blocked, then the second side of the wall will need to be plastered in the same way and brought vertically, otherwise the door will not be able to be installed smoothly.
Important point
, if you start from the wall with the bathroom, then it will no longer be possible to bring out the corners with the wall with the opening, because starting from the wall with the bathroom, all the irregularities will “crawl out” onto the wall with the opening and it may turn out that on one edge of the opening the thickness of the wall will be 10 cm, and on the other 15 cm. And how to install a door in such an opening is completely unclear...
You need to start leveling the walls from the wall with the opening, if you are leveling all the corners, and if only two corners, then the wall parallel to the bathtub should be leveled first.
Alignment of seams of internal and external corners
The final stage of plastering work is grouting the joints in the corners, which is necessary to create clear lines of the room.
In most cases, installing a plaster corner when leveling internal corners is not required; to prevent the formation of vertical cracks, it is enough to use a painting mesh with a fine mesh. The mesh is applied before the final broaching of the corners and should be buried 5 mm into the mixture. Finally, the seam of the inner corner is rubbed with a corner spatula moistened with water.
To prevent the formation of chips on the outer corners, they are additionally protected with paint corners. Before applying the final layer of plaster, the working edge of the corner is aligned vertically and in the plane of the walls, and then plastered. The corners, with a painting mesh attached to them, additionally protect the surface from the formation of cracks.
When redecorating premises, the use of even the most expensive finishing materials is often unable to mask geometric errors, so sufficient time must be devoted to leveling walls, floors and ceilings. The effort and money invested in this work pays off many times over in the finishing and installation of furniture.
Putty on internal corners
To apply putty to the inner corners, use a special spatula with a 90º angle. Such corners are much more difficult to align than external ones, because there is little room for maneuver. In addition, if the corner is covered with plasterboard, it takes a day.
The type of putty depends on the purpose of the room being finished. For the kitchen and bathroom, cement is suitable, which is not damaged by high humidity. Dries in 1-2 hours. Gypsum is used for finishing interior spaces, except for the bathroom, because there it will eventually fall behind the wall. Plaster dries in 2 hours. There is also a mixture of lime and cement for finishing the facade, which can withstand any weather conditions. It also takes 1-2 hours to dry.
When the start has dried, you can begin to apply the finishing layer; again we use a regular spatula. Roll out the finish around the perimeter as thinly as possible. When it dries a little, acquiring plasticity, we level it with a special corner spatula.
After a day, we polish the remaining small roughness and roundness:
- the embrasive is fixed on a grater;
- a spotlight and a stepladder are installed;
- obvious lumps are removed with a spatula;
- the wall is processed from the top of the corner in a circular motion.
Remember that the corners are processed after sanding the entire wall. This is done before applying the primer.
You can do without sanding if the previous work was carried out by an experienced craftsman who did not leave behind splashes or streaks from the movement of the spatula (which happens very rarely). And also, if in the future you use thick vinyl or non-woven wallpaper for decoration, small mistakes under them will not be so noticeable. The use of paint will highlight them. Also, if sanding for paint is done on all surfaces, and for wallpaper - in places where roughness is detected.
In order not to miss any unevenness, use a spotlight or flashlight directed at the wall at an angle of 45º.
Before the grinding process, wear a mask, gloves, and safety glasses, as required by the safety instructions. Otherwise, fine dust will harm your body. Next you need to select a tool. To repair a small room, it is irrational to buy an expensive grinding machine; you can use a manual sanding float with attachments for a mesh or sandpaper.
- dust does not remain on the instrument;
- wear resistance;
Sandpaper is more familiar to our builders because it costs less. Its significant drawback is that it quickly becomes clogged with dust; in addition, if a piece of putty gets stuck there, it will scratch the entire surface.
When purchasing, pay attention to the grain size: the starting layer is processed with a sheet with a large grain (P60 - P80), the finishing layer is processed with a fine-grained sheet (P100 and above).
Also, to sand corners you need a sanding sponge with beveled edges; if you don’t have one, fold a fine-grain sandpaper in half and use it.
There is a simpler method for leveling internal corners, which consists of attaching a plastic corner to the drywall with a stapler, followed by puttying the adjacent areas.