To declare love, sympathy, or just pure, sincere feelings, it is not necessary to say big words to the whole world; sometimes it is enough to give little ones a gift in the form of a heart, and this will already say a lot. And hearts made with your own hands are valued much more, because such things retain the warmth and soul of your beloved hands. Let's look at how to do this, from what material, in more detail in the article.
What hand-made art is valued is that there are no clear boundaries in the execution and use of the material, everything that is freely available at home, everything that your imagination dictates can be used: paper, cereals, balls, various fabrics and threads, etc. Let's look at some interesting ideas.
Coffee heart
For example, a gift for mom can be made from coffee beans. Such a gift will be not only beautiful, but also useful, because the aroma of coffee beans charges you with positivity and vigor.
We will need:
- cardboard;
- PVA glue;
- nylon sock;
- coffee beans.
We cut out heart blanks (2 pieces) from cardboard and glue them together.
We cut off a piece from a nylon sock that can be used to cover our heart. This is necessary so that the coffee beans stick well. It is best to choose a dark nylon that matches the color of the grains, so that you do not have to paint it later.
Cover the heart with grains. There is no need to rush in this matter; the closer the grains are to each other, the better.
In principle, the coffee heart is ready, you just need to let it dry. Such a heart can be decorated with twine or a beautiful ribbon, you can attach a string to make it convenient to hang, or you can glue a magnet, then you will get a wonderful refrigerator magnet that will fill the kitchen with an invigorating aroma.
Related article: Large Aranian patterns with patterns in the middle of a pullover and sweater
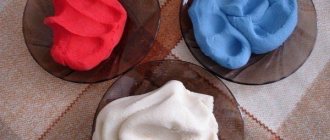
How to make a beautiful voluminous heart from dough
To make a heart, you need to mix salt and flour in equal proportions, add a little water and sunflower oil, and knead the dough. Next we form the heart. Place it on a baking sheet over medium heat and put it in the oven for 10-20 minutes.
Cover the heart with 2-3 layers of gouache.
Using a hot gun we attach the heart.
Such a picture will be irrefutable proof of the sincerity of your feelings.
Have a romantic holiday!
Master class with step-by-step photo “Heart” pendant made of salt dough
Svetlana Vladimirovna Buzmakova, teacher of the Municipal Educational Institution “Kindergarten No. 88”, Berezniki, Perm Territory Description: this master class is intended for children of senior preschool age, additional education teachers, educators, caring parents and just creative people.
Purpose: interior decoration, gift. Goal: Making crafts from salt dough. Objectives: 1. To introduce the technique of testoplasty, to promote the development of interest in modeling from salt dough; 2. Teach basic techniques for modeling salt dough; 3. Develop fine motor skills of the hands; 4. Develop creativity, imagination, fantasy; 5. Develop artistic taste; 6. Foster independence, confidence in one’s skills, and curiosity; 7. Instill the skills of perseverance and accuracy The passions have not yet subsided after the New Year, and then the next holiday is just around the corner - Valentine's Day.
Flowers on valentines are very common.
What is the significance of flowers in gifts? Most often, roses are given as a sign of love, but I want to talk about calla lilies. Callas
are a sign of beauty, admiration, admiration.
It is this meaning that has been given to them since the time when the flower language of love was in use in high society. Callas are strict, elegant, refined, and have a subtle vanilla scent. This is what allows florists to create a bouquet of calla lilies for men and women. The legend of calla lilies.
Many centuries ago, a village hidden in the forests was attacked by a strong and powerful tribe. His leader was captivated by the beauty of the young girl, who amazed him with her snow-white skin and huge eyes. The leader set a condition: either she becomes his wife, or the entire tribe will be destroyed. No one stood up for the beautiful orphan, but on the day of her forced wedding, the women dressed her in a white wedding dress and took her to the leader. On the way, the poor bride saw a ritual fire and decided to throw herself into it. But as soon as she made the first movement towards the fire, the beauty suddenly froze and turned into a beautiful white flower - kala. So heaven protected her from the violence of the evil leader. The grateful beauty, turned into a flower, became a symbol of purity. He protects women, serves as a talisman for them, and protects families created out of mutual love. On Valentine's Day, it is customary to give valentines. One of the most accessible ways to create a gift is a craft made from salt dough. Today I propose to make a pendant with calla lilies from salt dough.
We will need: 1. Flour; 2. Salt; 3. Water; 4. PVA glue; 5. Gouache; 6. Brush; 7. Sequins; 8. Braid.
To create this craft, we will make salt dough according to a traditional recipe. For 2 cups of flour you will need 1 cup of salt, 0.5 cup of warm water and 1 tablespoon of PVA glue. The glue must be diluted in water. The dough must be kneaded so that it does not stick to your hands, but also does not crumble. The dough can be used immediately or stored in the refrigerator in a plastic bag. To create our craft, you need to separate part of the dough and add red gouache to it. We will make the heart itself from this piece and we will not have to paint it later. Roll out the dough and cut out the base in the shape of a heart according to the template. For the pendant we will need three more small hearts. You can make them from circles. We make holes; you can use a cocktail straw for this. Let's decorate the pendant with calla lilies. The flower is created from a small circle. To ensure that the flowers are the same size, cut out a circle with a mold. We place a small flagellum in the middle. Wrap a circle around the flagellum and pinch at the bottom and top. Make the required number of flowers. Add simple flowers from circles. Cut out the circles. We strengthen the bead in the middle. We make cuts on all sides. We make leaves. We put a drawing on them. Arrange the flowers on the heart. Let the product dry. For coloring we use gouache.
If you want to surprise and delight your loved ones with unusual crafts that keep the warmth of your hands and the flight of your imagination, we have prepared for you a delightful selection of vintage puff pastry hearts and master classes on making them. Beautiful vintage hearts made of salt dough are a pleasant addition not only to a gift for Valentine's Day, but also a charming little thing that will cheer up the people you love on any other holiday.
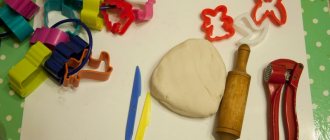
Let's start making vinage hearts from salt dough. In order to obtain the necessary material, we need flour, water and salt. Also stock up in advance with heart-shaped cookie cutters, acrylic paints, a magnet, hot glue and, of course, a good mood.
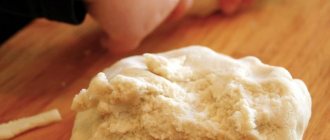
How to knead salted dough for hearts: flour and fine salt are taken in equal proportions and mixed thoroughly. Warm water is gradually poured into the dry mass until the desired dough consistency is reached. Remember that the dough should not spread or lose its shape, so be careful with water. If you add a little wallpaper glue to the mixture, you can be sure that the finished products will be stronger and more durable. Also remember that the dough must be kneaded thoroughly with your hands so that the material acquires the necessary plasticity.
Then everything is simple: roll out the dough to the desired thickness, cut out hearts with a mold and decorate to your taste:
The puff pastry hearts are not ready yet: they need to be dried in the oven. Place the products on a baking sheet and place in an oven preheated to 40-50 degrees for 30 minutes. Next, the temperature should be increased to 100-140 degrees and the hearts should be kept in the oven until completely dry.
After the hearts have cooled, they should be covered with acrylic paints.
These hearts can be used to make decorations for your refrigerator. Simply glue a magnet to the finished product.
Vintage salt dough hearts: lace version
We repeat all the steps described above, but apply a knitted napkin or a piece of lace to the rolled out dough, press it into the dough with a rolling pin
Carefully remove the “template” from the dough and cut out hearts from it.
You can make a pendant or garland from the hearts - in this case, two symmetrical holes should be made in the upper part of the products for a rope or lace.
Large salt dough hearts look no less impressive than small ones:
Such a complex design of hearts should be dried in the oven at a temperature of at least 70 degrees for two hours.
We thread and tie a satin ribbon.
Vintage salt dough hearts: Heart with roses
A piece of crumpled aluminum foil can be used to give relief to the heart. Well, if you don’t have heart-shaped molds on hand, then you can find a way out of the situation by cutting out the product using a paper template.
Roses are also very simple to make:
For those who like to surprise and delight their loved ones and make gifts with their own hands, I suggest being inspired by the wonderful works of a Polish craftswoman and making Valentine hearts from salt dough. Such a charming gift, made with soul and love, will certainly not leave anyone indifferent!
So, for work we will need: flour, salt, water, a heart-shaped cookie cutter, acrylic paint, a magnet, hot glue and a good mood :)
So, let's start preparing the salt dough. To do this, mix fine salt and wheat flour in equal proportions, add a little warm water. Try not to overdo it with water, so that the product does not subsequently crack and become fragile. To make salt dough works more durable, you can add a little wallpaper glue dissolved in water to the dough. To make the dough easy to work with and the work to be smooth, the dough must be kneaded long and thoroughly with your hands.
Roll out the finished dough and cut out hearts using a cookie cutter. We decorate to your taste.
Next, dry it in the oven: first at a temperature of 40-50 degrees for half an hour, and then increase the temperature to 100-140 degrees and leave until completely dry. Drying time largely depends on the size and thickness of the product.
Let the finished hearts cool and cover with acrylic paint.
After the paint has dried, glue the magnets on the back side using hot glue.
Our magnet hearts are ready!
Prepare the salt dough as mentioned above. Roll out the finished dough and apply a knitted napkin or embossed lace to it. Gently press the napkin into the dough, walking over the surface with a rolling pin.
We make two symmetrical holes in the upper part of the heart so that you can later thread a rope or ribbon and hang the finished product.
After the paint is completely dry, thread a rope or ribbon through the holes.
You can make the pendant larger.
Prepare the dough according to the principle outlined above, roll it out and cut out hearts of different sizes. We decorate the base heart with small hearts, lightly moistening the joints with water.
We make two holes in the upper part of the heart base. Next, we send the workpiece to dry in the oven. It took approximately 2 hours to dry this product at a temperature of 70 degrees.
Next, we decorate the pendant with acrylic paints.
We thread and tie a satin ribbon.
The heart pendant is ready!
And another interesting idea for a pendant. The heart turns out to be quite large - approximately 20*15 cm.
Prepare salt dough from 1 cup of flour, 1 cup of salt and a little warm water. Cut out a heart-shaped template from paper. Using a knife, we cut out the base for our pendant. We add relief using crumpled aluminum foil.
We make holes in the upper part of the workpiece. Next, take small balls of dough and roll them into thin flat cakes, roll them into small roses and make small leaves. We secure them with a toothpick onto a base slightly moistened with water. Next, the workpiece must be dried in the oven and allowed to lightly brown until golden brown.
We tint the edges of the heart with white paint, and paint the roses red.
When the roses are dry, paint them lightly with white paint. We color the leaves with a silver marker. You can decorate the spaces between the roses with beads by placing them on hot glue.
Well, that's all - all that remains is to tie the ribbon and our heart-shaped decoration is ready!
And finally, I invite you to admire the charming works of the craftswoman. You can get acquainted with the author and her other works here: https://sztukaniepowazna.blogspot.com/
Handmade valentines are sure to be the most heartfelt gift for Valentine's Day. It is convenient to use salt dough to make them. Many children are attracted to dough when their mother is preparing something baked or dumplings (dumplings), but at this moment the child’s creative impulse and his desire to “mix” are, as a rule, not welcomed. Crafts made from salt dough just give you the opportunity to show your imagination without the fear of spoiling something when experimenting with this material.
List of required materials and tools:
Flour 100 g; — extra salt 100 g; - water about 70 ml (for dough) and water for wetting; - gouache paints; - brush for painting; - a sheet of paper for templates; - a simple pencil; - scissors; - stack for plasticine; - rolling pin; - clear varnish and varnish with glitter.
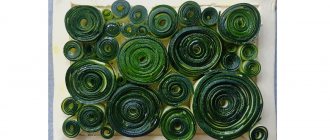
Using quilling technique
Quilling technique is also very popular nowadays. In fact, this is not an expensive job; all you need is special paper strips, which can be purchased at any craft store, and PVA glue. And if this is difficult for you and there are no specialized stores nearby, then you can also cut strips of the required thickness from A4 paper.
Using this technique you can make a very beautiful and original postcard or picture in an original frame.
The process is as follows: using a pencil, a knitting needle or a simple toothpick, we wind the strip into a spiral, glue it and give it the desired shape: a drop, an eye, etc. You need to make quite a lot of such blanks and glue them onto the prepared base.
Use your imagination and take action.
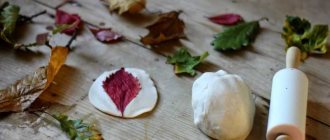
How to make hearts from salt dough with your own hands
Cool the water, mix the salt with the sifted flour and gradually add water (it may take more or less).
The dough should not be tough. Let's move on to the first heart. Roll out the dough to about 0.5 cm thick, apply a template and cut it using plasticine stacks.
We also cut out flowers and leaves using the templates, moisten their back side with water and glue them onto the heart base. We make veins on the leaves in a stack by simply cutting the dough with it. Roll three small balls, flatten each of them, moisten one side with water and glue it onto the flower - this will be the core. Roll small balls and, having dipped one side in water, glue them on the opposite side to the flowers on the heart.
We move on to the second Valentine, we also cut out a heart according to the template and glue two leaves onto it.
Roll the dough into a thin shape, 12-14 centimeters long.
Roll out this rope with a rolling pin, obtaining a strip 1.2 cm wide.
Without pressing, carefully roll the strip into a roll.
Use your fingers to slightly bend the outer “curls.” It turns out such a simple version of a rose that even a small child can handle.
We make 3-5 roses and, moistening their bottoms with water, glue them between the leaves.
Dry the laid out pieces on foil. Each has its own capabilities: gas or electric stove, oven, radiators, etc. Therefore, the conditions and drying time vary. Since the products are quite flat, they fit easily into a special dryer for fruits and vegetables, which I used. The dough took a long time to dry, but it did not crack or bulge, which can happen in a regular stove if the temperature is too high. We take a valentine with roses and first paint them red, and then with a semi-dry brush apply a few strokes of white paint over the light red shade. We paint the leaves green.
Make the heart itself yellow.
The base of the second Valentine will be red, which can also be varied with several strokes of white paint.
We paint the flower petals blue, the leaves green, and the core yellow. We also make yellow balls, then put a red dot in the middle of them. The paints must dry. If you use acrylic paints, there is no need to varnish the valentines. Gouache requires the application of varnish, it will add shine and color saturation. We apply regular varnish to the leaves, and colorless varnish with sparkles to the base and flowers; if this is not available, then immediately after applying regular varnish, sprinkle with gold or other colored sparkles, they will stick. It looks like we coped with the task and made our own valentines. If you glue a magnet to the back side, you will get a valentine magnet for the refrigerator. You can also make a hole in advance (before drying), into which a cord is then threaded - you get a pendant. Happy creative success and Happy Valentine's Day!
Irina Nagibina Сhudesenka.ru
To declare love, sympathy, or just pure, sincere feelings, it is not necessary to say big words to the whole world; sometimes it is enough to give little ones a gift in the form of a heart, and this will already say a lot. And hearts made with your own hands are valued much more, because such things retain the warmth and soul of your beloved hands. Let's look at how to do this, from what material, in more detail in the article.
What hand-made art is valued is that there are no clear boundaries in the execution and use of the material, everything that is freely available at home, everything that your imagination dictates can be used: paper, cereals, balls, various fabrics and threads, etc. Let's look at some interesting ideas.
Heart made of balloons
You can make any shape out of balloons and decorate your interior with them. The heart shape is no exception. Having a sufficient number of balloons, you can decorate the room in various ways.
But there is another great way to make a beautiful heart using just two balls.
We will need:
- 2 long balls (which are usually used to create animal figures);
- thick yarn or any other threads (you can use twine);
- silicate glue;
- scissors.
We inflate our balloons to the desired size and secure them. We wrap it with thread, previously soaked in glue, let it dry, pop the balls and carefully take them out without damaging the main structure. Now all we have to do is fasten the two halves together; to do this, we need to cut one half as shown in the photo below.
You can decorate the whole room with these balls, make them in different colors, and they can also be decorated with various ribbons, beads or artificial flowers. Don't forget to use paperclip decorations.
Flower craft
Any composition of flowers will always look beautiful and romantic. And it doesn’t matter whether these are fresh flowers or made from colored paper, such compositions will also look original even from foil.
Article on the topic: Knitting for children: patterns for a suit, dress, jacket, hat and booties
Air love
Another of the newest materials that has won the hearts of many needlewomen is foamiran. It is from foamiran that products are obtained the way you want: soft, voluminous or flat, moisture-resistant.
We will need:
- red or pink foamiran;
- felt;
- cardboard;
- heat gun;
- scissors;
- the basis for our design;
- beads for decoration.
Textile hearts
For sewing lovers, textile hearts, made of fleece or felt, would be appropriate. You can also use any fabric. Hearts made of fabric can be made voluminous using padding polyester for filling.
Please note that various ribbons, beads, sequins, etc. can be used as decoration.
Patterns:
- Romantic heart with angel wings.
- An ordinary heart.
- Kitty. Such a cute toy will look very good made from felt.
- “Strict” heart made of napkins.
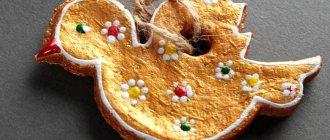
- Salt dough heart.
And finally, a great idea not only to make a unique gift, but also to involve your child in the making process - a heart made of salt dough.
Preparing this dough is as easy as shelling pears; all the ingredients are available in every home.
We will need:
- flour;
- “Extra” salt;
- PVA glue;
- water.
Mix flour and salt in equal proportions, gradually adding water and glue. The dough should not spread, so be careful with water. Knead the elastic dough and you can start forming hearts. To do this, you can use various cookie cutters or simply cut them out with a knife. After the dough has completely dried, you can start decorating. If you don’t have much time, you can dry it in the oven.
LiveInternetLiveInternet
Quote from Melissa
Read in full In your quotation book or community!
Making charming valentine hearts from salt dough - ideas and master classes
For those who like to surprise and delight their loved ones and make gifts with their own hands, I suggest being inspired by the wonderful works of a Polish craftswoman and making valentine hearts from salt dough. Such a charming gift, made with soul and love, will certainly not leave anyone indifferent!
So, for work we will need: flour, salt, water, a heart-shaped cookie cutter, acrylic paint, a magnet, hot glue and a good mood 
So, let's start preparing the salt dough. To do this, mix fine salt and wheat flour in equal proportions, add a little warm water. Try not to overdo it with water, so that the product does not subsequently crack and become fragile. To make salt dough works more durable, you can add a little wallpaper glue dissolved in water to the dough. To make the dough easy to work with and the work to be smooth, the dough must be kneaded long and thoroughly with your hands.
Roll out the finished dough and cut out hearts using a cookie cutter. We decorate to your taste.
Next, dry it in the oven: first at a temperature of 40-50 degrees for half an hour, and then increase the temperature to 100-140 degrees and leave until completely dry. Drying time largely depends on the size and thickness of the product.
Let the finished hearts cool and cover with acrylic paint.
After the paint has dried, glue the magnets on the back side using hot glue.
Our magnet hearts are ready! Next, I’ll show you how to make these lace heart pendants.
Prepare the salt dough as mentioned above. Roll out the finished dough and apply a knitted napkin or embossed lace to it. Gently press the napkin into the dough, walking over the surface with a rolling pin.
Next, remove the napkin and use a cookie cutter to cut out hearts from the dough.
We make two symmetrical holes in the upper part of the heart so that you can later thread a rope or ribbon and hang the finished product.
Next, the hearts must be dried in the oven at a temperature of about 70 degrees for 2 hours. Cover the cooled hearts with white or golden acrylic paint.
After the paint is completely dry, thread a rope or ribbon through the holes.
You can make the pendant larger.
Prepare the dough according to the principle outlined above, roll it out and cut out hearts of different sizes. We decorate the base heart with small hearts, lightly moistening the joints with water.
We make two holes in the upper part of the heart base. Next, we send the workpiece to dry in the oven. It took approximately 2 hours to dry this product at a temperature of 70 degrees.
Next, we decorate the pendant with acrylic paints.
We thread and tie a satin ribbon.
The heart pendant is ready!
And another interesting idea for a pendant. The heart turns out to be quite large - approximately 20*15 cm.
Prepare salt dough from 1 cup of flour, 1 cup of salt and a little warm water. Cut out a heart-shaped template from paper. Using a knife, we cut out the base for our pendant. We add relief using crumpled aluminum foil. We make holes in the upper part of the workpiece. Next, take small balls of dough and roll them into thin flat cakes, roll them into small roses and make small leaves. We secure them with a toothpick onto a base slightly moistened with water. Next, the workpiece must be dried in the oven and allowed to lightly brown until golden brown.
We tint the edges of the heart with white paint, and paint the roses red.
When the roses are dry, paint them lightly with white paint. We color the leaves with a silver marker. You can decorate the spaces between the roses with beads by placing them on hot glue.
Well, that's all - all that remains is to tie the ribbon and our heart-shaped decoration is ready!
And finally, I invite you to admire the charming works of the craftswoman. You can get acquainted with the author and her other works here: https://sztukaniepowazna.blogspot.com/
Love and be loved!
Gifts for Valentine's Day