It is very important for women that their hair is beautiful and neat, so various hair accessories are always popular. And it is not at all necessary to purchase expensive jewelry; many of them can be made with your own hands. Such simple products include a bandage. It can be worn at any age; the product can be combined with all clothing styles and helps create an original and unique look. If you know how to sew a headband, you can always look attractive. It not only maintains the hairstyle, but also adds a special charm to a woman’s appearance.
Material selection
Stylish and comfortable DIY hairbands are made from a wide variety of materials. It depends on the characteristics of the model, the time of year when it will be worn, and the chosen image. They are an elastic strip of fabric that is worn over the top of the head and can be tied or fastened. Products are made from fabric, yarn, ribbons, laces or ribbons. In addition, a hair band made from a regular scarf is popular.
When choosing material, you also need to focus on your skills. Those who know how to knit can make a headband from yarn by knitting or crocheting. Such products look beautiful and original without any decoration. Headbands made of fine cotton yarn will provide good support for your hair, while those made of acrylic or warm wool will keep you warm in cool weather.
If such an accessory is sewn for a baby, you need to choose the softest, preferably natural, material.
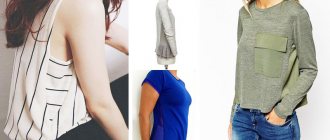
Using a machine you can sew headbands from fabric. For summer, any cotton material, silk, chiffon or viscose is suitable. You just need to take into account that artificial fabrics can be uncomfortable to wear, as they do not absorb sweat. Although silk is a natural material, headbands are rarely made from it: it is difficult to work with, it is free-flowing, and the finished product wrinkles quickly. But if you have certain skills in carefully processing fabric, you can sew a bright, original accessory.
For the summer, you can sew a women's headband from knitwear. Such models turn out to be especially beautiful. The material is elastic, so it can be tied with any knot, and the bandage itself is not rough and pleasant to the touch. Any knitwear can be used for sewing: both a piece of material and old items (T-shirts, skirts, dresses). An original product is made from bright nylon tights.
Warm headbands can be sewn from any thick fabric. Fleece, drape, wool, velor are suitable. Products made from faux fur look very stylish. Such models will not only complement the image and support the hair, but also keep you warm in cold weather. Many fashionistas wear them instead of a hat.
For autumn, a knitted headband or one made from denim is suitable. In the latter case, you need to choose a thinner material. It will be more convenient to work with it, since thick denim fabric is not easy to sew, and the seams on such a small product will look rough. You should also take into account that the material can shrink after washing, and the edges quickly fray. In addition, it does not stretch, so for convenience you will need to sew on an elastic band.
Quite creative headbands are made from satin ribbons, colored openwork lace, laces, leather strips, and old clothes.
Knitted headband
There is no bad weather.
But the time comes when you no longer want to wear a hat and it’s still cold without it. A stylish and fashionable accessory – a knitted headband – will come to the aid of fashionistas. Even a novice needlewoman can cope with such a product. The headband is a knitted strip of the desired width, sewn at the back of the head or knitted in a circle.
You can choose absolutely any pattern, from simple satin stitch to complex braids and openwork.
Decorative elements and crocheted flowers are added to the headband. Having chosen the model you like, we knit a headband with knitting needles with our own hands.
Model options
To make a headband with your own hands, you need to decide on the style. Beginning craftswomen can start with a simple model that can be sewn in 10-15 minutes. This is a regular fabric strip. If the material does not stretch, a thin elastic band is inserted inside. To make the finished product easier to put on, part of the fabric at the back can be replaced with an elastic wide elastic band.
There are also many other options for similar accessories:
- Narrow bandages. They are made from strips of fabric, braid, and ribbons. It could even be a rope or a braided lace.
- Turban headbands that can replace a hat. They are often made from wool or yarn, as well as fur. But the most popular are summer options made from a scarf or a piece of light fabric.
- Simple straight strips of fabric without decoration. Used to remove hair from the forehead and prevent sweat from running down the face when playing sports. They are most often made from natural elastic material.
- Headbands with bows, rhinestones, flowers and other decorations. Such products are more suitable for girls.
- Overlapping model. An ideal option for those who do not like to wear hats. The headband looks stylish, original, and protects the ears in the cold.
A popular bandage is called solokha. It is tied at the top of the head; its peculiarity is the ends sticking out to the sides. For convenience, it is recommended to insert a wire inside the strip, then it can be secured without tying it.
Narrow
Sports turban With bow
Overlapping
What do they decorate with?
A headband to maintain curls can be used as an everyday accessory or a sophisticated decoration. Round glass beads, bugles, beads of various sizes and rhinestones are decorative options for an original product.
Before decorating the headband with beads, you should decide on the color scheme.
Beads
For elegant decoration, you can use round glass beads. The highest quality is produced in Japan or the Czech Republic; bugles or glass “cutting” are also used.
Beads
Multi-colored beads are a wonderful decorative element. With their help it is easy to create visual volume.
Stones and rhinestones
An exquisite headband embroidered with semi-precious stones or rhinestones is a delicate decoration. Can replace a luxurious tiara or a bride's wreath. Using ready-made patterns, you can make headbands from beads and stones. A quality master class will tell you how to make them quickly.
Sizing
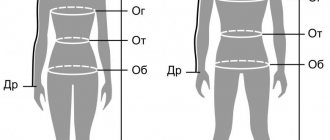
Before studying the question of how to sew headbands, you need to determine the size of the future product. It depends not only on the circumference of the head, but also on the chosen model. It is usually recommended to take measurements with a measuring tape. It should go across the forehead, above the ears and at the back of the head. If you don’t have it at hand, you need to attach the selected fabric to your head. This is done as if tying a scarf. After this, the required size is noted.
If you use knitwear that stretches, to determine the optimal length you need to add a few centimeters to the resulting indicator for the seams. For other materials this is not required as the elastic will be inserted. For models that are tied at the top with a bow, you need to add 25-30 cm. The width of the bandage can be any. On average it is 5 cm, but children's and summer accessories are narrower. And for the winter, on the contrary, they sew wider products that cover the ears.
In most cases, the fabric is folded in half lengthwise and sewn, so the selected width when cutting needs to be doubled.
Children's hair jewelry
Headband for girls
For the base, take a ready-made rim and cardboard. And for decoration, denim fabric, cotton lace (it can be crocheted) for ruffles, natural braid, jewelry and wooden beads.
- cut a circle out of cardboard 10x10 cm;
- fold the denim in half and trace a cardboard blank on it, increasing the radius by 1.5-2 cm for an allowance;
- Place the cut fabric on both sides of the cardboard and stitch it;
- fold the canvas to the wrong side and machine stitch it with a zigzag stitch;
- we connect the decorative ribbon into a ring and collect it on a thread;
- sew the ruffle to the wrong side of the circle (by hand or using a sewing machine);
- we sew the edges of the lace and gather them together (you can use several layers of ribbons of different textures);
- on the front side, over the ruffle, we fasten a decorative cord;
- we decorate the middle of the circle with beads (wooden parts can be painted in different colors with acrylic paint);
- base - coat the rim with glue and wrap it tightly with decorative cord;
- we connect the parts.
Handmade hair decorations are suitable for any children's party.
Hairpins in the shape of animal ears are easy to make.
cat ears
You can make “Cat Ears” using two metal pins, a template, felt and shiny foamiran (a synthetic dense material reminiscent of suede) in a contrasting color to the fabric.
- make 2 pieces out of cardboard. Two larger ears (for felt), two smaller ones (for foamiran);
- place the templates on the double-folded materials and cut out the blanks;
- glue the foamiran parts with felt ears;
- “Moment” glue the blanks to the hairpins.
This method can be used to make decorations for headbands and tiaras.
Sewing steps
This stylish item will take very little time to make. Before starting work, you need to decide on the model and choose the appropriate fabric. Then you should measure the circumference of your head to find out the size of the product. Depending on the material and the chosen model, you need to make a pattern or draw a diagram. But in many cases this is not required.
Next, you need to cut the fabric to the desired size. It is important to allow seam allowances. Typically, a strip is cut 2 times wider than the width of the finished product. Sew it on the wrong side and turn it inside out. After this, the women's headband needs to be decorated with the selected decorative elements, and if necessary, secure the elastic band. At the last stage, we sew the ends and process the edges.
Headbands with elastic band
A scarf is considered the best option because it can be tied in different ways. But for greater convenience, it is better to sew a similar model with an elastic band. It goes well with sporty and casual clothing and is suitable for women of any age. The easiest way to make it is to fold it in half and sew a strip of fabric into which the elastic is threaded. This model looks original due to its soft folds, and it is comfortable and easy to put on. Another option is a type of scarf like a bandana. This is a wide strip of fabric, most often a single layer of thin material. At the ends it is gathered into a bun with an elastic band.
What you need to make it:
- cut a rectangle for the scarf itself measuring 25 x 45 cm;
- tuck the edges and stitch;
- prepare a second rectangle for elastic 5 x 25 cm;
- make a drawstring out of it, insert a wide elastic band 10-15 cm long;
- put the end of the scarf into the drawstring, after tucking the edges, sew;
- repeat the same on the other side.
Due to the fact that the elastic band is narrower than the product itself, it gathers in beautiful soft folds. The convenient thing is that such a scarf does not need to be tied.
Cut out three parts
Sew two long edges on a large piece
Fold the two small pieces wrong sides together and stitch along the long sides.
Turn it inside out, iron it and turn both short sides inward by 2 cm. Sew in the center, not reaching the edges 1.5 cm.
We gather the short edges of the large part into cute folds and sew in an elastic band.
The folds on both sides should lie in the same direction Finished product
Overlap knit
To make this you will need two pieces of knitted fabric of different colors. A pattern is not required, but when cutting you need to take into account the size of the head. For a child 3-7 years old, you need to cut two strips 15 cm wide and 47 cm long. Older girls and young women will need to increase the size. To determine the length of one part, you need to add 4 cm to the volume of your head. Sewing such an original hair decoration is very simple, and for those who do not have experience, you can use step-by-step instructions. How to make a headband for a girl from knitwear with your own hands:
- Cut out two parts.
- Fold each one in half lengthwise and stitch.
- Finish the seams and turn them inside out.
- Place the seam in the middle and iron the stripes.
- Place the pieces together crosswise in the middle.
- Bend them in half to create an overlap.
- Align all 4 edges of the strips and stitch.
This DIY headband is very easy to make and looks original. It will suit both a child and an adult woman, as it can be combined with any clothing.
Fold the two cutting pieces in half lengthwise with the wrong side inward and stitch them either by machine or by hand using a back stitch.
We turn both patterns right side out. We lay both parts on top of each other with the seams facing up.
Fold the parts as shown in the photo. You will get a so-called “loop.” Fold the 4 ends together, mark the volume of the head, and baste along the drawn line
If the strip is not too tight, you can grind these 4 ends and trim off the excess
The bandage is ready
With a bow for a girl
A headband for a girl will look beautiful if you decorate it with a bow. It’s not difficult to make even without a pattern. All you need is a bright fabric. It’s better to choose knitwear, then you won’t have to insert an elastic band. Sequencing:
- Cut out a rectangle whose length is slightly less than the circumference of your head. The exact size depends on how the jersey stretches; The width is determined as desired.
- The second rectangle from which the bow will be made should be the same width; its length when folded in half is approximately a third of the size of the headband.
- The parts need to be stitched along the long side from the wrong side and turned inside out.
- Sew up the ends to form a headband.
- Fold the second piece into a simple bow and attach it to the front.
- Use a small piece of the same fabric to fasten both parts.
A more complex version of this bandage is when the bow is not sewn on, but tied. To do this, you need to take a longer strip of fabric. It is better to place the bow so that it is on the side of the head.
Tutorial on bead embroidery of hairbands “White Winter”
Good day, dear readers!
New Year is approaching, the most magical holiday!) And on New Year's Eve, when miracles happen, you want to look mysterious, romantic and, of course, beautiful. I suggest you decorate your hair with a headband. Snow-white - like winter itself, shimmering - like snow in the sun... And feel like the Snow Maiden)
In this master class I want to talk about some of the techniques that I use when working on my jewelry.
As I already wrote in the previous MK, due to being so busy with my little daughter (she is just two years old), decorations, as a rule, can be done “at night”, so the appropriate lighting is electric; the photo, of course, is not of the most ideal quality.
So, to make a hair band I needed the following materials:
- non-woven fabric. You can also embroider on felt or leather. I can’t say anything about these materials, since I embroider on non-woven fabric, and at the moment I am completely satisfied with it.
— white TONO glass beads (unfortunately, I don’t know the number)
- beads No. 15. I have TONO 1F (white transparent matte) and 121 (opaque glossy white), and MIYUKI 1105 (silver)
— Czech beads No. 10 46205 white rainbow and 02090 white translucent
- Czech crystal beads with silver
- nylon thread, needle
- leather
- rubber
1. Prepare the base - glue 6-7 layers of non-woven fabric together and draw the outline of the future bandage. We bring the needle to the face, pick up two beads No. 10, retreat a distance equal to these two beads, and bring the needle to the wrong side
2. From the inside out we come out between the beads
3. We pass the needle through the last one
4. We collect two more, and sew the entire contour of the bandage in this way.
To cover the outline, I sewed one translucent bead through two rainbow beads. In order for the beads to lie evenly, we pass through all the beads with a thread several times (as much as the hole of the beads allows).
5. Next, starting from the middle, sew on the bugles. I sewed it on with a wave
At this stage our bandage looks like this:
6. Now, using beads No. 15, we embroider the outline of the bugles. The principle of embroidery is the same as the outline of the bandage.
7. Sew on beads
8. I randomly embroidered the remaining space with 15 beads. I picked one transparent matte, one white glossy and one transparent matte onto the needle and randomly filled the empty space
9. All empty spaces are embroidered, the headband is almost ready. Cut along the contour. We try to cut as close to the beads as possible, but at the same time, do not damage the stitches on the reverse side.
10. Glue not very thick cardboard to the back of the bandage. The cardboard should be two millimeters smaller than the bandage. Then we glue this blank onto the skin, wait until it dries and cut out a millimeter more
11. This is how I glued the gum
12. Then we begin to sew the edge of the bandage. I sheathed it the Russian way. I already wrote about it step by step in the MK pendant “Forest Whirlpool” https://www.livemaster.ru/topic/292287-mk-kulon-iz-bisera-lesnoj-omut?vr=1&inside=1 I covered the place where the elastic was glued and on the front side and on the back for greater reliability.
This is what the wrong side of the bandage looks like:
Well, that's all, the bandage is ready - try it on and admire the result)))
I hope that MK will be useful to you in some way!
If you have questions, then, as usual, write in the comments. I will answer in detail)
When using this MK, a link to the original is welcome)
Thank you for your attention!
Good luck to you!
Oksana Zhuk.
Source: livemaster.ru
How to make from scrap materials
You don’t always want to fuss with pieces of fabric and spend a lot of time to get a fashionable accessory. But if you know how to make a headband with your own hands from scrap materials, then at any time you can update a boring look and stand out from the crowd. Satin ribbons, laces, old clothes, and so on are used for work.
Simple manufacturing methods:
- Headband made of satin ribbons. They are braided or tied in a voluminous knot. You can connect two ribbons of different colors with a beautiful checkerboard pattern. You need to sew an elastic band on the back.
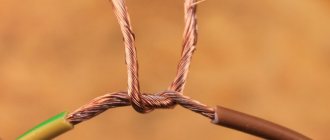
- Bandage made from nylon tights. It is best to take colored hosiery, but black ones are also suitable for an adult woman. You can also use two contrasting shades. It is necessary to cut off the top and bottom parts of the tights, fold the resulting strips together to form a Celtic knot. Sew the ends to fit the head and cut off the excess.
- A product made from laces or strips of leather in Indian style. For girls, you can make such original options with your own hands. Both plain and variegated elements are suitable for work. The options intertwined from different colors look interesting. If desired, they are decorated with beads.
- From an old sweater. For this, an elastic band or any other part of the product is used. You need to cut a strip equal in length to the circumference of your head. To prevent the threads from unraveling, it is advisable to cut the width twice as wide, fold it in half and sew it. After turning inside out, you get a strip that can be decorated with a bow or small colored beads.
Women most often create headbands from a headscarf or scarf. This method is convenient because it does not require sewing. It looks like a bandana, only tied in an unusual way. You can simply fold it into a strip and tie it around the circumference of your head under your hair, with the ends woven into a braid. It is also recommended to place the scarf in a bow or knot on the top of the head, on the side or above the forehead. Sometimes they make something like a turban by crossing the ends at the front and tying them at the back.
Headband made of satin ribbons From an old sweater Headband made from nylon tights
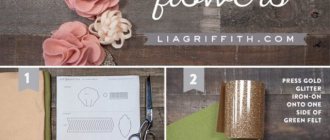
Felt headband: master class
Provided you follow the steps correctly, it will only take one hour to create a charming floral headband.
Change the shape of the petals, placement and color of the bandage according to your preferences. Prepare:
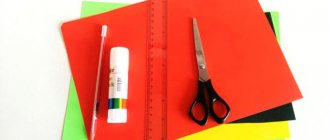
- pastel colors of felt, a chic combination of white + gray + pink;
- scissors;
- needle and thread;
- glue (preferably hot);
- cardboard.
Step-by-step instructions for making a bandage for a girl with your own hands.
- The base, that is, the rim itself, can be made in any way. Rely on the previous instructions.
- Preparing the pattern.
- On the cardboard, draw 2 oblong petals (one smaller, the other a little larger), the top is rounded, the bottom is straight.
- Using these patterns, you need to cut out 8 + 8 pieces of different sizes from pink felt.
- Make a sketch of the leaves; one larger + two smaller, pointed top, straight bottom.
- Make 3 sheets of gray felt.
- Prepare two ordinary flowers from white material, one larger.
- The last detail of the bandage is the middle.
- You need a piece of fabric approximately 7 cm long and 3-4 cm wide.
- Fold a piece of gray felt in half, make cuts at a distance of about 3 mm without bringing the scissors to the edges.
- All that remains is to connect all the details of the bandage.
- Watch carefully: white flowers first, the smaller one overlaps on top.
- Then glue pink petals, first row 8 pcs. bigger size.
- Unfold the middle of the bandage, you get this curly little thing, fit it on top.
- Baste the gray felt leaves in large stitches, placing the largest one in the center. Pull the thread so that the shamrock comes out.
- First the leaves are attached to the rim, and the flower on top.
Decorating the product
Headbands made from bright materials or printed fabrics look attractive in themselves. But to add freshness to the look, you can use a combination of contrasting colors. When tying a bandana, it is worth experimenting with different knots.
Such an accessory, decorated with sequins, rhinestones or a beaded pattern, looks feminine. It will shimmer and shine, creating a joyful mood. You can complicate the decor of the product. For this, it is recommended to use beads, stones, rivets, various metal elements, lace, ribbons, and laces. All these decorative details look very nice and unobtrusive. And for young girls, elements such as leather stripes, feathers and perky “ears” are suitable.
A headband with various bows or flowers will look bright and extravagant. Such decorations are made from tulle, felt or satin ribbons using the kanzashi technique. You can also purchase an exquisite brooch and attach it to a turban headband exactly in the middle. This will add charm and mystery to the image.
A headband is always a relevant and original accessory. It is suitable for any style, the main thing is to choose the right model and color. It is quite easy to make, every woman can do it. You just need a little imagination, effort, and most importantly, desire.
Options and patterns for beaded headbands
There are many options for weaving a beaded headband. From the simplest jewelry for a girl to an exquisite “tiara” for the bride. Beginning needlewomen should use ready-made patterns. This will help you master the simplest algorithm of actions, after which you can create more complex headbands from beads.
Wreath made of red beads
A luxurious wreath made of red beads and rhinestones will attract attention. Such an ethnic style accessory is self-sufficient, even if it looks as simple as possible.
Dragonfly on stiletto heels
An unusual “dragonfly” made of thin wire is a lightweight, unusual accessory. Located on a metal rim, it seems to float in the air.
Daisies made from ribbons and beads
A delicate wreath of daisies and other wildflowers made of beads is a real summer decoration. It is based on a satin ribbon of three colors, wire and beads. Even simple jeans and a T-shirt look unusual with him.
Luxurious wire crown
A good alternative to the bride’s tiara is airy “blooming branches” made of wire. For decoration, it is better to take plastic beads. Such a wreath will be lighter, which means it will look better on your hair.