Often, closets do not have compartments for storing small items and linen. A problem arises - there is nowhere to put children's rompers, socks, and handkerchiefs. And also, in cabinets and cupboards for the pantry there are shelves - there are no drawers. Small jars and bags take up half the usable space.
There is a simple solution without replacing the furniture with new ones. You can make a drawer with your own hands, even if it is not provided for in the original design.
Where is the best place to install drawers?
It is better to place drawers at a level no higher than 1-1.2 m from the floor, in niches between shelving shelves. You can also make drawers with your own hands in a niche with a bar for hangers.
When determining the best location, do not forget that the drawers slide forward and nothing should interfere with their movement. The most common mistake is to design them close to the sidewall, when the furniture hinge of the facade can serve as an involuntary obstacle to the drawer being pulled out.
In wardrobes, you should avoid places located close to the intersection of sliding doors.
If we talk about designing drawers, it is best to install a module with separate side walls. The module cover will serve as an additional shelf, and the sides can be secured between the cabinet partitions with tie bolts.
The advantages of integrating such a module into a finished cabinet are obvious:
- You don’t have to empty the closet of things to install guides and adjust drawers. After all, this is quite a dusty job.
- First, you can screw the guides to the sides of the module, and then assemble it and install the drawers. In the case of building drawers directly into a cabinet, you will have to crawl into an existing narrow niche with tools, which is more labor-intensive and inconvenient.
- During operation, the cabinet partitions could already bend due to insufficient structural rigidity and heavy load on the shelves. This means that adjusting the drawers will be very difficult. If at all possible, with the initially incorrect geometry of the niche.
There will be no problems with installing the module if it is made according to the internal dimensions of the niche.
home_and_garden
Stylish and comfortable home
Order in the closet with clothes
In our fashion community Freshjournal.ru
norub
conducts training “Effective wardrobe”, for whom this topic is relevant - please join..
And here we will talk about the problem of organizing storage in the closet, which never loses its relevance, so we are again turning to this topic. How to get rid of chaos in your closet? How to find what you need right now? We tried to select for you the tips and principles that work.
Things in the closet should be arranged so that you can easily find everything you need. And this just means that they must be visible. Something that is difficult to get, you are unlikely to wear often. What rules should you follow when organizing your own closet?
| Space If, in order to put another jacket on the shelf, you have to “crush” the others, there is not enough space in your closet. Hanging a hanger with a suit shouldn’t be a problem either. Solutions: Remove clutter from your closet, add extra storage space, or choose a larger closet. |
| Rods One way to add extra storage is to have two storage rods instead of one. You can install double rods in a closet or part of it yourself. |
| Additional shelves If there is space left on the rod in your closet, and there are sorely not enough shelves, purchase hanging sections for storage. |
| Contrasts You will be surprised, but the color inside your closet also plays an important role. Dark trousers and sweaters will easily get lost in the depths of a dark closet. And white T-shirts will disappear in a white closet. While white is a decent option, consider painting (or wallpapering) your cabinets a pastel shade or a bright color. Remember when Mammy Scarlett had a red taffeta skirt? And you will have red or bright orange interior walls of the closet, which will definitely cheer you up in the morning! |
| Priorities when placing clothes Let me remind you that things that don’t suit you, don’t fit well, and things that you won’t wear should not take up space in your closet. Therefore, before looking for a place for things, put your wardrobe in order and get rid of unnecessary things. Separate your clothes by season. It is advisable to store what does not belong to the current season in boxes or vacuum bags (after cleaning or washing it first). If you are the happy owner of a large dressing room, these things can be “pushed” into the far corner. |
Which guides to choose for drawers
If you decide to make drawers with your own hands, then you should decide on the type of guides and their length. The varieties were briefly defined in the article about cabinet fittings.
- Roller guides are the most budget option. If you plan to meet the smallest amount, then choose them. Their only drawback is that they do not extend completely: the drawer in the closet will extend approximately 2/3. The calculation of parts for a drawer on roller guides is exactly the same as for telescopic ones. That is, you can always change one type of extension to another if the need suddenly arises.
- Ball (telescopic) guides can be fully extended and are more reliable in terms of operation. For strength, you can put two sets on one box, then the container can be used to store the same tools (the bottom is better made of chipboard; fiberboard will not withstand a heavy load).
- Metaboxes (or metalboxes) are mainly used for installation in kitchen cabinets. The design and calculations of parts for this type of guides are fundamentally different from the first two. The fact is that the metaboxes themselves are the sides of the drawer (height 54, 86, 118 or 150 to choose from), and only the bottom and back side are made from chipboard. During assembly, the entire structure is rigidly attached to the facade.
In length, all guides start at 250 mm, for installation on drawers with a depth of 250 mm, respectively. And further, in increments of 50 mm to 550-600 mm (that is, 300, 350, 400, etc.).
The depth of the cabinet side should be 20-50 mm greater than the depth of the drawer. That is, on a cabinet with a depth of 520 mm we install drawers with 500 mm guides, on a cabinet with a depth of 400 mm we install drawers with 350 mm, etc. Do not forget that the box installed inside must be “recessed” to the thickness of the facade.
The design of the guides is such that it will not be possible to cut them to length. Therefore, choose the “right” size from the beginning.
Rules for fixing shelves in your closet
If you want to get the job done efficiently, follow these recommendations:
- the number of compartments must be equal to the number of sashes. However, this rule is not relevant if the furniture is equipped with wide doors, behind which it is quite possible to create a couple of compartments with shelves;
- It is most convenient to place linen inside the rack, whose height is 35-40 cm;
- It is better to arrange books in cells with a height of 20 to 35 cm. The distance between the shelves should be sufficient to accommodate all items;
- the optimal height of the opening in which clothes will be stored is 150-160 cm;
- Items with significant dimensions are best placed on corner shelves;
- in general, the depth of a compartment-type cabinet is 60 cm. These are standard dimensions for models created in the factory.
You can make a cabinet with your own hands, deciding on the dimensions yourself. It is important to take into account that the door mechanism takes up about 10 cm, this reduces the internal volume.
How to correctly calculate the dimensions of drawer parts
There is nothing complicated in calculating a drawer; the main thing is to know a couple of formulas and not get confused in the numbers.
Let's look at the example of calculating a module for two boxes. Let it be designed for installation in a cabinet niche W/D/H 500x500x400.
Since the front of the drawer must slide “inside” the depth of the cabinet itself, the depth of the side of the module is 480 mm (we allocate 20 mm for the front).
Calculation of parts for drawers will look like this:
| № | Part name | length | width | quantity |
| 1 | Top/bottom of module | 500 | 500 | 2 |
| 2 | Module sides | 368 | 480 | 2 |
| 3 | Side of the drawer | 450 | 150 | 4 |
| 4 | Drawer forehead | 410 | 150 | 4 |
| 1 | Drawer bottom (fibreboard) | 440 | 448 | 2 |
| 2 | Drawer front (chipboard, MDF, solid wood) | 181 | 497 | 2 |
Chipboard thickness 16 mm.
The sides of the module are “sandwiched” between two thicknesses of chipboard, so their height is 400-16x2=368.
The side of the drawer is equal to the length of the module guide. At a depth of 480 mm, guides 450 can be installed.
There are no special standards for calculating the height of drawers. At a height of 368/2=184 you can install two drawers with a height of 80-150 mm.
The front of the box (front and back panels of the box) is calculated using the formula 500-90=410. The value 90 is the addition of all the thicknesses of 16x4 laminated chipboards and the gaps for installing 13x2 guides. That is, 16x4+13x2=90.
For ease of fastening, the bottom of the box is laid slightly smaller than the box frame, 1 mm on each side. The box itself turned out to be 450x442, so the bottom is 488x440.
You can read about the calculation of drawer fronts and hinged cabinet doors here.
Pull-out buckets and plastic containers for sorting waste
For some housewives, a retractable bucket built into a kitchen cabinet is a dream. Buying and installing it is as easy as shelling pears, but just look at the price tag and the desire disappears by itself. Well, I don’t want to spend so much money to use it as garbage. How do you like this replacement?
By the way, many housewives have adapted retractable storage systems with containers for sorting waste for storing vegetables. And what is very convenient! And you can replace it with a more affordable analogue.
To store vegetables, you can also build in a pull-out mechanism with plastic baskets of a suitable size into the kitchen cabinet.
With this approach, you can replace any expensive pull-out system in the kitchen with a “homemade” one of similar functionality! She may not look so chic and modern, but she will definitely cope with her role!
Marking for drawer guides
According to the dimensions calculated above, you need to saw the parts of the drawer and roll up the visible ends with an edge.
Then the boxes are assembled and the bottom is filled with fiberboard. And only after this they begin marking for attaching the guides to the sides of the box itself and the inner sides of the stand. There is nothing complicated here; detailed instructions can be obtained from hardware suppliers.
For example, roller guides are attached under the “bottom” of the drawer, and telescopic guides in the center of the sides. Let's give a visual markup diagram using our module as an example.
It's simple:
We install the bottom drawer as low as possible so as not to waste internal space. It is enough to retreat 10-20 mm.
We distribute the remaining space evenly between the drawers. In our case:
Preparatory work and necessary tools.
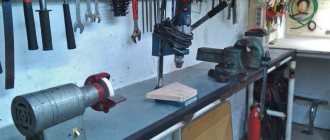
Before you start, you need to prepare everything you need. Of course, this stage is required for any work, but in this situation it is worth understanding the specific case. A homemade plywood box can generate income if you make enough of them to sell. But in such a situation you will have to be patient and have the following tools:
- Woodworking Machine. Its price is high and not everyone has it, but when creating batch products it’s worth stocking up on it. Its capabilities are impressive; it is a substitute for a plane, circular saw, and several machines. It is powered from a simple network, so everyone will appreciate the ease of use.
- A drill and a screwdriver, and sometimes just one thing.
- A jigsaw (there is no need for a professional one), but if you have one, the work will go faster.
- Stapler for furniture.
Many of the tools can be rented, but the purchase will be considered profitable, because they will be useful even after the work is completed, but if you have few ideas on how to make a box, we recommend looking at them here: https://fb.ru/article/306910/ yaschik-iz-faneryi-svoimi-rukami-chertej-instrumentyi-i-osobennosti-izgotovleniya.
What tools are needed to make a drawer with your own hands?
It all depends on what work you decide to do yourself and what to delegate to specialists. For example:
- To cut the parts to size, you will need a jigsaw with a file for chipboard or wood, a grinder or a router to align the ends for rolling the edge. Cutting parts to size can be ordered at a furniture shop.
- To seam the ends with melamine edges, you will need an edge with glue of the required size, an iron, a stationery knife and sandpaper to cut and sand the edges. The PVC edge sticker can be ordered along with the cut, indicating the sides corresponding to the sides of the parts.
Everything else - drilling the blanks, assembling the drawer boxes and installing them in the closet - will have to be done with your own hands. However, this can also be delegated to third-party specialists, but then what’s the point of studying this issue?
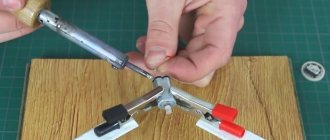
- To drill the connecting holes, you will need a drill with a confirmation drill, as well as drills with a diameter of 5 and 7 mm.
- Assembling the drawers (twisting them onto confirmations, fastening the fiberboard bottom and guides with 3x16 self-tapping screws) can be done with the same drill or screwdriver. Since the amount of work is small, you can get by with a ratchet screwdriver with the appropriate hex and Phillips bits.
- Small hand tools will require a tape measure, an awl, screwdrivers, a pencil, and a square.
The list is not so long and can easily be found among a set of home tools. We recommend that you read the article about cabinet fittings to purchase all the hardware and fasteners necessary for making drawers.
How to “shove in what you can’t fit in”: 5 secrets for organizing your closet
How to organize storage if the closet is small and inconvenient, but there are a lot of things? Moreover, in such a way that nothing is ever lost in it, and the contents of the shelves always look neat. It turns out it's quite simple. We tell you 5 secrets of “rebooting” your closet, thanks to which you can achieve approximately the same results as in the photo below (it was then).
Secret 1. Vertical storage
If you have tried the vertical storage method, be sure to give it a try. The easiest place to start is with T-shirts. Then you can deal with the laundry. Well, then - with whatever you want.
- The essence of the principle is simple: things should not be stacked on top of each other, but in a row in a vertical position, that is, upright. At the same time, in order for the clothes to stand, they must first be folded into a rectangle. You may also need boxes for vertical storage.
As a result, storage will be more compact and convenient. Firstly, you will have an excellent overview, and secondly, you will be able to take things out and put them back in place so that neighboring things do not fall into a heap.
Here are some practical tips:
- To quickly reorganize your wardrobe, use this trick: simply take a stack of clothes, knock them over and put them in a drawer. Voila! Perhaps this is all you need to know about vertical storage.
- Once you've mastered vertical storage and folding items into rectangles, you can play with the height and width of the rows and customize the system specifically for your closet.
- On the Internet you can find many videos about ways to fold things. Basically, all of them are not very useful. As practice shows, in this matter you just need to follow your intuition and over time, the skill of neat and compact folding will come by itself.
- You need to fold bulky items or clothes with a complex cut into rectangles according to the principle: first we form a large rectangle from the clothes, then fold it into a small one.
Secret 2. Additional shelves
If the cells in your closet are more than 30 cm high, then you can build additional shelves into them. There are several options on how to do this:
- Shelf inserts – you can buy them on Aliexpress (see photo below). The good thing about this method is that the inserts are installed in a spacer without the need to drill into the walls and they hold quite securely. If necessary, you can always remove or rearrange them.
- Shelves made of MDF - you can order MDF cutting to the desired size, then install them on 4 shelf holders (sold in construction stores). Unfortunately, in this case you cannot do without drilling the inner walls of the cabinet.
Secret 3. Long boxes for deep cabinets
For deep shelves that are more than 50 cm deep, you can use cute long boxes like the KNOCK boxes from Ikea. They are especially convenient for storing back piles of clothes.
Secret 4. Focus on folding things
Many of us think that storing clothes on hangers is convenient and correct - clothes don’t wrinkle, nothing needs to be folded, there is a good overview. Well, there really are advantages. However, there is one significant drawback - clothes on hangers take up an unacceptable amount of space. But clothes on shelves, on the contrary, use space sparingly, and in practice it turns out that folded items hardly wrinkle. The only exceptions are jackets, trousers, clothing made from light fabrics, and designer clothing.
- If your closet is not large, focus on folding clothes. And if you are just about to purchase a wardrobe, then we advise you not to get carried away with the hanger compartments.
- To fit more things in your closet, you can use a module with hanging shelves as in the photo below.
Secret 5. Getting rid of unnecessary things
And finally, the last secret and the most important one. In 99% of cases, wardrobes do not hold the required number of things only because there are too many of them. Think about it, why put things in order that you just need to get rid of? If you carry out a quality audit of the closet, then its reorganization will be easy and quick, all things will fit and will no longer be lost.
- What things should you get rid of? Of course, from old and worn, obsolete and out of fashion. We also recommend that you decisively say goodbye to things that don’t suit you or that you feel insecure about. You can read in more detail about how to properly conduct an audit here.
vote
Article rating
Final stage
The guides are attached to the cabinet with an indentation of about 3 mm from the front edge of the side part. On drawers - flush with the front edge. Due to the indentation, you will be able to align the facades and the main part of the cabinet. Attach the facades from the inside using 4x30 self-tapping screws.
The trick to getting the fronts to fit evenly is to first drill holes in it for the handles, then place it in place and screw it from the outside. Pull out the drawer, fasten the façade from the inside as usual, and unscrew the outer “rough” fasteners. Then you drill holes for the handles through the front wall of the drawer and install the last element of the fittings.