The question is trivial. First, we recommend determining where to install your homemade fan. Two types of engines dominate in technology: commutator (historically the first), asynchronous (invented by Nikola Tesla). The first ones make a lot of noise, switching sections causes a spark, the brushes rub, causing noise. An asynchronous motor with a squirrel-cage rotor is quieter and generates less interference. You will find the start-up protection relay in the refrigerator. By adding a couple of phrases of humorous phrases, we will return the seriousness of the site. How to make a fan with your own hands without scaring your family. Let's try to answer.
Several suitable materials
There are several options for suitable materials for creating fan blades and cones:
- Plastic base. It is a favorite material for designers to create devices like fans. Plastic blades are made from the top of the bottle, which is located closer to the neck. The entire part is cut off right down to the cork. In addition, a cone and a base for a fan are made from a plastic bottle. The second piece is usually constructed from the bottom of a plastic bottle. Sometimes additional parts are required: drinking straws or cardboard.
Plastic blades for fan - Cooler. The easiest way to make blades and a cone for a fan is to use a computer cooler. This part is used as an aerodynamic filter in the computer unit. In this way, a cooling system is built for the internals of the system unit. The cooler is just a fan, only reduced in size. To make the ventilation equipment larger, you will need several unnecessary coolers.
Cooler as an integral part of the cone and blades for the fan - Disk. This part is suitable for creating blades. This option is easier to use, as it is small in size. But a disk structure is much more difficult to build. Also, it is not possible to make a cone from a disk.
An example of creating blades from a disk
Wind blower without engine
How to make a mini-fan at home without a motor? A very popular option is to create a device using small neodymium magnets.
Take the cooler from the computer and separate 4 transformer coils from its body. Instead of copper windings, you need to install and secure the same number of pieces of magnet. Usually they buy neodyms in the form of half-arcs or remove them from an unusable hard drive. The magnets are placed exactly in the places where the transformer windings were removed, that is, along the perimeter of the cooler frame.
As soon as the last piece is secured, the mini fan will begin to rotate. Using permanent magnet technology, it is possible to assemble an almost perpetual motion machine. To stop it, one of the neodymium pieces that replaced the coil is removed from the circuit.
The field of the magnets must be equal in strength to the field of the disconnected coils, otherwise the propeller will not be able to rotate in a constant, stable manner. The poles are placed diagonally, alternating plus and minus.
What if none of the above methods work and you don't have enough time or parts to make your own fan? In this case, you will have to use a regular factory product.
Step-by-step instruction
For each material listed previously, there are instructions for creating blades and a cone for a fan.
Made of plastic
Let's consider the algorithm of actions with a plastic bottle:
- One part of the plastic bottle with a cap will be the blades. Therefore, the base is cut in such a way that several petals are formed. The petals come off one by one.
- To give the blades their shape, you need to twist them.
A candle, matches or lighter will help with this. The main thing is to carefully monitor the process, since soft plastic is susceptible to fire. It is better to keep the lighter at a maximum distance just to heat up the plastic. Section of the first part of a plastic bottle - The cover is used as a base for a propeller with blades. A hole is made in it that matches the size of the motor axis. To strengthen the connection, the material is glued.
- The fan base or cone is constructed from the remaining part of a plastic bottle. A hole is made in it to place a lid on which blades with a motor are placed. The structure is installed strictly at a right angle. The main thing is to make the base heavier. Large bolts, nuts or other metal elements of significant weight are suitable for this.
- At the end, a hole is made for the button on the base of the future cooling device, and the electrical circuit is closed. You can also place a power supply there.
From the cooler
Next, consider the instructions for using the cooler:
- To turn the cooler into a ventilation device with a propeller, first the wires are prepared, and then the connecting structure. When placing the device near a computer unit, an ordinary USB cable will be useful. The connecting wire is cut and stripped of insulation. A similar operation is carried out with the cooler wiring. During the propeller assembly process, you will need a red and black wire. The first is responsible for the plus, the second for the minus. But if there are other colors in the wires of the cooler and USB cable, they can be cut off and removed. This is done to avoid confusion.
Installing the cooler on a plastic base
- Let's move on to the procedure for joining materials.
First, the wires and cooler are cleaned of dust and other debris. It is better to twist the cords tightly together. Don't mix colors. An incorrect design will lead to difficulties in the process of designing parts for the fan. Twisting requires 1 cm. If necessary, most wires are cleaned and insulated later. Wires and cooler - Don't forget about the safety of the design. Properly insulated propeller wires ensure a low chance of shorting out an outlet or computer. Exposed wires are wrapped with electrical tape if there is no power. It is better that the flooring is thick.
- The final touches to creating the propeller are to equip it with a computer cooler. The point is that this part is light but fast. 5 volts is enough for a very high rotation speed. The voltage indicator was chosen for a reason: the cooler will cope with its task and will not make a lot of noise.
Final layout of parts for the fan
When the minus falls to the plus, a dangerous situation is created. Do not allow the black and red wires to touch while connecting the electrical circuit. In this case, not only the USB cable burns out, but also the components of the computer system.
Typically, a computer is not afraid of such situations if it has special protection against voltage surges built into it. The problem is much more complicated with sockets. During surges, the socket short-circuits and the entire wiring is disrupted. Therefore, care should be taken to insulate the exposed part of the wires in order to avoid complications and unusual situations.
To create a full-fledged fan of significant dimensions, you will need several unnecessary coolers. Otherwise, the device will fall due to oscillations and vibrations. This situation cannot be allowed for the following reasons:
- If dropped, the device may bounce directly into your face. But such a device will not cause deep cuts.
- If the made device falls on a flat surface, the blades will simply break. The fragments will fly to different places. A dangerous part can also bounce into the eye.
- Other dangerous unforeseen circumstances.
From disk
You can't make a cone out of a disk. But this material is useful for creating blades. Let's look at the detailed instructions for creating parts:
- Since a fan with disc blades does not use a cooler, you need to buy or find a special motor.
He sets the structure in motion. But it is actually possible to use the engine from the system cooler for cooling. It is necessary to select a motor that moves with a certain part - protruding iron or plastic rods. But the disk will make a much better and stronger propeller. Parts from an old VCR and player are taken as a motor. These materials are good because the devices are based on the process of spinning disks and cassettes. You cannot use a motor from a washing machine or a broken fan. Such devices spin the propeller strongly. When you assemble a product yourself with low-quality tools, the structure turns out to be flimsy. Therefore, a motor with a suitable rotation speed is first selected. If the motor is spinning at high speed, it is likely that the disc base of the blades will break apart and scatter across the room. The running motor is connected with wires in the same way as described earlier. Example of disk layout - Next comes the design of the blades.
The disc is the base of the propeller that is attached to the engine. Therefore, you need to work more carefully with this detail. To begin with, several disk surfaces are cut into 8 identical parts each. The material is first lined using a ruler and a simple pencil. This is necessary to prevent errors. In this case, a soldering iron will be more useful, since the tool does not leave sharp edges, unlike scissors. After this, the disk surface is slightly heated with a lighter. This makes the material more pliable. The separated parts twist like the blades of a real fan. A similar procedure was done with a plastic bottle. A wooden plug is fixed in the center of the device. If the size does not match the hole, the plug must be planed. Final disk fan with 2 bushings - After creating the propeller with blades, everything else is designed. The disk is not useful for constructing the cone. The central part of the disk fan is mounted on a standard toilet paper roll sleeve. The resulting part is fixed strictly in the center of the second disk surface. This structure will act as a foundation for the fan. The remaining part of the sleeve is located at the top. The propeller motor is placed in this place. Disc blades are attached to the motor. The device is now ready for use. Additional decorative elements in the form of lighting are always added upon request. This makes the device look presentable.
Homemade products for the garage: DIY ideas
The garage takes up a lot of space in the life of the stronger half of humanity, even if the family does not have a car. In addition to being used as a room for storing and servicing a car, the garage has a fairly wide range of functions, despite its rather limited area.
First, let's look at several options for ergonomic use and design of the interior space of the garage:
- In 99% of cases, a garage box has a rectangular shape in its internal configuration. Accordingly, the distance from the car to the side walls is not very large and is not comfortable for carrying out any work. The most common arrangement option is to move the work area (workbench, shelving or cabinets with tools and spare parts) to the rear of the garage, to the wall opposite the gate. This area may even have enough space to install any necessary equipment other than a workbench.
- If there is an additional room in a large garage (utility room, electrical room), then on the surface of its door you can organize tool storage using a hanging sheet or fill it with holders in the form of loops of different sizes made of plastic and ordinary ropes.
- The simplest option: if you cannot install a shelving in the garage, you can place a metal grill at some distance from the wall. You can hang almost any objects, clothes and the like on it. You don't even have to install shelves.
- Another way out is to attach hooks to any surface. There simply can’t be enough of them in the garage. You can make them yourself, or you can buy them at the supermarket. Significant savings in free space are guaranteed.
So, the garage has been purchased. At the initial stage of arrangement, we will most likely talk about purchasing pieces of furniture. Finding something that suits the owner and at the same time takes up a minimum of space is not so easy. The way out of this situation is to make the necessary pieces of furniture with your own hands.
A table with a folding hinged top is ideal for a small garage. Such a stand does not take up much space, but can be a table with a very decent usable area. In its manufacture, the materials from which the old cabinet was made are often used.
Source: https://dekoriko.ru/postrojki/garazh/samodelki/
Fan Design Considerations
The amount of air will depend on the size of the propeller
Before you begin design, you need to imagine the design of a cooling-type product. Depending on their location, they can be floor, ceiling and tabletop.
Both factory and homemade fans consist of the following parts:
- Propeller. The larger its diameter, the larger volume of air will be supplied to the object.
- Electric motor. A product powered by a household network, adapter, batteries or rechargeable batteries can be used. The performance of the finished device is directly proportional to the motor power.
- Stand. Here you need to show imagination and ingenuity. The stand must meet criteria such as safety, stability and presentability.
- The wire. For a small motor, any cable left over from broken watches, lamps and other small household appliances is suitable. It is advisable to install a switch on the wire to control the device without leaving your seat. If you plan to connect a USB, an extension cord or a cord from an old mouse or keyboard will do.
The starting point for starting design and construction is finding a motor. If you have unnecessary tools, toys and kitchen appliances in your home, you can donate them. Motors from a drill, screwdriver, screwdriver, mixer, children's car, trimmer, electric razor can be used. Sometimes in an apartment you can find broken coolers from system units or laptop stands. Considering the saturation of modern housing with technology, finding a motor will not be difficult.
Wind blower without engine
How to make a mini-fan at home without a motor? A very popular option is to create a device using small neodymium magnets.
Take the cooler from the computer and separate 4 transformer coils from its body. Instead of copper windings, you need to install and secure the same number of pieces of magnet. Usually they buy neodyms in the form of half-arcs or remove them from an unusable hard drive. The magnets are placed exactly in the places where the transformer windings were removed, that is, along the perimeter of the cooler frame.
As soon as the last piece is secured, the mini fan will begin to rotate. Using permanent magnet technology, it is possible to assemble an almost perpetual motion machine. To stop it, one of the neodymium pieces that replaced the coil is removed from the circuit.
The field of the magnets must be equal in strength to the field of the disconnected coils, otherwise the propeller will not be able to rotate in a constant, stable manner. The poles are placed diagonally, alternating plus and minus.
What if none of the above methods work and you don't have enough time or parts to make your own fan? In this case, you will have to use a regular factory product.
Design of an electric motor cooling fan impeller and its application
When choosing an electric motor cooling fan impeller, special attention should be paid to its design and application.
The design of the electric motor blowing impeller can be:
- Composite. The working blades are mounted on the manufactured mounting hub.
- One piece. The hub and blades are stamped as a single piece of sheet material.
The amount of air that reaches the cooled surfaces depends on the diameter of the impeller, the angle of attack of the blades, and the type of impeller relative to the direction of rotation. The impellers are forward curved, straight radial and backward curved.
CD
Don't know how to make an efficient CD fan? It's easier than it seems. We divide the disk into 8 sectors. An even number of blades is easier to balance if axial runout occurs.
We cut out the blades with ordinary scissors. You can do this work with a construction knife, or melt the sectors with a soldering iron - there is not much difference. If you accidentally break a CD, get a new one.
The extra segments are broken out, the rest are given the aerodynamic shape of a propeller. To do this, just heat the workpiece over a candle or using a hair dryer. If you make a mistake with the geometry, you can always correct the situation by reheating. This is the advantage of crafts made from a CD.
In the center of the structure we glue a thickening: any piece of plastic 5–10 mm. We drill a hole in it for mounting on the electric motor shaft.
Review and comparison of production ready models
When considering a radial volute fan, you need to take into account the material of manufacture: cast aluminum housing, sheet or stainless steel. A model is selected based on specific needs; consider an example of serial models in a cast case.
From time to time the need for a kind of fan arises, but small models are relatively expensive. There is no need to rush to shell out money, because you can easily make a small fan with your own hands. In terms of efficiency, it is not inferior to purchased analogues, and its creation will require a minimum amount of materials.
How to determine the power pins of a USB cable
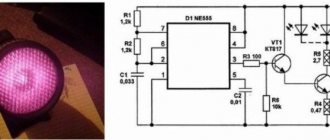
Any USB connector consists of 4 pins. We are not interested in averages, these are information wires. The 5 volt power supply is on the outermost contacts. Wiring in the illustration:
If you reverse the polarity, nothing bad will happen. The motor will just spin in the wrong direction. How to determine the motor supply voltage? There is no need to look for markings. If the toy (where it was installed) is powered by three batteries (1.5 volts each), then the motor is 5 volts. If it runs on two batteries, it will not be suitable for USB power.
Fan based on a plastic bottle
What our craftsmen don’t do from plastic bottles! The time has come to say that they also make a very good fan. It may not ventilate your entire room, but it will definitely help those who have to work at a computer.
We offer two options for creating such a fan model.
Hard plastic model option
To complete the work we will need:
- plastic bottle with a capacity of 1.5 liters;
- a motor from an old toy;
- small switch;
- Duracell battery;
- marker;
- scissors;
- candle;
- hammer and nail;
- Styrofoam;
- hot glue gun.
So, we take an ordinary 1.5 liter plastic bottle with a stopper. At the level of the label line, cut off its upper part. This is exactly what we need to make the propeller. We divide the surface of the plastic blank into six parts.
We try to mark it out so that we get equal sectors: the quality of operation of the future device depends on this.
We cut the workpiece along the markings almost to the neck. We bend the blades of the future propeller and cut off every second of them. We are left with a blank with three blades equidistant from each other. The edges of each blade must be rounded. We do this carefully.
To remove those parts of the blades that are closer to the neck of the workpiece, it is better to use a utility knife; do not forget to round the edges of the blades
Now we will need a small candle. Let's light it up. We heat each blade at the base on it to turn it in the direction we need. All blades must be turned in the same direction. Remove the lid from the workpiece and punch a hole in the very center using a nail and hammer.
We place the plug on the rod of a small motor. Such motors can remain from old children's toys. As a rule, getting them is not difficult. Secure the cork with glue.
Now you need to make a base on which the motor will rest. For this purpose, we take, for example, a piece of polystyrene foam. We attach a rectangle to it, which can also be cut out of foam packaging.
Our motor, to which the propeller is attached, will be fixed on the upper surface of this rectangle. To do this, you need to make a recess in the foam that corresponds to the parameters of the motor.
Hot melt adhesive is used to secure the elements of the product. If it is unavailable, other adhesives can be used. It is important that the fastening itself is as reliable as possible.
Polystyrene foam is a convenient material for constructing a fan stand, because it is easy to give it the desired shape, but it is better to make the base of the stand heavier.
A small switch and a power supply, the role of which is played by a rectangular Duracell battery, are attached to a foam stand. We assemble the simplest chain, trying to do everything as carefully as possible.
All we have to do is screw the propeller onto the plug fixed on the motor. Our fan is completely ready for operation.
The foam stand probably weighs too little to give the device the necessary stability. After all, with a sufficient span of blades, it can turn out to be quite powerful. Therefore, it is advisable to make the base of the model heavier.
Option product made of soft polymer
Let's prepare in advance everything that we will need during the work:
- two bottles of SevenUp lemonade;
- electric motor 12 V DC;
- seven thick straws for drinks;
- connector for power supply;
- the power supply itself;
- switch;
- scissors and utility knife;
- marker;
- hot glue gun;
- Super glue;
- plastic ties;
- wire cutters;
- soldering iron;
- insulating tape;
- CD disk.
So, there is another option for building a homemade fan from a plastic bottle. Let's take a bottle of smaller capacity, for example, SevenUp lemonade.
The algorithm for cutting the blades of the future propeller is the same as in the previous version. The plastic of this bottle is much softer, so you can give the desired slope to future blades without resorting to heating them.
A hole in the center of the cork should be made using an awl or nail heated over a fire for this purpose. The 12 V DC electric motor, on the shaft of which the propeller will be attached, can be taken from old toys or a hairdryer that is unnecessary in the household.
The cover is fixed to the shaft using hot melt adhesive. We immediately screw the light propeller to the lid.
When talking about this option for constructing a fan, we mentioned seven tubes, but if the tubes you have have a smaller diameter, you will need more of them: you need them to fit tightly into the neck of the lower workpiece
The most interesting thing is the construction of the stand. It turns out to be not only stable, but also attractive. To create it you will need seven thick drinking straws. It is necessary to glue them together with superglue. It turns out to be quite a strong and attractive stand.
For the base, take the top part of a plastic bottle larger than the one from which we made the propeller. We push the stand of tubes into the neck of the workpiece, approximately to the middle of its length. We fix the stand in this position using superglue applied to the neck of the workpiece.
Now you can install the engine on the rack, securing it with hot glue. The fact that the stand itself is made of hollow tubes helps hide the wires nicely. We simply pass them through the central tube. This way the wires end up inside the base of the device.
To further strengthen the structure, you should use plastic ties, which are glued with hot glue to the stand on the sides of the motor so that the tie lock is tightened over the motor itself, ensuring its immobility. The excess tip of the fastener is removed with pliers.
In the plastic surface of the bottle, which serves as the base of the structure, holes are cut for the power supply connector and switch. It is better to do this with a utility knife.
We connect the connector for the power supply and the switch. The wires should be soldered and insulated. The switch and connector are fixed to the plastic with hot glue.
The CD disk, which becomes the bottom for the base of the future fan, is not only the finishing touch of the work, but also makes the product more stable
To make the base heavier and more stable, we will build a bottom for it from a CD.
To do this, lubricate the edges of the plastic blank with hot glue and press the disk against it.
The motor is connected to the power supply via a connector, and the device itself is turned on using the red button located on the left
Now we connect power through the connector. For this purpose, you can use a power supply for LED strips, which is sold in electrical appliance stores. Well, this homemade product is ready to go.
To make sure that you correctly understand the sequence of work performed, watch the video at the end of this article.
Decor
Now you need to think about the design of the fan unit that you made yourself. In order to assemble all the coolers together, you need to decide what shape the structure will be in. You might find it easier to fold them into a square or just line them up.
In any case, for these purposes you will need a glue gun, which is usually used to make DIY products in technical creativity or floristry circles. You can use it to glue the ribs of the coolers in the right places and let them cool. But if you don't have a gun and just have wire and tape, you can fasten the coolers through the bolt holes with wire and wrap the edges with black tape.
So, you have managed to make sure that making a simple room air blower with your own hands is simple and accessible even to a person far from technical creativity. Such simple solutions can help out in a situation where you need to keep the room cool in windless weather, but a regular fan is either broken or simply not in the house. In these cases, simple ingenuity comes to the rescue.
So, all you need to prepare is a sharp knife, electrical tape, an unnecessary USB cord and, in fact, a homemade executive body. As for the latter, it is customary to use one of two options: an old cooler from a computer or a motor from a typewriter. Next, we will look at two instructions that will clearly explain how to make a USB fan at home with your own hands!
Use of factory parts
Let's return to the presence of conditionally unnecessary computer components in the home workshop. For example, a cooler from a power supply or system unit.
The electrical part of the work is reduced to a minimum. If the power is 5 volts, we work according to the scheme: USB cable. To supply 12 volts you will have to look for a power supply or a phone charger. In addition, there are “turbines” that are connected to a 220 volt network.
Actually, to make a fan from a computer cooler, you just need to fix it on some kind of stand. And if you use batteries instead of a USB cord, the flow of fresh air can be organized anywhere.
Idea No. 1 – Use a cooler
As a rule, it will take no more than 15 minutes to assemble a USB fan from a cooler. First you need to prepare the cooler. There are two wires coming out of the device - black and red. Strip the insulation to 10 mm and set the prepared element aside.
Next you need to prepare the USB cable. Cut off one half of it and peel off the insulation at the cut point. Under it you will see four contacts, of which two are necessary: red and black. You also clean them, but it’s better to cut off the other two (usually green and white) so that they don’t get in the way.
Now, as you understand, you need to connect the prepared contacts in pairs, according to: red to red, black to black. After this, you need to carefully insulate the cable connections and make a stand. As for the stand, it’s a matter of your imagination. Some successfully use wire, some very interestingly cut out a seat in a cardboard box.
In the end, the homemade mini fan is connected to the computer, and you can enjoy the operation of your own electrical appliance.
Cooler idea