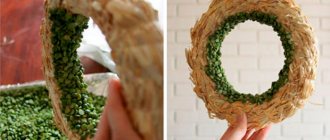
Little Mermaids
You will need: 2 toilet rolls, colored paper, scissors, paints, glue, markers and glitter.
Master Class
- Paint the bushings a tan beige color.
- Draw a face for the little mermaids.
- Cut out of colored paper: strips for hair, blanks for a bra, a skirt, a starfish to decorate the head and a mermaid tail, as shown in the image.
- Curl the hair strips using a felt-tip pen.
- Glue the cut pieces to the bushings.
- Decorate the mermaid's tail with glitter.
Mermaids made from bushings are ready!
Making a squirrel figurine from a toilet paper roll
What materials will be needed?
- Thick paper or cardboard, orange and light brown. It is important to ensure that one of the colors is slightly lighter.
- A sheet of plain white paper. With its help we will make teeth for our squirrel.
- The bushing itself.
- Eyes from some toy, or eyes also made with your own hands from circles of light and dark paper.
- A jar of glue, a ruler, scissors, a pen or pencil, and a black felt-tip pen.
- A small acorn that can be found under an oak tree.
Step-by-step manufacturing guide.
- To begin, you will need to use scissors to cut a piece of cardboard or thick brown paper that will fit the size of the sleeve.
- Next, we glue the sleeve with the piece of cardboard that we cut off.
- Let's start making squirrel ears. You will need to bend the halves of one side of the sleeve inward, alternately. You need to take root with care, maintaining symmetry.
- We also cut out the squirrel's tail from cardboard. The tail strip should widen slightly closer to the tail, and be slightly higher than the bushing itself.
- Start cutting out the paws from cardboard. Two sticks with fingers of such thickness that they could later hold our acorn.
- An orange cardboard heart with rounded ends will become the muzzle for our little animal. We also cut out white teeth from a sheet of white paper. Remember that squirrels have quite long ones!
- We assemble a squirrel figurine from the parts using glue. We also place the acorn in the hands of the animal, securing it with glue. The tip of the tail should be slightly curled with a pencil, and a nose should be drawn on the squirrel’s face with a felt-tip pen. The figurine is ready!
Organizer for rubber bands
You will need: a sleeve, fabric, a glue gun, a plastic cap with the diameter of the sleeve, 4 push pins.
Master Class
- Cover the sleeve with fabric, leaving one circle open.
- Cut out a circle of fabric and glue it onto the plastic lid.
- Insert 4 push pins as legs to make the organizer stable.
The organizer for rubber bands from the sleeve is ready!
DIY.ORGANIZER with UNICORN.Do-it-yourself ideas from sleeves/How to make organizer.Hand made.
Convenient hooks for chains
Sleeves made of durable cardboard can be used as original hooks. To work, you will need to prepare a wooden sign, strong glue, and paints.
Instructions on how to make a useful accessory with your own hands:
- Cover the bushings with several layers of paint.
- Glue them onto the prepared wooden panel.
- Attach a panel with improvised hooks to the wall.
Such hooks can withstand sufficient weight, but you should not overload the parts.
Hare binoculars
You will need: 2 bushings, cotton wool, glue, thick mega-fluffy chenille wire, pink pompom.
Master Class
- Glue the 2 bushings together.
- Roll out many cotton balls of approximately the same size.
- Glue cotton balls onto the sleeves.
- Form the bunny's ears out of fluffy wire, then glue them on.
- Glue a pink pom pom between the sleeves as a spout.
The hare binoculars made from bushings are ready! I recommend watching this video!
DIY crafts: PHONE HOLDER from toilet paper rolls – Innova Crafts
Teenage Mutant Ninja Turtles
You will need: 2 bushings (for one turtle), scissors, glue, clothespins, black marker, green and yellow paints, painting sponge, colored paper, decorative eyes.
Master Class
- Cut strips of colored paper and make a belt as shown in the image.
- Cut out a strip of colored paper that will later become a blindfold.
- Cut off part of the sleeve, shortening it slightly, then cut off the corners and shape it into a shell.
- Paint the front side of the shell yellow and the back side green.
- Draw abs cubes with a black marker on the yellow side and diamond shapes on the green side.
- Vertically cut off part of the sleeve, glue the edges to make the sleeve narrower, then secure with clothespins until completely dry.
- Remove the clothespins and paint them green.
- Apply glue to the inside of the shell and glue the narrow sleeve.
- Cut out a blindfold from colored paper and glue it on, securing it with a clothespin.
- Glue the belt.
- Make and attach the head as shown in the image.
- Glue on the turtle's eyes.
- Make a whole team of Ninja Turtles the same way.
Ninja Turtles made from bushings are ready!
Cat toy
Making a toy for your beloved pet is very simple and quick.
For the cat toy you will need:
- Thick rope or wire.
- A long sleeve, preferably not from a roll of toilet paper, but from towels.
- Feathers, beads, colored paper, bells.
Manufacturing:
- Pull the rope or wire through the sleeve and tie at the top.
- Paint the feathers in different colors, cut out various oblong figures from paper in the likeness of Christmas tree branches or garlands.
- Secure all toys to the bottom of the sleeve using a needle, thread, tape or glue. Feathers can be used to pierce cardboard to secure it.
- The toy is hung on a window or door handle.
Llamas
You will need: bushings, colored cardboard, scissors, glue, paints, brush, black marker or felt-tip pen.
Master Class
- Paint the bushing with red paint and wait until it dries.
- Paint the rug with white paint and leave to dry.
- Draw the body and legs of the llama on red cardstock, then cut them out. For the toy to be stable, the legs must be in a U shape.
- Draw eyes and other small details with a black marker as shown in the image.
- Make a cut on the body of the llama and glue it to the sleeve.
- Glue the tabs to the bottom of the sleeve.
- Make llamas of different colors in the same way.
The bushing llamas are ready!
Materials and tools for work
Before starting independent creative work, you need to prepare the following set:
- Toilet bushings.
- Scissors, stationery knife.
- Glue.
- Paints (gouache), acrylic varnish.
- Colored and illustrated paper.
- Decorative elements (beads, rhinestones, films imitating other materials).
- Various textiles for creating crafts.
- Threads, needles.
Instructions with a detailed description of the work being performed may also be useful.
Before you start creating crafts, be sure to familiarize yourself with the rules for processing toilet sleeves - after all, cardboard is not resistant to moisture. This fact should be taken into account in the process of creative activities.
Unicorn
You will need: a sleeve, colored paper, scissors, glue, glitter and colored cardboard, rainbow colored yarn, black marker, pink lipstick or pink pencil.
Master Class
- Cover the sleeve with colored paper.
- Wrap different colors of yarn around 3-4 fingers, then cut and shape into a mane and tail.
- Glue the mane and tail to the sleeve.
- Cut a triangle out of glitter cardstock and glue it on as a horn.
- Make ears from triangles of different colors and sizes, as shown in the photo.
- Glue the ears next to the horn.
- Draw eyes and eyelashes with a black marker.
- Draw on the cheeks with pink fondant.
The unicorn from the sleeve is ready!
How to make a unicorn organizer | DIY Organizer from a Sleeve
Practical pencil case for schoolchildren
From several sleeves you can make a real convenient pencil case with compartments for pencils, felt-tip pens and other writing utensils. Instructions on how to make a craft from a toilet roll:
- Cut the bushings at an oblique angle. To give the pencil case an original appearance, you can make sleeves of different lengths.
- Glue together the parts - future storage compartments - using glue.
- The pencil case can be made either in the form of horizontal tubes or in the form of a vertical stand.
- Cover the finished product with gouache and acrylic varnish.
If desired, the craftsman can use additional decor - cover the product with fabric, draw a sketch, or paint using a stencil.
Dog puppet
You will need: 3 bushings, a simple pencil, scissors, soft wire, rope, decorative eyes, colored paper, glue gun, wine cork, 2 wooden sticks, paints, a brush, a piece of foam.
Master Class
- Paint the 3 bushings brown and leave to dry.
- Draw 10 small circles and 2 larger circles on construction paper, then cut them out.
- Take the bushing and make 4 holes for the paws.
- Glue 10 circles onto the sleeve.
- Prepare 2 pieces of rope and thread them through the paw holes as shown in the image.
- Make 2 more holes opposite the paws and thread the rope.
- Take the second sleeve, cut off the third piece and set it aside.
- Make the dog's head: Take a large piece of the cut sleeve and make 2 holes in the top opposite each other.
- Measure the distance where the head will be, tie a knot and attach the head by threading a rope.
- Wrap 2 wooden sticks with soft wire and connect them together to form a cross.
- Glue the cross to the ropes.
- Glue 2 blue circles and decorative eyes on top of them.
- Cut ears from the third sleeve and glue them on.
- Glue on a small piece of foam for the nose.
- Screw in the small piece of sleeve that you cut off earlier and glue it in as a tongue.
- Cut the wine cork into 4 parts, make a hole in the center, paint it black and wait for it to dry.
- Attach cork blanks as paws by threading ropes through the holes and securing with knots.
The puppet made from bushings is ready!
Shoe organizer
If you buy paper towels in large rolls, save them. After all, you can make a large organizer for shoes. To make it stronger, you can additionally wrap each roll in a layer of thick cardboard. And then glue them together. You can also paint this organizer so that it fits perfectly into your interior.
Rainbow
You will need: a sleeve, white paper, corrugated paper in rainbow colors, scissors, glue, hole punch, rope, blue paint, brush, black marker, pink pencil.
Master Class
- Paint the bushing blue and leave to dry.
- Punch 2 holes opposite each other with a hole punch.
- Thread the string through the hole and tie a knot.
- Cut out a cloud from white paper.
- Draw eyes, eyelashes and a mouth on the cloud with a black marker.
- Highlight the cheeks of the cloud with a pink pencil.
- Glue the cloud to the sleeve.
- Cut the corrugated paper into strips.
- Glue rainbow stripes to the inside of the sleeve.
The rainbow from the sleeve is ready!
Unusual office organizer
You can make your own organizer for storing office supplies. For work you will need the following materials:
- sheets of thick cardboard;
- tin cans (6 pcs.);
- pencil;
- scissors;
- tourniquets;
- paper;
- glue;
- spray paint;
- ruler.
The work is performed in the following sequence:
- You need to clean the jars, cover them with glue and wrap them in paper.
- Then a handle is made and wrapped with a tourniquet.
- The jars are painted and dried.
- Then the cans are placed in pairs, connected in the middle with a handle and wrapped in ropes.
For the next version of the organizer for pencils, pens, paper clips and scissors you will need:
- cardboard tubes;
- acrylic paints;
- brushes;
- plastic paints;
- clear varnish;
- bias tape or braid;
- sackcloth;
- coffee beans, dried flowers.
The work is performed in the following sequence:
- It is necessary to cut the tubes to the required length; the number of elements is determined arbitrarily.
- The inside of the tubes is painted gold using acrylic dye.
- A stand is made from a plastic cover. You can also use old records. The elements are coated with acrylic paint and clear varnish.
- The upper edges of the tubes are treated with bias tape, which is fixed to an adhesive base.
- The tubes are wrapped in burlap and decorated with braid.
- The elements are placed randomly on the stand and fixed with Moment glue.
- The work is completed by decorating the organizer with ribbons, coffee beans, and dried flowers. The elements are attached with superglue.
You can prepare several compact organizers for pens and pencils in the required style:
- The stands can be made from wood cuts. You will need a low frame, the material is cleared of the core, processed with sheets of sandpaper, and coated with transparent or translucent varnish.
- To make a stand in a vintage style, you need to cover a tin can with pink fabric. Then lace inserts are passed along the top and bottom edges. Flower-shaped fittings are attached to the end.
- The organizer made from tin cans looks original. The containers are covered with colored paper, and decorative stones and shells are applied to the material using an adhesive base. Objects are coated with transparent varnish and fixed on a base made of a sheet of plywood.
- The nautical style pencil holder requires paper towel tubes. A cardboard base is being prepared. Each tube is covered with lace napkins, PVA glue is used, and folds are formed. The tubes are fixed to the base and painted with water-based paint (blue, orange, yellow). You can glue starfish, plastic fish, artificial algae, and shells to the stand.
- Pencil holders can be made from tin cans decorated with burlap. Along the perimeter of the upper part you need to glue flowers sewn from linen fabric in light shades.
- A stand made of a plastic or tin container can be covered with craft paper or leftover vinyl wallpaper. The materials are glued to the jars; the decor can be supplemented with braid, beads, and lace.
- Stationery organizer stands can be made from plastic shampoo bottles. The container is cut into 2 parts, the cut line should be smooth or curly. Handles are cut out at the top and glued to the bottom. Velcro is glued to the back of the containers, with the help of which the containers are fixed to the canvas and hung from the wall.
- Art Nouveau style pencils are made of satin fabric and lace. Satin is glued onto a cardboard circle and bordered with lace. Plastic tubes are installed and glued in the center of the circle. Products are decorated with lace, ribbons, sequins, and beads. The composition can be supplemented with a photo frame painted in a suitable color.
Sweet monsters
You will need: bushings, paints, sponges or brushes, regular and curly scissors, glue gun, black marker, decorative eyes, multi-colored tape, soft wire, bags of candy, ribbons.
Master Class
- Use your imagination and decide on the type of monsters.
- Take the bushings and cut out the mouth holes and the shaped edge of the head.
- Paint the bushings bright colors and leave to dry.
- Glue soft wire and decorative eyes.
- Decorate the monsters with strips of tape.
- Place a bag of candy inside each sleeve and tie with a ribbon.
Candy monsters made from bushings are ready! I recommend watching the video: how to make a miniature watermelon box)
DIY Miniature Water Melon Gift Box | Toilet Paper Roll Craft Ideas for Kids on Box Yourself
Bee
You will need: sleeve, colored paper, scissors, glue, black marker, self-adhesive eyes.
Master Class
- Cover the sleeve with yellow paper.
- Cut strips of black paper, then glue them on.
- Cut out the wings from blue paper, then glue them on.
- Attach self-adhesive eyes and draw a mouth with a marker.
- Glue 2 black stripes to the top of the sleeve.
The bee from the sleeve is ready!
Where to get ideas
Toilet paper roll is a versatile material. It is easy to work with, convenient, and most importantly simple. Ideal for children aged 1 year and older. The versatility of the sleeve allows you to make animals, flowers, organizers, cars and even various buildings out of them. The possibilities are limited only by the author's imagination.
Octopus
You will need: sleeve, orange paper, felt-tip pen, glue, scissors, self-adhesive eyes.
Master Class
- Cut 8 strips of the same size from orange paper.
- Twist them using a felt-tip pen.
- Cover the sleeve with orange paper.
- Glue the twisted strips inside the sleeve around the circumference.
- Glue the eyes and draw a smile on the octopus.
The octopus from the sleeve is ready!
Organizer for office supplies
You will need: bushings, plastic board, colored paper, scissors, glue, rhinestones.
Master Class
- Place the sleeves on the plastic board the way you want the organizer to look.
- Cut the length of some bushings.
- Cover the bushings with colored paper.
- Decorate each sleeve to your taste by gluing rhinestones.
- Glue the sleeves to a plastic board to form an organizer.
- Fill your organizer with office supplies.
The stationery organizer made from a sleeve is ready! I recommend watching this video!
DIY. Budget DIY office stationery organizer. Desktop organization.
Train
To make a train, you need several bushings, cleared of any remaining paper. We make the hitch from strips of colored paper, and the driver’s cabin from a piece of bushing about 5 centimeters in size. We cover all the blanks with colored paper and decorate them with bright stripes. We glue paper windows and cardboard wheels to the cars. The length of the train is limited by the number of prepared bushings.
Christmas tree
You will need: toilet paper or paper towel rolls, scissors, glue gun, paint, sponge, decorative elements - shiny ribbon, rhinestones, sequins...
Master Class
- Cut the bushings as shown in Image 1.
- Paint 4 blanks with green paint and the bottom part with brown. Then leave to dry.
- Glue the blanks together to form a Christmas tree.
- Cut the ribbon into pieces and glue them in a zigzag pattern to the tree.
- Glue sequins and rhinestones.
The Christmas tree made from bushings is ready!
Original decor
It's easy to turn an unnecessary thing into an unusual design solution. We offer you to decorate your house with your own hands.
Unusual Christmas tree made from ordinary bushings
- We collect the required number of bushings: at least 7 - this is exactly how many will be needed to make at least a tiny Christmas tree. And the maximum value depends only on your imagination.
- We paint the bushings green - this will be the crown.
- We paint 1 or 2 bushings brown - tree trunk.
- We glue the bushings to each other with their sides to form a pyramid.
- Glue the trunk at the bottom. If you have a small Christmas tree with 3 rows, then one brown bushing, cut horizontally in half, will be enough for support. If the Christmas tree is larger, then for stability, place two bushings fastened to each other, or maybe even three, folded into a triangle.
You can leave the Christmas tree this way. Or you can turn it into a New Year's one: attach a small glass ball from the inside to each sleeve, and wrap it with tinsel on top, hang beads, rain or small LED garlands. Here your imagination is not limited.
Paper flower painting
This craft is somewhat reminiscent of the scrapbooking technique. Use our recommendations or come up with your own, more complex flower patterns from bushings:
- We cut the sleeves into rings of different widths - these are future flower petals.
- We glue or tie the round rings together with a thread, four pieces at a time (it will look like buttercups). We make several such preparations.
- Cut one ring in half and glue two smaller rings from the resulting rectangles.
- We squeeze several rings into an oval shape and glue their ends to the resulting small rings. We make several of these blanks, similar to daisies.
- We squeeze several rings on one side to a pointed shape and glue them with their sharp ends to each other. This preparation resembles an aster, so we make several too.
- We decorate the resulting flowers with different colors.
- We prepare the background - we draw leaves, grass and stems on which our beautiful flowers will be placed.
Be sure to hang this framed masterpiece on your wall and let your family and guests enjoy the beauty.
Mini packaging for a small gift
- We measure the diameter of the sleeve and divide the value in half.
- We retreat from the upper and lower edges a segment equal in size to the resulting value, and mark two points opposite each other.
- We gently squeeze at points on both sides of the sleeve, and it “closes” like a small box of an unusual curved shape.
- We decorate the top with paints, apply sparkles, draw flowers and hearts with nail polish, glue beads and sequins, and the final touch is to decorate with a ribbon bow.
Such gift wrapping will dazzle the birthday boy with its beauty. The main thing is to remember to put a gift inside.
Crafts made from toilet paper rolls are a very exciting activity for children of any age.
Kids are interested in exploring the world and making something new from unexpected things. Creativity and creativity develop imagination and thinking.
And the more non-trivial objects and materials you use for crafts or decor, the more entertaining the process for adults and children.
Snowmen
You will need: bushings, felt, glue gun, paints, sponge, decorative eyes, soft wire, buttons, glitter, orange tic-tac, glitter balls.
Master Class
- Paint the bushings with white paint and leave to dry.
- Glue on 3 buttons, eyes and an orange tic-tac for the nose.
- Cut a strip of felt and glue it as a scarf.
- Form a U from soft wire and glue glitter balls as headphones.
- Apply glitter precisely to create a smile.
- Make each snowman unique.
Snowmen made from bushings are ready!
5 DIY IDEAS FROM A SLEEVE. BEST DIY New Year's crafts. What to give for the New Year 2022.
Firecracker
You will need: bushes, balloons, Christmas tree rain, scissors, wrapping paper, glue, glitter, stickers.
Master Class
- Tie a knot in the ball and cut off the tip.
- Pull the cut portion of the ball tightly onto the sleeve.
- Cover the sleeve with packing paper.
- Decorate the cracker with stickers.
- Cut the Christmas tree rain into confetti and pour 3 tablespoons into the cracker.
- To activate the firecracker: point the empty muzzle upward and pull back the tail of the ball.
The New Year's cracker is ready!
Binoculars
You will need: yellow cellophane, scissors, tape, black paint, brush, green and black paper, glue, rubber band, wine cork, string or elastic band.
Master Class
- Cut out 2 circles of yellow cellophane and tape them to the circumference of the sleeves as binocular lenses.
- Paint the circumference of the wine cork with black paint and cover it with green paper.
- Cover the bushings with green paper and glue the black stripes as shown in the image.
- Glue the bushings together and secure with a rubber band. After a while, remove the rubber band.
- Glue the taped cork between the bushings.
- Prepare an elastic band or rope of the required length, make a hole in the side of the bushings and secure the elastic band.
The binoculars are ready! I recommend watching the first 4 minutes of the video, in it you will see great life hacks with bushings!
40 SIMPLE AND GENIUS RECYCLING IDEAS
Stationery organizer made of cardboard - master class
For this master class you will need: a cardboard box, a stationery knife or regular scissors, a ruler, a pencil, universal Moment glue, PVA glue, acrylic paints or colored paper, a glue cap (the handle is next to the drawer), a sponge and a brush.
The organizer has a large box glued together from cardboard parts; the box opens with a handle (adhesive lid). The storage section is decorated with acrylic paints, or colored paper, a piece of wallpaper - the choice is yours
We will need a cardboard box made of thick cardboard (preferably corrugated). We transfer all the details onto cardboard using a pencil and ruler.
Each letter corresponds to the order of work: that is, first take part A, then 2 parts B, then part C, and so on. Please note: there must be 2 parts G, and 2 parts. H. (box walls).
- Take Moment glue and apply it to the sections of the children. A (back) and one of the side parts det. B. Hold B perpendicular to A for 5 minutes so that the glue dries. Then on the other side we glue the second part in the same way. IN
- Next we work, looking at the sequence of letters: C, D. As a result, we get the main part of the organizer
- Glue the bottom drawer in the same way. We do everything slowly and carefully. Now all that remains is to decorate our work
- But before painting or pasting, you need to cut ordinary napkins or paper towels into narrow strips. We coat the cuts and glue all the sharp edges of the product with pieces of napkin and PVA glue. Waiting for the glue to dry
- We begin to paint the product with a sponge and white acrylic paint. First we go over the entire surface for the first time, after drying - for the second time. We paint both the main part and the drawer. Then we take colored acrylic paints and apply them to the product 1-2 times.
- Take any suitable lid and glue it in the center of the box. Just like that, we made a box out of a cardboard box for any small items, as well as for manicure tools, nail polishes, and so on.