Author's rating
Author of the article
Yakov Pavlovich
Professor, Head of the Department of Vegetable Growing
Articles written
153
Corn harvested in the fall needs to be cleaned and prepared for winter storage. This is especially important for farmers and summer residents who keep animals on their property. An unpeeled cob takes up a lot of space and is not profitable to store in this form until spring. Therefore, different methods are used to peel the grain from the cob; often for this purpose, they make a corn sheller from scrap materials with their own hands. Before designing and calculating the design of a device, you need to understand how it works.
general description
A corn sheller is a useful device with an electric motor that helps the owner do a large amount of work without physical fatigue and spend a minimum of time on it. It can be of two types: large, into which a bucket or even more cobs are poured for processing, or small, designed for one cob. The first, with a capacity of 1 bag, is capable of husking it in 3 minutes, that is, such a mechanical assistant can process half a ton of corn in an hour.
Pumpkin Seed Crafts
Pumpkin seeds are ideal for coloring, so you can make bright and unusual crafts from them. For example, together with your child, using this natural material, you can make:
Color some of the seeds blue, blue and brown. A boat and a mast are made from brown seeds, and a sail is made from white seeds. And from blue and blue seeds the sea and sky are laid out.
The seeds are colored brown, orange and green. Carrots are made from orange seeds, and their tails are made from green seeds. And the brown ones are the soil in which these carrots grow. The background remains undecorated, so it is recommended to use white or light blue cardboard as a basis.
Classic method
When fresh corn comes into season, many people are looking for information on how to cook it to make a delicious dish. The classic method of cooking cobs in a pan on gas:
- We sort the heads of cabbage by size, put cobs of similar size into a bowl so that they are ready at the same time.
- It is advisable to cook the grains on the day of purchase - they will be more tasty and healthy.
- The prepared heads of cabbage are placed in cold water.
- The container is tightly closed with a lid, and the liquid level should completely cover the grains on the cob.
- To determine the degree of readiness of the cereal for softness, you should either taste it or use a fork. In this case, you need to focus on the approximate time for preparing boiled corn of a certain degree of ripeness.
- Salt the grains 5 minutes before the end of cooking or immediately before serving so that they do not remain hard.
- After bringing it to readiness, this dish is infused in the pan in which it was cooked, under a closed lid, for about 10 minutes.
- Before serving, place it on a plate, rub with salt and butter. Sometimes other spices are used to taste.
- Serve immediately after cooking, as in this state, it will be the softest and juiciest.
To know how long to cook old corn, you need to know its degree of maturity. The first stage of ripening is milky ripeness, when liquid is released from the grain when pressed.
If they are simply soft, then such cobs are considered ripe, but if the grains are in a hard state, they are already overripe. In the first case, the cereal should be cooked for up to half an hour, in the second - up to 50 minutes, and in the third even longer - 2-3 hours.
The method of cooking cobs described above is the simplest and most familiar, but there are many other recipes for preparing this grain crop. To do this, you can use a slow cooker or oven, pressure cooker or microwave.
Flavoring additives
Any recipe for making popcorn itself contains advice to improve the taste of the treat with butter and salt or sugar. But there are many more flavors of this dish. You can experiment by adding a variety of spices as desired:
- cinnamon;
- coconut flakes;
- powdered sugar;
- nutmeg;
- paprika and even mixed spices from a bag.
Recipes
Caramel
Kids should love caramel popcorn, which you can also make at home:
While the grains are opening, melt the butter and dissolve the granulated sugar with it.- Leave the container with the sweet mass on the fire and, stirring continuously, bring until golden brown.
- After this, just pour the mixture into the popcorn and mix.
Watch the video with the recipe for caramel popcorn:
With chocolate
You can also improve the recipe by preparing caramel with chocolate - to do this, melt the sweet bar or add cocoa powder to the butter and sugar.
With cheese
Another great recipe. And not with an aromatic additive, but with real cheese, finely grated into a hot delicacy. The cheese will melt and create delicious strings that will not change their taste even after hardening.
Spicy
It is somewhat more complicated than the previous ones, but it will definitely not leave you or your guests indifferent!
- Take corn syrup (50 ml.), half a cup of sugar, a little cream sugar, a pinch of vanilla, salt and chili pepper, and 2 liters. water.
- The ingredients must be mixed and simmered over low heat until partially thickened (about 20 minutes).
- After the resulting mixture you need to pour the popcorn.
Corn is a versatile product that can be used to prepare different dishes. Read the advice of our experts on how to can, pickle, and fry this healthy grain in a pan, how to diversify your menu with canned vegetables, as well as how to cook delicious corn porridge and make a salad, including with crab sticks.
Steps
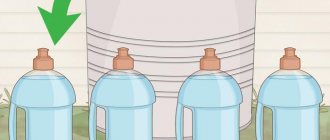
- 1Place a trash can near you.
If you have a lot of corn, spread out some newspaper and shuck on it. After this, you can simply roll up the newspaper and throw it away.
{"smallUrl":"https://www.wikihow.com/images_en/9/99/Cornpic8_400.jpg","bigUrl":"https://www.wikihow.com/images/thumb/9/99/ Cornpic8_400.jpg/336px-Cornpic8_400.jpg","smallWidth":460,"smallHeight":550,"bigWidth":336,"bigHeight":402,"licensing":"
What is a corn cob sheller?
Unpeeled corn cannot be used on the cob and will not be stored for long. The resulting harvest will turn into a breeding ground for fungi and harmful insects until spring. They can completely ruin the grain. In addition, much less space is required to store dehulled grain. What matters to small farmers.
There are 2 types of peelers:
- Industrial – process up to 500 kg of cobs per hour of operation. These are large installations and require 2 workers to service them. Since the hopper of the mechanism is loaded with large volumes.
- Amateur ones are low-power devices that can clean no more than 100 kg of raw materials in one hour.
Corn grits can be:
The installation is assembled from several main elements (may differ depending on the design):
- The drum is a container where the grains are separated from the stalks; it has a hole for loading raw materials, removing waste and sifting out the purified grain.
- Hulling element - fixed on the drum shaft, needed to clean the grain from the stalk.
- The grain container is a separate part, necessary for collecting the finished grain.
- Protective cover - protects against rotating parts of the unit.
- Drive is a complex of elements that sets the device in motion.
There are many combinations of these types of peelers.
Crafts from sunflower seeds
With the help of sunflower seeds available to everyone, the following crafts can be easily and simply created:
A disposable paper plate is used as a base. It is covered with yellow paper. A thin layer of black plasticine is glued to the central part of the plate. Sunflower seeds are glued to this plasticine.
The body and legs of the hedgehog are made from plasticine. Sunflower seeds are glued to the back with the sharp edges facing up. The figurine is completed with eyes and a nose made of plasticine.
The foam ball is completely covered with a thin layer of black plasticine. In the front upper part of the sunflower seed ball, two circles of 2 rows are laid out. These will be the eyes of an owl. They can be supplemented with highlights from white plasticine. The rest of the ball is completely covered with seeds to form feathers.
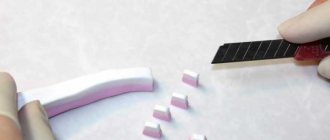
How to easily peel corn from grains
There is a very simple way to quickly clean corn from grains. To do this, the cob, first of all, needs to be cleared of leaves, tassels and “tail”. In order to make your work easier, the cob can be cut crosswise into several parts. After this, one row of grains is completely removed. Then, with your thumb, press on the row adjacent to the empty one, at the very base of its grains. As a result, the grains will be separated from the row in groups. Next, the entire cob is cleaned using the same method.
Before using this method, it is preferable to boil the corn. It will be a little more difficult to get the grains in their raw form.
Ideas for crafts made from seeds
To choose which craft to make to decorate your home or to participate in a competition in kindergarten or school, we recommend that you read the simple instructions for making original products. You can use different types of seeds for:
- Layouts of simple applications.
On a sheet of cardboard you need to draw an image (for example, the sun, an owl, a cat). Lay out the background from small grains or cereals, paste over the image itself with larger seeds of different shades: the sun can be made from sunflower seeds, the wings of an owl can be decorated with beans.
How to freeze corn kernels
To do this, corn on the cob is dipped in boiling water and blanched for five to seven minutes. Then the cobs are immediately transferred to a bowl of ice water, kept for about five minutes, removed and dried on a towel.
Thanks to this method, the corn kernels are easily separated from the cob.
The grains are separated from the cob in two ways.
Method 1. Using a sharp knife, cut the grains along the cob, being careful not to touch it.
Method 2. Husk the grains manually. Although this procedure is long, the grains turn out intact. This method is good if you freeze one or two cobs. But when freezing corn in large quantities, it is better (and easier) to use the first method.
The prepared grains are laid out in one layer on a tray and placed in the freezer for 1-2 hours.
When the grains are frozen, they are poured into portioned bags, tied well or sealed. For quick freezing, the bags are given a flat shape. Then they are placed in the freezer for further storage.
Corn kernels can be frozen in one go. To do this, pour enough grains into the bag so that they lie in one layer. The bag is well closed and put in the freezer. This method will prevent the grains from freezing to each other.
When frozen corn kernels are needed for cooking, they will not need to be cooked for long, since they have already been pre-heated. Without defrosting, they are placed in boiling water and brought to readiness.
Corn kernels can be cooked in the microwave or in a slow cooker using any recipe you like.
The shelf life of frozen corn is 6-8 months.
Corn, like all other vegetables, cannot be re-frozen. Therefore, it is immediately packaged in such a way that it can be used in one go.
Frozen corn is cooked in the same way as fresh corn. The only difference is that frozen corn cooks faster.
To freeze corn for the winter, you can choose any of the methods proposed above, since they all retain the beneficial properties of the corn and do not affect its taste.
Even toddlers love corn!
Contained in sections:
Showing publications 1-10 of 245. All sections | Corn. Activities, games, crafts from talasha
This golden autumn! It's a wonderful time! The autumn days are ending. Nature is not happy at all. The ground is shrouded in dry leaves. Only aspen can boast of gold coins. The autumn wind quickly picks up dry leaves and carries them to the river. Hundreds of small boats are sailing to...
Summary of a lesson on the surrounding world in the middle group “Corn” Lesson
on the World around us in the middle group.
Theme : “The world of plants.
Corn »
Purpose: Expand understanding of the plant development cycle. Objectives: 1. Enrich children's ideas about objects and phenomena of the world around them, using the example of corn
. 2. Continue to develop the premises...
How to separate corn kernels from the cob at home
Usually in cooking, the purified product is boiled and then consumed, without first separating the grains. But there are times when you still need to separate them. We will describe how to do this below.
Manually
It is most convenient to peel boiled corn with your hands.
Here's one way:
- Boil the culture and cool it so that you can hold the cob in your hand.
- Place a wide container in front of you.
- Take a sharp knife in your working hand, and hold the corn in the other.
- Using the tip of the knife, carefully begin to pick out one row of grains.
- Use this method to go to the end of the row and repeat for the rest. You can separate the remaining rows of grains with your hands.
Using a peeler
It is better to clean raw corn using a sheller. This device is a container, inside of which there is a metal disk with teeth (peeler), driven by a motor or manually. The blades located just below the disk direct the grains into the outlet chute.
Also learn how to grow sweet corn.
All actions when working with this device are very simple:
- Prepare the cobs. Free them from foliage.
- Place the container with the product near the peeler.
- Place a container under the outlet of the device to collect the finished product.
- Load the cobs into the sheller and turn on the device.
- Open the bean collection flap.
Cleaning Corn Using a Drill
Do-it-yourself corn crusher (crusher)
Corn
are very important as one of the main food products for people and animals, due to their high nutrient content.
When growing it for feed, you have to separate the grains from the cobs. This process is quite troublesome.
Therefore, to make it easier, you can make a special corn sheller with your own hands .
Now we will show you how to do this.
Description and main components
The device for cleaning corn grains from the cobs has many names: husker, crusher, crusher, peeler, husker, etc.
This device is a device that is equipped with teeth and a motor.
Made with your own hands, it allows you to greatly simplify and speed up the peeling process, separating the grains in almost a few minutes. In this case, a person is only required to pour the cobs into the device.
A device for cleaning corn can be large, designed for several cobs (one or two bags), and small, which can accommodate one head of corn.
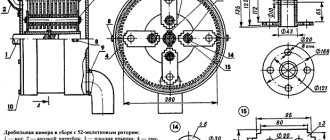
- a removable housing with three holes (one for pouring cobs, another (with a damper) for exiting bare stalks, the third for exiting separated grains) and a lid;
- peeling metal disc with teeth;
- gutters for releasing separated grains;
- engine (1.5 kW, up to 1450-1500 rpm);
- vertical shaft with bearings;
- drive belt;
- capacitor;
- stands on legs.
You can see the elements of a do-it-yourself corn
The disk should be 1.5-2.5 cm smaller in diameter than the bottom. The gaps between the disk and the side walls are designed to allow grains to fall there and pour them into the chute.
There are also tips for drilling holes in the disk and screwing bolts into them, which will knock the grains off the cob. There can be a lot of them, or just a couple of them.
The engine is installed under the stand on the legs and the shaft is attached. A start button or control unit is attached to the back of the stand.
The housing must be tightly closed with a lid so that the cobs do not fly out during operation of the device. There is an interesting option when a tray for cobs is attached to the top of the lid, the bottom of which closes with a flap.
Cleaning corn from the cob with a drill
Corn cleaning
from cobs and PVC tubes with screws screwed in.
Drill and corn
Dad's channel subscribe
This design will help save some time, since while one batch of cobs is in the cylinder, another can be loaded into the tray at this time and then simply open the damper so that they fall inside the unit.
In any case, opening the lid should be easy and convenient for you, but it should not rise during peeling.
How the device works
The operating principle of a homemade corn husker is simple. Corn cobs are poured into the unit body from above. Then the motor turns on, which, using a belt, begins to rotate the shaft and, accordingly, the peeling disk.
Teeth or other growths on the disc knock the kernels out of the cobs. They fall into holes and gaps, fall to the bottom of the body and, with the help of one or more rotating blades, centrifugal force and air flow, fall into a chute, through which they then exit into a container placed in advance or into a tied bag.
With the help of gravity and centrifugal force, full ears fall down and are crushed by teeth, and empty ones rise up. When the damper is opened to release the cleaned cobs, they fly out to the ground.
Tips and tricks for making
- Before you make a corn crusher with your own hands, draw a drawing of it and carefully consider how all the parts will be attached. This way you will understand what tools you will need and what fasteners you will use.
- The hole for the exit of the peeled cobs can be made in such a way that a bag can be put on and tied to it. This will allow you to quickly collect the cobs in one place and not waste time collecting them throughout the yard.
- If you use a gas cylinder as the housing, you need to be extremely careful before cutting it, as there may be gas residue. You should first familiarize yourself with the technology on how to properly clean a container from them on the Internet.
- Usually the electric motor rotates the shaft using a belt, but if the motor is not too powerful, you can attach it directly to the shaft. The main thing is to adjust the shaft so that the number of disk revolutions does not exceed 500.
- To make it easier to move the peeling unit from the utility room to the street, wheels can be attached to the legs.
Now you know how to husk corn at home quickly and without much hassle. The homemade unit offered to you does not consume a lot of energy and does not require special knowledge during manufacture. It can easily be made in one day. It is enough to use ready-made drawings and tips, as well as familiarize yourself with the type and principle of operation of the peeler in the video.
If you do not have suitable materials, or simply do not have time for “tinkering,” you can purchase a ready-made device. In any case, a sheller, whether purchased or made by yourself, will be your solution to the problem of how to shell corn at home.
Source: https://vdiweb.ru/ochistka-kukuruzy-s-pomoshhju-dreli/
Introductory points in preparing corn for cleaning
First of all, it should be noted that it is more convenient to handle a fully ripe crop. To do this, before harvesting corn, make sure it is fully ripe:
- the leaves lighten and dry out;
- the brush becomes hard;
- the grains acquire an attractive light honey or yellow-orange color and are characterized by smoothness;
- the required degree of juiciness is achieved (when pressing on the grains with a fingernail, milk juice is released).
If it is possible and in the future you plan to clean corn cobs every year (for canning or freezing for the winter), then it makes sense to invest in a special, small manual device - a “husker”. This gadget can significantly simplify the task of how to shell corn at home, and on sale today there are automatic and simple mechanical ones driven by the principle of rotation of the meat grinder.
Before peeling corn at home directly from the grains, you need to peel the cob and free it from the leaves. This is done simply - you need to sharply pull them down, starting from the upper narrowed part, they will turn inside out, after which they can very easily be separated from the base with a knife. Part of how to husk corn also includes cleaning it from hairs. First of all, you need to cut off the “tassel”. Next, to make the task of removing leaves and hair easier, you can keep the cobs in the microwave (for about two minutes at low power). After this, rinse the cob well to remove dirt and remove all hairs with your fingers.
Attention! If, after cleaning, traces of insect damage are found on the grains, such areas should be removed.
Watermelon seeds
Small watermelon seeds are more suitable for laying out various applications. For example, using such natural material you can make the following crafts:
Cheburashka is drawn on a white sheet of cardboard. Its body and ears are sealed with watermelon seeds. You can use black peppercorns as eyes or make eyes from black plasticine.
A peacock is drawn on a white sheet of cardboard. The stripes dividing its tail into feathers are lined with watermelon seeds. You can stick pine cone scales or beans on the ends. The remaining “empty” elements of the picture are simply painted.
The old kitchen clock is disassembled into individual parts. The base (into which the clock mechanism is inserted) is covered with seeds. An indication is cut out of golden paper and pasted over the seeds. The watch is assembled in reverse order.
Plant varieties and their characteristics
Sweet corn is best suited for cooking and canning. The following are considered the sweetest, juiciest varieties.
Dobrynya. The harvest of this variety produces large, dense ears that are extremely unpretentious and not susceptible to wilting and various diseases. Already 2-2.5 months after planting, you can observe the first harvest
But one important condition must be observed - soil moisture, otherwise the harvest will be small. Gourmand. This variety produces a high yield in the form of wide ears reaching a length of 20 centimeters
Resistant to a wide range of diseases, ripeness is achieved after 70 days. Due to its pleasant milky-sugar taste, it is excellent for canning. Early golden. The variety is distinguished by its early ripening period and resistance to fungal diseases. Only young cobs are suitable for consumption, as the taste properties are lost over time. Spirit. Corn matures within 90-100 days and has bright yellow kernels with a delicate, milky flavor. The plant reaches 2 meters in length, does not rot, and is not susceptible to fungal and viral diseases. It is best consumed boiled or canned.
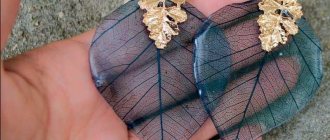
Maple, elm and ash seeds for creativity
Unusual tree seeds are ideal as an addition to ready-made figurines. They make interesting wings and ears. You can also make the following original crafts separately from these natural materials:
- From ash seeds you can make a three-dimensional chrysanthemum or a real porcupine. To do this, plasticine is glued to a cardboard base in the shape of a circle, and the seeds themselves are glued to it.
- And maple seeds can be made into an applique in the form of a Christmas tree or unusual snowflakes. Such natural materials are very well suited for making simple crafts for the New Year.
- “Fluffy” elm seeds will be an excellent basis for creating applications with different flowers. You can use pea halves as the centers of the inflorescences. But the ash seeds themselves will become beautiful petals. Such applications can be supplemented with butterflies made from dry leaves and branches and stems.
When to Harvest Corn
The timing of corn harvesting depends not only on the selected variety, but also on the purpose of its cultivation. Young and juicy cobs are suitable for preservation; specimens that are fully ripened on the bushes are suitable for drying. Both options are suitable for freezing.
Make sure your corn is ripe before harvesting. On cobs that are ready for harvest, the leaves turn pale, dry out and become harder. The brush also hardens and turns brown, and the grains become yellow, honey or orange.
Lifehacks for quickly collecting grains
Preliminary cross-cutting of the cob will help speed up the cleaning of corn.
In this case:
- It is not the whole grain that is processed, but its small parts;
- the cuts made break the high density of adhesion of the grains to each other, which greatly simplifies their extraction;
- You can peel a short piece of stalk from both sides.
At the same time, there is a high probability of damage to the grains at the cut sites, so you will have to carefully separate them into those suitable for long-term storage and those that are best used in the near future.
To make cleaning raw corn take less time and not require much effort, it is recommended to first immerse the prepared cob in boiling water for 2-3 minutes. This will soften the grains and make them easier to remove.
You can put the cobs in boiling water and leave for 30–40 minutes or until the water cools slightly. In this case, even manual husking will be much faster and easier, and with a knife you will only need to lightly press the rows of grains.
Dipping corn in boiling water or soaking it is permissible only if the extracted grains will be used primarily for preservation or preparation. If you plan to store them in their usual form, it is better to use dry cleaning methods or thoroughly dry the extracted seeds.
How to make?
To make a corn husker with your own hands, it is important:
- Use of durable materials and parts.
- Selecting the appropriate volume of the device.
- Availability of detailed, step-by-step instructions.
To create an electric corn husk, prepare:
- The basis for the unit is made of durable material (aluminum, dense plastic).
- Reservoir for cobs. It could be an old, unnecessary thing (a hopper from a washing machine, a cylindrical container).
- Damper on the body.
- Disc with teeth.
- Toggle switch (switch).
- Scraper.
- Flange.
- Motor.
The creation of the structure begins with fastening the base and tank with rivets. The grain removal mechanism is connected to the tray shield. A toggle switch with a magnetic starter is installed on the wall of the tank. Holes (no more than 14 mm) are drilled into the disk with a drill, teeth are welded, semicircular for farming or sharp for small harvest volumes.
The tray has 2 holes: one for grain and the other for empty cobs. 2 plates of 2 cm each are attached to the bottom of the chamber. They are needed to support the rubber scraper. Its task is to direct corn cobs from one side to the other. The flange is attached to the motor shaft.
Corn sheller (corn sheller): do it yourself for cleaning
After harvesting, there is a need to quickly and efficiently process corn cobs, since they cannot be stored for a long time. Carrying out such work manually with a significant volume of harvested corn takes a huge amount of time, and the process itself is monotonous and tiring. Many people often ask the question: “How to quickly peel corn?”
There is a convenient device for cleaning corn from grains, thanks to which shelling will not cause trouble and will take the shortest period of time.
What is a corn cob sheller?
This device is called differently: corn huller, huller, huller, etc. In fact, it is a machine equipped with a motor and teeth that will help you process your crop in a matter of minutes.
Electric peelers, depending on their dimensions, are divided into two types:
- large (most often used in large farms, for processing large batches of grain; the cobs are filled with whole bags and cleaned in 3-5 minutes);
- small (can be used at home, to process one cob at a time; sometimes the body of such a device is made of thick plastic, which is not a minus, since the materials are selected with high quality).
There are two holes in the device: a cob is placed in one or a whole bag is filled in, and the finished peeled product is poured out of the other. The mechanism of action is extremely simple.
Electric corn shellers
The corn husker is powered by electricity: after the corn is poured, the motor is turned on, which rotates the teeth of the device (usually located on the disk) at high speed.
The cobs, tightly compressed inside the sheller, hit these teeth, as a result of which the grains themselves fall out of them through specially made holes into the lower section, and then into the substituted container. As soon as the grain stops falling, it means that the cleaning of corn is completed and you can safely load a new batch into the huller, having first thrown out the garbage from it.
How to clean a cob in a small installation?
The principle of operation is the same, but the device itself looks like a pipe with teeth inside.
It should be said that the device does not leave any unpleasant odors after use and does not require thorough washing, so it will not cause any discomfort after use.
A manual peeler differs from an automated one only in the presence of a special handle. When peeling the cob, you will need to twist it so that the teeth do all the work. The device itself is small in size and its operating principle resembles a meat grinder.
DIY corn husker
Of course, the easiest way is to purchase a device via the Internet, but if your goal is a homemade corn sheller, then this is quite possible.
How to make such a device? The main thing that is needed is:
- use durable materials and parts;
- choose the volume of the device that suits you;
- find detailed and understandable step-by-step instructions
In general, a do-it-yourself corn sheller may well be equal in quality to the one bought in a store with a guarantee. And most importantly, spare parts for creation will free you from seemingly old and completely unnecessary things: used cylinders, motors, drills, broken washing machines.
Homemade electric corn husker
The assembly diagram can be easily found on the Internet. The main elements of corn shelling are:
- the base of the device is made of durable material;
- container where the cobs will be placed (pipe, cylinder, hopper from a cylinder or washing machine);
- toggle switch for starting the device on a magnetic starter;
- disk with teeth 8-9 mm long;
- scraper for guiding processed grains (made of rubber);
- cover on the body.
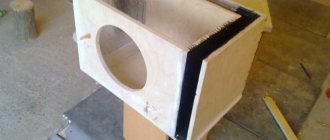
The internal structure of a homemade corn husker
The sequence of actions is as follows:
- The selected cylindrical container is attached to the base.
- The tray shield is connected to the grain removal mechanism.
- A switch with a magnetic starter is installed on the cylinder wall.
- Holes with a diameter of 14-15 mm are made on the disk and teeth (8-9 mm) are welded on top.
- Two metal plates corresponding to the dimensions of the cylinder are attached to the bottom of the disk.
- A rubber scraper is attached to the plates (a strip along which your grains will gently fall into the placed container).
- Two holes are made: for the exit of finished grains (you need to attach a scraper to it) and for removing unnecessary cobs.
- The cover for the device is being made.
Whether you make it yourself or buy it in a store, a cob peeler will definitely solve the question for you once and for all - “How to peel corn?”
Do-it-yourself corn husker (video)
Source: https://moezerno.ru/texnika/lushilka-dlya-kukuruzy-kukuruzolushilka.html
How to cook corn in a saucepan so that it is soft and juicy?
Hello, regular readers and guests of my blog! How to cook corn in a saucepan so that it turns out soft and juicy? Today I have prepared for you 4 recipes for how to quickly and deliciously cook cereal on the cob. The recipes are very simple and require a minimum amount of ingredients.
The first time I tried boiled corn was at sea. The bright yellow cobs were incredibly tender, tasty and juicy. Subsequently, I tried to prepare such a delicacy myself, bought cereal and cooked it for 1.5 hours. We had to add water all the time, and the kitchen became unbearably hot. But I never managed to get the grains soft - they turned out tough and tasteless. Only after a while did I realize that I had bought too ripe cobs.
According to the degree of maturity, cereals can be divided into 3 types:
- milk maturity - the grains are very soft and watery, not suitable for cooking;
- medium ripe – the grains are elastic, light yellow, and release juice when pressed;
- ripe - the grains are tight, bright orange in color, and take a very long time to cook.
Medium-ripe grains are suitable for quick cooking - corn needs to be cooked for only 20-30 minutes. To make the dish more juicy and aromatic, you can add leaves and stigmas of the culture, butter, and milk to the water. To get a piquant taste, you can add vegetable trimmings (onions, parsley stems, tomatoes) to the pan.
Principle of operation
The design features of the mechanism allow it to efficiently peel corn cobs. Most often, these devices are a hollow cylinder of small diameter to which the shaft of an electric motor is connected. A disk is attached directly to the shaft, which will peel the cobs. It has many low rounded teeth, they protrude approximately 6-8 mm. Many holes with a diameter of 10 mm are drilled throughout the disk.
Cleaning occurs after starting the electric motor, which spins the cleaning disk. He tears the grains from the cobs rotating in the drum. After that, the grains are removed from the drum through holes in the disk, entering a collection container. Unpeeled (and therefore heavy) cobs move under their weight to the bottom of the drum, and peeled, and therefore light, cobs rise up. As a result, the cobs are cleaned of corn grains.
The corn sheller is also made according to a different scheme. They are also called drumless devices; they have an electric motor mounted on a strong support, a long empty cylinder is mounted on a shaft, and it has teeth bent inward. The structure is closed with a casing, to which there is an outlet chute, which serves to remove clean grain out. In this device, each cob is cleaned in turn. The grain goes down, and the bare cob remains in the person’s hands.
Useful tips for cooking corn
Some useful tips for cooking corn:
- Do not store peeled corn for a long time; it is better to cook it immediately.
- It is also advisable to consume the boiled product immediately and not leave it for later, since its taste deteriorates significantly over time.
- If you plan to fry or stew the crop, then leave one layer of foliage on it: this way it will turn out juicier.
- Do not salt the water when cooking. It is better to salt the dish before serving or just before removing from the heat.
- Sort corn by ripeness before cooking, as this will affect the length of the process. If you mix a product of different ripeness, some cobs will become overcooked, while others will be undercooked.
- If the corn is overripe, cut it in half and soak for four hours in a mixture of milk and water (1:1). This will make the product softer.
- For cooking, it is better to use thick-walled dishes (cast iron), as they retain heat better.
Did you know? Some scientists suggest that corn is the oldest grain crop in the world.
As you can see, all the actions are very simple: they do not require special knowledge, skills and abilities. All you need is a knife or peeler.
Raffaello made from corn sticks
Your favorite delicacy can be consumed separately or included in many dishes. Therefore, finally - a simple sweet dessert made from corn sticks.
You will need:
- A jar of condensed milk;
- Corn “sticks” – 150 g;
- Coconut flakes - to taste;
- Nuts (any) – 100 g.
Cooking step by step:
- Grind the corn sticks in a blender or pass through a meat grinder to obtain “flour”;
- Place condensed milk in it and stir thoroughly until smooth;
- Form small balls from the “dough”, place a nut on them and press them in, then roll the pieces again, giving them a round shape. Instead of nuts, you can use dried apricots or prunes;
- Pour coconut flakes into a deep bowl and roll each ball evenly in it, then place in the refrigerator for a couple of hours. After this, the delicacy is ready to serve.