Kanzashi crafts are in trend today, so don’t give up the pleasure of learning this handicraft and making it one of your hobbies.
Take as your assistant step-by-step photos and a step-by-step master class on creating a miniature bouquet of tulips - boutonnieres made of satin ribbons and lace using the kanzashi technique. This composition is perfect as a decor for a children's suit or festive dress; it can also be used as a decorative bracelet or decoration for a hairband, headband, or bag.
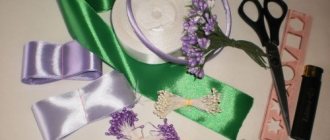
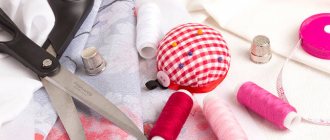
Materials for boutonnieres and tools for work
To make a beautiful ribbon boutonniere with your own hands, prepare the materials. You will need:
- satin ribbon 2.5 cm scarlet;
- silk ribbon 2.5 cm in a soft blue shade;
- satin ribbon 2.5 cm deep green;
- milky lace 4 cm wide - 18 cm;
- three round sew-on (adhesive) rhinestones;
- a piece of felt measuring 5x5 cm;
- candle and lighter;
- scissors;
- polymer glue such as “Dragon” or “Titan”;
- ruler;
- white thread and needle.
If you are not at all familiar with this needlework and terms, look at the introductory one on our “Women's Hobbies” website.
Step-by-step manufacturing technique with photos
Take a piece of dark olive-colored felt measuring 5x5 cm, cut off its corners and carefully round it, making a regular circle from the square.
Take a piece of milky lace, a needle and thread. Sew thread along the entire inside of it.
Pull both ends of the thread toward you. Make sure that the length of the inner stitched part of the lace is equal to the length of the perimeter of the circle.
Sew the lace into a neat ring and join the edges.
Glue a felt circle in the middle. The base for the satin ribbon boutonniere is ready!
To make green leaves, cut the satin ribbon into 9 cm long pieces.
Take one of the pieces and place it along a horizontal line, wrong side up.
At the points in the middle of the segment, fold the fabric forward and down. Mark the center point on the fold line. Fold the ribbon along the center point of the fold line forward. Shape the fabric into a neat petal.
Fold the petal in half lengthwise. Then fold the bottom side edges back towards the fold line. Form the fabric into a neat petal. Singe its bottom edge over the fire and press down with tweezers. One of the petals for the pillow is ready.
Working in this mode, make 7 neat bright green petals from satin ribbons for kanzashi tulips.
Glue the green petals in a circle onto the lace and felt base. Make sure that all the leaves are glued evenly and symmetrically.
In the next part of the master class you need to make tulips using the kanzashi technique. Cut 2.5 cm red and blue satin ribbon into 21 cm pieces (3 pieces in total).
Take one of the segments. Place the front side facing you. Stepping back 2.5 cm, bend it forward and down.
Fold forward along the line of the main tape. Secure the folded fabric with a pin.
Step back 2.5 cm again and fold the ribbon forward and down. Bend back along the line of the main tape. We fix the bends with a pin.
In the same mode, step back 2.5 cm again, bend forward and then back, and secure with a pin.
For the fourth time, fold only the edges. Then lift the bottom edge up and secure both edges with a pin.
Take a needle and thread. Sew all the folds on the ribbon on the outside using a basting stitch.
Pull the threads towards you, tie them and sew the bottom of the bud.
Using this technique, make two more buds. In total you should get three kanzashi tulips: two bright red and one pale blue.
To decorate a boutonniere made of satin ribbons, sew or glue rhinestones into the middle of the buds.
Attach the buds on top of a cushion of green petals and lace.
The boutonniere using the kanzashi technique “Tulips” is ready! Wear with pleasure and receive well-deserved compliments from friends and acquaintances. Such compositions can be made for gifts on March 8, replacing them with fresh flowers.
If you liked this master class, make other decorations according to our instructions from.
Today we will learn how to make a very beautiful tulip from a ribbon with our own hands, we will use satin. This material is very easy to work with, the flowers will turn out very delicate and beautiful, and the result will exceed all expectations.
Let's try to make a delicate tulip from a ribbon with our own hands
Tulips originated in the Middle East. In ancient times, these flowers were a symbol of peace, natural renewal and secret spiritual experience. Often mentioned in the poetry of Omar Khayyam.
In Europe, namely in Portugal, the tulip appeared more than 400 years ago. Growing these flowers, until the 17th century, was considered a privilege of the aristocracy. But after tulips spread very widely throughout Europe, the fashion for their cultivation became popular in France, England and Holland.
Now the tulip occupies a place of honor among decorative flowers and symbolizes the arrival of spring. The bulk of tulips are grown in the Netherlands. Japan, the USA, France, Chile, New Zealand and the island of Tasmania also have significant plantations. Mass flowering begins in March and lasts about three months, depending on the variety.
The history of creating flowers from ribbons originates in China. Where silk has been popular throughout the centuries. The fashionistas of old made the first fabric flowers from silk. Despite its origins, the fashion for fabric flowers has become very popular in France. From the 14th century to this day, fabric flowers have not lost popularity. Only the technology for creating them is being improved.
When creating a tulip from a ribbon, the following materials will be used:
- satin ribbons, different colors (width 5 centimeters). Choose bright and rich colors. Then the bouquet of ribbons will turn out very beautiful;
- green satin ribbon for leaves (width 2.5 centimeters);
- matches or lighter;
- sharp scissors;
- strong glue. A glue gun is best. But, in its absence, you can use glue, such as “Moment”;
- tweezers;
- a round blank made of thick cardboard or felt, 4-5 centimeters in diameter.
Step-by-step instructions for creating a bouquet of tulips from satin ribbons.
This master class is dedicated to creating tulips from satin ribbons. The bouquet will consist of flowers in three shades: purple, yellow and red.
Cut the ribbon into squares (5x5 cm). There should be 9 squares of yellow pieces, 6 squares of purple and red pieces.
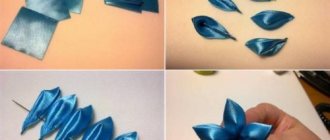
Let's start working with red squares. Carefully fold it in half, diagonally, to form a triangle. Hold the fabric with tweezers. Repeat this step two more times, folding the satin in half. We solder the edges with fire. You can use matches, but a lighter or candle will work more reliably. The edges must be burned very carefully; the satin burns well.
The resulting triangle now needs to be turned inside out. Our petal is ready for further assembly. As a result, such details will make an excellent, bright and beautiful bouquet of tulips.
With the same accuracy, we collect the remaining prepared squares. There should be 21 petals in total.
Now we will collect a bud from the petals. It consists of three petals glued together. Apply a thin layer of glue to the edges of the part and quickly glue them together. First two, then a third.
We repeat the previous step for all prepared petals. As a result, you should get two red and purple buds and three yellow ones.
Tulips have very beautiful massive leaves. Let's not deprive our bouquet of such greenery that is so pleasing to the eyes and let's create leaves for the buds.
Now we will work with the green satin ribbon. For the bouquet you need to cut 21 strips measuring 8x2.5 centimeters.
Fold the leaf blank in half, wrong side inward. The fold line should be at the bottom. Now we cut the workpiece diagonally. You only need the part where the fabric was folded. We solder the edges with fire. We open the sheet like a pocket.
Glue 6 tulips with two leaves onto the round blank in a circle. We attach 6 leaves to them. with the front side facing inward.
We plant a bud with three leaves in the center, having first trimmed its tail a little so that it stays more tightly in the center. Otherwise it will fall to the side.
Our bouquet of tulips is ready!
In this way, you can create different types of tulips, not just buds. Play with colors. Satin flowers can be used to create:
- jewelry for hair, things, bags;
- postcards;
- candy bouquets;
- interior;
- and much more, as much as your imagination can handle.
Progress:
Transferring a drawing
We schematically draw tulip buds directly on the base, arranging them in a fan shape. To do this, use a fabric marker - disappearing or water-soluble. To better understand how to draw a bouquet, straighten your fingers on your hand and look at it: this is exactly how the flowers in the bouquet should be arranged.
Try to leave a minimum distance between the buds: look at how the tulips look on the sample. In this case, the size of the buds should be 4 cm, and the size of the stems - 7-8 cm.
Threading the ribbon into the needle
We always cut the tape only diagonally, approximately 30 cm, and pierce it with a needle at a distance of 5-6 mm from the edge.
Headband
To make such beauty we need to have:
- two satin ribbons two and a half wide;
- a piece of ribbon six millimeters wide;
- a piece of felt material;
- hair strip or headband;
- lighter or candle;
- cotton buds;
- acrylic paints;
- scissors.
We cut the tape that we will use for the buds into small strips four centimeters long. We will make each flower from twelve petals. This means that for five buds you will need sixty segments.
The green ribbon is cut into twelve centimeters. We will use it to form the petals of our bouquet. Eight pieces are enough for this craft.
We round off the raw edge of the future petal, cutting off the sharp corners.
Next we carefully singe the rounded edge of the petal. Thanks to this, the petal will curl up a little and take on a “living” shape. In addition, a slightly singed edge will prevent the threads from shedding. Just don’t overdo it, the black edge of the segment will not add beauty to the flower.
Even in such simple work, you should not forget about safety precautions. To avoid getting burned, use a metal clamp or tweezers.
We clamp the second end of the part in the middle with a small fold and subject it to the same processing.
This is what we got. Now the remaining sections of the tape need to be brought into the same form.
It's time to work on the leaves. Fold the green ribbon in half with the glossy side facing out.
Now we cut the part so that we get a triangle, without one sharp corner.
Carefully set the free edges on fire with a candle and glue them together so that a small hole appears at the bottom.
When all the petals and leaves are ready, move on to the next stage.
Our tulip needs a center that will act as a pistil. To do this, we will paint one side of the cotton swab green.
We begin to form our flower. Using a gun or glue, attach three finished parts from red ribbon to a cotton swab in a circle.
Glue the next four petals overlapping. The last five are on the same principle. We should get a tulip like this:
Apply a little glue to the base of the bud and put a leaf on a cotton swab.
We shorten the cotton swab and our flower is ready. To attach our bouquet to the hair strip, let's prepare the base.
We cut out a small rectangle from felt material, as shown in the photo.
We glue one tulip at a time onto this base, forming a bouquet. Additionally, you can add some loose leaves to the edge.
We make a bow from a narrow ribbon and attach it to the base of the bouquet. Also, if you wish, you can decorate the composition with rhinestones, beads, decorative buttons and other elements that you like.
The final stage: sew the felt base to our hair strip.
Our ribbon tulip is ready. An original decoration will become a bright detail in your wardrobe.
Embroidery of lilacs with ribbons
Embroidering lilacs with ribbons
Beginners really like embroidering bouquets of lilacs. The embroidery technique is very simple, and the result is fascinating. Volumetric lilac branches scatter throughout the picture quickly, bringing a lot of pleasure from embroidery.
Mastering the stitch used to embroider lilac flowers is quite simple. For embroidery you will need two needles - one with thread, the second with ribbon. We fasten the ribbon and thread from the wrong side and pull it to the front side. Next, you can remove the needle from the tape so that it does not interfere.
We sew along the tape with thread: two stitches along, one across, then repeat again. We pull out the thread, thereby collecting the ribbon. It turns out a cute lilac flower. We fasten the thread and repeat the same seam to create a new lilac flower.
Video: Embroidery of lilacs with ribbons
Using the kanzashi technique
This master class is no more complicated than the last one. We will need:
- two satin ribbons four centimeters wide and twenty-five centimeters long each;
- needle and thread to match the color of the ribbons;
- heat gun or transparent quick-drying glue;
- decorative stamens;
- lighter or candle;
- scissors;
- pins.
Let's get to work. The wrong side of the ribbon is applied to each other. The top ribbon will eventually become the front of your flower.
Using a candle or lighter, glue the sections of both tapes together. The ribbons are fastened, now you need to bend them four centimeters.
To align the edges of the ribbons, bend them down, as shown in the photo.
Secure the fold with a pin.
We bend our ribbon up again at a distance equal to its width.
Then we bend it down again and secure it with a pin.
We make the third fold in exactly the same way, with the only difference - the first end of the ribbon must be inserted under the working part of the fabric.
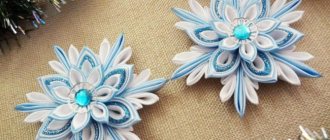
For most people, spring is their favorite season, which transforms nature and mood. No one can argue that the symbol of spring is the tulip. Their variation of shapes, colors and smells in each country captivates the eyes of admirers and finds a response in the hearts. The delicate spring flower, which we want to present to you in a step-by-step master class, can decorate your clothes, decorate a room, or whatever your imagination allows.
Let's look at how to make a bouquet of spring tulips yourself using the kanzashi technique, putting all your soul and positive emotions into it. This gift will be beautifully decorated in a pot so that the complete composition will delight its recipient.
What we need for the craft:
- red satin ribbons and pink organza 4-5 centimeters thick, two colors each
- scissors
- lighter/candle
- thread and needle for sewing
- hairpins
- stamens
- pins
- decorative cord
- plastic bottle (flower pot)
- foam hemisphere
Time to make a bouquet in a pot is 2 hours.
To form tulips, we take 2 types of ribbons (satin and organza ribbon) 25 mm wide, green, and glue. We put them together and in this way we give the buds greater expressiveness by forming and adding leaves to them. The whole process is based on the correct folding of the ribbon. The width of the stripes must be chosen based on the size of the flower you prefer to make. So, the larger the inflorescence, the wider the stripe should be. In our case, it will be of medium size, performed with 50 mm tape.
We fix it with a pin, and unfolding the workpiece straight, we form the next, same fold. Fold the organza together with the wrong side of the satin strip inward. We begin to assemble the workpiece and form a fold across it, at an angle of 90 degrees. We wrap it away from us at an angle of 90 0 and again wrap it up towards us. Fix the corner with a needle.
We fix it with a pin, and unfolding the workpiece straight, we form the next, same fold. We do this 4 times (moving in a circle) and attach the last fold to the beginning of the ribbon. We immediately cut off the end and singe it. Along the outer edge of the future bud we sew loosely around the entire perimeter.
Next, we retreat some space so that the next time they fold, they do not overlap each other. We create two more corners using a similar pattern. Then we secure them all with a hairpin. This method produces a square.
We form the last corner. We bend one of the strips at ninety degrees, and put the other on top. We secure the last one with a hairpin. We cut off the remainder and treat the cut area over the fire.
We will model the bud from such a square. We sew it along the contour using a thread and a needle. Next, without fixing and without cutting the threads, we begin to tighten its edges. Pull the thread and move all the edges of the square together. As a result, they will all converge like an accordion in the center. Next, remove the auxiliary needles and tighten the bud, be sure to align the inner and outer edges. Tie a knot and cut the thread.
We put the stamen blanks (it will be interesting if you take them in different colors) together, cut off the legs and use silicone glue to form their single root.
All that remains is to correct it a little and give it a neater look and make the petals more expressive. We decorate the middle of the flower. We smear the middle with glue, fix it, glue several stamens inside, glued together. We take an arbitrary number of stamens, according to the principle: the more, the better.
We install them in the middle of the tulip and this performs 2 functions at once: additional fixation of the bud and the formation of a full-fledged flower.
Embroidery of trees with ribbons, diagram
Natural motifs, including trees, shrubs, are very common compositions for ribbon embroidery. Trees can be embroidered with plain ribbons, but trees embroidered with ribbons that differ from each other by several tones look best. Thus, the texture of the wood and the falling sunlight are visible. If you combine ribbons from different materials in embroidery, you can achieve even greater contrast.
Blooming tree
Oriental tree with coins
Eastern tree
Making leaves for a tulip
Now we are moving towards the formation of leaves. We take the organza and ribbon in 15 cm pieces, fold them together, right sides inward, scorch them and cut off the edge at an angle (with a soldering iron or scissors - in this case we burn the edge). You can make 2 types of leaves without connecting 2 ribbons together, which will only make your craft more interesting and airy.
Cut the rectangle diagonally and solder the cut sides. You can do this with a soldering iron by placing a ruler diagonally and running the soldering iron along the line where the ruler is attached. We model a leaf from the resulting triangles.
Fold the leaf with the sharp, soldered end in the middle, up, and glue it at the base. In the same way, we create organza sheets, the length of which is 10 centimeters. Then we will get smaller ones. We glue the parts to the inflorescence at the base from different sides. To make them bend a little, we heat them from the bottom using a lighter.
We connect the buds and leaves. If you want the leaf to be a little more interesting and with a bend, for this, singe the tape a little in the middle of the leaf until it begins to bend, giving it the desired shape.
From these flowers you can make a variety of compositions that will always look beautiful. It all depends on your desires and imagination. Sheets of organza can be made separately; this will be a wonderful variety in the composition, giving it lightness.
To make a pot, we take the base of a plastic bottle, glue a semicircle from a foam ball on top, decorate the joint with ribbon and wrap the bottle with decorative cord. If you have a ready-made flower pot, then you just glue a hemisphere on top and decorate it in any order.
At the base of the bouquet, add loose leaves into the gaps, and in the middle of the composition you can add organza sheets. We recommend decorating the top with stamens, and you can make and attach an ordinary ribbon bow to the pot, creating a very festive look.
You can never say that DIY crafts are irrelevant, boring and childish. First of all, the technique you take is important. Kanzashi gives the field for any user to create and surprise, without requiring special and complex skills inaccessible to the general user. Everything complex is simple details that are components of everything that we observe around us. By devoting some free time to new hobbies, you develop yourself and make your personality more interesting to others and loved ones.
Templates for embroidery with ribbons
Template for embroidery with Asters ribbons
For those who decided to embroider the desired picture without a kit, having independently selected ribbons and fabric, we have prepared templates for embroidery with ribbons. In order to transfer them to fabric, you will need tracing paper, or there is a more complex, but no less effective method, described below.
We pierce holes along the contour in increments of 0.2-0.5 mm (depending on the need to understand the drawing) and then draw with a pencil. The dots remain on the surface of the fabric; the template can be placed nearby to periodically check with the embroidery.
Ribbon embroidery pattern Butterflies
Ribbon embroidery template Bouquet of flowers
Template for embroidery with Iris ribbons
Ribbon embroidery template Tender heart
Video master class “Kanzashi tulips”
2019-04-17T14:42:32+03:00
Good day everyone!
When a holiday approaches, we try to buy gifts for all our friends and relatives. These gifts can vary in significance and cost. It goes without saying that the most expensive things are given for the most significant events. But there are also those when a small handicraft made with your own hands will come in handy, especially when they are made by children. One of the most common crafts is artificial flowers.
However, this craft will be suitable for any holiday, as a small souvenir. In the previous article we. This article will talk about the best options for making paper flowers, namely tulips. By the way, some options can be safely done with children in kindergarten or elementary school!
So let's get started.
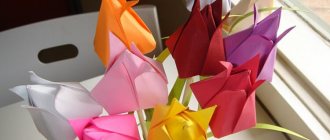
In order to make such tulips, you need to prepare corrugated paper, several sweets and wooden skewers.
First of all, insert the skewer into the candy wrapper and wrap it with tape around the skewer.
Now take one piece of paper and twist it like a bow.
After this, we fold both halves together and stretch the paper, making convex petals.
We take this petal and apply it to the flower blank. Attach with thread.
In the same way we attach two or three more petals - depending on what kind of flower you want to make.
Now we cut leaves from green paper and attach one to each flower.
If the petals are made from paper of different colors, you will get a bouquet of multi-colored tulips.
That's all. Make bouquets and give them to mothers and grandmothers, friends and acquaintances.
Step-by-step origami diagrams for making tulips
Creating crafts from paper or origami is interesting and exciting creativity.
There is just so much that is made from this common material. Making flowers is not exactly a complicated process.
The main thing is to take your time and do everything calmly. This is a Japanese technique for making crafts, and it does not tolerate fuss. For you, we have prepared step-by-step instructions with diagrams (templates) for downloading, as well as a video master class on how to make tulips out of paper.
For the craft, take a square sheet of paper and fold it in half twice. After which the triangle is bent on one side and unfolded, then the same on the other side. The result should be a triangle.
Next, we do it according to the following scheme, as a result we get the flower itself.
After this, all that remains is to collect the stem and put a bud on it. The diagram is shown below.
To make it more clear, this video shows the entire process of assembling a tulip using an origami pattern.
Happy crafting to you!
PS Did you like our ideas and recommendations? Share with your friends on social networks and leave your feedback in the comments