Today I'm creative. For those who have free time, hands, a desire to create something
and save on purchases (reptoids and hay).
I tried to make a video for you with weaving the main knots,
to make it clearer.
A little about why reptukh is needed at all.
Reptukh is also a “slow feeder”
, for horses or goats, which swallow hay like crocodiles, and
an outdoor “bag” for hay
, if there is mud up to your neck in the levada.
You hang reptiles and the horses don’t trample the hay into the mud.
And also, whether purchased or homemade reptilian is a common thing, horses often gnaw through the ropes, making convenient holes in it for their muzzle to pass through and continue to eat the hay at their usual pace. But even the holey reptile continues to perform its second function - even though the hay is not trampled underfoot.
I make reptukhs from “hay” ropes, they are also “bales”, they are also polypropylene twine,
scientifically.
When hay is delivered, there is a lot of it left, so I carefully remove it from the bale, trying to unwind
it as much as possible, and not cut it into pieces.
How many meters depends on the size of the reptile you need and the width of the cells. You can make a huge reptuh
, a meter and a half high,
so that he would stand in a stall
, for example.
Or you can a small “travel” one
, fine mesh, in a horse transport so that the horse doesn’t get bored on the road.
In the video, it’s clear: weaving the main knots and the reptile test on goats.
I apologize for the clumsy movements,
it’s inconvenient to shoot and weave at the same time
, I don’t yet have a studio, or at least a mount for a mobile phone. I'll definitely get it. ))
What materials are needed:
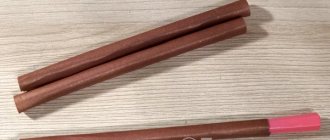
The rope itself
. In my case, 8 pieces x 3 m = 24 m. I specially took colored ones so that the process would be clearer in the photo.
You will need one iron ring
, the same size as on a halter, but it is possible without it.
just more convenient with him
. If there is no ring, then all the ropes from the bottom of the reptukha are simply tied into one knot and that’s it.
You also need a strong rope or lace of a different color
, about a meter long.
I once made this element from thick aluminum wire with a winding instead of a rope. This way this circle holds its shape,
making it easier to put hay in the reptiles.
My knots are the most common ones.
I don’t know how to make them beautiful.
For a more durable rope, you can use thicker ropes, such as “clothes ropes”. But, it’s easier for me to weave a couple more reptukhs than to buy something. If you have the skill and experience, you can take an hour's lesson.
I have one little black horse who likes to bedding himself with hay. and if a senko is packed into a reptukh “for the night”, he mercilessly deals with him. This fate has already befallen two ball nets and one purchased one. So I was inspired by the diligence of Grays Ly and decided to pick up a rope that would be too tough for this little scoundrel!
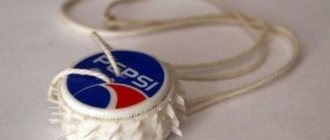
I wove my own reptile according to a pattern from a store-bought one. It turned out like this:
Here are a couple more pictures explaining the design of my repto. bottom:
The top of the reptile is assembled through rings onto a drawstring rope:
In the second reptukha I already made a drawstring in a contrasting color so that it wouldn’t get “lost.”
When most people hear the word “sheep,” they associate it with a green meadow and a white sheep on it. But, although in the summer sheep mainly eat grass, in the winter they need hay and concentrates (the queens year-round), which, to save money, are best fed from feeders. In this article we will look at do-it-yourself feeders and waterers for sheep, their varieties and features.
DIY forest drag
This article will show how you can make the simplest drag, while in the forest, with your own hands, without special training and with very few tools.
A drag is a device that allows you to conveniently drag heavy things while hunting.
So, now you can start making the drag. The article will describe everything step by step.
Stage 1. How runners are made.
In order to make runners, you need to cut down 2 small birch trees that grow as bushes. They work well because they have a well curved lower part of the trunk, which is what is needed in order to get the correct runner shape. Besides, it’s not such a shame to cut them down, because they grow in a bush and this greatly interferes with each other’s growth. The remaining part of the trunks will be used to manufacture all other parts of this simple structure. In total, you will need two birch trunks, the diameter of which in the annular part should be approximately 7 cm. Now you need to cut out of them two runners with a rectangular cross-section extended upward, as shown in the photo.
Stage 2. It's time to make the frame.
In the runners, you first need to drill a hole only for the upper cross member, in order to be able to measure the place where the lower one will be located “in place”.
Now you need to attach the upper cross member, as well as 2 braces, so that the structure takes on its appearance, and also allows you to mark the places where you need to attach the lower cross member.
For convenient use of drags, you need to make a “rule” (this is a special stick of a certain length). The idea for this rule was taken from the Siberian hunting sleds that skiers carry around with them.
To determine the correct length of the rule, you need to try it on locally. And for this you need to finally tie the drag, tie the lower crossbars and braces.
Stage 3. Manufacturing of the draft system.
First you need to turn the holes for the cord in the upper straight ends of the runners, stepping back 5 cm from the end. Pass the cord through them and tie a rifle shoulder strap to its ends. Then insert the resulting harness inside and throw the shoulder strap over the shoulder diagonally across the chest. Next, you need to adjust the length so that the drag rises slightly above the edges of the boots, and remains far enough behind so as not to cling to it with your feet when walking. Now you can pick up the future rule and estimate the length.
Now you need to saw off the excess from the rule and trim the handle clean. After this, drill 2 holes “in place” and tie them parallel to the runner, which is on the left. You need to tie it with the same pieces of cord and in the very holes that hold the main part of the structure. This means that all these cords need to be cut with a margin, so that in the future you can easily tie the “rule” on the left and right hand.
It should take less than two hours to make the drag.
The drag must perform well: crawl calmly over fallen trees, go through holes, and also glide well on moss and hard ground.
Source
Do-it-yourself feeders and drinkers for sheep: classification depending on the number of animals
Drinking bowls can be single or multi-place. The only difference is that one or more animals can use the drinking bowls at the same time. Individual drinkers, as a rule, are automatic drinkers connected to the water supply. Although only one sheep can drink from the bowl of such a drinking bowl at a time, due to the unlimited amount of water, the entire flock does not need to rush to drink. Animals approach automatic drinking bowls one at a time as needed.
Bowls of automatic drinkers can be made from:
Manufacturers offer drinkers that train lambs to drink from automatic drinkers.
Automatic drinkers on a pasture. The main difficulty is connecting the water supply, which is practically unrealistic in Russian conditions
Multi-place drinking bowls can be made from:
- plastics;
- become;
- an iron pipe cut in half;
- concrete gutter;
- an old bathtub with a drain plug tightly plugged;
- a truck tire cut in half;
- any other suitable container.
Truck tires. Today in Germany, the use of rubber from old tires is prohibited even in equestrian arenas due to the release of harmful substances into the air by rubber. Although in the 90s it was a very popular ground for playpens there. Time will tell what happens if you drink water from these tires.
Tip #2. If it is not possible to buy a factory drinking bowl, it is best to use an old bathtub. With a drain hole, it is easy to wash and drain dirty water. You just need to make a drain for the water so as not to create dampness near the bathroom.
Different types of drinking bowls, advantages and disadvantages
Let's take a closer look at the types of drinkers, their advantages and disadvantages:
| Type of drinking bowl | Advantages | Flaws |
| Single drinkers | ||
| Push-action automatic drinker | There is little water directly in the drinking bowl and this helps to keep the drinking bowl clean; clean water enters the bowl as needed | Not every animal is smart enough to press the tongue of the drinking bowl to get a drink; some animals are frightened by the noise of incoming water; water connection required |
| Automatic drinker with float | Thanks to the constant presence of water in the bowl, the animal does not have to think about how to get moisture; little noise from the flow of fresh water | Particles of food from sheep's faces and spores of blue-green algae from the air get into the water in the bowl, as a result the water blooms and becomes poisonous; drinking bowls need to be cleaned frequently; water connection required |
| Bucket in a car tire | Does not tip over; the sheep doesn’t have to think about how to get water at all; easy to wash and change water to fresh | Limited water supply; requires periodic topping up; freezes quickly in winter |
| Heated drinking bowl | Doesn't freeze in cold weather; if it is an automatic drinker, then an unlimited amount of water | A factory drinking bowl requires a concrete base; it is necessary to insulate the water pipeline at the automatic drinker; With a homemade craft, the owner and animals have every chance of getting an electric shock. |
| Multi-place drinking bowls | ||
| Factory | Can be heated; adapted to receive an unlimited volume of water; equipped with a drain hole | Roads compared to handicrafts |
| Iron pipe sawn in half | Easy to make, just weld metal squares at the ends, which will also serve as supports | Impossible to properly remove dirt and algae |
| Old bath | If there is a plug that tightly plugs the drain hole, this is an ideal option for a private owner who does not have the opportunity to connect a water pipe to a base or shed; you need a hose of the appropriate length, it washes well | No |
| Old tire | Free | Guarantee of spilled water when trying to clean dirt from a tire; release of harmful substances from rubber into water |
Hand press from a wooden box
To make a press, you can take an ordinary wooden box. You need to put hay in it, compact it as much as possible, close the lid on top, and apply pressure. A couple of days later we take out a compact, neat briquette from the box.
To get a homemade hay press with your own hands, you can use the principle of a garlic press.
Hay is placed inside and pressed on top with a press. While one holds the press fixedly, the other ties the hay with twine to prevent it from falling apart.
How to make your own snowmobile sled from metal pipes
In general terms, the assembly of metal sleds follows the same principle as in the case of plastic pipes. The only difference is the technology for connecting the workpieces. If plastic was soldered, then in order to make sleds for a snowmobile from steel tubes with your own hands, you will have to weld them.
All elements of the metal sled are welded by electric welding
First, a rectangular frame is welded from the tubes. It consists of racks and a platform. Skis can be bent from a thick-walled plastic pipe or a stainless steel strip with a width of 20 cm or more can be used. The runners are attached to the frame posts. A plywood sheet is laid on the platform. A drawbar is welded to the front of the frame for hooking onto the snowmobile.
Automatic, mobile bale press
When harvesting hay, a bale forming device will be very useful. Compressed hay is much easier and faster to load, transport, and unload into storage. In addition, in this form, hay better retains its nutritional composition.
The dimensions of the loading chamber are as follows: length - 250 cm, height - 50 cm, width - 40 cm. To make it, we take a profile pipe 20 by 40 mm and sheet iron 1.8 mm thick. To make a piston, profile pipes 20 x 40 mm are taken. To obtain a piston rod, we weld two 30 x 30 mm profile pipes together. Guide rollers are used to move the piston. The force of the winch is transmitted to the piston rod by means of a pulley using a steel cable with a diameter of 5 mm.
When the hay is compressed, the piston returns to its original position using a nylon cord. To make a winch, we use a shortened conveyor roller. The winch reel is 130 mm wide. This is a reel with two sections - with a wound steel cable on one section, and a nylon cable on the other. A driven sprocket with 45 teeth is welded to the side of the winch. The thickness of the winch shaft is 30 mm. The winch rotates using ball bearings.
The steering wheel has a 14-tooth drive sprocket. The steering wheel lever has a length of 1680 mm. To make it, we take a 20 x 40 mm profile pipe and weld it together crosswise. A roller chain from agricultural machinery is used to transmit rotation to the winch. The loading door is made from the same profile pipe 20 x 40 mm.
Part two. We make belts for attaching to a person
Make a hip belt.
Using a tape measure, measure your waist just above your hips, where you want the harness to be. Measure a piece of belt 4-5 cm wide to this length and add 30 cm for adjustment (in case you are warming yourself with a thick jacket).
Find the center of the belt strap and measure 20cm in either direction. Install the grommets in these places so that they are 40-45 cm apart.
Cut two 30cm pieces of tape (wide). Place one piece of isolon on top of one of the pieces of tape and completely wrap the foam and tape with tape, securing them together. Repeat with the other piece of webbing and foam.
Place one pin and washer through the sleeve on the hip belt. Place the taped piece of foam behind the grommet and tape it to the hip belt strap. Repeat on the other side.
Kamchatka has become closer and more accessible - join our hikes!
More details
Attach the poles to the seat belt.
Thread one of the pins on the hip belt through the top two holes in one PVC post.
Secure by attaching a key ring to the pin. Repeat on the other side with the second pole.
Self-assembly of a round baler for a walk-behind tractor
You can assemble such a device with your own hands; all you need to do is select the required dimensions and use available tools. With the help of a homemade baler, which is used with a walk-behind tractor, you can collect small rolls that are easily loaded onto a transport trolley, and are easily carried around the farm by hand.
Homemade hay press with your own hands - drawings:
The design of the roll picker includes the following main parts:
• the front, which is the base on which all components are installed, as well as the fastening element to the draft unit. • chassis with a base for a press chamber with two wheels on which the unit moves across the field; • a pick-up with a conveyor that collects hay or straw from the field; • cylindrical chamber-casing with a pressing mechanism; • cardan transmission with mini-gearbox to increase speed.
It should be noted that the pressing apparatus is the most important component in a self-made baler. The device consists of such parts as rollers, a pressure grid, and a forming plate on a spring, which replaces the factory device with hydraulics in a homemade product.
Tools and materials
To make a snowmobile sled yourself, you need to stock up on the following materials:
- steel sheet;
- metal tubes with a cross section of 20 by 20 mm;
- PVC pipe;
- sheet of plywood 1.0-1.5 cm thick;
- welding machine;
- milling machine;
- hacksaw;
- grinding machine and other necessary tools.
Snowmobile sleds are made from any available materials, not just those purchased specifically for this purpose. Craftsmen can make a sled from a motorcycle carriage or a sled from wood, and some craftsmen even make sleds from barrels.
Step-by-step description of the work
To create a convenient roll press for a walk-behind tractor, you need to follow these steps: 1
.
First of all, you need to assemble the chassis - this is the base on two pneumatic wheels. 2
.
Then install the header and the pick-up with the conveyor. 3
.
Separately mount a press chamber with rollers and a pressure grid installed in its lower part, and in the upper part - a plate with a spring for pressing the compressed layers so that the roll is wound more tightly. 4
.
Assemble a drive that ensures the movement of the working parts of the machine. To do this, you need to connect the cardan and a two-speed gearbox - from it the chain drive will go to the rollers and the pick-up conveyor. 5
. On the mechanism of the device that picks up the hay, install gears with a diameter larger than those on the rollers. This will increase the picking speed and simultaneous pressing force.
To get better results when harvesting hay with a walk-behind tractor, you can use a simpler, longer-term, and more effective option - dividing the work. First, the grass mass is collected using a walk-behind rake, then it is pressed using a separate manual or electric device.
Below is a video of a homemade baler made by yourself.
Source
PP tube skis
You can also make skis from several water pipes with a diameter of 25mm
We lay it parallel and fasten it with long bolts or studs:
This design is less strong, but has a significant advantage over a solid HDPE pipe.
The tubes act as guides, making the skis more stable when turning.
I also use a combined option, when a supporting frame is made from PP tubes, and only then a large pipe is hemmed:
Required tools and materials
- Plywood. FSF plywood is suitable for sleds that you often use, but at the same time store outside the apartment - in the country house or in the garage. This material has good resistance to moisture, but contains phenol that is harmful to health. For children's sleds, it is better to choose FC plywood - a less moisture-resistant, but environmentally friendly material. In addition, pay attention to the type of plywood: to ensure the product has a neat appearance, buy 2/4 sheets with a sanded face without visible defects.
- Metal tape. The frame and runners in a snowmobile sled are made from metal strips. It can be steel or aluminum alloy. The first option is more durable, but the second is easy to use.
- PVC pipes. A lightweight sled model can be made from plastic pipes. This is an elastic and frost-resistant material, which, however, is not very durable. To strengthen the connections of plastic parts, use metal corners.
- Tools. To make a sled yourself, you will need a circular saw, a drill-driver and self-tapping screws. For metal sleds, a welding inverter, a vice and a hammer will also be useful. For plastic sleds - a soldering iron and a hair dryer.
Preparation (taking into account various factors)
The choice of material and design of the sled depends on several important factors.
- Terrain. If you expect to navigate uneven terrain, add more cushioning to the drawbar and seat. This can be done using a damper, padding and an inflatable layer.
- Type of snow cover. It determines the ideal shape of the runners. Wide skis move better on loose snow, while narrow skis move better on ice. The greater the bend of the runners, the less they burrow into deep snow. On the fastest sleds, the ends of the skis rise to the frame and are attached to its front part.
- Load. The required strength of the material depends on this. Plastic sleds can support a child or adult weighing up to 70 kg. For full-fledged passenger sleds, an aluminum alloy is suitable, and for cargo sleds, steel or wood. The height of the sides is also important. Usually it is 30 cm, but you can make it larger to make the sled roomy and safe for passengers.
- Driving style. Remember that sleds with a low center of gravity are less likely to tip over. If you plan to do extreme racing with sharp turns, give preference to a squat design. In this case, the seat should be at a height of about 20 cm.
DIY snowmobile sled. Instructions
Find a suitable drawing. The design of the sled must meet your requirements for strength, capacity and maneuverability.
- A homemade snowmobile sled consists of a frame, runners and flooring. A metal pipe 20×20 mm with a wall thickness of about 2 mm is suitable for the frame. For runners - steel strips 20 mm wide. For flooring - plywood with a thickness of 15 mm.
- Using a welding inverter, make a frame by welding 4 metal pipes. To make the sled gain more speed, the front part of the frame can be rounded. The larger the width of the frame, the more stable the product: usually it is 70-80 cm. The length affects cross-country ability and maneuverability: long sleds overcome obstacles more smoothly, but are less controlled when cornering. The average length of the frame is 170 cm.
- To give the frame strength, weld several cross members to it.
- In the same way, attach vertical posts to the bottom of the structure to which the runners will be attached. The number of racks depends on the length of the sled: usually 2-5 on each side are enough. The length of the parts should not be too long: the lower the center of gravity, the more stable the structure. The optimal height is 20-30 cm.
- Take the metal strips that will serve as the runners and bend them. Use a pencil to draw a fold line on the part, place the strip in a vice so that the clamps are exactly along the line, and bend the strip with light blows of a hammer. To avoid leaving marks on the surface, use a copper or brass pad. The bending angle should be about 60° or more.
- Weld the skids to the posts.
- Attach a drawbar to the front of the structure. You can make it yourself from the same pipe that you used for the frame. However, it is better to take a finished product with a damper: it will dampen jerks during fast driving. To strengthen the fastening, weld a steel sheet into the place of the hitch, then cut a sleeve of a suitable diameter into it.
- Transfer the dimensions of the frame onto the plywood. Cut the sheet with a hacksaw or circular saw, then sand with sandpaper or a sander. Attach the decking with self-tapping screws.
- Calculate the height of the side. Weld posts of the required height to the top of the frame. The number of racks depends on the length of the sled. There can be at least 7 of them: 4 are installed in the corners, and the rest - between them. The fourth side in this case is not closed by the side.
- Weld the crossbars that form the side to the posts and check the quality of all welds.
Hay making equipment
Mowers, rakes, and a baler for a walk-behind tractor are those devices that greatly increase the functionality of the unit, allowing it to be used to perform a wide range of agricultural work. Harvesting hay and cleaning lawns are the main areas of work where you can’t do without a mower and other equipment on the site.
We list all the attachments on the walk-behind tractor, which are designed to facilitate the work of preparing livestock feed and lawn care:
We invite you to become more familiar with the varieties of each category of attachments.
Feeders and their differences from nurseries
The feeder is designed for feeding concentrates, mixed feed or silage. There should be no holes in it through which food could fall out. The feeder is made from:
- wood;
- metal;
- plastics;
- concrete trough (for a large number of sheep);
- stone (hollowing out a feeder in soft rock);
- bricks;
- metal pipe sawn in half (for large livestock).
The feeder can be combined or intended only for concentrated and succulent feed.
Combined feeder with oats. After eating the oats, you can add hay. Although not advisable
Feeders of various types, advantages and disadvantages:
| Type of feeder | Advantages | Flaws |
| Combined wooden | Easy to manufacture; multifunctional | Mixing different types of feed |
| brick | A container coated with cement does not allow water and rodents to pass through (at first) | Impossible to wash clean |
| Plastic hinged or rubber basin | Hygienic; easy to clean, and therefore suitable for both concentrates and succulent feeds | Designed for one animal |
It is very undesirable to mix particles of succulent feed and concentrates. If it is possible to wash the feeder, it should be washed. And for hygiene, it is advisable to wash the feeders after each use.
Walk-behind mowers
More and more often you can see how owners of dachas and small farms make hay with a walk-behind tractor. There are several varieties of this equipment, differing not only in appearance, but also in the principle of operation.
The following modifications can be found and selected on the market:
Frontal models are divided into two categories:
When choosing attachments for yourself, you should consider the following features:
How the grass will be laid:
Bevel height:
The grip width depends on the specific model.
Method of aggregation with a motorized device:
Rotary mower
The rotary attachment to the walk-behind tractor can be attached in all three ways (rear, front, side), depending on the location of the cutting parts for a particular mower model.
The model range of disc (rotary) mowers assumes the presence of one, two, or three discs, which are mounted on a rigid frame. A support wheel is also attached to the same frame, connected to the working parts of the mower through a transmission. This support wheel, by its rotation, drives the working parts of the mower.
The main application of a rotary mower to a walk-behind tractor with a PTO:
We invite you to watch a video of the operation of a disc (rotary) mower for a walk-behind tractor:
Segment mower
A segment mower for a walk-behind tractor is a type of frontal mower, designed for mowing grass and hay in areas with different topography, and the grass is cut directly at the root. Such mowers can be attached to the walk-behind tractor in two ways:
The attachment is used for both soft and hard grasses, and is also suitable for mowing stubble.
The design is very simple and easy to maintain. The mower consists of a rigid frame on which two bars with cutting elements (fingers) are fixed, one of which is completely motionless, the second makes reciprocating movements to the right and left. The principle of scissors is that the grass falls between the cutting edges and is cut off by them.
We invite you to watch a video of the operation of a Chinese mower for a walk-behind tractor:
Flail mower
This is also a type of front mower on a walk-behind tractor, but flail modifications are mounted with a motorized device only at the rear. The cutting height is adjusted with a special roller. The attachment allows you to mow not only grass and hay, but also bushes up to 3 cm thick. These are quite heavy attachments, their weight can exceed 100 kg.
The video will tell you how a flail mower works on a walk-behind tractor:
Part three. Useful additions to drags.
Metal fins are an optional addition to your drags. They make it much easier to move on steep slopes or in fresh snow and reduce the chance of sliding sideways. However, these guides are not needed on flatter terrain or denser snow and can create unwanted drag. The wing nuts in this design make it easy to add or remove for use on variable terrain.
Form the fins.
Use a ruler to mark a 45-degree angle from the end center point to the outer edge of the aluminum angle piece.
Attach the part to the workbench and cut with a hacksaw along the mark.
File the edge. Repeat the same with another piece of aluminum angle, aligning the cut angle from the first piece.
Drill holes for hardware.
Use an 11mm drill bit to drill three holes at equal intervals along the length of the uncut side of each piece of aluminum angle.
Place the angle iron on top of one piece of aluminum flat rod and mark the holes for drilling. Use a ¼” drill bit to drill holes in the strip along the marks. Repeat the same with the other part.
Attach the fins.
Turn the sled over so the bottom is facing up. Place the aluminum angles on both sides about three-quarters of the way from the front of the skid. Mark three drilled holes on each part of the slide. Use a drill to make holes in the sled according to the marks.
Using ¼”-20 bolts, secure aluminum angles to the underside of the sled and an aluminum flat block to the inside of the sled. At the same time, we screw the wing nuts tightly to the flat block.
Balers
This device allows the owner of a land plot not only to carefully select cut hay or grass, freeing up the soil for further processing, but also to compactly pack them and prepare them for further transportation. The baler for a walk-behind tractor can be of two types:
Mainly, due to their more compact size and simpler design, private households prefer to use roll-up awnings. Bale crops are more typical for farms.
Round baler
A roll baler for a walk-behind tractor forms rolls of hay or straw.
At a price, a roll hay baler is more affordable than a bale baler; if desired, you can purchase a mini baler for a walk-behind tractor, which will allow owners of summer cottages and private estates to improve the procedure for preparing feed for livestock.
This video will help you understand how all this happens:
Square Baler
The pre-picker for a bale-type walk-behind tractor works on a different principle. The hay is also fed into the bale chamber using an auger, then the chamber is filled to the limit and the knitting mechanism is started - two threads tie a rectangular bale, after which it is pushed out. In bale-type units, it is possible to adjust the density and height of the finished bale; in addition, rectangular blocks of hay or straw are more convenient to store and transport.
We invite you to watch a video review of the operation of the square baler:
Another useful canopy powered by a walk-behind tractor is a homemade straw cutter. It will help grind the feed immediately before serving it to your pets. The walk-behind tractor drives the cutter knives.
We suggest watching the video to see how this happens:
How to make a snowmobile sled
Assembling the sled is not that difficult. There are many simple designs that you can create in your garage. It is important to immediately determine their purpose. This will determine what type of sled to assemble for your snowmobile: passenger, cargo or drag.
Tools and materials
The choice of material will depend on the design of the sled. Basically, plywood, boards, and metal profiles are suitable for such work. Skis are made from stainless steel sheets or use thick-walled plastic pipe.
A universal set of tools will help you work with different materials
The list of suitable tools depends on the materials used for the work. However, when assembling a sled, a combination of wood, metal and plastic is often used. It is optimal to have a universal set of tools that allows you to process all materials. From complex equipment, the list must include a welding machine, an angle grinder, an electric drill, and a grinder.
Owner reviews
We offer reviews from owners of walk-behind tractors who use various attachments for preparing feed.
Vadim, 39 years old:
Hello. I have a “Solnyshko” hay tedder with four sections. With its help, I dry the straw and hay and quickly collect it in a stack. I bet on the Centaur, it fits perfectly with the adapter. The field is not entirely level, but the tedder does an excellent job, although the hooks on one of the discs (the outer one) are slightly bent, but they do the job.
Oleg, 33 years old:
I want to share my impressions about the rotary mower. I have a homemade one with two disks. I assembled it according to drawings from forums, where the design was tested and improved. The performance is good, the working width is also good, and there is an ideal cut on flat areas. There are also disadvantages - the cutting height is not adjustable, the grass is scattered throughout the area. I am satisfied with my work, the mower justified the cost and effort.
Alexander, 42 years old:
I have a small farm, I keep livestock, so I am always and everywhere looking for feed. I have my own pasture, and I also grow wheat at the same time. There is all the equipment for the Neva. The walk-behind tractor is durable and functional with canopies. Last season I splurged on a round baler and have no regrets. The unit is easy to operate and easy to transport. The result is neat rolls that can be rolled by hand and transported anywhere. Time has been freed up, there’s one less thing to worry about, and now I do absolutely all field work with a walk-behind tractor.
Long gone are the days when hay was harvested and turned using a conventional rake. Progress has made the hard work of farming easier, and mowing work has become much easier. Manufacturers of agricultural machinery offer quite effective attachments for hay harvesting. Such equipment is not always affordable for beginning farmers, so many people prefer to make tedder rakes with their own hands.
How to make a hay loader with your own hands
Guys all the best!!! Who can tell me what? I want to change the top gearbox cover. I have 2 levers. Is it possible to work with one lever instead of mine???
Alexander (Jolicia) it’s possible, I have one with one lever
Alexander (Jolicia) and the meaning is better with two
Diman (Coshon) The second reverse lever, yes, I have only one than better with two then
Alexander (Jolicia) second lever reverse - yes,
Diman (Coshon) On mine it’s built-in and I do everything with one lever, I think it’s better than with two
Alexander (Jolicia) with two you switch faster
Diman (Coshon) And in his case, then one took it in his hands and started speeding
Alexander (Jolicia) well, who do I want to put with two, my friend T-25 has a cab with a beggar and a gearbox cover with reverse, then you drive great, you don’t touch the speed, only the higher and lower ones
Valera (Zarya) No, I understand that when you drive a cart, you can use 4 levers. But when to throw haystacks with a haystack. I just switched the reverse forward or backward, there is a difference.
Valera (Zarya) I mean two separate levers. One is between the legs, in the middle of the cover, the other on the left side is shifted towards the engine. There is an option in the middle of the cover of the lever housing with a speed lever, and in front on the same housing there is a reverse lever. So the question is, is it possible to exchange one for the other???
Application of tedder rakes
After mowing, you should prepare the grass for turning it into hay. This means that it is necessary to form windrows, turn over from time to time, and collect into bales or rolls. Factory or homemade tedder rakes collect the mown grass into windrows and, if necessary, turn them over to dry. To use hay harvesting equipment, walk-behind tractors, mini tractors, tractors and even horses are used. This is much more efficient than working with hand tools. You can perform the following operations:
Do-it-yourself rakes for mini tractors have a number of advantages. The device is more efficient than hand tools, is easily transported to the storage area and takes up little space. Affordable price and no problems purchasing spare parts.
All tedders can be divided into several types. For example, rakes differ in the rotation of the working elements when forming transverse and lateral rolls. They are also divided according to the type of working mechanisms:
Manufacturing instructions
As we noted above, our sleds require plastic pipes. They are necessary for the runners, given that the runners must be flat and the pipes round, they must first be heated so that they straighten. They heat it either with a special heater or a hair dryer, but with the latter very carefully and carefully monitoring the heating. Otherwise, the pipe may be damaged.
- After heating, the future runners are placed on a flat place under pressure until they cool completely. And only after that they mark the front side and bend it at an angle of 30 degrees. A strong frame base is welded from a profile metal pipe, on which the runners are subsequently placed. A drawbar is installed in front of our sleds, reinforced with a steel sheet, and a bushing is placed in it. Then the plywood flooring is fixed, welded and the connection at the welding points is checked for strength.
- Considering that we make snowmobile sleds with our own hands, many technical solutions cannot always be implemented. A motorized stroller will make an excellent sled, just put it on runners. True, this design is only suitable for powerful snowmobiles, since its weight is still significant.
- You can also use the sleigh principle to make a do-it-yourself cart with wheels for an all-terrain vehicle or ATV.
Volokushi
This device is a lightweight, often wooden structure, similar in type to a sled. Although sleds are typically used for dog or reindeer sleds, they can also be easily retrofitted for a snow machine. Drags are valued for their small weight and size, ease of operation and the speed with which the drags can be loaded and unloaded. Their body does not freeze.
However, this equipment has a big drawback - due to its design features, the front is subject to deformation. The purchased version is presented in the form of a plastic trough on skids.
Passenger
Passenger snowmobile sleds are not much different from cargo sleds. Only the basic design of cargo sleds is made of a strong base, skis and a low platform, and passenger models are designed for one or two people. In Russia, even in specialized stores it is very difficult to find them. To use such designs, the snowmobile must be very powerful, such as the Yamaha, Buran, Yarmak, Russian Mechanics, Viking, Stealth and other machines.
To increase passenger comfort, the design of the sled can be supplemented with shock absorbers.
The housing is made as a cabin, which also additionally contains lighting and heating elements. The booth itself is created from plywood sheet, plastic sheet or other similar materials. For skis, both sewer PVC pipes and thin HDPE pipes are used, but in this case, to create runners you need to use several pipes for each ski.
How to make a rake on a mini tractor
Making hay harvesting equipment yourself is not difficult. Such equipment is perfect for farmers who own small plots of land and mini tractors. The presented version is designed for use in coupling with mini-equipment and is equipped with 5 raking wheels. Before you make a tractor rake with your own hands, you need to prepare the following materials:
Drawings and approximate dimensions.
For hubs, it is best to use hubs from Zhiguli, since they have tapered bearings. This will increase the wear resistance and durability of the chassis. The above figure shows the device. It is necessary to be careful when creating a rotor so that in the event of a possible breakdown it does not cause the failure of the power plant, and also does not cause harm to the health of the person operating the equipment.
The best option when manufacturing a rotor assembly would be to use a rear automobile axle. Properly assembled tedders can greatly facilitate the collection and tedding of dry plant mass, as well as its subsequent baling. Rotary rakes are characterized by gentle handling when harvesting crops such as alfalfa. The use of tedder rakes will minimize losses when harvesting haylage.
Should I buy a nursery and feeders or make my own?
There are practically no feeders for sheep on trading floors. When monitoring online sites, it turned out that there was no choice.
Advantages and disadvantages of online platforms selling goods for agricultural animals:
| Internet platform | Advantages | Flaws |
| Agro-russia | No, because there are no feeders | offers a feeder for calves for 380 thousand rubles; could probably be adapted for sheep |
| Agroserver | No. There are no feeders, only drinkers | No |
| Avito | Only individual plastic feeder available | The cost of the feeder is higher than in a horse shop |
| horse shop | There is a meager assortment of feeders and reptiles; cheaper than on Avito; several payment options; possibility of returning goods | Not always in stock. |
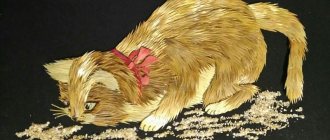
Fine-mesh reptile will help keep hay from being scattered
Tip #1. If you use a reptile, hang it so that after the sheep eat the hay from it, it does not touch the floor, as the sheep can get their feet tangled in the net.
A man who at least held a hammer, saw and nails in school can cope with the manufacture of a wooden manger and feeder in half a day. The bulk of the cost in this case will be lumber. Moreover, the wood does not need to be sanded; the sheep will still gnaw it.
Advantages
The simplicity and strength of the tedder design make it possible to use this type of hay harvesting equipment on almost any soil. The rake teeth and most parts of the unit are made of durable spring steel, thanks to which the rake can work even after being hit by stones. Even self-made mounted tedder rakes on a tractor allow you to efficiently and carefully collect the mown dry plant mass and place it in even hay windrows. The most popular are the “Solnyshko” tedders. This is due to a number of advantages:
Most farmers claim that thanks to the use of rotary rakes and tedders aggregated with mini-tractors, the loss of dried plant matter during raking is minimized. In addition, the “fingers” on the turner wheels not only beat the hay well, but also turn it over, which improves the ventilation of the windrows and, accordingly, increases the quality of the hay mass.
Cargo homemade sleds for snowmobiles
A special feature of cargo sleds is their resistance to heavy loads. This is achieved by using durable materials, such as metal. Skis are made wide. Due to this, the runners do not fall into the snow. Improves maneuverability and stability when the snowmobile moves at high speed. Shock absorbers are sometimes provided between the runners and the platform frame. They smooth out impacts on bumps. The sled bounces less, which reduces the likelihood of damage or loss of cargo.
Shock absorbers smooth out impacts when riding a snowmobile on uneven terrain, thereby improving cargo safety
READ ALSO: From boredom to all trades: PP and HDPE pipes or what to do with the remains of pipes
The snowmobile sleds shown in the photo are made from metal with your own hands. The platform is covered with plywood. The sides are welded from tubes. They won't interfere with cargo sleds. It is convenient to secure the transported cargo with straps over the sides.