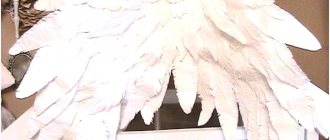
Lesson number 1. A simple hat - cap
A headdress can only be made if there are materials for it. For one of them you need: a leaf from an album (2 pieces), accuracy and patience.
- You need to place one sheet on a flat surface and cover it with a second leaf on top. The sheets must be in a horizontal position.
- You need to bend the top edges of the sheets approximately 2.5 centimeters.
- Then we bend the upper corners of the leaves so that their edges touch in the middle. This is done in the same way as when folding a paper airplane.
- You need to fold up the bottom strip on the top sheet.
- The corners of the strip need to be folded and secured.
- The same needs to be done with the bottom leaf.
- All that remains is to smooth out the resulting hat.
- If the edges of the cap are sufficiently well secured, then the headdress will be durable and will not fall apart for quite a long time.
A paper cap is an excellent way, for example, to protect your head from dirt and dust during repairs. The cap in this case is part of the clothing.
Lesson number 2. Everyone's favorite cylinder
It is quite possible that you will need to make a cylinder hat. This may be required for school work, to spend a weekend or to attend some fashionable and successful corporate event.
Making a cylinder is actually not that difficult if you follow the step-by-step “recipes”.
A wonderful cylinder can be made from ordinary cardboard. To do this you will need 2 sheets of colored cardboard. They must be proportionate to the product.
You also need to stock up on decorative ribbon to make a bow. You can also use a flower, such as papier-mâché.
You will also need scissors and a pencil, as well as a fairly large compass, an eraser, and, of course, glue. The glue must be suitable for all components of the hat.
- To begin with, you can look at photos or other pictures of real cylinders.
- Using a compass you need to draw a circle on a sheet of cardboard. He will be the main one. Diameter – Suitable for the required hat. You need to draw another circle from the center - it should be larger.
- The first sheet needs to be cut along the drawn circle.
- Next, up to the outline of the main circle, you should make strips with scissors, like a fringe.
- The strips need to be folded. This will be the first preparation.
- The second leaf needs to be cut along a large contour.
- Then a circle of small diameter should be made from it.
- Before the start of the main circle (inside), you need to cut strips in the form of a fringe, as in the first case.
- Then the stripes should be folded. This will be the second blank.
- You need to make a strip (cut) out of cardboard; its width should be equal to the height of the cylinder we are making. The length should be a little longer than the main circumference.
- Then we wrap the strip into a cylinder. There must be an overlap for gluing. Then we glue the cylinder so that its circumference is equal to the main circle.
- Then we coat the fringe with glue in the second workpiece.
- The fringe is glued to the inside of the cylindrical part.
- You should coat the first piece with glue, or rather its fringe.
- You need to glue the fringe to the inside of the cylindrical part on the other side.
This will do the bulk of the work. Now you can safely design the resulting cylinder. You can cover it with decorations, you can make a ribbon with a bow, you can refresh it with decorative flowers.
MK “We sew a hat with a brim for dolls of any format”
When sewing a hat in the process of this MK, the model was a Xiaomi Monst doll. However, the master class is aimed at a doll of any size, since the hat is sewn according to a pattern created for a specific doll. We will sew a six-piece hat. There can be a lot of models of six-blade caps. The main difference between these hats is the shape of the brim. Let's start with overview photos of the hat being sewn.
WE CREATE A PATTERN. We need two measurements: head circumference and cap depth. We take measurements and determine the parameters we need. See details
Using the ribbons we determine the measurements we need.
To create a pattern, take: OG - 25 cm Cap depth - 7 cm (1/2 the length of the ribbon used to measure the depth of the cap). Since we will have 6 wedges according to the exhaust gas, we divide the exhaust gas by 6 and get the width of one wedge. On a piece of paper (preferably in a box), draw a rectangle corresponding to the parameters of one wedge: 7 x 4.2 cm Divide the rectangle in half vertically. Draw the outline of the wedge on one side. We increase the wedge by 3 - 4 mm (increase for the seam) along the bottom and along the vertical contour
Fold the rectangle in half... Cut along the contour... Wedge pattern with seam allowance READY SEWING SEQUENCE . Therefore, only overview photos of operations are presented in detail. We cut out 6 wedges... First we sew three pairs of wedges, and then connect them... Iron the seams... The top of the hat is READY .
BRIEF PATTERN OF LIFE-SIZED BRIDS AND WEDGES FOR Xiaomi Monst DOLL
The margins in the model under consideration are not stitched to the 6th wedge. This model looks quite interesting and, in my opinion, would best suit a coat previously made from the same fabric. The brim was cut out, sewn along the top edge, turned inside out, ironed and stitched along the top edge. For rigidity, you can glue the fields with doublerin. We connect the brim to the top of the hat with basting.
LINING The methodology for cutting, sewing the lining and connecting six-piece headdresses to the top is described in detail. Therefore, only overview photos
They stitched the lining, turned it inside out, sewed up the hole through which the hat was turned out... They stitched it... Inside view:
Exterior view:
The heads of Xiaomi Monst dolls have their own characteristics... Not only are they big heads, but they also have quite thick and coarse hair. When I changed my hairstyle by making two ponytails, I decided to tie the last 6th wedge. To do this, I passed an iris thread inside the stitching in two folds and pulled it a little. In the end, I liked this form.
See you again on my page! Margarita
Lesson number 3 – top hat for a doll
Sometimes a child asks to make “clothes” for a doll. If the doll is a male character, you can make a fashionable and beautiful cylinder (cap) for him. It's pretty easy to make.
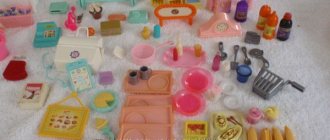
For all the preparation you will need plastic cups, as well as containers for cottage cheese or yogurt. You will need baking dishes, as well as a pencil, compass, scissors, tape, cardboard, fabric, and decor.
- You need to take a plastic cup and cut it so that only the cone remains. The volume should correspond to the doll's head.
- Using a compass you need to draw a circle on the cardboard. It should be 3 times the diameter of the cone. Then you should cut out a circle from cardboard.
- You need to place a cone in the center of the cut out circle, outlining it with a pencil.
- You need to cut out the inner circle.
- The cone from the cup must be connected to the cardboard ring using tape.
- You need to cover the craft with the chosen fabric. You can not glue it, but sew it.
- A cylinder hat can be decorated with rhinestones, beads, ribbons, etc.
Note that such a hat can be made for a child, you just need to choose the right materials and monitor the size.
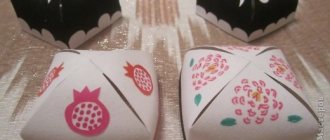
Straw hat made of threads
You can create original hats for dolls with your own hands if you use floss thread. These hats look like straw hats and can be used as brooches and hairpins. A distinctive feature of such a hat is the method of its manufacture using a pre-made blank. The blank is made from a bottle cap and a cardboard circle placed on it. And since the threads are glued to the blank, it is first wrapped with tape. The floss thread is braided, which is twisted and glued around the blank, starting from the top of the crown plug. After the threads have dried, the doll's hat is carefully removed from the blank and decorated at the discretion of the craftsman.
INTERESTING: How to make a bed for dolls
See similar master classes: Making a gypsy costume.
Lesson number 4. Hat for an adult
You need to take a cardboard box, a brush with paints, a compass, scissors, and tape.
- The box is disassembled. A circle is drawn with a compass on one of the square or rectangular parts. You need to cut the material along it. This will be the first round.
- A rectangle is cut out of the box, bent, and bent around the circumference of a small circle (for the head).
- The middle is cut out from the first circle. It will form the height of the hat.
- The parts are held together with tape.
- The resulting headdress can be painted in any color using paints, or you can use spray paints from a spray can.
- This hat can also be decorated with various decorative details.
How to easily make a top hat for a gnome doll, master class with photos
The top hat is a traditional headdress for many types of dolls. In particular, for a gnome named Patrick - a symbol of success and financial luck. Here is one way to make a cylinder - very simple.
The secret is that the headdress is made at the same time as the gnome's body. It is easy to understand the manufacturing principle if you carefully look at the pictures and read the simple manual.
I make my gnomes using twists of slimtex clothing insulation - it is soft, elastic, and easy to sew with a needle.
We cut off a strip of insulation - its height should be equal to the height of the gnome’s body plus the height of the future cylinder.
Roll up the twist, fasten the insulation with threads and sew it together loosely. There is no need to do stitches often; we will still dress the gnome.
We mark with a marker the dividing line - the boundary between the body and the cylinder.
Lesson number 5. Crochet hat
This idea will be good, especially if you already know how to knit. You can make a hat this way if you refer to the image of any lesson. This is a good idea. Many people want to stand out from the crowd.
Such a knitted hat will be very good for summer, especially if you combine it with knitted handbags or gloves.
- Take a hook and thread. The yarn should be quite thick.
- First, a ring of 4 loops is knitted. Then we knit 6 single crochets.
- Then there is knitting in a spiral. In the 2nd row there should be a doubling of loops, in the 3rd row - 1 and 2 loops in each loop of the previous row. In the 4th row you can make 3 loops in each previous loop (of the previous row).
- This way the upper part of the hat is knitted in the form of a circle. It is necessary to determine in advance how many centimeters the diameter will be (according to the size of the head).
- Next, a rectangle is knitted, which must be knitted without doubling the loops, forming a height (crown). It is knitted simply, repeating the stitches of the previous row.
- To make the brim of the hat, you need to continue knitting what started out as a crown, adding loops.
The hat is ready! It will be very useful by summer.
There is a large selection of master classes on the Internet. A good hat can be made of any type: for dolls, sombrero, children's, cowboy, and so on. Patterns may vary. The main thing is that it turns out neat and does not fall into pieces.
“Everything is like people”: sewing a felt hat for a doll
Today we will sew a felt hat for our doll favorites. This master class can be used as a basis, adding your own ideas and skills to it. So let's get started.
I will sew a hat for a doll a la Barbie.
Necessary:
- a piece of felt, the desired color and size, I have a regular brown sheet;
- PVA glue - I use construction glue;
- scissors, pattern paper, measuring tape, thread to match the hat;
— a blank (I’ll explain below where to get it);
- a glue brush - an ordinary synthetic one, and various decorative elements that will be necessary to decorate the finished hat (ribbons, beads, seed beads, etc.).
First of all, we take measurements - head circumference and height.
Having received the dimensions, we proceed to constructing a pattern on paper. Now we would really need a compass, I don’t have one, so I draw a circle by hand, the circumference of which is equal to the circumference of the head.
Next, we plot the height of the product on our pattern (the height of the doll’s head). see photo below.
We can immediately note the width of the fields. This is not necessary, but it was more convenient for me.
If you drew the pattern by hand like I did, then you need to check the evenness of our circles. To do this, fold the cut out pattern in half and check. We trim off the excess.
Now we take a piece of felt, put the pattern on it and cut out the future hat.
Now we need a blank on which we will stretch the felt and form a hat. The circumference of the blank should be equal to the circumference of the base of the hat. Ideally, the blank should be wooden, but we will use whatever we have on hand that is more or less suitable 
You can use anything that has a cylindrical shape and fits the size we need. A toothpick jar fits perfectly with my pattern (at the base of the hat)
But our jar has a completely flat base, but we need it to be rounded, a hemisphere. Therefore, we take foil and tightly form a hemisphere, making sure that the edges are even. Having formed it, we apply it to our “blank” and secure it with cling film or cellophane. We secure the film with a medical plaster. Let me explain: the patch is thin and has a fabric base; after stretching the felt, we can stick pins into it to secure the material to the blank. Below is a photo of what it looks like.
The blank is ready, the hat is cut out, let's move on.
We grease our blank with PVA glue.
And soak our cut felt base in cold water. The felt should get wet well, but the water should not run.
After the water procedures, we apply the future hat to our blank and carefully stretch it so that there are no wrinkles. Then we secure it with pins in a circle and send it to dry.
To be on the safe side, I also wrapped it with thick thread.
Attention! The felt should dry well. After drying, remove the product from the blank. I got such a romantic hat
But that is not all. We don't need such fields. Therefore, we continue to model.
At the base of the hat, where the brim begins, we tighten it lightly with regular thread using a running stitch. We do this so that the product does not stretch and lose its shape in the future. For larger hats, you can sew on braid and even lining.
Now let's trim our margins.
If the hat does not hold its shape well enough, then you can repeat the procedure with glue and dry everything well again. I repeated.
Now we try on the brim, cut off the excess, the brim will end up with a seam, so we carefully sew the two halves together, if the threads match, the seam will practically not be visible.
Sew the brim to the base of the hat. We stretch the thread well so that it seems to fall into the felt and the seam is less noticeable.
The hat is ready. Now let's start decorating. For decoration, I used felt of other colors (yellow and gray), brown cord, and a bead. Next is just a photo.
I glued the resulting flower with hot glue.
Thanks everyone for your attention. I hope my master class is useful to someone.
I apologize for the quality of the photo and my tormented finger, which just tried to get into the frame