In today's article I will tell beginners how to choose the right weaving material to make the creative process more enjoyable. Hand made, created by craftswomen, is increasingly appearing on pop stars and film artists. You can create such beauty yourself. All that matters is great desire and diligence in work. To start creating a product, you need to have an accessory such as a beading machine. It is quite possible to make it yourself from available materials. With it you can create a picture, weave a wallet, handbag, mobile phone case, belt, bracelet, picture, flowers, book cover and even a large decoration - a bedspread for a sofa. There are different types of looms, it all depends on what exactly you plan to weave, what size the product is, narrow or wide, large or small. They are able to expand their capabilities in bead weaving and weave or embroider beautiful ornaments or designs.
The very first one made of cardboard and wood
It is necessary to prepare thick cardboard, a board, plastic or metal corners - 2 pieces, used in apartment renovation, and also purchase office clips from office supplies - 10 pieces. We cut out rectangles from durable cardboard with the size of the product (2 pieces) that you are going to weave. Next, we wrap the corners with cardboard, make slits about 2 mm deep on the fold and attach them to the board on both sides with office clips. Then we pull a certain number of threads, bend the ends and secure them to the board with clamps on both sides. It is lightweight and easy to use.
Options for making machines yourself
Plastic Frame Beading Machine
If you decide to start weaving beads using the weaving technique, you don’t have to immediately buy a machine. For the first work, it is quite possible to make it yourself. The simplest model, which will be quite durable, requires very little. You need to take a lid from a plastic container that is long enough. It is advisable that it be made of soft plastic, then it will be easier to cut through. To make a beading machine, you need to cut out the middle of the lid (so that you get a frame) and then make slits about half a centimeter deep along the narrow edge. Their number should be one more than the width of the number of beads in the product.
This very simple bead machine is quite convenient and is quite suitable for mastering the bead weaving technique.
Wooden machine
This type of homemade machine is very convenient, and its use is recommended for beginners. There are several ways to do it, and here we will look at almost all of them, omitting only those that are too similar.
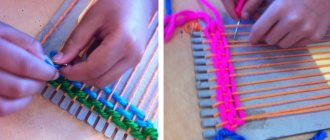
The simplest version of a wooden beading loom is a nail loom. It's very easy to make. For this you will need: a smooth wooden board of the required length and small nails with fairly large heads (the warp threads will not jump off). First you will need to mark the board. This should be done like this: stepping back a little from the edge, two parallel lines are drawn on it at a distance of 2 centimeters from each other. Then the places where the carnations will be are marked on them at a distance of a centimeter. The studs on the bottom line should fit into the gaps on the top line. We make the same markings at the opposite end. It is important to remember that as a result, the studs on the outer lines should be opposite each other. The same rule applies to the two inner lines of nails. Then we drive in the nails. The bead machine is ready.
Beading machine with studs
Cardboard machine
The second version of the wooden machine is a little more complicated and not as durable, but safer (you won’t get scratched by protruding nails). For it you will need a board, thick cardboard (cardboard from a box of chocolates is quite suitable), melall corners and office clips.
The production of such a machine begins with the preparation of cardboard parts, there will be two of them. We cut out two rectangular blanks from cardboard and prepare metal corners of suitable width. Having wrapped the corners with cardboard, mark the middle and make neat cuts where the cardboard is folded to a depth of about two millimeters. On both parts they will be at an equal distance. Only then will the threads stretched across them run parallel. Next, you should use office clips to attach them to the board-base at the required distance. The beading machine is ready.
Comb machine
The third version of the machine will require more time to create, but will be very convenient and quite durable. You need to take: a board for the base, 4 small blocks for fixing and two wooden combs, the length of which will determine the width of the product. To make it yourself, first you need to screw the blocks to the base. They are screwed in pairs at each end. Between the bars of one end you should leave a gap into which the comb will fit tightly, without flying out. Once both combs are in place, you can start braiding. This version of a homemade machine is convenient because you can change combs by changing the maximum width of the product.
Machine made from a cardboard box lid
It happens that you don’t want to do a lot of preparatory work before starting beading, but want to immediately do what you love, and then the machine out of the box will come to your aid. Also, such a machine will be very useful for beginning craftswomen who are just getting acquainted with this technique. It doesn’t require any money at all, and it’s very convenient to work with. Its big advantage is that even if beads slip off the needle while weaving, they will remain inside the box loom. When starting the manufacture of a machine of this type, you must immediately clearly determine what the number of threads in the base of the weaving will be, and make the required number of slots (extra slots will only get in the way, spoiling the edge of the box). As with all other types of machines, the slots must be clearly opposite each other. A box for such a machine needs to have thin edges, otherwise it will not be possible to make cuts.
Ruler beading machine
This is the simplest version of the bead machine and is suitable for beginners in weaving beaded bracelets for girls. It is narrow, light and very easy to make. It requires a wooden ruler no shorter than 30 centimeters, hard cardboard and clamps. This bead loom is convenient for mastering weaving techniques. It will be very easy and simple for you to make it. Manufacturing begins with the cardboard being folded in half and secured to a ruler using clamps. Then slits are made on it according to the number of threads.
We hope that this master class was useful to you, and beading on a machine will certainly become your hobby for many years. Now it will never be difficult for you to make a machine yourself. Bead weaving is very exciting and allows you to weave the most extraordinary things. Using this technique, you can easily create unique handmade belts and bracelets, bags and wallets, as well as entire beaded paintings and bedspreads. It is worth remembering that bead weaving is very useful for children, and this technique will certainly captivate them.
The second method using nails and wood
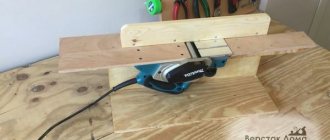
You need to prepare the following components: PVA glue (for wood), a wooden board (50 by 40 cm), two bars (4 by 40 cm), many small nails. Now we make it, attach the blocks with glue along the edges to the board. Once we are sure that the bars are firmly glued to the board, we begin to nail the nails. We do this in a checkerboard pattern, the distance between each nail should be 0.5 cm. We tie the fishing line to the first outermost nail and pull it in the form of a snake until the end of the last nail. With such mini-equipment you can weave pictures.
Herringbone
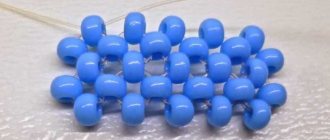
- You can string beads onto wire and then make a pyramidal spiral.
- You can also weave a flat Christmas tree.
- But the most interesting option would be a product made using the needle technique. Follow this pattern for weaving a beaded Christmas tree for beginners, making 4-5 branches in each row. Twist the finished product along the axis of the trunk, arranging the branches in a checkerboard pattern.
How to make a Christmas tree from glass beads, watch the video:
- You can use the brick technique or hand weaving, weave a strip of the desired length and width, sew it along the edges, gradually filling the strand with filler.
- Or use the weaving technique in a circle and fill the product every 5-6 cm.
- You may find it easier to sew beads onto the fabric (see how to embroider with beads) and then form a rope.
We offer a video with a lesson on weaving a rope of beads for beginners:
If a rope seems like a very rough product to you, try weaving a necklace out of beads.
The easiest alternative for beginners
The third version is very simple. This lightweight beading machine is suitable for beginners in weaving bracelets, wallets, belts, and baubles. You will need a cardboard shoe box, a utility knife, tape and a strong nylon thread or fishing thread. Along the edges of the box we make cuts with a sharp object with a depth (about 0.5 cm), or even smaller with a distance of approximately 0.2 cm - 0.3 cm. Then we pull a thread or fishing line tightly through the cuts and seal the edges with tape on the back side of the box or make nodules.
The basis for embroidery is canvas, hoop
The fabric should be dense, especially if beads are combined with beads or stones, which will give the design a special beauty and uniqueness. The craftswoman must take into account the size of the canvas cells with the size and sew them correctly to the canvas in order to avoid gaps, unclear patterns, folds or stretching.
Also, to make embroidery easier, you must use a hoop. Then you will avoid distortions on the fabric and the embroidery will be neat and flawless. Such devices have different shapes (oval, round, square), it all depends on the picture that you prefer to depict on textiles. Hoops can be wooden, plastic or metal.
Preparing for work
When the miniature machine is ready, you need to decide on the color of the future product, as well as its size. The length of the thread should exceed the length of the finished product by two and a half times. If you are planning a small product like a bauble, then the ends of the threads can be left free, but in the case of making, for example, a belt, you should wind each thread onto a spool or just a strip of cardboard, otherwise they will get tangled when weaving.
It’s better to start simple, so the optimal number of threads is 4 pieces. The color is chosen solely based on the preferences of the master - you can make the bauble in pastel colors, or you can take the so-called acid shades or select a color scheme to match certain clothes.
Once the colors have been chosen and the threads have been measured and cut, they need to be tied in a knot. The knot is placed in the center, for example, marudai, and the threads are distributed into divisions. If you are weaving a cord of 4 threads, then they will be located, strictly speaking, on four sides - top, bottom, left and right. To describe how to weave kumihimo, we usually use the following names for the threads - top, bottom, and so on.
When distributing threads of different colors, you can improvise, or you can use kumihimo weaving patterns - you just need to see the required arrangement of threads for the initial arrangement, no more patterns will be needed.
The machine is loaded, all that remains is to prepare the weight for the lace. As a plumb line, you can use, for example, a heavy keychain or even a stone, but it will need to be wrapped in a kind of rag bag, tied and attached to a knot on the threads in the center of the machine. If you are using a keychain or something else with a loop, you can attach a paperclip to it and also hook it to the knot.
Needles, threads, scissors
The use of sharp needles plays an important role in the embroidery process; there should be several of them. This will make it easier to complete the drawing in colors. The needles should be thin with a wide eye; their numbering usually corresponds to the bead numbers; No. 12 is considered popular.
The choice of threads is very simple. You can use elastomeric, silk, silicone or nylon threads, as well as floss. In some cases, a thin fishing thread or wire is used. When embroidering, it is advisable to match the color of these improvised means to the color of the canvas. Each of the listed accessories has its own advantages and disadvantages. It all depends on what work of art the craftswoman starts working on. For beginners, to master this creativity, it is best to purchase a special set. In the future, you can choose the necessary tools yourself to create unique masterpieces.
silk
floss
Generally, scissors are an essential tool. It is very convenient when you have sharp, compact, curved scissors at hand, with tips curled up and more. You can cut the thread blindly, from the inside out, ideal for evaporating threads without damaging the fabric. Multiple options and amazing designs of scissors exist nowadays, just choose the ones that are comfortable for you.
Best handmade library
Do-it-yourself beading machine options
February 3, 2022 handmadebase
- Video: Making beading machines
Beading has now become a hobby for many people. It's beautiful, very interesting and opens up space for creativity. Handmade beaded items used as jewelry always attract attention, emphasizing the good taste of their owners. Many people believe that only bracelets, earrings or unusual figures are woven from beads, but this is not all. Using a bead weaving machine, craftswomen weave entire beaded patterns using the bead weaving technique. Machines are also necessary for needlewomen, as well as a spinner for beads. In this master class we will look at all the main ways to make machines yourself, as well as the rules for choosing them when purchasing and their types. You will certainly see that making a machine is not at all difficult.
Craft magnifying glass
It facilitates the process, needlework becomes easy, convenient and enjoyable. At the same time, the vision is not very strained and the craftswoman will perfectly see her work in an enlarged form. The magnifying glass has a special device that is attached to any surface and has a backlight that has a positive effect on the process. The lighting should be very good. This is painstaking work and puts strain on the eyes. There are many different models, for example, a magnifying glass with a special cord that hangs on the neck, which gives space to the workplace and hands, binocular, backlit with a tripod, and also one that is attached to the workplace.
stand
with backlight
with fastening
on the neck
Dear needlewomen, you can understand the technique more deeply from the video in our section. Also, thoroughly study what accessories you will need for embroidering mosaic designs.
Modern beads come in:
Glass
Plastic
Calibrated
Ordinary
Before we start weaving, consider:
- material for making beads
- bead size
- hole diameter
- bead shape
- future product format
- quality of coloring
- need for fittings
Types of machines for bead weaving
Wire Beading Machine
When you decide to buy a beading machine, you should pay attention to some of its characteristics and, based on them, choose the type of machine that will be optimal for you.
When choosing a bead machine, you should immediately pay attention to the maximum width of the product that can be made on it. If you plan to weave only bracelets on a loom, then purchasing a wire loom is quite enough. It is easy to weave on, takes up little space, and is inexpensive. Another plus is that the length of the product is not limited due to the reel on which the woven part is wound.
The next thing that is important in the machine is how the base for weaving is positioned. To prevent your eyes from straining unnecessarily, you should choose the machine on which the base will be at an angle of 45 degrees.
When choosing a machine for beads, remember that they can be made of wood, wire, plastic and metal. Their models are varied - very simple, convenient for children, and complex professional ones for creating entire paintings woven from beads.
Children's beading machine
Small wooden beading machine
Large wooden beading machine
Recommendations for material selection
When choosing glass beads, you should consider its cost. This type is expensive and it is important to choose it with the opportunity to touch and look. It is difficult to do this from the illustrations. You can take beads that are painted inside or completely painted over, or you can purchase them from colored glass beads. For crafts intended for long-term use, it is preferable to prepare beads from a material that is resistant to abrasion. The same tips apply to plastic beads. The difference between the beads is not visible in the photo, but plastic is easier to work with and it rarely loses color, since it is created on the basis of painted plastic.
It is easier to work with large size beads, for example number six.
Using large beads offers some advantages:
- They are easy to work with and result in quick results.
- allows you to correct errors in a timely manner
- ability to change the shape of the product
It is important to mention schematic images. The diagrams are not very clear without explanations written underneath them. The diagrams become more readable after the first lesson.
Small disadvantages when creating beadwork
Handmade is and will always be appreciated. After all, needlework is not just the process of creating a picture or decoration, it is a way to reveal your inner world. Show the whole world that with the help of a simple needle and beads, you can create such beauty that not a single living soul has ever seen. Even after several centuries, great-grandchildren will admire the handmade work and be proud of their relative who did it.
Just a couple of years ago, our grandmothers used simple thread and beads of several colors. Since the assortment was meager, and there was no special opportunity to buy everything you wanted. Nowadays, to create a masterpiece, there are absolutely any accessories. Beads of any shade, needle from small to large. Each product uses fishing line, wire or thread. And a huge number of devices, ranging from a jar to a special machine.
For both experienced needlewomen and beginners, the material for creating a masterpiece costs a lot of money. To embroider a picture, for example, you need at least 14 colors of beads, 3-5 grams each. There are also special threads that will not tear, flake or get tangled during the process. The needle is thin so that the bead can pass through without difficulty. Hoop or special machine. Embroidery pattern. And all this will cost a pretty penny. But I really want to create.
Of course, you won’t be able to save money on beads, patterns and threads with a needle. But with devices it won’t be much easier. You can make a machine at home from improvised materials for creating baubles, belts, beaded fabric and for weaving various crafts.
Material used in weaving
When creating products you need available tools:
- beads of different shades and sizes
- organizer
- needles
- tweezers
- pliers
- wire
- glue
- fishing line
- beads
- pins with caps
- various accessories
- scheme
- scissors
Organizer and its range
This is a container with lockable cells, convenient for placing beads. It is indispensable in the creative process, since beads of all colors are always at hand and do not roll out anywhere. Each compartment is numbered, corresponding to the number of beads. It is convenient to collect beads from here. Often, needlewomen use a fishing organizer. When choosing a container, you need to provide a compartment for needles and threads, and the width of the cells. Wide divisions make it easier to pick up beads.
If the container does not snap securely, it is recommended to place it in a case. This way you will be protected from its opening and scattering of beads.
Wire: pros and cons
When you decide to start beading on wire, you need to consider a few tips. When weaving, it passes through the bead. You need to study and highlight how many times it is threaded through the bead in the diagram. The beads should fit tightly to each other and not dangle. The wire chosen is neither thick nor thin. One breaks too often, the other bends heavily. Copper wire is ideal. Many bead products are made with special thin needles with a small long eye. This needle easily passes through the bead.
Fishing line and thread in needlework
Needlewomen also use fishing line and thread. When working with thick fishing line, you can do without a needle. The fishing line is taken new, without damage. When selecting translucent beads, it or a thread is selected in the same tone. Monofilament can be used. Its color range is varied, it is durable, silky, and glides well.
How to make a machine for weaving with beads: master class
You can make a machine for weaving with beads from scrap materials. We’ll tell you what exactly it’s made from in today’s master class. And with its help you can create a wide variety of bracelets, with any complex color patterns, and even with inscriptions.
Tools and materials Time: 3 hours • Difficulty: 3/10
- any wooden box;
- knife;
- fishing line;
- beads of the same size, but different colors;
- clasp for bracelet.
Step-by-step instruction
So, let's get to work. It must be said that to create a machine for weaving with beads from scrap materials, any wooden box or casket is suitable.
Step 1: make notches on the box
In order to make it convenient to work with beads, you need to make special notches on the box. Using a knife, you mark the places where the vertical threads will lie. They will then become the basis for the bracelet.
Step 2: tension the threads
After the notches are ready, you can tighten the thread. As you can see, there is nothing complicated, and instead of a wooden box, you can use any cardboard box.
When making a machine from a cardboard box, make sure that the cardboard is dense, can withstand the tension of the thread and does not bend. As a base for such a machine, you can use any wooden frame from an old painting or a photo frame.
Step 3: weaving a bracelet
When the main thread is taut, you can start working on the bracelet. In this case, the author makes the central square element on this machine, and the remaining vertical threads become a full-fledged part of the bracelet in a very unique way. Beads are simply strung on them in random order, after which you can attach them to the clasp.
As you can see from our master class, making a machine for weaving with beads is not so difficult, and a bracelet woven on it looks very interesting and unusual. Using this machine you can weave many different decorations. Patterns of bracelets that can be woven using a machine are available on our website. Their harms are both complex and simple. The main difficulty in working with such bracelets is the correct selection of colors. The more shades, the more interesting and brighter the product looks. You can even make a full-fledged picture of beads, or a bracelet with your name written on it.
Christina All posts by the author (1124)
pleteniebiserom.ru