The principle of making a crown for the autumn ball
This craft is performed in several stages, but the principle of its manufacture is very simple.
- A strip is cut out of cardboard or plain paper to the size of the head of the person for whom the crown is being made. If the cardboard is light in color, then it is painted over or covered with colored or corrugated paper in autumn tones: yellow, golden, orange and red. If the strip is dyed, then you can mix all these colors with a small addition of green or light green.
- Glue paper cut-out leaves onto the strip. You can choose regular colored or corrugated paper, but you can also use light paper, and then simply paint over the cut out leaves. Details of leaves and branches can not only be glued, but also fixed with a stapler or double-sided or regular tape.
- This step is not necessary, but if you want the crown to have a gloss, then all the parts can be wrapped with transparent tape, and then simply cut off the excess.
- You can decorate the crown with rowan branches, pine cones and flowers, or other autumn elements, which are cut out like regular and voluminous appliqués.
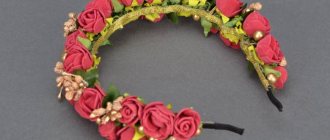
Create a headband-crown with fruits and berries for the Queen of the Harvest
So what should you do if you, like me, were informed today that at tomorrow’s Autumn Festival in kindergarten your daughter should play the role of the Harvest Queen?
At first, of course, they would be indignant at why they reported so late, but after learning that everything was in order, there was a suit, a basket of vegetables and fruits too. If only you could come up with some kind of crown. “Well, glue the leaves to the paper crown. Only better. We will use it again next year.” At this point, faint, because she should be a queen, a real one, and not in some kind of paper crown! And in a panic run to come up with something.
But you can skip the stages of indignation, fainting and panic, because we are needlewomen, and therefore sorceresses, so I will now tell you what to do.
As a result, while I was walking home, the idea of quickly making a crown headband with fruits and berries in autumn colors matured in my head. Fortunately, I’m still a hamster, I always have supplies of materials.
I got a box at home with berries, flowers and other things for wrapping gifts and creating bouquets as gifts for friends and acquaintances (because, for example, I buy flowers in a wholesale store and form the bouquets myself, adding something non-standard to them, that’s where the floral tape comes from ) and started. And while I was collecting materials and tools, the thought occurred to me that I wasn’t the only one who got caught, all mothers could be taken aback. And I decided to film the process and describe it so that no one else would panic. I’ll also get into the autumn master class competition 
If you are not as thrifty as I am, you can buy all kinds of flowers, fruits, and berries for scrapbooking at hobby stores or find a lot of interesting things in supplies for florists. You can use your imagination in your choice. There are no restrictions here.
For those who are in a hurry, I have prepared a video. And for conservatives like me, who like to look at the photo longer, read the description, scroll back the page and stop at the right place - a standard master class with the photo below.
I also wanted to warn you right away that this idea is not suitable for products for sale; in this case, the main criterion was speed. And for my headbands I use a different manufacturing technology. It takes much longer. Now it's important for us to do it quickly. But don’t forget about accuracy
Here is my treasured box:
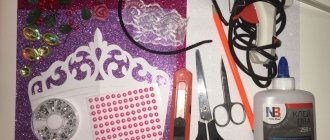
To begin with, I decided that I would need the following materials:
- the base for the headband (I have a metal one, it’s good because it bends to the size of the head; you can take an old children’s headband and free it from the decor);
- berries, fruits, flowers and everything you find and consider necessary on the wire;
— grosgrain and satin ribbons (prepared just in case);
- felt and wire (also just in case you want to add green leaves);
- floral ribbon (the skein was clearly visible in the box).
And no tools except scissors.
We take the base for the rim and begin to wind our flowers, berries and fruits in random order, starting with large elements.
Fill in the central part of the rim.
We insert smaller berries (or leaves) between large fruits and flowers.
Winding from the front side, we see the rim, naturally, “from the face”. Therefore, we turn it “inside out” and see how everything looks there. If necessary, add elements. The rim should look good from all sides. If the child puts it on himself or the teachers in a hurry put it on incorrectly, it will be ugly. It’s ugly for me.
Added
Now add to the right and left.
Don't forget about the “wrong side”.
At this stage, you can try it on and, depending on the hairstyle and size of your daughter’s head, stop. I decided to see it through to the end
from the face
and from the inside out.
During the process, I abandoned the leaves and ribbons.
Now you need to wrap the base with floral tape. Our task is to close the wire and secure it even better.
We begin winding, trying to pass between each element.
If you are not a perfectionist at all or it’s time to go out on a holiday, then you can leave it like that.
I'm not exactly a perfectionist, but I love neatness and a beautiful inside out. So I continued. I decided to make the reverse side with grosgrain ribbon. She also closes the metal parts of the base of the rim at the bottom.
Got it:
- glue gun;
- pliers (because I found protruding wire tips in some places).
I bent the sharp ends of the wire and applied the tape. Somehow I wasn't very happy with it. The wrong side turned out very uneven.
Yeah! I have regelin (I already said that I’m still a hamster). I decided to make a rigid frame out of it.
First I glued the regelin.
And then, she wrapped the end of the rim with grosgrain tape, when she reached the wire, she put it on the regelin and glued it, and when she reached the second end, she wrapped it around it too.
Now everything is ready! In the night we got this photo.
Another photo from the morning before leaving in daylight.
Oh, and it turned out good! I'll probably use it for fall photo shoots :).
I hope you find my experience useful when you encounter the same problem.
Your Olga (ReschikovaV)
Crown for the autumn ball made of maple leaves
We will need:
Colored paper. You need to select paper that is not very thick; it is best to use corrugated paper for leaves.
Scissors.
Stapler or glue or thread and needle.
Progress
The main rule is to choose bright colors of paper. Such as orange, red, yellow and a little green. It is necessary to cut out foliage without stems, that is, only leaves. When the required number of leaves have been cut out, they should be sewn or glued together, but you can also secure them with a small stapler. To do this, bend the sheet on the side and fix it. We place the next leaf overlapping so that the lower bend extends beyond the first leaf. The third leaf goes over the second and is fixed again, thus securing all the leaves on the crown to the required length.
After connecting all the leaves to the desired length, we combine the first and last leaves with each other, forming a crown in the form of a circle.
Paper crowns + templates for printing and cutting
And for those who don’t want to bother too much with manufacturing, there are ready-made stencils for this case; they can be printed, cut and glued together. However, a color printer is required here.
And you can strengthen such tiaras by gluing them to cardboard so that they last longer.
You can print out a black and white template and give the children a field for creativity so that they can color it themselves or decorate it with different sparkles and rhinestones.
Let's look at the stages
- Cut a rectangle of the required width according to the volume of your child’s head. If you do not have the required color of cardboard, you can cover it with paper of the required shade;
- attach the leaves in any order, in any way that suits you;
- To prevent the leaves from shrinking, after drying, cover them with large transparent tape.
Don't be discouraged if you don't have the required attribute on hand. They can be cut out of colored paper, and they will be no worse than the real thing. Look in the pictures for more details.
Making a crown for the Snow Queen from felt or foamiran
A suitable option for those who make an original and neat crown for a real princess or Snow Queen.
Manufacturing scheme:
- Using the template, we cut out a shape from double-sided foamiran. This product will not fit around the circumference of the head, it will rest on the top of the head. The diameter of the circle is from 5 to 10 cm.
- We gather a long piece of tulle with a thread of a suitable color so that it is enough to frame the entire circumference.
- We cut out a circle from foamiran, the diameter of which corresponds to the circumference of the product, and place it inside the product.
- We attach the tulle. We attach a small hairpin downwards, which will hold the product on the head.
- Decorate the corners with beads.
- You can make a edging on the body from beads.
The work is completed, the product is waiting for the princess.
From felt
Autumn is the most beautiful time of the year. Despite the chilly weather and rain, autumn is filled with a wonderful atmosphere, a huge abundance of colors and tart smells. The colorful forest and frosty air stir our soul. With bated breath we greet and see off every sunny day. This is a time of quiet family evenings, comfort and warm hugs. We also associate this time with the autumn ball. This is one of the most anticipated holidays for schoolchildren. It provides an excellent opportunity to demonstrate your talents and beautiful outfits; they also welcome autumn in kindergartens by holding matinees. For our little fidgets, this is the beginning of a creative journey. They prepare diligently: they learn poems and songs, act out skits, thereby trying on various images for themselves. And the parents are responsible for creating a suitable costume and selecting the necessary accessories. A crown for an autumn ball will be a wonderful addition to any look for both a girl and a boy.
Let's look at the stages
Before you start work, decide what material you will make it from. A paper crown is made very easily and quickly. You will need to print a suitable template from the Internet and, after choosing the color of the product, cut out the sketch. Glue the edges, decorate with various things, and you're done.
But these are children, they are in a constant rhythm. One awkward move and your work will be irreparably ruined. Paper is good, but its main drawback is that it wrinkles easily and tears quickly.
Cardboard is another matter, because it is dense and reliable. You can already be calm about your creation. And another advantage of a crown made of cardboard is that it will not bend under the abundance of decorations. So don’t be stingy and feel free to create.
Real autumn leaves will serve as an excellent decoration. For a girl, you can fill the leaves with glitter hairspray.
One important tip: involve your child in the craft and do it together. This will help him develop accuracy and thriftiness with things. It’s also just fun and interesting, and this day will remain in children’s memory for a long time.
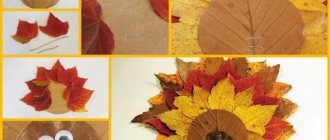
Leaf decoration
To make this product, take your baby and go for a walk in the park. Well, here you have a rich, colorful carpet of leaves, but we only need maple ones. Try to collect the brightest and most beautiful ones. If you wish, you can add a couple of green leaves, it will turn out very original.
So, you came home with a colorful bouquet. Place it on the table, taking one leaf at a time, begin to weave a crown. We think many of you wove flower wreaths as children, or at least have an idea about it; it’s almost the same principle.
First remove the thickening on the stems, then carefully bend a small part of the leaf and pierce it in two places with the adjacent stem. It feels like you are sewing, but instead of a needle you have stems. When doing these steps, rely on this photo.
Option from whatman paper
To make such a head decoration with your own hands, follow these steps:
Even an adult can try on such a crown; it will look trendy and will last for several years. If desired, you can replace one large sheet with three small ones. The principle of operation is the same, only the stencil is different.
Another simple and quick way is to use a felt crown. Felt is an indispensable material in creativity. It is easy to work with, it is not whimsical and is the same from all sides. Your product will look original and luxurious. Another plus is that you can insert an elastic band or ribbon here. This will allow you to conveniently attach the crown to your child’s head.
All decorations will also be made of felt. To make your leaves look natural, sew their outline and veins with threads.
Video on the topic of the article
Here are videos that will be interesting for studying this topic:
DIY crown
A handmade paper crown can serve not only as an addition to your child’s fancy dress costume, it can also be used in everyday games, or as a gift to guests who come to your child’s birthday party. And if you make cardboard blanks in advance and distribute multi-colored markers to your guests, then everyone can make a crown to their taste and take it with them as a souvenir.
Lesson #1
- crown template (download here);
- vintage paper (pages from an old book, sheet music, etc. will do);
- spray glue and PVA;
- stationery knife;
- brush;
- glitter;
- various decorative decorations - buttons, pearls, ribbons, etc.;
- hot glue gun.
1: Print out the outline of the crown on construction paper and cut out the template. Lubricate with glue.
2: Glue vintage paper on top. If you are using small pieces of decorative paper, glue them overlapping each other. Apply glue stick to corners and joints.
3: Turn the shape over and trim off any overhanging edges of the decorative paper.
4: Now glue the second side of the template in the same way.
5: Glue decorative tape (for example, velvet or corduroy) along the bottom edge. Decorate the top with sparkles. To do this, coat the edge with glue and sprinkle with glitter. After the glue has dried, brush off any unadhered glitter with a dry, soft brush.
6: Using a hot glue gun, glue both ends of the piece together. After that, decorate it with buttons and beads. Make a fan out of colored paper and glue it onto the crown. Here's what we got:
Master class No. 2
And now we will offer you several models at once, the main thing is to understand the principle of operation, and then you can come up with a wide variety of crown options. To work you will need:
- cardboard (it is better to use not very thick one);
- hot glue gun;
- rubber;
- decorative elements (braid, beads, etc.) or paints and colored markers.
Draw or print a template (download them here) and cut it out along the outline. Glue a cardboard “strap” along the bottom edge, after making shallow cuts on it so that the cardboard bends better. The length of the “strap” should correspond to the circumference of the child’s head. Punch two holes at the ends and secure the crown with an elastic band or tape.
For decoration, use paints or colored markers.
Lesson #3: Golden Crown
This is more difficult work. You will need:
- scissors;
- paper;
- PVA glue.
1: Cut a sheet of paper into squares measuring 5 x 5 cm. The more squares you cut, the better. Fold each square in half diagonally and smooth out the fold thoroughly.
3: Lubricate one of the lower corners of the triangle with glue and insert it into the other triangle. Please note that glue must be applied only on one (front) side.
4: In this way, make a “garland” of triangles. Remember to place it on your baby's head from time to time to determine when you have reached the desired length.
5: Take another triangle and apply glue to both ends. “Open” the crown and glue the triangle so that it is located between two adjacent triangles. Fill in all other “gaps” in the same way. After this, carefully smooth out the folds.
6: Now roll the crown into a ring and try it on. Use a pencil to mark where the two ends of the part are attached. Apply a little glue to one end, then tuck it into the other end and press.
The crown is ready! Smooth it out slightly with your fingers so that the ring is rolled evenly.
Step by step lesson #4
Another original crown based on the template (download it here). You will need:
- thick colored paper (square sheet measuring 30 x 30 cm);
- cardboard and compass;
- scissors and/or stationery knife;
- glue.
1: Cut a square sheet of paper in half so that you have two sheets, each measuring 15 x 30 cm.
2: Cut a circle out of cardboard with a diameter of approximately 11.5 cm (use scissors or a utility knife).
3: Applying the template to the top edge of the construction paper rectangle (long side), draw a wavy line. Cut the sheet along the contour, and then repeat the same with the second piece.
Crown with rowan
It is not difficult to build such a headdress. We will need a headband, a glue gun, flowers, rowan berries and dry leaves. If you are preparing the autumn crown in advance and want it to last for a long time, then you will have to prepare the leaves first. They need to be ironed and allowed to dry thoroughly, preferably under pressure.
Let's start making the headdress. First of all, we glue the rowan branches. They are heavy and bulky. It will be easy to hide the rest of the flowers and leaves under them. Now we place the main accents. We will make them using large asters. They can easily be replaced with chrysanthemums or other flowers that grow in your country house or garden. When the accents are set, we begin to glue the leaves. The main thing here is not to overdo it. 3-4 large sheets and 3 small ones will be enough. The final step is gluing small dried flowers. The autumn crown is ready.
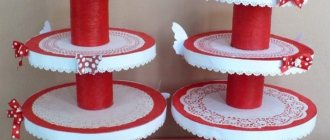
Crown made from paper towel rolls
A flirtatious little crown for the princess from the film “The Bremen Town Musicians” can be made from paper towel rolls.
To make it you will need:
- towel or toilet paper roll;
- scissors;
- stationery knife;
- awl;
- a simple pencil;
- hat elastic;
- glue;
- PVA glue, glue gun or “Moment”;
- material for decoration.
First you need to decide on the height of the crown.
Note!
Macrame: diagrams, interesting projects and detailed descriptions of making crafts
- Crochet amigurumi - examples of how to make a beautiful toy with your own hands (75 photos)
- Coffee topiary: step-by-step master class on how to make a small decorative tree from coffee beans
Draw a simple toothed pattern on the sleeve. Cut along the contour with a stationery knife. At a distance of 1-2 cm at the bottom, make holes with an awl opposite each other,
Insert a hat elastic of the required length. To prevent it from moving, secure it on the inside of the sleeve with tape or a piece of cardboard. Decorate as desired.
Head decoration made of small flowers
Such a simple and elegant decoration can serve as a crown at an autumn ball. It’s quite easy to create such an accessory with your own hands. We will need a rim again, but this time a thin, wire one. Our crown will be made from orchid flowers, barberry berries and willow branches. The picture shows a sample made from artificial flowers. You can create your headdress in the same way or decorate it with live plants. We select flowers and berries in the same color scheme. If you are making a craft from artificial material, then it will be quite easy to paint it.
Let's start production. Glue flowers to the headband. There are large ones in the center, and small ones on the sides. The remaining space needs to be filled with willow branches, to the ends of which we will tie berries with wire. The weave can be chaotic and asymmetrical. The main thing is that in the end the flowers and berries are distributed evenly.
How to make an origami crown from A4 paper for a boy
An origami crown would be an ideal option for children's games. By the way, children themselves can do it for themselves.
It is very useful to make such crafts, because here children will use not only emotions, but also creative abilities, develop perseverance and patience, as well as imagination and spatial thinking.
You will find more paper crafts in this article.
For such beauty you will need only 2 sheets of A4 paper. Of course, you can increase it if you wish, but this is at your personal discretion, there are no strict rules.
Bend the top corner down into an even triangle. To be honest, it’s difficult to find clear descriptive words for such actions, so look at the photographs, I think everything is clear and understandable there.
We bend the remaining edge to the resulting triangle, carefully iron the fold and cut it exactly along it with a stationery knife or scissors. We will no longer need this cut off part.
We straighten the triangle and we are left with this square.
Now we need to fold it in half and cut it.
The resulting two halves also need to be folded in half and also cut. And we will get 4 squares with them and we will work. We need to divide the second A4 sheet in exactly the same way as the first.
And now we will work with each square separately, there should be 8 pieces. We fold the square into a triangle, try to bend it very evenly and iron the fold, then straighten it.
We bend one edge to the strip that appears, and then the second.
Next we bend the lower tip.
Fold the bottom again, and then again.
This is the kind of detail we should get on one side.
And this is from the other side. To make it slightly concave, we use a felt-tip pen or pen to bend it a little, making it slightly arched.
We do this with all the squares and we get 8 blanks.
Now we bend the edges and begin to insert one into the other and do this with all of them.
We have such a long chain, now we close it to the ring.
If the game is planned to be very active, then all the parts can be glued together at the joints, and if not, then you can leave it like that.
The crown is ready! Write below what games you can play using these attributes. Your tips can be very useful to others, so write your ideas.
Crown of maple leaves
This is a rather non-trivial way to make a headdress. Our autumn crown will consist of a cardboard rim, maple leaves and gold beads. The first step is to prepare the material. We dry the leaves and make a cardboard rim 4 cm wide. First we glue the front row of leaves. We bend the rim and secure them with a glue gun. Thus, the cardboard strip was surrounded on both sides by leaves. Next we glue the second row. Now we fix the leaves on the back side of the rim. Thus, we make the “wrong side” beautiful. The final touch is gluing the gold beads. It is advisable not to attach them along the entire perimeter of the crown; it is better to place such emphasis on the front part.
Crown for the king for a boy
A boy's crown should be different:
- The royal crown has equal spaces between the corners of the upper carved part.
- Use red, yellow, brown material. Make the edging shiny.
- The product for a boy is prepared without flowers.
- Rhinestones are placed at equal distances, in an orderly manner.
The rest of the details are the same. When using foamiran, avoid tulle edging. This is a feminine attribute.
Make an autumn crown using maple leaves for the fall holiday. Choose colors so that the product blends with the color of the suit.
Important! The beauty of a product depends on the smooth contour of the product. Use only dense material, clearly draw the outline, or use a template downloaded from the Internet. All parts are located at the same distance. Accuracy and attention to detail are the key to the success of needlework.
Crown hat
Children simply adore this headdress. It replaces summer wreaths with them. Even a child can make a crown for an autumn ball from maple leaves. We will tell you two methods for making it. The first method is similar to weaving dandelion wreaths. Only here, instead of flower stems, we will bend and add branches of leaves.
The second method is more time-consuming. For such a crown you will have to make a cardboard base in the form of a circle. We will tie ribbons to its ends, which will make it easy to take off and put on the headdress. The maple leaves will need to be ironed and dried first. And then, using a glue gun, fix it on a paper rim. It is advisable to make the crown magnificent. Therefore, you need to glue the leaves not in one, but in at least two rows.
Master class of a crown made of beads and wire
The crown made of large beads looks original. It is made using wire.
What you will need:
- Wire.
- Beads.
- Beads.
- We begin to place beads on the wire. We do this according to the scheme: three small parts, then one large one, after that three small ones again. This is the basis.
- Having collected it, we make a loop from the wire, stringing beads. Make sure that the beads are on the edges of the loop, and the large bead remains in the middle, at the top.
- Having completed the loop, we again collect the main thread in a similar way.
- We do this on the basis that a large loop should be made in the center. We alternate the main part with the loops until we reach the middle of the product.
- We make the central loop 2-3 times larger. It can be round or star-shaped. We string more large beads on it, alternating with beads.
- We make the remaining part from small loops, in the image of the first half of the base. The final stage is securing the ends by twisting the wire.
- We align the shape, make the loops the same. Job completed!
Important! Use plain beads and beads or multi-colored ones. Let their color match the child’s suit.
Gothic crown
This headdress looks quite intimidating. But some girls achieve exactly this effect. It’s very easy to make an autumn crown with your own hands in this style. We will need thick wire, branches, electrical tape, paint, chains, beads and autumn leaves. Let's start manufacturing. First, let's twist the wire into a headband. Then we wrap it with a branch. For this purpose, you can use soft and pliable willow twigs. Now, using electrical tape, we attach the branches to the crown. These can be branched branches of an apple tree or rowan tree. When everything is ready, paint our headdress black. It is advisable to use spray paint for this purpose. This will ensure that the color pigment is evenly distributed. After the crown has dried, attach chains and beads to it. You can repeat the option from our sample, where one bead is in the middle, above the forehead, and the other two are located in the area of the ears, or you can come up with your own version of the decor. The final step is to string dried leaves onto the crown.
Crown made of foamiran with glitter on the rim - master class with a finished pattern
Crowns made from glitter foamiran or eco leather turn out very beautifully. In the light they sparkle and shimmer, creating a magical fairy tale around. I also recommend watching “How to make bows from foamiran” -
This manufacturing option is, of course, exclusively for girls; it is suitable for festive outfits, for example, for kindergarten graduation or for a photo shoot.
My fom is glittery on one side and just plain on the other. On the other side we apply a stencil and trace it with an awl or a non-writing pen.
Moreover, it can be made using this pattern in two variations: bend our blank into a ring and glue the edges together, or glue it as is to the rim.
As an option, for a more stable shape and so that the back side also shines, you can glue it with a second, same layer, but I was too lazy to cut it out so I did it in one layer. You can duplicate it if you wish.
It turned out like a princess crown!
The photo does not convey all the beauty of how it sparkles and shimmers when the light hits it.
A simple crown for a Snowflake made of tulle
A crown made of white tulle, decorated with rhinestones, turns out light and airy, like a real snowflake. It's very easy and quick to make. Prepare:
- white headband (to make it easier to work, it is better to choose a headband already covered with fabric);
- hard tulle;
- snowflakes, rhinestones;
- threads;
- a needle;
- scissors.
A piece of tulle is folded over and lightly pulled together with thread to form folds. It is sewn to the headband and decorated with snowflakes and rhinestones. The original crown is ready.
DIY carnival crown made of wire and beads: instructions, video
Carnival crown made of wire and beads
This very unusual decoration made of wire and beads looks like costume jewelry - expensive, luxurious and beautiful. The crown will become a decoration and highlight of the carnival, it will make you pay attention to your daughter or to you, if you need to wear a costume to the holiday. We are trying to make the same one with our own hands. Here are the instructions:
- The crown consists of a set of beads, scissors, wire, and a thin rim.
Do this:
- We take the headband, remove all unnecessary accessories from it, we only need the frame.
- First, let's make specific branches for decoration. We remind you that the central part should be much higher and wider than the sides. Therefore, it will require a little more wire and beads.
- We take a small piece of wire and string beads onto it. Then we connect the two ends and twist them together.
- We also do the same with other beads and two branches.
- It will be interesting to alternate beads of different diameters; you can also combine large beads. Moreover, it is not necessary to take only white beads: add variety, complement the silhouette with elements of different colors.
- The central part is ready. We will attach them in the middle using the ends of the wire.
- We also prepare the side branches, but remember that they should be shorter and narrower than the central branch.
We attach the finished blanks to the rim. A beautiful and unique decoration for the New Year's holiday is ready. Watch the video below. The craftswoman makes the same accessory, from the same materials, but it turns out no less interesting and original. Try again.
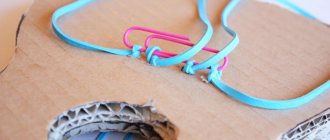
DIY crown from stationery folders for the New Year: instructions
Crown made from stationery folders
Crown made from stationery folders is an unusual option, made with your own hands. Outwardly it looks like the crown of a snow queen, and making it for the New Year will not be difficult. So call your child and get to work. But first, prepare everything you need for the process:
- Buy 4 transparent stationery folders in the store (ordinary cardboard or just white cardboard will do)
- Silver lace or braid
- Tulle with a pattern
- Cardboard
- Needle
- Wire
- Scissors
- White threads
- Rubber
- Decorative elements - beads, tinsel, bugles
- Glue gun
When everything is ready, you can proceed:
- We measure the circumference of the head.
- We cut out the parts from the folders (from one we get up to four pieces). And there are either seven or nine of them in the crown.
- They are located like this: the central part is the highest, the next two on the sides are lower by a couple of centimeters, the rest are even lower than the previous ones by two centimeters.
- Then we cut out triangles of the same format from tulle.
- After all the parts are ready, we alternately connect the plastic and tulle with a seam together with wire.
- We pass the decoration from the braid over the seam.
- We do the same with all preparations.
At the end of the work, we “put” all the overcast parts on an elastic band and sew them on the machine. As you can see, nothing complicated. But at a masquerade, this will be the most unusual decoration. Here is another version of such a crown for the Snow Queen costume:
Crown made from stationery folders Crown made from stationery folders
Crown cutting templates
If you display the image on a sufficiently thick and, if desired, colored sheet, it can be used as a blank - by cutting it along the contour, gluing it or attaching an elastic band, you will get the finished product. But more often, printouts are used as templates (stencils).
Crown cutting template 1
Crown cutting template 2 Crown cutting templates Crown cutting template 3
Crown cutting template 4 Crown cutting template 5 Crown cutting template 6
Crown cutting template 7 Crown cutting template 8 Crown cutting template 9 Crown cutting template 10
Elsa's Crown
Many girls are fans of the cartoon “Frozen” and each would like to be like one of the heroines. Please your daughter and make an Elsa crown with her, especially since it is not at all difficult to make.
What can a crown be made from? Prepare silver cardboard, glass beads of a similar shade, thin gray satin ribbon, scissors, glue, and blue pebbles for decoration.
Prepare a strip of cardboard 3-4 centimeters wide and a length equal to the circumference of your head. Tie pieces of satin ribbon to the ends of the strip.
Using the template, cut out the front of the product and glue it to the strip. Next you need to decorate the product. Use glass beads and blue stones or rhinestones for this. This is the simplest option for making a crown for the heroine of an animated film.
Using a figured stencil and decorative elements, you can make a more original product.
Methods for making a crown from other available materials
A crown for a girl can be made from different materials. The main thing is to have a great desire and show your own imagination.
For this you can use different materials. Many of them are found in almost every home:
| Material | Description of technology |
| Foil | Take a roll of foil and cut the material into pieces. They are rolled into a voluminous roll and connected in the form of a ring. Next you need to twist the remaining parts and screw them to the base. The shape of the decoration depends on the child’s preferences |
| Plastic bottle | This material can also be used to make a crown that will complement a party outfit for a miss or an older girl. The surface must be covered with silver or gold varnish. You need to take a large bottle with a capacity of at least 4-5 liters and cut off a rectangle. Triangles are cut out over the entire surface. The ends need to be connected with a stapler. You can use stones, sequins, beads as decoration. |
| Mastic | The product will be used to decorate a cake for a children's party. To make it you need to buy or make mastic. Pre-print or draw a stencil of the future decoration in real size. Next, you need to roll out the mastic and attach it to the template. Using a thin knife, the workpiece is cut out and its edges are joined. You can decorate with food beads and flowers made from powdered sugar. |
Thanks to desire and imagination, you can make an original crown for a girl. You can create decorations from felt, satin ribbons, and also from A4 sheets using the Kanzashi method.
The child will be happy and will tell his friends about his mother’s skills.
It is better to make jewelry for the princess together with the baby, who will be able to take part in various exciting processes.
The product will complement the Snow Maiden or Princess costume for the New Year. Crowns are cut out of beets, potatoes and other vegetables to be faked for the fair.
Useful video
Share this post
- Related Posts
- Pregnancy 7 weeks: what happens, development, pain and discharge
- What are the popular toys for 6-year-old children and how to choose the right purchase?
- Cool ideas for simple and cool pregnant belly designs
- Why does a child smell of acetone from his breath, what Komarovsky advises and how to treat it
- Komarovsky's advice on how to put a child to sleep, features of hyperactive children
- List of things for a newborn for the first time
Crown made from toilet paper roll
And rolls of toilet paper and towels can easily be turned into small symbolic headdresses, which are often worn by princes and princesses in fairy tales. A small crown made from a toilet paper roll looks interesting and touching. To make a crown, wrap a cardboard roll with colored tape.
Wrap the roll with strips of colored tape
We make deep cuts on one of the edges of the roll.
Making cuts
At the bottom of the crown we thread a rubber band through the holes. To prevent the rubber band from moving around, we tie a small nail in the inner part.
Insert a rubber band with a nail
Miniature crown - ready!
Cardboard roll crown
Look at the video - how to make a crown for a princess with your own hands:
Decorate the crown to your taste, using all the power of your imagination - and any child will like the craft.
Cardboard crown with cotton wool rim
Real kings and queens will surely like a crown lined with “furs” made of cotton wool.
To make a crown with a rim made of cotton wool, print out a template for cutting:
Template for cutting out a crown with a rim of cotton wool
Cut out the printed template along the contour.
Cut it out
Using the template, we draw outlines for cutting onto the cardboard.
Outlines for cutting on cardboard
Glue the cardboard parts of the crown together. Glue a strip of thick fabric (felt or burlap) to the inside. Such a crown will stay better on a child’s head.
Glue a strip of thick fabric
The base of the crown is ready! We decorate the crown with sequins and paper strips. We glue rolled cotton wool around the circumference of the crown, which we paint with yellow paint. Instead of cotton wool, you can use a strip of light fur.
Royal crown with jewels and fur trim
Snowflake crown made of chenille wire on the rim
From a hoop and chenille wire you can make a beautiful and original crown for a little Snowflake.
You can get creative and add year numbers. It will turn out very original!
DIY crown for a “Snowflake” costume for a girl for the New Year: instructions
Crown for the “Snowflake” costume
This is a truly New Year's paraphernalia - a crown for a snowflake . Many girls wear this costume for a winter holiday. You can find a dress and shoes, but you will have to make a crown for the New Year with your own hands. Below you will find instructions.
Let's prepare in advance:
- Scissors
- The most ordinary New Year's tinsel
- Glue gun
- White tinsel on wire
- Rhinestones, beads, beads
- Thin wire
- Headband
We do this:
Crown for the Snowflake costume
- The crown has two parts: snowflakes in the amount of three to five and the base - the rim.
- We connect three parts together with a crossing in the center.
- On the long rays we fix small snowflakes with a lush pattern from the remains of tinsel.
- We attach a large bead, several pieces of beads or rhinestones to the central part. We will make from three to five snowflakes.
- We install them using wire on the frame-rim, decorating everything with tinsel.
The crown is ready. The same decorations as on the crown can be made on the dress. Then you will get a beautiful set.
Below is an example of another crown, which is also easy to make. Here's the template:
Sample
For this accessory you will need more beads and rhinestones for decoration, as well as an elastic band for attaching to the head.
Crown for the Snowflake costume
Option from whatman paper
To make such a head decoration with your own hands, follow these steps:
- take whatman paper and draw a maple leaf on it;
- cut out the sketch and the same one from the fabric. The fabric should be autumn shades;
- then cut out a rectangle from these two materials that will correspond to the volume of the head;
- connect the two main parts with fabric cutouts;
- All that remains is to decorate. For this you can use sparkles and gold braid.
Related article: Dumplings with raw potatoes
Even an adult can try on such a crown; it will look trendy and will last for several years. If desired, you can replace one large sheet with three small ones. The principle of operation is the same, only the stencil is different.
DIY crown from a plate on your head for a carnival: instructions
DIY crown from a plate on your head
An interesting option for decorating from disposable tableware . This accessory is suitable not only for a little girl, but also for older girls and women for a carnival. You can make a crown from a disposable plate - it’s simple and quick. So, let’s try to make decorations with our own hands for the upcoming New Year’s carnival:
Crown from a plate - instructions
- We fold disposable tableware in half.
- We make cuts like on a pie, but do not cut them all the way through.
Crown from a plate - instructions
- Now let's get to the fun part - coloring the future crown. It is advisable to use bright, cheerful colors.
- Now bend the tops up, decorate with multi-colored buttons, placing them on glue.
Tip: You can use ready-made painted paper plates. Select dishes with a New Year's pattern and simply cut out the crown and that's it.
This decoration is very easy to make, and it doesn’t take much time. Therefore, first arm yourself with everything you need and invite your child for a royal look.