We all wanted a pet that our parents forbade. Now we have grown up and transfer our negative experiences to our children. They also hope to get a friend for fun. Most often it is a dog or cat. But there are exotic desires, like a parrot or a hamster.
If someone who likes to stuff food into their cheeks can somehow be tolerated and fed. However, the bird is not accessible to everyone, since it needs a cage and specific nutrition. But there is a way out - a child’s passion will be satisfied by a hand-made origami parrot.
But not everyone knows how to make a parrot out of paper using the origami technique. Therefore, we will further shed light on this issue.
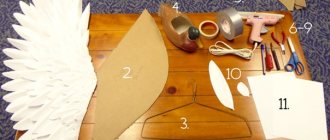
What will we need for this?
Before starting any work, you need to make sure that the work surface of the table is clean and ready for work. In addition, it wouldn’t hurt to give your child a short briefing on the safety of working with scissors and other materials.
It is better to help the little ones at all stages of work.
Origami is a very ancient art that was learned in China and Japan. It teaches the master self-control, patience, and allows him to develop his imagination and do incredible things with just one sheet of paper. For children, we have selected the most optimal basic schemes that even the smallest ones can do.
Interesting Facts
In the east, parrots have been revered since ancient times for their wisdom and magnificent attire. The ability of these birds to imitate human speech made them attractive conversationalists. The aristocrats of China kept parrots in their chambers and entrusted their most intimate secrets, believing that the winged listener would not tell anyone what he heard. In India, parrots were considered the liaison between earth and sky, since they could convey requests to the gods in human language.
These birds still surprise today:
- All species of parrots have a developed ear for music and are able to dance gracefully.
- Cockatoos and Grays live up to 70 years in domestic conditions.
- Almost all parrots are monogamous. Many species require a mate to feel comfortable in captivity. Birds become no less strongly attached to their owner if he is affectionate and attentive to them.
- Parrots do not have vocal cords; they produce all sounds using their beak and tongue.
- The largest species is the hyacinth macaw, reaching the size of a three-year-old child. Its length with tail is 1 m and its weight is 1.5 – 2 kg.
- Grays are considered smarter than others. The vocabulary of these parrots is up to 2000 words, and they use them appropriately, creating the impression of a meaningful conversation. In addition, Grays perfectly copy a person’s intonations and the emotions they express.
- Parrots “look around” 180°, second only to owls and eagle owls in this ability. The latter freely turn their heads 270°, thanks to the special structure of the neck vessels.
- Endemic to New Zealand, the owl parrot (kakapo) cannot fly due to its disproportionate weight. Evolution did not affect these birds, which were in natural isolation, so today they are considered living fossils. An amazing feature of kakapo is their smell, reminiscent of a cross between honey and flowers. It's as if birds wear expensive perfume every day.
- Parent parrots give their chicks “names” that are a set of individual sounds.
- Not all parrots eat fruits and greens. The kea species, native to New Zealand, prefers game and small livestock. Local farmers complain that winged robbers are stealing their sheep, causing damage to their flocks. However, in reality this is extremely rare by chance, since the relatively small kea prefer carrion.
Types of origami paper crafts
Origami refers to the art of folding a sheet of paper by bending without secondary cuts and joining by gluing or fixing with additional materials.
Simply put, paper art allows you to create a full-fledged three-dimensional figurine from paper, in which, without additional processing and decoration, the image that the creator put into it will be recognizable.
These same topics include art such as appliqué and modular origami, which we will discuss below.
Quilling
Quilling or paper rolling is the art of creating three-dimensional or planar compositions from long and narrow strips of paper twisted into spirals. These spirals are given a wide variety of shapes - these are the elements for paper rolling, which are modules for creating works. It is believed that quilling was invented by the monks of Mediterranean Europe in the 14th - 15th centuries. In Russia, this creativity came into fashion only at the end of the 20th century.
Pictures made from rhinestones and sequins are no less beautiful. Due to the fact that these materials have a shine, works made from them look quite expensive. The principle of creating such compositions is similar to embroidery, only here sequins or rhinestones are used instead of threads.
Application on the theme of origami parrot
For this fake, it is enough to use a regular A4 sheet and a set of colored paper. For a child, you can make a paper blank in the shape of a bird.
After this, the young child covers the bird with pieces of torn paper of different colors. You can use the brightest colors, since these representatives of the bird family, as a rule, are full of elaborate colors in their plumage.
In addition, you can make a simple applique. It is enough to trace the outline of the bird, and then the child himself will start laying out the mosaic and gluing pieces of paper.
A simple base shape for creating a parrot
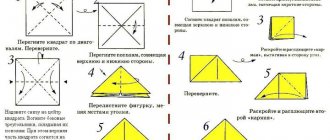
For older children, we suggest plunging into the diverse world of origami, but let's start with a simple basic diagram, as a result of which we will get an original bird. First, let's make a basic "horn" shape. To do this, we turn the square in front of us in the form of a rhombus. We bend the edges symmetrically along the center line to form a “horn” that resembles an ice cream cone.
Next, we turn the top of the resulting triangle back to the fold line. We turn the two side wings of the pocket towards the middle. The turned away corners will be the parrot's future legs, and the resulting sharp tip will be the bird's tail. We form the head from the turned-down corner and make a beak from its edge. That's all! Now all that remains is to bend the structure in half and the parrot is ready. Add eyes or decorate the bird to your taste.
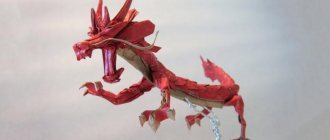
Parrot in classical technique
The easiest way to make a parrot is to use a ready-made modular origami kit. Such sets are sold in stores for joint creativity between children and adults. You can also make triangular modules yourself from thick colored paper. They need to be inserted one into the other, connecting according to a certain pattern. The work is carried out as follows:
- It is necessary to carefully study the diagram, decide on the number of modules of each color and group the modules, arranging them by color on a well-lit table to make it more convenient to work.
- Using the diagram as a guide, assemble the head, body, wings and tail of the bird from the modules.
- Check that all modules are firmly attached to each other. If necessary, adjust the parts at the joints so that the craft looks smooth and symmetrical.
Scheme of a blue macaw parrot from modular origami
The first step of modular origami is to make a basic “socket”, which will consist of 6 purple and 5 turquoise modules. The order does not change, and rows 3 to 5 are assembled as standard. Further, starting from the 6th module, you determine the direction of the parrot “front” and “back”. Considering that this design is more complex, it is better to stick to the diagram. Beginning creators can make modules without color so that they can color their parrot later.
Next, for manufacturing, we add modules up to the 8th row. After that, add 2 turquoise modules to get a combination of 6 turquoise, 2 purple. For the front side we use 9 purple ones. The next row is the fastening row in the structure, which connects the front and back parts. We follow the order of adding on the stomach and back so as not to disturb the proportion of the picture.
On the 16th row you fix the red triangles for the bird's head. The next row will consist of a combination of 6 red ones, and the 18th row of 5 red ones, the 19th row is one module less (4). To assemble the bird's tail, you can use alternating rows or mix them in a checkerboard pattern.
That's all! At first glance, modular origami seems complicated, but once you practice the basics, everything will be simple! This way you can decorate various interior details. For example, a bird in the kitchen, a bookmark in a book, a postcard or a stand.
The attractive thing is that there are no restrictions in such a topic, and thanks to the variety of modular origami, you can, if necessary, disassemble the craft and use the modules on another one, just as you can do with a Lego constructor.
Naughty paper parrot
Using a variety of crafts made using the origami technique, you can easily decorate the interior of an apartment or country house. Paper origami parrot is not the only interesting idea. For example, in spring, a variety of bird figurines are perfect for interior decor. You can make a crow, an owl, or a crane out of white or colored paper, but there are reasons why many lovers of paper crafts prefer parrots:
- A figurine of a parrot, which “knows how” to open and close its beak, can be used in role-playing games, as well as in home puppet theater performances.
- A cheerful bird made of multi-colored paper will not only lift your spirits, but will also perfectly enliven any environment.
- The parrot is one of the most beloved birds by children, so any child will be delighted to take part in making such a craft.
- The silhouette of a parrot is always recognizable by its powerful beak and bushy tail. If you draw small details on the finished craft, the bird will turn out to be very interesting.
Making a funny “talking” bird using the origami technique is an excellent option for joint creativity for children and their parents. You can also do them in clubs and sections, at school during technology lessons and in kindergarten.
To make a parrot out of paper, you need to find the simplest diagram for beginners.
The main advantage of the origami technique is that it does not require glue. Scissors, as a rule, are also not needed, except in cases where the needlewoman independently makes modules from colored paper. Therefore, this craft is great for children. To make the folds smoother, you can bend the paper along the lines using a wooden or metal ruler. You can cut paper for making modules not only with scissors, but also with a stationery cutter.