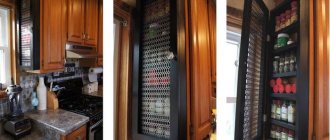
Hello everyone) I’m writing my first blog. I promise that the photos from me will be in good quality, where everything will be clearly visible. I will also describe my actions in as much detail as possible.
When I bought the car, it was without a radio, with a collective farm and sagging trunk shelf, which was upholstered with leatherette and held together with paper clips. When driving, it beat hard and the leatherette creaked against the plastic of the interior. There were 2 different speakers with a diameter of 20 cm embedded in it - one from Sovdepov, filled with some kind of wine, the other was a pioneer - which over time was completely covered. Soon a Pioner radio and a passive subwoofer from the same company were purchased. Since it was passive, with a rating of 80 watts, it didn’t sway too much from the radio))) and even struggled when hitting bumps))) plus it also took up some space in my hatch. I'm tired of all this and I decided to fix it all))) I would like to note that I do all this exclusively with my own method and ingenuity, without drawing information from anywhere, so in some places it may seem strange, but you will see the result at the end))) Initially it all looked like this , How:
We take two pieces of chipboard 18 mm thick. Since in the end everything will be covered with carpet, the color does not matter. We make the part where the speakers will cut into 27.5 cm wide, and put the second part close to it, which will fold back, like in the original trunk shelf. Then we unscrew the speakers from the old shelf, put them on top and mark the outline with a marker. Which we cut with a jigsaw.
After cutting with a jigsaw, carefully sand the end with a grinder. Then we round the sanded boards around the entire perimeter with a router.
It is not always the case that a shelf in the trunk is made with your own hands exclusively by people who do not have it included in the car’s configuration. There are often cases when there is a shelf, but the owner is absolutely not satisfied with it. The main reasons are usually 2. They are based on the same factor: manufacturers most often make shelves from plastic.
Lada 2114 Turtle › Logbook › DIY rear shelf.
To begin with, I walked around and looked around the shops.
The shelves start at 1500 and go up. It won't work. The plywood turned up. There is a jigsaw. There is a warm garage. All conditions. This is what you need to take off with.
To begin with, I started dismantling the original shelf and sides. But in the photo they are nothing. They look.
I unscrewed the screws, the sides are in no hurry to fall off. I thought. The sidewall will still go to waste. I solved the problem with a jigsaw.
Machine without shelf. Nothing too.
I left the sides alone for a while. Shelf for long-term storage.
I decided to make the shelf in two parts of different widths. To make it easier to open. Cut it out and screwed the hinges on.
What has happened so far.
Further refinement with a file. Things slowly came to a close.
To begin with, I “carpeted” the turtle.
The most difficult part is the sides. I tightened it and screwed the speaker on.
Upholstered and installed a shelf. What happened in the end?
I think it's good. All that remains is to carefully stick the register in the trunk and buy some adhesive tape to secure the shelf. She already fits well, but that’s for sure.
I threw in the wiring, soldered it, connected it, listened. The rear does not outplay the front, but only complements it. This makes me happy. But we need to change our heads.
What surprised me: the rear license plate began to rattle. With the trunk closed, you can only hear it when standing behind you, but with it open... it almost shouts over the music. Or is the ShVI bad or are the speakers good? You'll need to put something under it.
Source
Maintenance of Oka engines
The Oka engine of both the first and second generations is quite reliable. And if the factory requirements for maintenance regulations are met, it has a service life of 120,000 km.
According to the vehicle passport, both engine 11113 and engine 1111 have a maintenance program every 15,000 km. To undergo maintenance at this interval, it is recommended to use fully synthetic motor oil. When using semi-synthetics, and even more so mineral motor oils, the Oka engine requires changing the lubricant in accordance with the service life of the oil, that is, at least 10,000 km.
In this case, the oil system must be flushed and the filter element replaced. The oil volume in the Oka engine is 2.5 liters, but when replaced, 150-300 ml of lubricant remains on the engine walls, so the filling volume is controlled by the dipstick. Overfilling of oil is not allowed.
Rear acoustic shelf for cars
Today we’ll look at how the author of this article made an acoustic shelf for a Muscovite.
You will need:
Two sheets of chipboard (one sheet with dimensions 39x108x2 cm, the second 26.5x108x2 cm), Putty approximately 1.5 kg. About one and a half cans of mounting foam. Two furniture hangers, nails or screws, wood varnish, and covering material.
The author took chipboard from an old cabinet as a basis. The sheets need to be cut into two pieces, one part will rise, and the speakers will be mounted in the second. The chipboard needs to be treated with varnish so that it is not exposed to moisture in the future. Since the author of the chipboard from the cabinet had irregularities and holes on it, we removed everything using putty. Each car has its own individual dimensions, the author describes the approximate dimensions. On the second piece, I cut off the extension on the sides.
The same holes need to be cut on the shelf itself.
For podiums you need 4 pcs holders. The author made them from leftover chipboard. You can choose any angle at your discretion; the author has it at 45 degrees. We connect the holders and podiums with self-tapping screws, having previously coated them with some kind of glue for reliability, and screw them to the shelf.
The shelf is sheathed only on the outside. The speakers are connected from below, in the hole. After complete covering, you can screw on the black hinges, but the author painted them separately (the usual color of the metal does not fit in at all.)
Here are the final photos of the shelf that the author has already installed in the car.
Source
Layout development
First of all, you need to think about what kind of future shelf you imagine, how it will be attached to the body (or to the rear seat support), how much luggage space you will allocate for it, how many levels it will have (one- or two-story design) and etc.
The simplest option:
Attach a piece of chipboard on top parallel to the floor of the trunk, and attach a smaller piece perpendicular to the first to it using corners. Below, between the extreme horizontal points, there is a vertical part that will prevent objects placed inside from moving along the floor.
A more intricate option involves dividing the space horizontally with a shelf into two levels. The bottom floor is the trunk floor, the second is a measured piece of chipboard or thick, 10-12 millimeters, plywood. In this case, in the upper floor it will be possible to cut an entrance for the neck of the fire extinguisher, thanks to which it will be firmly held in a vertical position.
How to make a shelf in a car with your own hands
I’ll share my version of an acoustic shelf and my experience of placing a subwoofer for a 22-year-old Camry...
When the question arose - to make a shelf (since I simply didn’t have my own, like most of the interior when I bought the car), I started thinking - where to place the sub? There were two subwoofers in stock and both were cabinet ones, but I really didn’t want to spoil the bounty of the trunk of my Kamryukha with this large wooden chest... And the quality of the subwoofer in the sedan - riding in the trunk - did not impress me at all (from experience in the driving cars)
I decided to pull the sub out of its nest and install it in the rear parcel shelf. In this version, it will play on the volume of the trunk, since I have not yet begun to assemble the body to the shelf. I noticed that on many Korean cars the sub is installed this way! I’ll try this option for now - if it doesn’t suit me, I’ll strain all my Kulibin brains and make a box. I didn’t make the box, not so much out of laziness, but because of space. The width - which the rear parcel shelf allowed to be cut - will force the box to be of the required volume, quite narrow, and therefore - almost or even to the very bottom of the luggage compartment - and I really wouldn’t want this.
Why didn’t you place the sub in the trunk in the fender well? Yes, firstly: he will start playing in the trunk, and not in the cabin, and therefore he cannot avoid what he so wanted to avoid; and secondly: the width of the trunk allows me to carry a snowboard across it, and for me this is extremely valuable, since I drive it three to four times a week.
In general, not finding other options, I settled on making a shelf out of plywood, which would kill two birds with one stone - the first, of course, is installing the sound, the second, I’ll make a shelf, since I simply don’t have one.
I took a piece of plywood of the required size (with a small margin)
After lengthy measurements, I cut it according to the preliminary shape.
Acoustic shelf in the trunk
The VAZ 2109 acoustic shelf can be easily and easily made on your own. This will be discussed in our article. An acoustic shelf on a VAZ 2109 is installed for a number of reasons, the main one of which is to create a clear and pure sound from the speaker system.
Engine tuning to increase power
When considering how to improve this car, you should pay attention to the installed engine. It has a relatively low power rating and low reliability.
There are two methods for improving the motor:
1. Installing a new one, for example, taken from a Rover Mini. This power unit has a volume of 1.3 liters, as well as higher reliability. This modernization method is considered preferable, as it can significantly improve the performance of the car. However, the method has one significant drawback - the high cost of implementation.
2. The second option involves improving the standard design. This method is cheaper and easier to implement, and allows you to achieve a high power level. Engine tuning begins with changing the carburetor: increasing the diameter of the throttle valve allows for the supply of a large amount of air, as well as increasing the service life of the structure. A new camshaft can be installed, which will also increase the number of revolutions. Replacing standard valves increases engine power and changes the combustion chamber. Modernization of intake and exhaust manifolds, installation of a new air filter - all these changes also increase engine power.
In general, we can say that there are quite a few methods for modernizing a motor. The engine that comes from the factory does not have high driving performance.
Advantages of an acoustic shelf
VAZ 2109 acoustic shelf
Today you can purchase an acoustic shelf in specialized stores. Its cost is not that high, although it is still recommended to do it yourself. In any case, whether the shelf is purchased or made with your own hands, it will provide advantages:
Acoustic shelf VAZ 2109
Note. To hide budget types of speakers or for some other reason, the panels are covered with special materials that do not distort the sound. In addition, when choosing or manufacturing shelves, special attention is paid to options for different sound directions. On the shelves it is possible to build so-called scenes. In this case, the sound can come from different angles in different directions: to the rear window, into the passenger compartment or trunk.
Creative shelves for storing cars
Homemade shelf for cars
Purchasing a shelf for cars is a way out of the situation when the toy car fleet has grown so much that it takes up almost all the free space. Additionally, cars scattered around the house can cause serious injury, which is why it is important to have a good storage system for them. This review contains several ideas that will inspire parents and collectors!
Vintage typewriter rack spotted on 4 EGT blog. It will become not only a practical storage unit, but also a beautiful showcase for displaying your collection.
This cozy “garage” is easy to sew yourself using instructions from the Homemade by Jill website. Its main advantage is portability.
The environmentally friendly truck, produced by the Czech brand Fler.cz, is a toy in itself and also serves as storage for other cars. With the latest design upgrade, it now has real wheels.
This DIY wooden car rack from What About Wood holds 35 to 40 toy cars.
This Little Miss Alizzi shelving unit once served as a cassette shelf. Now it's great storage for cars with a chalkboard instead of a back wall.
Do you have your own unusual ways to store toy cars? Share with us in the comments!
What can a shelf be made from?
MDF shelf drawing
A common material for an acoustic shelf is MDF or multi-layer plywood. Be sure to cover the surface of these materials with carpet or other acoustic material to ensure compliance with the overall design of the interior. As for the area for installing speakers, they must be made so firmly that they completely eliminate rattling and vibration.
Shelf for cars in the form of a truck vector layout free download
Good morning everyone! Today I want to offer you a great vector layout! If you are planning to make a shelf for cars in the form of a truck, this vector sketch is what you need. This toy car shelf will help your child beautifully display their entire toy collection.
This difficult-to-manufacture piece of furniture is made from plywood of various thicknesses. Consists of three separate shelves for 100 machines each. You can make one or more individual sections, depending on the number of machines you have.
Layout characteristics:
- Dimensions of one shelf - sections for 100 machines - 1000x400x50 mm.
- The dimensions of one section are 100x35x50 mm.
- Material: MDF or plywood thickness 3, 6, 9, 18 mm.
- total cutting length is 116 linear meters.
archived files in cdr x4, eps, dxf formats
↓ Download free model of a shelf for cars in the form of a truck in one archive ↓
(.zip file, 3.98 MB)
Making a shelf with your own hands
Acoustic shelf for VAZ 2109
So, if we decide to make a shelf with our own hands, then go ahead. A ready-made acoustic shelf costs about 1,000 rubles in a store. Why waste extra money if you can make everything yourself, spending some of your time and receiving inexpressible pleasure from the process. A homemade shelf has advantages over a purchased one, and it’s simply impossible not to notice.
Start
To make a shelf for a VAZ 2109, you will need to prepare.
Materials
Tools
Note. As mentioned above, the ready-made standard shelf of the VAZ 2109 is used as a model. Therefore, it will need to be removed. A simple screwdriver, a little patience and time - the shelf is dismantled.
How to mark an acoustic shelf
Main stage of work
Acoustic shelf for VAZ 2109
This includes the manufacture of acoustic podiums, the construction of a box for seat belts, pasting and much more.
Podiums
Note. The podiums, as mentioned above, are made on a separate piece of chipboard.
DIY shelf
How to make an acoustic shelf for a VAZ 2109
Making a box for belts
Note. When making a box, the following point must be taken into account: the belts must enter the box from the side.
Covering with carpet
Note. After these operations, the boxes are assembled and screwed in place.
The final stage of work
Shelf reupholstery
Upholstery material
Reupholstering the acoustic shelf on a VAZ 2109 can be the most problematic part of the job. That is why we devoted a separate chapter to it in our publication. Every owner of a VAZ 2109 dreams of making the interior of their “nine” more comfortable and attractive. An acoustic shelf is not only an element that serves a practical purpose, but also a separate component of the entire interior. For this reason, she needs to be able to give a style that is beautiful and consistent with the overall design. The material most often used is carpet. On the other hand, if the interior itself is covered with leather or a substitute, or maybe Alcantara, covering the shelf with the same material will come in very handy.
Carpet reupholstery
Re-upholstering the shelf with carpet
Experts recommend paying special attention to working with carpet. The following points need to be taken into account:
So let's get started:
Note. Nairit holds firmly, but takes a long time to dry. It is recommended not to lay the carpet right away, but to wait until the glue dries a little and its adhesive functions increase.
Advice. It is recommended to work with gloves. This will make your work easier and your hands will remain clean. In addition, if you do not have the skill to do this kind of work, it is recommended to pull the shelf in parts: first one half, then the next.
Finished rear acoustic shelf
That's all. If the instructions are complicated and doubts arise, then it is better to entrust the work to specialists. On the other hand, you can learn everything with your own hands, so it’s worth the risk. During the work process, it is highly recommended to watch the video and study photo materials. Thus, the price for purchasing and installing an acoustic shelf in a VAZ 2109 will be significantly reduced, because you will only need to spend money on consumables.
Popular publications
latest comments
A couple of years ago I decided to install good speakers in my “Six”, which was passed down to me from my dad. Before that, there were home-made plywood speakers, the sound quality of which was the same as the cheapest plastic Genius ones. Naturally this did not suit me. I picked up some good JBL GTO-938 ovals. But there was nowhere to put them.
There were no holes for them in the factory shelf, and I didn’t want to damage the metal.
I decided to buy podiums. After shopping around, I couldn't find anything suitable. And the prices were, frankly speaking, abnormal; the cheapest and most obscene shit, obviously collected by prisoners or Tajiks, cost 1000 rubles.
I decided to make a shelf with podiums myself.
There are no photos of the detailed process, since at that time I didn’t set a goal to post anywhere. I'll post what I found on my phone. I took photos to show my friends that I made it myself and didn’t buy it.
I decided to make it from chipboard. Since my old broken-down crib was lying in the garage, I was provided with free material 17 mm thick.
Having removed the original hardboard rear shelf, I outlined the outline, taking into account the fact that the chipboard is thicker and therefore should be smaller, since the cabin is becoming narrower. I used a jigsaw to cut out the shelf and all the blanks for the podiums.
To give a slight angle I placed a block
I fastened the entire structure with self-tapping screws. The edges were processed with a rasp and coarse sandpaper.
The cavities were filled with foam
We cut off the excess and sand it. We impregnate it in two layers with epoxy glue for strength.
we prime it in a dark color so that it does not show through later and ultraviolet radiation does not destroy the foam
We cover it with acoustic carpet and install ovals. By the way, the carpet is very difficult to pierce and drill. It is better to burn holes with a soldering iron, a hot nail or a cigarette..) Insert the ovals, pull the ends of the wires into the pre-prepared holes
Let's put it together. We solder terminal strips to the ends of the wires
We attach the shelf to the car using furniture bolts and paint the caps to match the color of the carpet. To prevent anything from rattling between the shelf with podiums and the metal shelf, we lay a layer of the same remaining carpet.
By the way, the speakers (JBL GTO-938) are very bassy, you can google the characteristics. The role of the bass reflex is played by the original holes for small speakers in the metal shelf of the body. And the trunk acts as a kind of subwoofer. In the end, the overall sound turned out great!
Nothing farts or rattles, turn it over.
Below are just photos of the installed shelf from different angles. It wasn’t really possible to take a photo from the street, I caught a lot of glare
We calculate the amount spent at prices from 2 years ago (I don’t think they have changed much). Carpet
200r Epoxy glue
70r Titanium glue (for gluing carpets)
60r Polyurethane foam
100r Everything else was free in the garage
The total came out to a little over 500 rubles
Did you like our site? Join or subscribe (you will receive notifications about new topics by email) to our channel in MirTesen!
Source
Do-it-yourself rear parcel shelf for a car
I started with a shopping trip. The cheapest is 1500 rubles. This does not fit. Plywood with a jigsaw was available. Yes, and there is a warm garage too. Working conditions are acceptable.
Let's get started!
First of all, I removed the old shelf and side panel.
After unscrewing the screws, the shelf remained in place. I had to think a little. In any case, the sidewall will not be needed. The jigsaw went to work.
The sidewall won't be needed yet. The shelf will be stored for a longer time.
Although the sidewall will be needed to create a template for the new sidewall. I also didn’t forget about the dynamics. Now is the time to start cutting.
There were 4 parts in total (two according to the template and two a couple of centimeters wider). I used self-tapping screws for twisting. Part of the rear shelf also came in handy. Here I used a corner as a fastening element. Then it was time to screw the corners for fastening to the body.
After completing the above work, I made a fitting. I decided to make the shelf not monoblock, but consisting of two parts. Moreover, the parts will be of different widths. This will make it easier to open. I made a cutout and screwed on the hinges. The result was finalized with a file.
So I got to the tight fitting.
Upholstering the sidewalls was not as easy as expected, but the work was done. The speaker took its place.
I also put the sidewalls in place.
The shelf was also upholstered and installed.
The result turned out well.
At the final stage, you need to connect the wiring and fix the shelf. To secure it I used adhesive tape. Although to a greater extent this was done for reasons of greater reliability, since the shelf held up well even without it.
Next, I pulled the wiring and soldered it. By ear I determined that the rear speakers do not shout over the front ones. Quite good news. But there was a need to replace the head.
After connecting all the wires, a slight rattling sound appeared in the rear license plate area. When the trunk is open, the noise is simply unreal. When closed, the noise is much less. Looks like my speakers are great. Or the seams are not very good. The issue was resolved with an ordinary lining that absorbs vibration.
Source
Rear shelf of VAZ 2115 - do-it-yourself acoustic shelf
Recently I came up with an obsessive idea to make a wooden acoustic shelf in my spot. For this purpose, a varnished door from an old wardrobe was cockroached from the trash can closest to the house (fortunately there is plenty of this stuff in the trash cans)))) They also used 6 mm plywood that was lying on the balcony. All the cutting and assembly took place there on the balcony)) To begin with, I found on the Internet a common diagram with the dimensions of the shelf
Then we work according to the presented scheme, using a marker and a jigsaw.
After that, I went to the car 5 times (from the 7th floor), adjusted everything in place)))
After this operation, I also had to go to the car and adjust it. The saddest thing was adjusting the angle of fastening the plywood on the glass side. It's sad, because I didn't have a sanding machine, I had to use an electric plane)))
Naturally, there were some trips to the car and adjustments to the location.
The next step was cutting out the holes for the speakers
Then another idea came - to get rid of the sub in the trunk and embed it in the shelf too
I decided to try on the music
The next stage was covering it with carpet. I had never done this before, so I didn’t even know where to look for it. Thank heavens, the search did not last long. I bought 1 linear meter of carpet (1 m by 1.45 m) and spray adhesive. It turned out something like this
A place for the amplifier was found on the bottom of the shelf. I collected all the wires in one place. Now there is nothing in the trunk and space is freed up.
The sound in the car became richer, I even had to turn down the settings a little)))
All my expenses are the purchase of 1 linear meter of carpet and glue. It cost me 690 rubles. Both glue and carpet cost about the same. Since the carpet is a meter wide, and only half a meter was spent on the shelf, there is still room for some little things in the car, such as racks.
Manufacturing stages
You should start, like any serious business, with preparation. In this case, you need to remove everything unnecessary from the interior, and then remove the decorative shelf that was installed by the manufacturer and the insulation. We got it like this:
Stage 1. Applying markings. You can use wood, but in our version it is chipboard. The decorative shelf is used as a kind of template.
However, approximately 0.5 cm will need to be removed from each side in order for the shelf to fit into the space allocated for it.
Stage 2. Sawing. Of course, you can do this job manually, but it is better if you have a suitable power tool.
Performing preliminary fitting:
Stage 3. Holes are marked according to the size of the speakers
Now you need to carefully cut the holes, something like this:
Stage 4. Create a template. This way you can install the speakers at the desired angle. In addition, nothing will fall off the shelf. In our version it looked like this:
Now you need to turn it over to get the other half
Next, we lay the finished templates on the chipboard, trace and cut them out.
We glue the resulting second level of the acoustic shelf and further strengthen it with self-tapping screws.
Stage 5. Now you need to try it on again:
The next step is to cut a hole in the iron part of the shelf. Its diameter should be the same or slightly larger than that of the product being manufactured. To do this, you should use a grinder. If access to the trunk is not organized, then you shouldn’t even dream of normal bass sound. You also need to keep in mind that clutter in this cavity does not have the best effect on the sound quality.
Stage 6. We decided that one more level would not be superfluous. This is what it looks like:
And then we installed this:
Stage 7. Cut off all excess, grind and go through with sandpaper
All that remains is to cover the product with a suitable material, in our case it is carpet.
There is no need to use vibroplasts or sound insulation on the acoustic shelf itself, but it is very advisable to cover the trunk with them. Stage 7. It is also the final stage. The almost finished product is installed in place.
In this image you can see that the sound from the speakers will be reflected from the rear window:
Acoustic shelf repair
VAZ 2115 acoustic shelf and its repair
Repair work usually does not take much time. Removal and installation takes place in a matter of minutes:
Note: you can choose a more convenient way to attach the acoustic shelf. It can also be installed using self-tapping screws. Moreover, this option will be more reliable and effective.
Acoustic shelf VAZ 2115 classic
In some cases, repairing the acoustic shelf itself is impossible. If it is broken, a characteristic creaking sound will be heard in the car. This is mainly why they change it, because the sounds produced are almost unbearable. If the cause of this creaking is just a small crack, then this problem can be eliminated, and even quite easily: you can simply glue it together.
Note: you need to choose high-quality glue. The best option would be to use epoxy glue.
In addition, many people just want to replace the standard rear shelf, even if it is not broken. After all, most often it is made of rubberized plastic, which is why the sound of the speakers is quite unclear.
Acoustic shelf for VAZ 2115 and its dismantling
Some tips
Note: you should not take a thinner piece of plywood, since the resulting acoustic shelf will be practically no different from the standard one.
Note: As a rule, its price is not much higher than the cost of the materials used for its manufacture.
We create acoustic podiums
It doesn’t seem logical to change the shelf, investing effort, time and money into good sounding music, leaving the standard VAZ 2114 podiums, which are made of plastic and eliminates more than half of your work. Plastic does not dampen the vibration of the speakers at all; on the contrary, it enhances it, creating rattling and extraneous noise. Therefore, we will make new podiums, tougher, and making all the previous torment justified.
For the new holder you will need:
- Columns.
- Installation rings (included in the kit).
- Gloves and brush.
- Epoxy glue and hardener.
- Fiberglass and lycra.
If you start creating a podium from scratch, some skills in woodworking and other work with materials will come in handy, firstly, for an untrained person this is unrealistic, and secondly, people with such skills can imagine what exactly needs to be done without this article. Therefore, relying on the option that there are no such skills, as well as special equipment, on the basis of a standard podium we will carry out the procedure for strengthening it using the materials described above.
This procedure is done as follows:
- We cut off the mesh (part of it) from the podium and fix the installation ring; the structure should come out monolithic and rigid.
- We put lycra on the structure.
- Mix glue and hardener.
- We spread the resulting solution onto the lycra and, as in papier-mâché, glue the fiberglass (you need to stick 3-4 layers).
- Let the structure dry.
- We install.
The option of polyurethane foam is “not an option”: firstly, it causes corrosion of the body, and secondly, in addition to vibrations, foam also dampens sound.
Making a shelf with your own hands
A do-it-yourself acoustic shelf for a VAZ 2115 can be beautifully covered with carpet
You can make a rear shelf yourself quite quickly, as it has a simple design. Work on its manufacture occurs in the following order:
Note: these can be leftover parts from an old shelf.
Note: You can choose different speakers. In addition, instead of two large ones, you can install three smaller speakers.
Thus, making an acoustic shelf with your own hands will not be difficult. Moreover, a homemade shelf will turn out to be much better than the standard one.
And its price will be lower. Of course, before you start work, you should familiarize yourself with photos and videos on this topic. There are a huge number of them on the Internet. Our instructions may also come in handy.
Engine VAZ 1111
Oka engine 650 cc. turned out from half of the 2108 power unit. The choice of exactly half of the already developed block and the engine itself was determined by the cost of developing equipment for the manufacture of a 2-cylinder engine. A design feature of this in-line petrol twin is the overhead camshaft, which controls the operation of four valves - 2 for each cylinder.
The working process in the engine occurs in two revolutions of the crankshaft, which causes vibrations during operation of the internal combustion engine. To compensate for the imbalance, two balancing shafts are installed to dampen vibration. Engine power is 29 hp. The maximum torque is 44.1 Nm, which is achieved at 3400 rpm.
The fuel supply system is made according to the Euro-0 standard based on a carburetor. The fuel pump is mechanically driven by engine components.
The oil system is similar to the original 2108 using a gear pump. Oil is taken from the crankcase and sent through internal channels directly to the rubbing pairs of the camshaft and crankshaft.
The cylinder walls are lubricated by oil mist generated when the crankshaft rotates. The valve stems and parts of the valve timing mechanism, with the exception of the camshaft itself, are lubricated by gravity.
Why would you need to replace an acoustic shelf?
If the sound quality of the speakers initially satisfied you, then the need to make an acoustic shelf with your own hands may arise for the following reasons:
Drivers often encounter breakage of shelf fasteners, which occurs while driving on a rough road. Most often, this malfunction is encountered by drivers who do not slow down in front of potholes or on rural rough roads.
However, the vast majority of VAZ-2115 owners replace the acoustic shelf in order to improve the sound quality of music inside the car.
In this case, the shelf should be made of plywood with your own hands or to order. This material will help make the speakers sound clearer.
Interior modification - how to do tuning?
When considering the most popular tuning methods, do not forget about the possibility of changing the interior. Let's highlight the following most popular tuning methods:
- Interior insulation. In order to feel comfortable while driving in noisy cities, you should take care of proper insulation.
- Installing more comfortable seats. The seats installed in the car at the factory, to put it mildly, do not provide adequate comfort.
- Modernization of control units and instrument panel. An example is the work of changing the instrument panel in order to increase the readability of information.
- Improving the quality of finishing. You can also install panels from high-quality materials.
Important! You can finish the interior at the lowest cost due to the fact that there are quite a large number of ready-made kits on sale.
Preparing to make a shelf
First of all, you will need to prepare the materials and tools that will be required to complete the work.
The tools that will be useful to you are a jigsaw, a drill or screwdriver, and a grinder. Please note that the plywood must be at least a centimeter thick, otherwise the shelf will be no more effective than the standard one.
Many people are interested in how to take the dimensions of a shelf correctly, so as not to make mistakes during manufacturing. To do this, experienced craftsmen recommend removing the standard shelf and using it for a pattern. In any case, you will have to dismantle it; it is better to do this before cutting the material. This way you definitely won’t go wrong with the size.
Removing the stock shelf is not that difficult. To do this you will need:
After dismantling, parts of the old panel can be used as a pattern. In this case, a drawing will not be needed. To do this, first draw them on cardboard, and then transfer them to plywood. You have to prepare the following parts of the structure: main, decorative and adjacent. Next, prepare the side supports and grates.
On the side of the seats, on the main part of the panel, there is no need to make cutouts in the corners, since attaching a homemade shelf can be done differently than a stock one. From the old shelf, cut out the part that fits the rear glass and attach it to the new panel. You can also not take the side walls from the design of the old acoustic panel, but cut them diagonally yourself. By stitching, adjust them to the main part. Assemble the structure with screws. It is enough to screw in only a couple so that in case of a mismatch in size, dismantling can be done easily.
In the main part of the stock panel, two holes are usually pre-made for speakers. If necessary, you can make additional holes, for example, so that the shelf can accommodate several different speakers. In the decorative part, each of the holes should be several millimeters larger. Measure them against the speakers you plan to install. The heads must fit freely into the place prepared for them.
Other small-scale Oka power units
Only VAZ 1111 and VAZ 11113 engines were serially installed on the car. It was with these power units that the car was supplied to retail chains.
As options to save production and meet environmental requirements, both SeAZ and KAMAZ tried to use power units from other manufacturers. This was due to the fact that AvtoVAZ refused to continue producing minicars and actually stopped supplying power units to complete the car.
So in 2004, a trial series of cars with a Korean Hyundai Atos engine was produced. 15 cars were produced for trial testing, but the program did not go into series.
Also this year, small-scale tests were carried out at SeAZ of cars with engines from the Melitopol plant MeMZ 245. The car was called OKA-Astro and was subsequently produced in small series at the Kamov automobile assembly plant. Another version of the Ukrainian power unit was MeMZ 247.1. This engine, which complied with Euro-2 requirements, was not supplied for mass production, although such equipment is rarely found on the secondary market.
In 2007-2008, a Chinese three-cylinder injection engine was installed at the Serpukhov plant, which developed 53 hp.
The sports version of the Oka uses the engine from Priora.
The Oka-based tracked all-terrain vehicle uses a VAZ 2131 engine.
As an option for garage tuning, there are several examples of cars using three-cylinder Volkswagen diesel engines.
When installing shafts and heads there was always a feeling - they are capable of more, something is missing. Yes, there are results, and they have been achieved - engine 11113 produced 39-40 horses. For some it was enough, for others it was not. When I switched from the RS58 shaft to the RS628 , the highs improved, but overall it seemed to me that the shaft was defective or something. In particular, the torque at medium speeds has deteriorated, a noticeable pickup has appeared after 4500 rpm, and there is a torque hump at the bottom. But something was wrong, and the RS584 shaft sometimes gave more power in measurements than my motor. I was already starting to think that the shaft was bad, or I was doing something wrong.
I didn’t think about modifying the carb - the combination of jets was selected, the engine seems to be running... They stopped reports from losers who sawed carbs, then they were removed because of their unsatisfactory performance. From their reports it followed that they did not see any results, and what could they see without having any diagnostic instruments on hand except their ass accelerometer? And so, recently something happened - we need to make a carb. The trial carb was disassembled and lay on the table for 2-3 months, having already stopped emitting any odors out of despair. But, having assembled a cylinder head with M11 shaft for Nikolai, I made a 21x27 . A head with a sports shaft and carb was installed and showed excellent results, but I will write about them later. I came home inspired - and the next day I made two 21x28 .
But first, a few words about the car. OKA, engine 11113, modified cylinder head and RS628 shaft. In January, the Motor Tester showed 39 hp. , which upset me somewhat at first - in comparison with the serial graph, a clear “provision” was visible in the average speed. It was inconvenient while driving - the maximum speed and acceleration time were lost. The results were as follows - 39 hp. at 5500 rpm , torque 5.5 kg at 2800 rpm , at 6000 rpm an increase of 1.1 kg and 9 hp. On the graph below the blue line is cr. torque of a serial internal combustion engine, red - power of a serial internal combustion engine, dotted line - respectively torque and power of my engine (click on the screenshots to enlarge):
In the spring of 2008, after a run of about 50 tkm after boring, I replaced the pistons and rings (without boring), I installed SM , which increased the engine efficiency by reducing friction in the “cylinder-ms ring” pair. Removing the VSKh again inspired me - the engine produced 43 hp. , noticeably raising the torque line after 5000 rpm . However, up to 5000 rpm everything remained unchanged. The measurement result is 43 hp. power at 5700 rpm , torque 5.5 kg at 5400 rpm (the second, top, “hump” became higher than the first). The increase at 6000 rpm was already 1.7 kg and 14.5 hp. Let's look at the graph (dotted line - VSKH before and after replacing the pistons):
And so, I installed a bored-out carburetor. It was a shock in every sense. After test rides, my hands were shaking. The carburetor required a different combination of jets, which is quite understandable - the diffusers increased, the flow rate decreased. The engine shook - the Motor Tester produced 46 hp. at 6000 rpm , the torque is already 6 kg at 5300 rpm , the increase at 6000 rpm was 2.2 kg (.) and 18.5 hp. (. ) . Need I mention that the production engine at 6000 rpm produces a measly 3.3 kg of torque and 28 horses! And here at 6000 rpm – 5.5 kilograms and 46 horses! But the main thing is to look at the graph. It all rose up, the gap between the humps leveled out and almost became level, forming a long shelf of torque - from the bottom to the top! The blue and red lines are the torque and power of the serial 11113 internal combustion engine, the purple lines are the torque and power after replacing the pistons and rings, the red dotted lines are after installing and tuning the 21x28 carburetor.
And once again let's look at the final graph 46 horsepower engine. Pay attention to the scale at the top of the screen, showing the amount of power and torque at certain speeds - it’s easy to see that the motor shows a flat torque level within 5-6 kg of torque in almost the entire range. From the bottom to the top. Look at 7000 rpm - there are 4.1 kilograms of torque and 41 hp. !!