- March 11, 2020
- Crafts
- Natalia Drong
Before throwing away used drink containers, packaging for various household supplies, empty matchboxes, and popsicle sticks, take a close look at them. You can easily breathe a second life into this seemingly unnecessary household waste and garbage and turn it into useful and beautiful objects for the interior of your apartment or cottage, for household needs, for school, or for entertainment.
Making simple crafts from household waste with your own hands is a useful activity for children. It awakens imagination, develops motor skills, and teaches perseverance and order. There is also an environmental component to making crafts from packaging, bottles, and cans. While waste recycling plants are not operating in all regions, let a tin can converted into a lamp decorate your home rather than rust in the ground.
Why is it useful to recycle trash?
- It causes environmental damage. Plastic and batteries, for example, take centuries to decompose.
- Recycling helps reduce the consumption of finite resources on Earth
- Crafts made from waste for children are very useful things; their invention contributes to the development of children's imagination and simply brings joy. Moreover, there is no need for financial expenses when all the necessary materials, as a rule, are available.
- All civilized countries strive to protect the environment and therefore introduce different methods of recycling waste.
Crochet
You can crochet a wonderful robot - the Android OS logo, familiar to users of smartphones and tablets. This toy can be used as a keychain, a container for small things (beads, buttons, etc.), because inside it has a plastic container from a kinder surprise.
For knitting you will need:
- light green or light green yarn;
- hook No. 2.5;
- plastic container from kinder surprise;
- glue and beads for eyes.
You can see how to make such a toy in the video tutorial:
How to make crafts from waste
First of all, you need to decide what material the craft will be made from. It should not be too complicated so that the child can completely make a craft from household waste with his own hands, which will allow him to develop his imagination to the maximum and enjoy the process.
Typically, in the manufacture of such products they use:
- Waste paper
- Cardboard sleeves
- Plastic
- Disposable glasses
- Tile
- Glass
- Polyethylene
Design options for homemade urns
Outdoor trash cans designed for the disposal of household waste from residents of a country house come in a variety of shapes, models and designs. The first step in making your own trash can is choosing a suitable design.
Common container models depending on the purpose of use:
- open (installed under canopies);
- closed (used to avoid unpleasant odors);
- with ashtray (for smokers);
- with a canopy (to protect garbage from rotting garbage);
- with several containers (for separate waste collection).
Based on their design features, the following types of containers are distinguished:
- stationary - the container is stationary, fixed on the surface;
- mobile - the bowl is dynamic and can be emptied by turning over; the model can be equipped with wheels and be light in weight.
Crafts from waste paper
Don’t rush to throw away the accumulated waste paper; you can use it to make many interesting things, for example, furniture for dolls.
- From matchboxes using glue, fabric and colored paper you can make a chest of drawers, a table and even a sofa.
- Crafts like this one made from waste are suitable for school.
- They are also suitable for storing beads or small accessories.
We sew from felt
An equally interesting model can be sewn from felt. A master class is offered for beginner roboticists.
Workpiece dimensions:
- torso - 4.5 cm;
- head - 3.5 cm;
- legs - 2 cm;
- hands - 1.5 cm.
Each square is sewn together from 6 parts.
The cube is filled with filler.
Robot parts can be glued to each other or sewn.
Products made from cardboard cores
Cardboard tubes make funny animal figures. On the Internet you can find many photos of similar crafts made from waste - octopuses, elephants, and other living creatures.
They are also used to make organizers that are suitable for storing office supplies.
Robot made from caps
A robot made from plastic caps would be quite interesting. Thanks to the elastic band that holds everything in place, his arms and legs will move. We offer a detailed master class on making a transformer from 22 covers:
- You will need 4 hats for each leg. In the first two we make a hole with a hot awl in the middle, in the third - at the bottom, but closer to the edge, and in the fourth we make two holes at once - in the center and on the side.
- We insert the needle into the elastic on one side and tie a tight knot on the other.
- We thread two covers with a central hole, then there is a cover with an offset center and a cover with a hole in the side wall. We tie an elastic band into a knot.
- We assemble the second stage according to the same scheme.
- To make a hand, we make holes in the center of three hats, and in the fourth - on the side.
- First, we pull the needle and elastic through the lid with the side hole, then alternately with the central ones. Tighten the elastic band into a knot.
- For the head we will need a cap and a cap from a tube of toothpaste. For the bust: five covers. In two of them we make holes in the center, in the other two - two symmetrical holes on the sides, and in the fifth - only three holes in the center and on the sides.
- Screw the head of the cap, the toothpaste cap and the cap with three holes with an elastic band. Next comes a hood with two holes and a hood with one hole. The two remaining plugs - the shoulders - are threaded with an elastic band into the side holes on the body.
- We make a side hole in the outermost caps of the hand. We thread the elastic band, then through the shoulder and the hood with three holes. Next comes the second shoulder cover and the outermost second hand cover.
- We pass the elastic through the side hole in the leg, then through the side holes of the lower body cover, through the side hole in the second leg and tighten.
In principle, our transforming robot is ready. All that remains is to add the eyes. You can make holes in the head of the cap and glue or glue them on using plasticine. The robot will need a grenade launcher. A ballpoint pen cap is perfect for this. It can be attached to your arm, placed behind your back or placed on your shoulder.
Plastic products
By fastening two bottle bottoms together, you can make beautiful decorative apples, you can add leaves to them, and twigs can be made from drinking straws.
You can also make a beautiful decoration in the form of a crown from straws; you just need to make a cardboard base and glue the straws onto it.
Robot made from plastic bottles
You can also make a robot from the simplest material - plastic bottles. For the craft, prepare:
- three plastic plugs;
- two wheels of a toy car connected by a frame.
- two forks;
- a bottle of opaque cola;
- a toy bucket from a set of children's dishes;
We make two holes on the bottom sides of the bottle, through which we thread the frame and secure the wheels. We fold two forks - these are levers - and fasten them to the body from the back with bolts. We put a bucket on the head, to which we attach two larger hats - these are the eyes, and a smaller one in the middle - the mouth. We decorate the robot, as science fiction suggests.
Products made from plastic cups
If you still have disposable cups that you don’t plan to use anymore, then you can also make various interesting things out of them, this may be of interest to primary and secondary school students.
Fluffy paws are made from wire and tubes. The glasses are painted with gouache, and eyes are cut out of paper. The paws can be secured with plasticine.
Crafts made from waste and waste materials can be used not only at school - they can be used to decorate a nursery well.
Flowerpots for flower pots (hanging or tabletop)
Another idea for making crafts from garbage (plastic bottles).
Materials for work:
- 3-4 plastic bottles;
- acrylic paint;
- twine or rope;
- paper;
- scissors or stationery knife.
Actions:
- We cut the bottles at a height slightly greater than the planned height of the future pot.
- Cut out the face of an animal (hare, bear) from paper, as shown in the photo.
- We press the pattern to the pot and cut the edge along it, leaving bows on both sides of the muzzle for threading rope or twine (if it is a hanging pot).
- We paint the pot and draw in the details of the face.
- We thread a rope through the arms and hang them up.
Broken tile organizer
If after renovation there are broken tiles lying around in your house, you can use them to make an organizer.
- First you need to cut it into small squares with a tile cutter.
- It is not necessary that they be absolutely the same in size; if they are slightly different, it will be even more beautiful.
- Then, you need to find a tin can and decorate it with these squares using hot glue, and then grout it.
- As a result, you will get a good-quality, weighty organizer that will serve as a stand for screwdrivers.
Robot made from cans
A beautiful robot made from tin cans. You need to insert one can into another. The arms and legs are made with metal caps that cover half-liter glass drink bottles. Having made a hole in the center of each cap, they need to be tied together with a thread, fixing the ends. Screw two identical caps onto the front of the robot body.
Cut a hole on the top jar - a neck, screw it with two bolts - ears. And make the ears from aluminum circles, securing them to the sides so that they protrude in different directions.
Don't forget to photograph your work step by step and post it on your social network page. Let your visitors envy your skills and maybe even learn an amazing experience.
Broken glass mosaic
To create this craft, you need to take precautions, namely, wear safety glasses and a mask, and since the edges of the glass are sharp, you need to take them not with your bare hands, but with tweezers.
- Mosaic is made from colored glass. You will need a bottle, you need to remove the label from it, then wrap the bottle in a towel and, using a hammer, break it into small pieces, the smaller the better. Next, on A4 sheet you need to make a sketch with a pencil, then erase the pencil so that barely noticeable outlines remain.
- Then you need to trim off the excess paper and stick the sketch onto cardboard of the same size.
- It doesn’t matter what kind of cardboard it is, the main thing is that it is as even as possible.
- Next, using hot glue, you can begin gluing the mosaic elements, focusing on the contour. When everything is ready, you can cut strips of corrugated cardboard and stick them around the perimeter of the picture, as a frame.
- On top of the resulting structure you need to glue a sheet of thick, transparent plastic of a suitable size, or you can use glass from an unnecessary frame.
- Then, from the same cardboard with a cork backing glued on top, cut out a square frame 5 cm wide, decorate the cardboard sections inside the frame with narrow strips of felt of the most suitable shade, first glue only the inner walls of the frame, then glue the frame and the picture with the mosaic together.
- For reliability, coat all cardboard joints on the back side of the product with hot glue and after that glue the cardboard sides to the frame on all sides, also prepare the back wall of the frame of a suitable size from cardboard, glue it together with the frame and, at the last stage of work, decorate the cardboard sides strips of felt.
Now that the picture is ready, all that remains is to attach the hinges at the back for attaching to the wall.
From bottles and tape
If the previous project seemed too complicated to complete, you can get by with a simpler technique. Pull out three 1.5 liter plastic bottles with electrical tape without removing the caps - this is the body of the robot. Attach another bottle of the same bottle to each end bottle with a cork - you will get legs.
Cut the next bottle in half and secure the half without a cap in the middle bottle - this is the head. We decorate the head with two plugs - eyes.
You can make hands from half-liter bottles by cutting them into segments and joining them together.
Cut out the palms from the other two bottles and attach them to the hands. The craft is ready!
Flowers from plastic garbage bags
Decorating the world is easier than it might seem.
- To do this, you will need several multi-colored garbage bags.
- You need to fold them so that the bottom is on one side, then cut off the fold line.
- Then, to make the flowers more magnificent, you need to fold them in half, cut them in the middle and fold them like an accordion, wrapping them in the middle with thread.
- Next, you need to trim the edges with corners, using scissors, fold them in half and wrap them with thread at the base, then straighten all the petals, disconnecting all the layers of the bags from one another.
- As a result, you will get a bud that needs to be attached to the stem.
- For the stem you will need a balloon tube with fasteners, to which you need to attach the bud, inserting the petals into the holes of the fastener and tying them. Finally, you can wrap the stem with a green bag.
- All these products are just a small overview of what can be made from waste.
There are many videos and photos of crafts made from waste, with detailed instructions on how to make crafts from waste with your own hands. This doesn't just apply to children.
Many artists make various works from garbage and sometimes display them in art galleries.
There is nothing impossible for a person; even from garbage you can come up with an original interior decoration. The main thing is not to allow yourself to be lazy and develop your creative abilities as much as possible, then the result will bring joy and there will be no difficulties during the work.
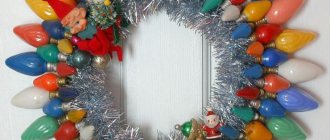
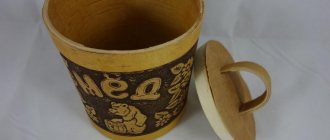
New Year's toys made from light bulbs
It’s great if, on the eve of the New Year, a dozen old electric lamps have been preserved in your home. Their shape and size are completely irrelevant.
Before painting, it is better to degrease the glass part and wipe it with a cotton swab dipped in acetone, alcohol, or nail polish remover.
We paint the glass part of the light bulb with acrylic paint: we draw on it whatever our heart desires: snowflakes, flowers, faces, clock dials.
We attach a large paper clip (after straightening it) or a piece of wire to the base. You can decorate the base by tying a serpentine or rain on it.
And an excellent New Year's craft made from garbage, created with your own hands, is ready!
New Year's toys made from light bulbs of a slightly different type look great. The lamp, holding the base with your fingers, must be carefully dipped into glue (preferably transparent silicate). Then put it in a container filled with glitter, let it dry and attach the straightened paper clip. You will get such a wonderful decoration for the Christmas tree.
Photos of crafts made from household waste
A small art object made from old brushes
Successfully made crafts from unnecessary trash can wonderfully decorate any area. An interesting option can be made from old paint brushes. Take specimens of different sizes.
- Imitations of faces and figures are painted on the shaft.
- The pile, cast in different colors, will be an excellent hairstyle.
- A set decorated in this way will make a good family.
Such an unusual art object will be an excellent colorful decoration for a room, gazebo or space near the front door.
Drawing of a trash can with dimensions
Drawing of a simple conical sheet metal trash can with layout and dimensions
When the workpiece is cut, the reamer is bent along the lines in three places, and the joint is connected by welding. Without experience in such work, thin metal can be damaged, burned, not welded, or deformed by sagging on the reverse side. Therefore, it is better to practice on scraps of steel. To get a thin seam, you need to use electrodes no thicker than 2mm.
Next, the triangular ends are folded towards the center to obtain an even cone and the resulting joints are welded together. For ease of emptying, a U-shaped piece of metal sheet is welded at the bottom, which will serve as a handle.
To make the structure stable, a stand is assembled. Two T-shaped parts are welded from a square section profile, which can be fastened together with a horizontal section for rigidity.
Holes are drilled in the upper part of the finished tank and stand, and the parts are connected with bolts and nuts. The finished assembly is cleaned with sandpaper and painted with powder paint. The joints with the legs must be protected with a coating of copper, graphite or lithol grease.
In a similar way, you can make a large bin for collecting waste according to the following scheme:
Drawing of a truncated metal trash can with dimensions
Instead of a profile for stands, you can use iron pipes or corners. When you need to cut large workpieces, it is better to use electric sheet metal shears.
If you don't have a welding machine, you can make a trash can from a water barrel. First, remove rust from the surface, dry it, apply primer and paint. You can put a garbage bag inside to make emptying the container more convenient. If the barrel is too high, you can reduce the length using a circular saw.
An old barrel can be converted into a waste incinerator. To do this, you need to punch 5-6 holes in the body. This will create strong draft when burning waste, which will reduce emissions of harmful substances into the air. Burning garbage in this way is allowed on personal plots if the territory is not adjacent to agricultural land.
Other ideas
If you periodically buy yogurt at home in plastic containers, then two of them can be washed and left for making children's binoculars. It is enough just to cut off the bottoms and fasten the bottles by wrapping them with electrical tape. All that remains is to decorate the workpiece. Of course, this is just a budget “counterfeit” of a real binocular or a specialized store-bought toy, but how much effort has been put into it.
Used light bulbs can be used to make a composition inside a glass pear or for painting to create a Christmas ball for the New Year.
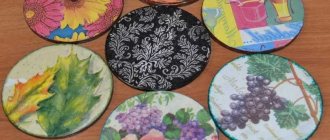
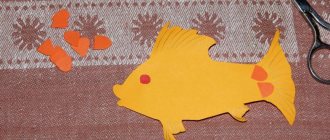
An unwanted computer disk can also be used to do something interesting. For example, one old disk is suitable for making a fish. If you have several disks, you can come up with a more complex composition.
The ability to use household waste to give it a second life develops creativity to a greater extent than when using standard materials. After all, you can implement not only examples of crafts from the Internet, but also come up with your own.
Important! A child, using unnecessary things or simply waste, begins to think creatively and develop imagination. Moreover, from the first years of life, children learn to take care of the environment.
From empty juice or milk boxes
Do you like juice? Do you drink milk? Where do you put the boxes? You probably throw it away, but in vain! After all, in the soul, every box is not just a box, but a real person! With your own face and your own character. Don't believe me? See for yourself!
Large empty boxes can be used to make vehicles.
And land ones.
And air ones.
And even waterfowl.
Well, for those who like to grow something, we offer this option.
Vegetable garden in boxes. A very convenient way to grow different seedlings. It’s neat and you don’t need to spend money on special trays.
Now let's get serious. How to make sure there is always order on the table? Of course, install an organizer! You can, of course, buy it. But it’s much more interesting to make it yourself from the same irreplaceable boxes. And decorate to your liking.
Vertical flowerbed from an old cart, chest of drawers, bags
If old useful things cannot be put to good use in the house, then you can do it outside. For example, a worn chest of drawers can be used to make an excellent vertical flower bed.
- It is enough to install the item in the right place.
- The drawers are pulled out to different levels. Soil is poured into the resulting trays.
- All that remains is to plant the plants.
You can do the same with a cart. Using the same pattern, it’s easy to use an unnecessary stepladder. You will get an interesting flower garden if you use old bags as flowerpots.
They fill them with soil and plant plants. Handbags can be placed around the area or hung on a base.
Garbage removal rules
In order to protect residents from noise, it is allowed to remove solid waste from 7 a.m. to 11 p.m.
SanPiN 42-128-4690-88 strictly regulates the frequency of garbage removal in order to prevent it from rotting and decomposing. At air temperatures from +5 °C and below, the frequency of removal is 1 time every 3 days. During the warm season, when the average daily temperature is above +5 °C, garbage cans must be removed daily.
In case of violation of waste removal standards, you should file a complaint with the Rospotrebnadzor department, since supervision over the implementation of sanitary and epidemiological legislation is within its competence.
Useful things for home and garden
Crafts that give a second life to trash can be not only beautiful, but also useful. Using outright garbage, it is easy to build things necessary for the household.
Such products can be used both on a summer cottage and in a house, as well as a city apartment.
Questions
Lyudmila Sergeevna, 36 (Novorossiysk): Any expensive toy is usually of interest to a child for only a short time. But games with garbage and seemingly unsuitable objects for play are their favorite. Why not use suitable waste for good. Create your own art with your child. By the way, our grandmother wove huge baskets from newspaper tubes.
Alena, 27 (Voronezh): Yes, some product options are not simple. You need to keep your hand from shaking and have more strength to cut the material. But this is no longer a banal drawing (however, drawing is also important for children), but a labor-intensive process. We went to “developmental” classes until we were three years old. For example, we made a fish from a disk. All this can become a memory. We keep our “garbage” crafts for years.
Maria, 33 years old (Pereslavl): In our kindergarten, we periodically hold competitions involving the creation of crafts. So we often use not just store-bought materials, but also so-called garbage. The child often gives the name of each composition. Natural material can also be used for these purposes: fallen leaves, broken branches, etc.
meat fork
View this post on Instagram
Posted by @interior_des.ig
More precisely, for cutting even pieces of meat, sausage, eggs and even onions. It sounds very practical, but if only you knew what they propose to make it from! We will need a large paint brush and an umbrella. Intrigued? Remove the bristles from the brush and drill small holes at equal distances in the handle. We take out the knitting needles from the umbrella. We insert them tightly into the wooden handle. The fork is ready! Tell me if you try it again.
Where to find modern alternatives
Meat fork myvictorinox, olive-house