The temperature requirements in the garage differ from those in the house, because a person stays here for a long time only when carrying out some work on the car, and the rest of the time there is only the vehicle itself. However, to store a car, a certain temperature must still be maintained, so a long-burning stove for a garage is still relevant, especially for regions with cold climates. It is easy to make such a heating device with your own hands.
Long burning stove for garage
What is a long-burning stove, where is it used, its advantages and disadvantages
A long-burning furnace is a heating structure equipped with an additional chamber for combustion of the gas emitted by the fuel. In such a furnace, the combustion process of the combustion material slows down, as a result of which the room is heated in a period from several hours to a day and a half.
Under the influence of constant temperature, the fuel in the furnace breaks down into wood coke and pyrolysis gas. When interacting with oxygen, the gas begins to burn more intensely, releasing a large amount of thermal energy, sufficient not only for heating, but also for heating water.
Long-burning stoves are equipped with an additional chamber for combustion of gases
Long-burning furnaces differ from traditional designs in that they require a dosed supply of oxygen not from the bottom, but from the top.
Long-burning stoves are used for heating country houses, private households, garages, workshops, basements, chicken coops, barns and other outbuildings and residential buildings. Depending on the size and modernization of the design, these heating structures are also used in industrial premises.
In common parlance, these heating structures are also called long-burning stoves.
These efficient heat sources have gained great popularity due to their functional qualities. However, such furnaces have a number of both positive and negative criteria.
How to load fuel and operate the unit correctly
A long-burning unit differs from a traditional furnace by an increased loading volume and limited access of oxygen to the working area. The operating time of the boiler depends on the amount of fuel loaded, so the firewood is stacked as tightly as possible, without leaving large gaps between the logs. If materials such as peat, fine coal, shavings, sawdust or pallets are used as fuel, then they are poured to the level of the smoke channel without compacting. The necessary compaction of the fuel will be provided by a heavy metal piston.
Fuel loading is performed in the following order:
- remove the top cover from the unit;
- remove the air distribution device;
- load the stove to the level of the chimney;
- spray the top layer of flammable material with lighter fluid;
- install an air regulator;
- return the cover to its place;
- A piece of rags soaked in a flammable liquid is thrown inside the air channel.
Steady combustion is accompanied by smoke coming out of the chimney evenly. As the wood burns, the duct pipe moves down. It can be used to judge the remaining operating time of the solid fuel unit.
It is best to light the stove using a rag moistened with a flammable liquid.
During operation, ash and ash accumulate at the bottom of the barrel. It must be said that their quantity does not have any effect on the combustion process. However, fuel combustion products must be periodically removed, since they reduce the thickness of the filling layer. To do this, open the bottom door and scoop out the ash using a regular metal scoop.
When removing ash, leave a layer 10–20 mm thick on the bottom of the oven. This will not have a particular effect on the amount of firewood; however, it will create an excellent heat-insulating cushion that will protect the bottom of the unit from burning out.
Types of long-burning stoves and their choice for self-production
These stoves are usually made of bricks, metal or stone. They can be round, cylindrical, square or irregular in shape. Depending on their design and method of burning fuel, long-burning furnaces differ in types.
Classic long burning stove
The design in which the flame spreads from bottom to top, pushing burning gases through layers of combustion material, is classic. This type of furnace is equipped with a heat exchanger and an afterburning chamber into which an additional portion of air is supplied. Prominent representatives of this type are long-burning furnaces: Buleryan (Breneran), Butakov furnace, as well as modified designs with different heat exchangers.
In Buleryan furnaces, the role of a heat exchanger is played by curved pipes located inside the furnace body
Long burning shaft furnace
Another type of such structures is a shaft furnace. In this design, the combustion zone is shifted to the grate part. The products of fuel combustion are discharged through the adjacent compartment, in which they burn out, creating heat exchange. This type is best built from brick, which has been confirmed over many centuries.
In shaft-type furnaces, the combustion zone is located directly above the grate
Hearth oven
This is a top-burning design in which the upper part of the combustion material is ignited, and the direction of fire is in the opposite direction. Such a device requires oxygen supply under the burnt layer, so the furnace must contain special air delivery channels. Simplicity of design combined with efficiency and functionality has led to the creation of many DIY options. In this case, the material for its manufacture will be used cylindrical containers. A striking example of this type of heating units is a stove called “bubafonya”.
You can use an old gas cylinder as a body for a homemade stove.
Gas generating furnaces
Gas-generating furnaces or structures with additional combustion of pyrolysis gases. In this design, the combustion material burns under the influence of two factors: high temperature and a small amount of oxygen. This leads to the release of flammable gases, which burn out in the additional chamber. The designs of this type of furnace are the most complex to manufacture, but their efficiency and ease of use are superior to previous options.
Pyrolysis gases burn out in an additional chamber above the firebox
The Burelyan stove is considered a hybrid of a potbelly stove and a long-burning wood stove. In our next material you will find a description of the operating principle of this unit, as well as step-by-step installation instructions:.
Let's start making - what you need
To make a homemade stove, you need to choose a convenient place. This must be a room with connected electricity and sufficient area. Now about the materials. It is easier to use a 200 liter steel barrel for a stove with a long burning time. However, the volume is not of fundamental importance; the heat transfer of the device will simply depend on it. They use gas cylinders and even fire extinguishers.
The stove can be made from an old gas cylinder
But, again, the volume of the workpiece: from a 27 liter cylinder you can make a stove for heating a bathhouse, from a smaller one or a fire extinguisher - for a tiny room. The thickness of the metal matters: the thicker it is, the longer the stove will last. If there is nothing suitable, we use a thick-walled pipe or steel sheets. The metal must be free of damage and rust. Other materials you will need:
- material for the legs if the oven is round in shape (pipes, angle, fittings);
- sheet steel 5 mm thick according to the dimensions of the end side of the product;
- sealed door or material for it;
- The 100 mm pipe is 15 cm longer than the device;
- 5 m of 150 mm pipe for smoke removal.
Measuring instruments are required: tape measure, plumb line, level, as well as a hammer, mallet, trowel.
Furnace design, its features and operating principle
Before you start making your own stove, you need to carefully study all the characteristics of the device.
If you plan to make a unit for heating a large room, then the stove must have high heat output. For example, for a house or room with an area of 150 m², you should choose a stove designed to heat up to 200 m². This “reserve” of power is necessary to be completely sure that every corner of the house will be warm.
It is also necessary to take into account that not every room is adjacent to a heat source, so heating it will require more time and power from the heating device.
If it is intended to heat a room with an area of 30–50 m², then the stove can be made without the specified “reserve”. In such a small room, heat loss will be minimal, so a unit with low power is sufficient. Automatic fuel refueling will greatly simplify its maintenance. When making such a stove, it is possible to provide hobs for cooking on its body. If the stove is not only a source of heat, but also an interior item, then its body can have windows made of fireproof glass.
Design features of long-burning furnaces
Long-burning heating devices have design features that distinguish them from other stoves:
- the combustion chamber has a volume for loading a large amount of combustible material;
- the body of long-burning stoves is equipped with a large door;
- the combustion compartment in the furnace body is divided into two chambers; one chamber is intended for smoldering flammable material, the second for gas combustion;
- the design of such a stove provides for the presence of a special bumper that prevents flame from entering the chimney;
- This element of the furnace frame is made of a metal plate, which is welded into the upper part of the combustion compartment.
Differences between a conventional and pyrolysis oven
To understand the operating principle of a long-burning stove, you need to compare it with the operation of a conventional stove.
The work of a conventional stove is to heat its surface and transfer heat to the room. The combustion material is ignited from below, causing the flame to spread to the sides, heading upward. This occurs due to the access of a large amount of air into the combustion chamber. The fuel in such a stove burns quickly, which is why the air temperature in the room is unstable - it either drops or rises.
The operating principle of a long-burning furnace is different. The firewood is ignited from above, and the fire spreads downward, while air is supplied only to the burning site. As a result, the material smolders, releasing heat evenly over a long time. In addition to the combustion material, pyrolysis gas is released, which also serves as fuel, additionally creating heat.
In a conventional furnace, fuel burns quickly, in a pyrolysis furnace it smolders slowly
To make stoves, you can use almost any available means. In our next article you will learn how to make a long-burning potbelly stove from a barrel: .
We assemble it ourselves - sequence of actions
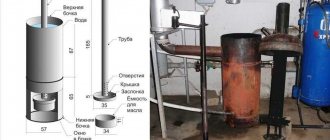
It is most convenient to use a barrel or gas cylinder. We carefully cut off the top of them - the material will come in handy later. We first unscrew the valve in the cylinder, drain the remaining gas and leave it for several days until the smell of gas ceases. We cut out a place in the body to attach a sealed door through which the ash is removed. We cut out a circle from 5 mm metal, the diameter is slightly smaller than the inner part.
We weld a pipe in the middle for supplying oxygen. In the lower position, it should protrude 15 cm above the surface of the heating device. We weld 6 blades 5 cm high from below at a certain angle. For a model based on a gas cylinder, we use the upper part of the body, where we cut out a place for the pipe, and use a lid in the barrel for these purposes. The air supply pipe must move freely up and down. We weld legs to the bottom of the body for stability. We cut a round hole on the side of the upper part and attach a 150 mm pipe to remove smoke.
It is more difficult to make a unit from sheet iron. Accuracy in calculations and marking of all parts is required, cutting and welding. It is almost impossible to make a round-shaped device at home without special rollers for bending metal, of course, unless thin sheet metal is used, which is irrational. If it is not possible to curl the sheets, the solution would be to make a rectangular oven. A possible option is shown in the drawing.
In appearance, it resembles the well-known potbelly stove, but changes have been made to the design to increase efficiency. The main changes concern the blower. It is made of an 80 mm pipe like the letter L, but for simplicity it can be made straight. On the threaded pipe we drill holes with a diameter of 6–8 mm. We install a blind plug on the thread, turning it along the thread to regulate the combustion with great precision.
We determine the correct supply of oxygen by the hot spot on the chimney - at first it should be further away from the stove, and over time it gradually moves towards it.
A potbelly stove becomes hot during operation, so it is used not only as a heating device, but also as a cooking stove. On the outside sides we install the screen at a distance of 50 mm from the walls. There is no need to weld the ribs - the unit works effectively with a hot interior. The screen serves to protect the room from infrared rays and prevents overheating of the room. It reflects at least half of them, maintaining the optimal temperature in the heating device.
Required materials and tools
To make a long-burning stove, you will need the following materials:
- metal barrel for fuel and lubricants with a capacity of 200 liters; as an alternative material, you can use a steel pipe with a diameter corresponding to the drawing or an empty gas cylinder with a capacity of 50 to 100 liters; You can also use sheet steel with a thickness of 3 mm or more;
- to make an air supply channel you will need a pipe with a diameter of at least 50 mm;
- for the chimney a piece of pipe with a diameter of 100 mm is required;
- a steel channel or a section of an angle with a flange width of 55–65 mm;
- for the air distributor you will need a metal sheet of at least 3–5 mm, with a diameter slightly larger than the circumference of the housing;
- to make the lid you will need a steel sheet with a thickness of at least 3–5 mm;
- metal hinges for the door;
- if the furnace body is equipped with a water circuit, then sheet steel and two threaded pipes will be required.
The tools you cannot do without when making such a stove are:
- welding machine, electrodes;
- Bulgarian;
- file;
- electric drill;
- metal drills of various diameters (including core drills);
- hammer;
- an anvil or other stable hard surface;
- yardstick;
- building level;
- pencil.
Installing a heating device - important rules
For the installation to operate safely, certain rules must be followed:
- It is prohibited to place combustible and flammable objects within the warming-up distance;
- we make the chimney dismountable for cleaning;
- Before use, we carry out a test to select the optimal mode.
The diameter of the chimney exhaust pipe is about 15 cm.
For the chimney exhaust we use a pipe with a diameter of 150 mm and a length of 5 m. With a smaller cross-section, smoke will not be removed well; with a larger cross-section, excess draft will appear. We install an adjustable damper on the chimney. Accumulated condensate must be removed periodically. If the chimney is not dismountable, doors are made in it for cleaning. Excessive formation of condensation can be prevented by constructing a chimney using the sandwich principle. Between two pipes of different diameters we place a layer of glass wool for insulation. We cover the top of the chimney pipe with a deflector to prevent rain, snow, and wind from blowing in.
In a house where there are children, we line the stove with bricks. The masonry around plays the role of a protective screen, so as not to get burned if you accidentally touch it, and protects objects and walls from overheating. It also serves as a good heat accumulator. The brick will accumulate heat and release it much more slowly than the iron body. We arrange the foundation if the floor under the stove is made of flammable materials. It is not necessary to deepen it too much; the weight of the heating device is light.
Calculation of basic parameters
A long-burning solid fuel stove can be made from available materials, such as a used gas cylinder, a piece of large steel pipe or a metal barrel. You should select a material with a wall thickness of at least 5 mm. This is due to the fact that a thinner casing will burn out after some time.
Option of the “Bubafonya” stove with a water jacket
Furnace size
In the absence of any drawings and diagrams for the manufacture of the furnace, you can make all the necessary calculations yourself.
Calculation of parameters in the Bubafonya furnace
In this case, it would be more accurate to talk about its diameter - D and height - H. These values should be proportional to each other, where a ratio in the range from 1:3 to 1:5 is considered optimal. The height of the stove is usually made at least 100 cm, since this parameter is directly related to the duration of operation of the unit. However, it is not worth making a structure that is too high, as it will be inconvenient to load it with firewood. It can also negatively affect traction. It can drop so much that the maintained flame inside the combustion chamber goes out.
As numerous thermal engineering studies have shown, you should not make a stove with a small diameter. From this narrow unit, the air will simply be drawn into the chimney pipe, causing the stove’s power to significantly decrease.
If you make the stove frame too wide, then there will be no uniform burning of the fuel near the inner walls of the chamber and in the middle of the hearth. In this case, only the central part of the combustion material will burn out. The metal circle of the piston will sag and clog the fireplace, causing the flame to go out. The optimal diameter of this design is from 300 to 900 mm.
Thickness of material used
This criterion must be taken into account, since the thin walls of the housing will burn out after some time. In this regard, it is necessary to select a material with a thickness of at least 5 mm. This is especially important if you plan to equip the frame with a water jacket, turning it into a boiler. In the image, the wall thickness is indicated by the symbol Δ.
If you use material with a wall thickness of up to 4–5 mm, this risks causing the oven to lose its power. Due to the thin walls of the housing, the temperature above the piston plate will drop. As a result, the afterburning of pyrolysis gases will be reduced, and therefore the heat generated will be reduced.
However, for heating small spaces such as a garage, shed or small workshop, the thickness of such material is quite acceptable.
Parameters of a metal pancake
For efficient operation of the furnace, not only the diameter of the round plate on the piston is important, but also its thickness. After all, the metal pancake is a partition and at the same time a heating surface for igniting pyrolysis gases.
When making a metal pancake, you should adhere to the optimal size. The distance from its outer edge to the inner wall of the oven should be 5%. In the image, this gap is indicated by the formula C=5%D.
The diameter of the metal pancake should be slightly smaller than the internal diameter of the oven body
Outlet pipe parameters
In the image, the diameter of the chimney pipe is indicated by the letter S. It is recommended that its diameter be at least 80 mm.
Air supply pipe dimensions
In the diagram, its diameter is indicated by the letter d. To design such a furnace, you can use a 75 or 80 mm pipe. The pipe must be welded to a metal circle (into its hole in the middle). The result is a part called a piston.
Another option for a long-burning stove is Bubofonya. Description of the operating principle, calculation of materials, as well as step-by-step installation instructions in our article:.
The final touch and you're done
We cut out the bottom of the oven from sheet metal. We drill a hole in it to supply secondary air.
We weld the bottom to the bottom of the combustion chamber. Four legs made of a round pipe must be welded to its outer side.
At the end, all that remains is to install the stove in its place. We install the chimney pipe, and you can carry out a test drive.
Preparatory work and choice of location for installing the furnace
If the furnace is made of sheet steel, then it is necessary to cut it into blanks in accordance with the drawing:
- cut identical fragments from the corners that will serve as a grate;
- you can also use metal corners to make stands and handles for the case;
- It is also necessary to cut the pipes in advance.
The location for installing the long-burning stove is selected with the condition that when assembled it is not installed closer than 100 cm to the wall.
Since the furnace body will be completely heated, it is necessary to take care of the insulating material in advance. To do this, you can build a stand from brick, which should be 30 cm larger than the base of the case. Alternatively, you can weld steel rods or angles to the stove frame.
At the installation site, from the side of the door into the combustion chamber, it is necessary to lay insulating material. As such, a basalt or asbestos layer is used, on top of which a steel sheet with an area of 100 cm is placed.
The walls next to the stove must be lined with insulating material
Drawings and diagrams
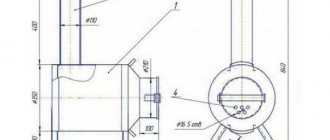
The undoubted advantage of the long-burning “potbelly stove” design presented above is its undemanding size. As a rule, for the stove to operate correctly, knowledge of the principles of its operation and compliance with the basic proportions is sufficient. However, we present to your attention drawings and diagrams of existing structures, manufactured and tested in real conditions.
Drawing of a vertical loading oven
Drawing of a long-burning boiler
Diagram of a long-burning furnace with an open air channel
Boiler drawing
Do-it-yourself long-burning stove: diagram and step-by-step instructions
The most common materials for making long-burning stoves are metal and brick.
Making a “bubafonya” stove from a gas cylinder
For making your own “bubafonya” stove, a used gas cylinder with a volume of 50 liters is best suited. The order of work is as follows:
- Cut off the top part of the cylinder at the place where the body is rounded using a grinder. This fragment will serve as a cover in the future design.
The top part of the cylinder can be conveniently used as a stove lid
- Weld a metal strip to the upper edge (at the cut point of the future lid). This side will prevent the lid from sliding off.
- Next, it is necessary to make a pressure piston, thanks to which the combustion material will be pressed during combustion. Cut a circle from a thick steel sheet with a diameter slightly smaller than the body. The circle should fall freely inside the cylinder. The gap between the housing wall and the circle should be 8–10 mm wide.
- Drill a hole with a diameter of 100 mm in the middle of the circle. It is convenient to do this using a core drill.
- Take a pipe with the same diameter and weld one end to the middle of the circle. The result is a part with a common hole.
- Then weld four sections of channel in a cross pattern to the back side of the circle.
They form unique channels through which air will flow into the combustion chamber. Instead of channels on the piston, you can use angles - Weld the handles and stands.
- Clean sharp and protruding welding fragments with a file or grinder.
Video: how to make a “bubafonya” stove from a gas cylinder
Making a long-burning stove from brick
Of course, in comparison with a homemade metal structure, a brick oven looks more advantageous. However, making it yourself is a labor-intensive process that requires certain skills and time.
There is a hob above the combustion chamber for cooking
Foundation preparation
Since the brickwork is quite massive, the stove definitely needs a solid foundation. The depth of the foundation must ensure the stability of the structure. The foundation is prepared as follows:
- First you need to dig a small pit 30 cm deep. Its width and length should be 10 cm larger than the expected dimensions of the stove.
- Level the bottom of the pit and cover it with roofing felt or other insulating material.
- Pour a 10 cm thick layer of sand on top, which must be compacted.
- Place a layer of fine gravel of similar thickness on top of the sand cushion.
- To ensure the reliability of the base, it can be reinforced with a metal grid. To do this, use reinforcing bars connected to each other with wire. The width of the grid cells should be no more than 10 cm. The thickness of the rods is selected in the range from 8 to 12 mm.
- Place the grate in the pit so that it does not touch the bottom. To do this, place broken bricks under the metal frame.
- Pour concrete mixture grade M-200 or M-250. The concrete must completely cover the metal frame.
For reliability, the foundation can be reinforced with a metal grid
Order of brickwork
After a few days, when the base has hardened, you can begin laying brickwork for a long-burning furnace. Before starting construction work, it is necessary to soak the brick in water for a day. This must be done so that the bricks laid in rows do not draw moisture from the mixture. Bricks should be laid as follows:
- The first and second rows must be laid out in continuous layers.
- An ash pan will be installed on the second row, so you need to provide space for the door.
- On the fifth row, a ceiling is installed above the door. Subsequently, a drying chamber box will be installed in it.
- The sixth and seventh rows are designed to accommodate the grate and install the door into the combustion chamber.
- From the eighth to the tenth row the firebox will be placed. When laying the combustion chamber, it is necessary to use fire-resistant material - fireclay bricks. Use clay-based mixtures as an adhesive for masonry. Ready-made mixtures intended for laying stoves are available for sale.
- The eleventh row serves as the ceiling of the combustion chamber and forms the area for the chimney. On top of this row it is necessary to lay steel reinforcement and fill it with cement mixture.
- On the twelfth row, a place for the hob is formed.
- Starting from the thirteenth - fourteenth row, rows for the chimney are laid. Its height is made according to individual projects, so the number of rows can be increased several times.
The procedure for laying bricks for a long-burning stove with a hob
Video: long-burning brick stove modeled on a children's construction set
What you need to purchase to build a stove
First you need to purchase masonry mortar and bricks. The amount of material will be calculated by a specialist. Do not forget about constructing a separate foundation for installing the furnace. The equipment will require cast iron elements: a door for the firebox, a blower (ash pan door), rings for the burner, a chimney valve, a grate and a hob.
In addition, it is necessary to purchase steel elements: a hot water tank and an oven. When building a structure, you will need strips made of metal of different widths and lengths. A corner made of metal of standard size 0.5 x 0.5 cm. Annealed steel wire with a diameter of 0.2 - 0.3 cm. A sheet of steel must be placed before the firebox.
Some designs may require roofing iron to cover the cooking chamber.
The required amount of material is calculated by a specialist based on the size and type of oven.
Long-burning wood-burning brick stoves for homes are built from fireclay and red bricks, clay and sand. To build the foundation you will need sand and cement, crushed stone, roofing felt, as well as boards for formwork.
Doors and gratings (grids) are mounted along the masonry of the main structure Source extracraft.ru
How to upgrade a long-burning stove yourself
To make a homemade stove less of a hassle, it can be improved.
Modernization of the Bubafonya stove
The weight of the Bubafonya stove structure usually reaches 150–170 kg. This creates inconvenience, since it must be turned over to clean it from ash and other combustion residues. To avoid this, you can improve the design by making holes in it with doors. However, it should be taken into account that the peculiarity of such a stove is precisely the absence of extra cracks through which air can penetrate. Therefore, when manufacturing doors, they will need to be carefully sealed in the closed position. This can be achieved by welding metal sides and seals to the body.
Air draft in the combustion chamber will be improved if the number and shape of the ribs on the round piston plate of the structure are changed. To do this, instead of channel sections, you need to weld steel plates. At the same time, they should have a slight bend along the entire length of the part. This shape will allow the incoming air to swirl, which will be evenly distributed in the combustion chamber. To obtain the desired effect, 6 to 8 plates are enough.
Curved ribs on the piston help improve traction
Modernization of a brick kiln
A long-burning stove made of brick will take up much less space if its design resembles the shape of a triangle and is placed in the corner of the room. The construction of such a structure will require less building material and, accordingly, less financial investment.
The brick version of the long-burning stove can be upgraded with a separate damper to switch between winter and summer heating modes. In the autumn-spring period, when there is no frost, but the air is saturated with dampness, this damper will help prevent the heating from being too hot.
An additional damper will make heating more comfortable
Important aspects of keeping your garage warm
Providing a traditional heating system in a garage is not easy, and it is also quite expensive, but maintaining optimal air temperature in such a building is still necessary. After all, it is even better to store transport at a temperature of at least +5 degrees, but some work needs to be done at a temperature of at least +18.
Long-burning garage stove
For the most part, car owners and motorcyclists prefer to use small, economical stoves to heat their garages, which are highly efficient and allow the room to be warmed up well. It is also important that the stove not only saves the family budget, but is also safe and provides quick heating of the garage. It would be good if various wastes could also serve as fuel – for example, waste oil or wood waste. This will also make the furnace a less unprofitable structure.
Potbelly stove round
On a note! Portable electric heaters tend to be ineffective, which is why few people use them to heat their garage. Plus, they are not safe, and it is not recommended to leave such heaters unattended. But no one will spend the night in the garage and guard the stove.
Features of the functioning of the furnace
Heat loss in a garage is always high - it is rare that a building of this type is properly insulated with good thermal insulation materials. It is also important to understand that heating a small room often requires much more thermal energy than warming a house. To heat a two-story house, you will need a device with a power of about 10 kW, but a design with a capacity of 2.5 kW can heat a standard-sized garage. If you want to ensure that the temperature in the garage is always about 16 degrees, then you need to install a 2 kW unit. Sometimes, in order to save heat, motorists try to heat not the entire garage, but only the place where they directly work.
A garage oven is an important piece of equipment that will create optimal conditions even in the cold season
Advice! Good insulation of walls, gates and sealing of all cracks in the building will significantly save and reduce heat costs. It will be easier to maintain the temperature at the desired level under such conditions.
The best homemade stove for the garage
Modernization of a homemade stove
Several improvements are available to the user:
- A coil can be installed in the heat exchanger to heat tap water (DHW circuit). It is made from a copper tube with a diameter of 8–12 mm and a length of about 10 m. The tube is wound around the flame tubes and both ends are brought out through holes in the back wall.
- In case the owners are absent for a long time, a heating element can be installed in the heat exchanger. The purpose of this device is not to fully heat the house, but to prevent the system from freezing. Therefore, the heating element can have a much lower power than the furnace itself: 3–5 kW. There is no need to install any additional automation equipment; just select a heating element with a built-in thermostat (these can easily be found on sale today) and set it to a temperature of, say, 20 degrees.
You can also embed a sleeve into the heat exchanger to install a regular thermometer - this is in case of a power outage, without which the electronic temperature sensor, and the display displaying the temperature, will be inoperative.
Device
You can see what it looks like in the photo. A classic pyrolysis oven has two chambers. One is used for fuel and is hermetically sealed to prevent oxygen from getting inside. Firewood is ignited manually or with a torch. The resulting gas (nitrogen with a mixture of hydrogen, methane, carbon dioxide and carbon dioxide) passes into the second chamber, into which oxygen is supplied to improve combustion. The separation of the chambers is carried out by a grate with stacked briquettes.
The second chamber can be combined with a chimney. It can operate using sealed dampers, taking into account natural draft, or using a fan.
Scheme of operation of a pyrolysis boiler
To extract solid residues, a retort is used, which is a round part of the body. Firewood is placed in it, and coal and coke are taken out from below.
What is the difference between a pyrolysis oven and a conventional one? In it, the fuel does not burn immediately, but goes through two stages, leaving behind gas and solid residues. The latter are also burned, which increases the amount of heat generated. As a result of all these processes, little remains of the firewood - a little ash. Therefore, oven cleaning is required quite rarely - sometimes once a week is enough.
Pyrolysis boiler - manufacturing scheme, main stages
To assemble a gas generator heating unit yourself, you must adhere to the following requirements:
The necessary elements should be cut using a grinder. The fuel loading hole is located slightly higher than that of solid fuel devices. To control the amount of air entering the combustion chamber, it is necessary to install a limiter. It can be made using a pipe with a diameter of 70 mm, and the length should be slightly longer than the boiler body. Using a welding machine, a steel disk is welded, which, together with the walls of the pipe, should form a gap of approximately 40 mm. To install a limiter in the boiler lid, you need to make a corresponding hole. It should have a rectangular shape. The hole is closed by a door equipped with a steel plate. This will ensure a secure fit. Below is a hole designed to remove water. Using a pipe bender, it is necessary to bend the pipe intended to move the coolant inside the boiler. This ensures maximum heat transfer. The amount of coolant sent to the device can be regulated by means of a valve mounted externally. As soon as the equipment is started for the first time, there should be no carbon monoxide in the combustion products. If this condition is met, the piping of the pyrolysis boiler (the diagram is indicated) is done correctly
It is important to regularly monitor the condition of the device’s welds and promptly remove any soot and ash that has formed from it.
An excellent option would be to combine a pyrolysis boiler not with classic water heating, but with air heating systems. As a result, air will be transferred through pipelines, and its return to the system will be through the floor. Such a system has numerous advantages: it does not freeze in severe frosts, and there is no need to drain the coolant when the owner leaves.
Using insulation: pros and cons
Economy-class garages are almost never insulated on the outside for a very simple reason - it is too expensive for a room that is not constantly used. Yes, this is not always possible, for example, in garage cooperatives, buildings are placed very close to each other, the gap does not allow installation of insulation.
To insulate a garage, you can use materials such as fiberboard, which extinguish when caught on fire. The use of plastic in such a room is unacceptable
But the internal thermal insulation of a garage can also be problematic. When installing insulation material directly on metal walls, a so-called dew point occurs at the point of their contact, i.e. place where condensation accumulates. Almost always, when in contact with moisture, insulation becomes unusable quite quickly.
And for the structure itself, such a situation can be disastrous. Insulation can be installed in a metal garage, but it is better to install a suitable material at some distance from the wall, about 20-50 mm.
You should retreat 50-70 mm from the floor. It is best to use washers as a profile to avoid creating closed contours under the coating.
With this installation option, condensation will also appear, but thanks to air circulation under the insulation layer, the moisture will gradually evaporate without causing any noticeable harm to the structure.
However, for a garage that is constantly heated, this option is not suitable, since the indoor humidity will be excessively high most of the time. This will put both the health of people and the condition of the vehicle at risk.
When insulating a metal structure, it is necessary to leave a ventilation gap between it and the insulating material for regular drainage of condensate
As a material for such “ventilated” insulation, it is recommended to use slabs, for example, fiberboard, chipboard, that is, wood materials that self-extinguish when ignited. Recommended thickness is about 5 mm.
Flat ondulin or its analogues are perfect. These materials have the ability to reflect infrared radiation, which provides effective heating.
But plastic, even with attenuation properties, is strictly not recommended to be placed in the garage. When ignited, such materials emit toxic fumes, which can cause poisoning to people who escaped the fire. It is also prohibited to use slabs containing asbestos as insulation.
When insulating a cold brick garage, it is recommended to first plaster the walls with vermiculite to protect them from moisture. The walls of a metal garage should be painted in two layers, having previously primed the base.
The walls of an insulated garage must be treated with a water-repellent compound to protect the building from the destructive effects of condensation
Cleaning and repair
During intensive use, the wood-burning heat generator must be subjected to preventative cleaning approximately once a month. This is due to the fact that the stove gradually becomes clogged with wood combustion products - ash chips. The latter interferes with the normal functioning of the unit.
If there are any places where smoke breaks out of the stove not into the chimney, but directly into the room, it is necessary to identify these holes through an external inspection.
When they are detected in the welds, you can use the electrodes again. But there is another cardinal method for any defective places. It is enough to cover them with fireproof sealant or cement mixed with liquid glass.
However, usually a well-made stove lasts a long time and does not cause problems.
Types of solid fuel for pyrolysis stoves
Of course, dry wood is considered the best choice of fuel for such a heating unit. But since one of the main reasons for installing long-burning appliances is to save money on heating the home, other types of combustible materials that are constantly at hand by the owners are also suitable.
In addition to them, coal is suitable, but this natural fuel is capable of generating powerful thermal energy. When used, it must be loaded into units with thick steel casing walls, otherwise they will quickly become unsuitable for use.
Design features for better heating
If you need to heat a large building, then it is advisable for the exhaust pipe to run horizontally in the room. After all, if it comes out of the oven straight up and out, then all the heat will also quickly end up outside with the smoke. Therefore, the temperature in the room will quickly drop. And if the pipe from the stove extends horizontally throughout the room, the smoke remains in it much longer: the hood is like a battery with a fairly high temperature. And in this case, a potbelly stove, made with your own hands, becomes like a cauldron.
To prevent the surface of the potbelly stove from burning, a box is attached to it. These are additional plates that are installed on three sides of the stove at a distance of 5–10 cm. The surfaces of the potbelly stove and the box should not touch. The air gap between them does not allow the box to heat up too much. This, firstly, protects the room from fire, and secondly, allows you to feel more comfortable near the stove. It is more convenient to make such protection for a rectangular structure, but it can also be made for a potbelly stove made from a cylinder. Moreover, the box can be built from an ordinary piece of tin, because it does not heat up enough to burn out.
Comparison with electric and gas boilers
Many people who build a house away from the city are faced with the choice of installing an autonomous solid fuel, gas or electric boiler.
In order to compare these options with each other, you will need to consider three important parameters: connection cost, service safety and ecology.
Connection cost. Although a solid fuel boiler is not cheap, its operation has the lowest cost indicators among all compared models.
For this purpose, they will require the owner to provide a gas supply project, perform installation work to install the boiler and meter, and also pay for the connection.
Today, according to conservative estimates, it will take 600 thousand rubles and more to supply gas to a house, perform installation work and obtain an operating permit. Installing an electric boiler will cost much less, but it’s also not cheap.
In most cases, such a connection will require changing the power of the power supply line to 380 V. This will also require significant financial investments for the reconstruction of in-house electrical networks and coordination with the distribution zone.
However, it is not a fact that the electricity supplier will agree to replace the technical conditions. A solid fuel boiler does not require any approvals, and the funds spent on the purchase of boiler equipment will pay off in 2-3 years, while connecting to the gas network and installing a new power line no earlier than in 6-9 years.
Service security.
Everyone knows that gas boilers are the most dangerous, since if there is a violation in operation and the flame breaks away from the burner, an explosive mixture can be created in the house.
Electric boilers pose a danger due to the possible occurrence of fires in cable lines during overloads. In addition, an explosion of the steam-water mixture in the heat exchanger may occur if the circulation of the coolant is disrupted.
Any boiler needs to be serviced on time. Photo source: termo-star.ruA solid fuel double-circuit boiler is also a source of a fire hazard, but the reality of its occurrence is much lower.
Since all structural components of the boiler unit are designed in such a way that the device is non-volatile. The built-in automatic protection, if the permissible parameters of the boiler operation are violated, shuts off the air supply to the firebox, after which the combustion process stops. In addition, today pallets are the safest fuel.
Ecology.
Here, in the first place are electric boilers, which have no emissions into the atmosphere at all, followed by solid fuel double-circuit long-burning boilers, and the list is completed by gas boilers, with the largest CO emissions.
Taking into account all the listed features of the types considered, we can conclude that the most convenient and easiest to operate is an electric boiler, followed by a gas unit, and a solid fuel unit is inferior to them in terms of these requirements.
Cost of basic options for solid fuel boilers
Solid fuel boilers are produced to operate on various types of fuel. The most commonly used wood species are pellets made from pressed wood chips and various types of coal.
The cost of boilers is from 30 to 200 thousand rubles. Photo source: avtokotel.ru
Recently, with the advent of biofuel from wood and agricultural waste, many users have switched to burning it in heating boilers. There are models that can run on any of these types of fuel.
The price of such modifications of heating units very much depends on the metal of the combustion chamber - cast iron or steel.
Wood-burning boilers today can be purchased for 55 thousand rubles. Coal units from 40 to 80 thousand rubles. Long-burning pellet double-circuit solid fuel boilers are the most expensive from 120 to 200 thousand rubles.
Tips for use
You need to launch a brick rocket stove only when the chimney is warm. For a small device, this property is not so significant, and a larger stove on a cold pipe only wastes firewood.
Therefore, to bake a rocket before loading the fuel quota after a long break in operation, you need to heat it with paper, dry shavings, straw, etc., placing them in a ash pit with the door open. When the hum in the stove decreases in pitch or subsides, then you can load all the fuel into the firebox; it should ignite by itself from the existing fire.
A rocket stove with a stove bench is not a completely self-regulating device for external conditions and fuel energy efficiency. Therefore, at the beginning of the fire with the normal amount of fuel, the ash door is left in the open position. After the stove begins to hum strongly, it is covered until the sound emitted is barely audible.
Only dry wood can be used to heat the stove; wet wood will not allow the stove to warm up to the required temperature, which can lead to reverse draft.