Homemade shovel for a mini tractor and example for manufacturing
Many of our compatriots who live in rural areas and have large plots of land of 25-50 acres are trying to purchase a good and convenient mini-tractor, which greatly facilitates a variety of work in the village. However, in addition to the vehicle itself, various devices with the help of which the tractor can perform useful work play an important role.
So, for example, to be able to move bulk cargo or clear the yard of snow in winter, you cannot do without a special shovel for a tractor, which you can make yourself.
Everything is not as difficult as it seems
So, from the very beginning it should be noted that there is nothing complicated in the design of such a device, however, in order for a homemade shovel for a mini tractor to reliably cope with the responsibilities assigned to it, it is important to approach the matter responsibly. The first stage is drawing up a project, which should reflect all the components of the bucket, as well as the mechanism for connecting the device to the tractor itself
Next, you should sequentially select all the necessary materials and components, using all kinds of available means for this.
Making a longitudinal bucket
The shovel itself, or in the correct technical language, the blade, should be made from a piece of pipe with a diameter of at least 70 cm and a wall thickness of at least 8 mm. To do this, it should be cut longitudinally, however, not in the middle, but stepping back from the central section by ¾, as a result of which the bend of the shovel will be exactly as needed. The width of the blade is selected depending on the dimensions of the minitractor, however, as a general rule, it should not protrude beyond the external dimensions of the vehicle by more than 40 cm on each side.
Considering the high load that the blade itself will experience, it must be strengthened with additional longitudinal stops, which can be a regular 40x40 mm square pipe, which is welded just below the middle of the central part of the blade. In addition to the longitudinal ones, it is recommended to make several transverse stops - from 4 to 8 pieces, which will make the shovel extremely strong and resistant even to heavy loads. But at the bottom of the shovel along the entire longitudinal part that will be in contact with the ground, it is recommended to put on a rubber casing that will protect the blade from damage when it comes into contact with an asphalt concrete surface.
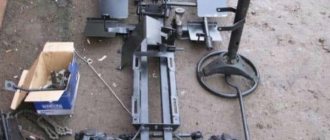
Mounting system and hydraulic cylinder for lifting
However, the shovel itself for a mini tractor with your own hands must have a good and strong connection, with the help of which it is possible to raise the blade to the desired height. To begin with, here you should weld the structure itself, which resembles the letter “A” with additional longitudinal steel elements, to which a bracket should be welded in the area of the middle jumper. As a technical mechanism that will lift the bucket, it is recommended to use a ready-made hydraulic cylinder, which is best purchased from a 2PTS-4 tractor trailer.
Assembly of the entire structure
After this, all that remains is to assemble the entire structure together and attach the homemade shovel to the mini tractor in two places - in the lower part on two through bushings through a bearing connection, and in the upper part through a hydraulic cylinder. The control of the lifting mechanism is displayed in the driver's cabin and is fixed in the form of a lever or remote control, depending on the type of lifting mechanism. Here it is also recommended to set restrictions on the lifting height in order to eliminate the dangerous height of lifting the blade, which can lead to the mini tractor tipping over.
conclusions
To summarize, we can say that in general, every person who knows how to handle welding equipment and metalwork tools can make such a ladle. So, answering the question of how to make a shovel for a mini tractor, we can confidently say that there is nothing cosmic about it and every experienced village owner will probably be able to design such a device for their vehicle.
Homemade ladle
You can make a KUN for a mini tractor with your own hands, while saving money on the purchase of this device. You need to acquire a metal sheet (with a thickness of six millimeters), metal scissors, welding, iron pipes of various diameters.
The KUN for the tractor is made according to a simple scheme:
- The fasteners are welded to the box and motor. The structure is reinforced from below with a metal corner;
- The KUHN itself is manufactured. It is enough to cut a sheet of metal into rectangles, which are then welded into one structure. Welding must be of high quality so that the finished structure lasts longer. Pipes and rods with a diameter of 10 and 5 centimeters, respectively, are suitable for the racks;
- Installation of hydraulic booster. For its mobility, a sleeve with a diameter of about 3 centimeters is suitable;
- The support pipe is welded to the front of the unit, then the racks are combined and reinforced with “kerchiefs”;
- For normal rotation of the bucket, a cylinder installed on the right is used.
To make your own bucket, you need to know how to use welding and understand mechanics. If in doubt, it is better to purchase ready-made equipment that can be attached to the Kioti tractor and other popular models of equipment.
A blade from a gas cylinder - how to make it yourself?
One of the most common options is to make a dump from a 200 liter barrel or from a gas cylinder. Such a snow removal attachment will successfully cope with clearing the local area from compacted icy snow masses, and will save your time and effort.
As in the first case, you will need a detailed diagram that will describe in detail all the dimensions and installation locations of the main elements of the snow blower. Next, to make an auger or rotary snow blower, you will need to prepare the same materials and tools as in the first case. You don’t have to buy steel sheets and stiffeners - a cylinder or barrel will be used instead.
A snow dump for a walk-behind tractor is made as follows:
- Cut an empty barrel or cylinder into 3 parts - in the end you should be left with 3 curved segments from which you need to make a shovel;
- Weld 2 segments out of the resulting three to each other along the contour. As a result, you will receive a product 3 mm thick - this is quite enough for high-quality snow removal;
- To strengthen the lower part of the blade, install a durable steel blade. Use a drill to make 3 holes in the knife with a pitch of 10 and a diameter of 6 mm. When installing the knife on the ladle, place a rubber gasket between the elements;
- In the middle part of the installed pipe, weld a semicircle in which you make 3 holes in advance - they will be used to securely fix the rotating corners of the bucket;
- Make an L-shaped holder from another piece of pipe. Insert one end of the part into one of the holes in the semicircle, and secure the other to the walk-behind tractor frame. You can see the result of the work done in the photo.
A ready-made snow shovel will help remove large amounts of freshly fallen and compacted snow. Thanks to the large width of the bucket, you can clear a significant area, saving your time and effort.
For better cleaning of the local area, a sweeping brush can be installed on the manufactured dump. It should be secured directly behind the bucket using bolts. If you want to use this element, then when making a blade, you need to weld 2 pipes, at least 1 m long, to its side parts. A third pipe is welded perpendicular to the pipes, and the brush itself is welded to it.
Manufacturing a front loader for a tractor
The front loader differs from the previous bucket in that it is mounted on a mounted mechanism located in the front of the tractor. In the future, such an excavator can be actively used for snow removal, leveling the site and clearing debris.
As in the first case, before manufacturing the loader you will need to study the drawings. They must be as accurate as possible so that the finished loader is extremely balanced and reliable.
Next, you need to collect all the materials and tools necessary for the work.
The work must be performed using the following raw materials and equipment:
- several sheets of steel - their sizes are selected depending on the dimensions of the loader;
- 2 large and 2 small hydraulic cylinders;
- bolts, nuts and hinge joints;
- grinders and drills;
- welding machine;
- pliers, screwdrivers, wrenches.
The sequence of manufacturing a front loader for a tractor should look like this:
- First of all, metal platforms must be installed under the front linkage mechanism of the tractor to serve as a support for the loader. In the installed platforms, you will need to make recesses for mounting rods;
- The next step is to assemble the arrow. To manufacture it, you will need to make 2 contours from profiles, which must be connected to each other at an angle of 30 degrees. Both circuits must be attached to each other by means of jumpers located in the lower, central and front parts of the structure;
- One vertical support must be welded to each circuit so that each of them protrudes in its upper part. One additional spacer must be welded to each support, the second side of which must be attached to the corner located in the central part of the existing boom;
- Eyelets need to be made in the back of the bucket welded from steel sheets. You will need to attach a boom to the bottom eye, and 2 small hydraulic cylinders to the top eye. The second ends of the hydraulic cylinders must be attached to the angle located in the central part of the boom. Large cylinders must be carried from the central part of the boom to a support installed in a vertical position;
- At the final stage, you will need to install the finished structure on the front linkage of the tractor.
In a self-assembled front loader, front hydraulic cylinders are responsible for its rotation, and large rear cylinders are responsible for bending and extending the boom.
Having studied the procedure for making the front and rear buckets, almost every farmer will be able to make a tractor with two buckets - such a unit will have the highest possible performance and will help in performing various agricultural and household tasks.
vote
Article rating
Making a shovel without a lifting mechanism
The design of attachments will be much simpler if the blade frame is fixed in one position, but the mini tractor blade can rotate left and right.
Fixing the hitch is done as follows:
- An iron disk with a diameter of 15 centimeters is welded to the shovel;
- Several holes are drilled on the disk for convenient use. Optimally - three holes;
- To fix the shovel, an L-shaped pin is inserted into the holes to hold the entire structure;
- An extended handle is attached to the bucket;
- The bolts on the structure are tightened and fixed;
- The finished structure is painted.
A ready-made homemade canopy can not only remove snow. In summer, a mini tractor with a blade can be used as a bulldozer to level the soil. The shovel can be replaced with a brush for cleaning the area. The operating principle of factory shovel blades is the same, but their design is not reinforced, and therefore cannot boast of reliability and durability.
Required Supplies
When creating equipment for snow removal with your own hands, you will need different materials and tools. Therefore, take care of this in advance so as not to be distracted during the manufacturing process:
- profile pipe;
- conveyor belt;
- bolts and nuts;
- spray paint;
- chains;
- pliers;
- welding machine;
- screwdrivers and hammer;
- vice;
- file;
- Bulgarian;
- a set of keys;
- drill;
- electric hacksaw.
Having all this at hand, you can quickly make a snow blower for a walk-behind tractor with your own hands. But don’t forget that you also need the right scheme. This will be the key to a proper homemade blade.
How does a blade work?
The blade is mounted on a subframe made of a steel profile, fixedly attached to the tractor frame.
To change the position of the structure and press the working edge to the ground, a 2-way hydraulic cylinder, controlled by a spool valve, is used.
Oil is supplied under pressure by a gear pump driven by an engine.
The tool has a rotating unit that allows you to place the knife at an angle to the longitudinal axis of symmetry of the machine (the position is changed manually or with a separate cylinder).
Design process
If there is no experience and technical skills in assembling various devices, then the work will be difficult to do and will take a lot of time.
But if you stick to the plan, follow the dimensions indicated in the drawing, and work correctly with welding, the equipment will turn out to be of high quality.
The loader is assembled in stages: first, the base is created, then the boom and bucket. Manufacturing of parts and assembly process:
- The basis. To form the base of a homemade front loader, use steel corners or square pipes. The base must be strong and rectangular in shape. It is mounted on the canopy with the bottom side so that its edge protrudes slightly forward. The hydraulic cylinder will be mounted in the center of the frame. An additional triangle made of pipes is mounted under it. The spacer and hinge joints for the boom are located at the top of the base.
- Arrow. The boom is assembled from metal profiles. Their angle should correspond to 30°. The ends of the frame and hydraulic cylinder are mounted at the top of the structure. A cylindrical hinge is installed at the center point of the boom if a mini-loader is assembled. Movable segments are attached to the hinge, which are connected by cylinders and crossbars. Sometimes a large channel is used to make an arrow, but a more reliable design is obtained based on two contours.
- Ladle. The product is assembled from one large steel sheet or several small ones. To do this, rectangular blanks are cut out and welded together so that the front part is located at a slight angle. The length of the boom must be maximum 2 m longer than the loader, otherwise it may tip over. To prevent the homemade product from turning over during operation, this part is equipped with a sinker.
- Assembly process. Steel platforms that provide support for the tools are mounted on the front of the tractor under a canopy. Previously, grooves are made in them for the installation of rods. The boom is made from steel profiles. To do this, profile sections are connected at an angle of 30°, resulting in 2 contours. To make the homemade product durable, the contours are fixed with steel staples. They are installed in the center of the product and along the edges.
When making a loader for a tractor with your own hands, you need to make a protrusion at the top. To do this, a vertical support is installed on one side of the circuit and welded with a welding machine. One side of the spacer is connected to the protrusion, the other to the corner, which is located in the center of the boom.
Eyelets are made on the back side of the bucket. The boom is attached to the bottom eye. Hydraulic cylinders are secured on both sides: one side to the angle, the other to the upper eye of the bucket. Large hydraulic cylinders are transferred from the central section to a support located vertically. Hydraulic cylinders located in the front part of the structure are responsible for rotating the working part of the bucket, and the rear ones allow the boom to bend and extend. The structure is securely attached to the tractor hitch.
How to make a blade with your own hands
Steel barrel for making a blade
It’s worth saying right away that there is nothing difficult in making a blade for a mini-tractor with your own hands, but in order for everything to work without problems, you need to approach this issue very seriously. First of all, you need drawings, of which there are a lot on the Internet. They need to display all the components of the shovel, as well as the device for attaching the equipment to the mini-tractor. Next you need to collect all the required materials and parts.
A front or rear-mounted blade for a mini-tractor can be created from a piece of steel pipe with a diameter of at least 700 mm and a wall thickness of at least 8 mm, a thick-walled old barrel or a heating boiler of suitable size. To do this, you need to cut the pipe longitudinally, but not in half, but approximately ¾ of the circumference. As a result, the shovel will turn out with exactly the bend that is required. The width of the device is selected in accordance with the dimensions and power of the mini-tractor, but, according to general requirements, attachments should in no case extend beyond the outer limits of the power unit by more than 400 mm on each side.
It is important to take into account the possible large loads placed on the attachment.
That is why it is necessary to strengthen it with additional longitudinal stops, for the creation of which a square pipe with a cross-section of 40x40 mm, welded slightly below the middle of the dump, can be suitable. In addition, it is worth making 4-8 cross stops. This will give the rear mounted blade more strength and stability even under heavy loads. And the bottom of the shovel, which is made by hand and is in contact with the ground along the entire longitudinal part, should be equipped with a rubber casing. This protection will prevent damage to the grader from contact with asphalt.
The lower edge of the shovel must be reinforced with a special knife. To do this, you will need a 5 mm steel strip with a length corresponding to the working grip of the grader. Holes with a diameter of 5-6 mm and a pitch of 100-1200 mm should be drilled in the knife to secure the rubber safety strip.
Blade for a mini tractor - we do it ourselves, drawings, video
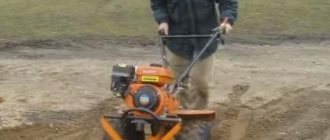
In rural areas, the presence of a mini tractor will not surprise anyone. Such necessary equipment allows you to cope with a number of tasks on the site, and together with attachments, its functionality increases significantly. If a cultivator on a mini tractor is a very popular canopy, then the blade is less popular. But it still remains a very popular equipment.
A blade for a mini tractor becomes necessary when in winter it is impossible to leave the yard due to a pile of snow.
In this case, connect the shaft to the mini tractor and in 5 minutes you will have a yard and road well cleared of snow.
Doing such work manually with a shovel is much more difficult, so owners of mini tractors either buy a blade or make it themselves. And now we’ll tell you how to do it.
What types of dumps are there?
A blade is an additional attachment to a mini tractor in the form of a bucket, designed for cleaning the yard, roadway, sidewalks from snow and ice. A mini tractor with a shovel is often used by public utilities and in construction, in the latter for the purpose of uniform distribution of crushed stone or sand.
Dumps differ from each other in the following qualities:
- all dumps weigh from 65 to 105 kg;
- the width can be in the range of 120 – 200 cm;
- the tractor must have a minimum power of 16 hp.
A special feature of the front shaft is that the front canopy makes it possible to use the mini tractor as a bulldozer. Thus, they can easily throw snow from the yard or level paths on the site.
It is worth noting that a minitractor with a front blade increases its weight significantly, which creates difficulties when lifting the shovel into the transport position.
Features of working with this canopy:
- We install the blade on the mini tractor.
- We choose the angle at which the work will be done (this will determine where the snow will move).
- If you intend to clear the road, then choose an acute angle. If you are going to work on large areas, then use a right angle.
How to make a shovel with your own hands?
For those who know how to handle tools and understand drawings, it will not be a problem to create a shovel for a mini tractor yourself. And we will tell you how to do this now.
Tools required for work:
- pliers;
- drill and grinder;
- old steel barrel 200 l;
- welding machine;
- keys and screwdrivers;
- strips of steel and rubber;
- fasteners (nuts, bolts, screws and rivets).
Making a shovel:
Cut the barrel into 3 parts so that you have 3 curved segments for the shovel. We weld 2 of them along the contour and as a result you get a product 3 mm thick. We reinforce the lower part of the blade with a knife. For a knife, take a steel strip 5 mm thick. The length must match the blade grip.
We drill holes in the knife (diameter: 5 - 6 mm) in increments of 10 - 12 cm. This is necessary for attaching the safety rubber strip. The width of the shovel must correspond to the power and dimensions of the mini tractor
But it is important that the blade does not extend beyond it by more than 40 cm on each side.
It is for the reason stated in paragraph 6 that we strengthen the device with additional longitudinal supports, namely square steel pipes with a cross-section of 40x40. We weld the pipes below the middle of the dump. We attach a rubber casing along the entire longitudinal lower part of the blade to prevent the equipment from coming into contact with the asphalt.
Design features of the fastening and lifting mechanism
One of the successful components of such homemade equipment is a good and strong connection. It is with its help that the blade rises to the desired height.
To create such a device, you need to weld an A-shaped structure from the longitudinal elements. And in the area of the middle jumper you will need to attach a bracket.
As for hydraulics, it is best to purchase a hydraulic cylinder from a 2PTS-4 tractor trailer.
Putting the whole structure together:
- We attach the blade at the bottom through a bearing connection in 2 through bushings.
- We connect the blade at the top through the hydraulic center.
- We bring the device control into the driver’s cabin and fix it in the form of a remote control or lever.
That's basically all you need to know about making a shovel for a mini tractor
If time and materials allow, then take into account the drawings and get to work
Believe me, such a homemade blade will not be inferior to the factory version either in quality or in convenience.
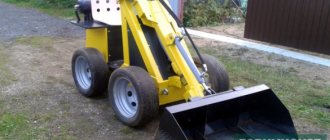
Universal mounted bucket
A homemade KUHN for a mini tractor is one of the types of front loaders. It is indispensable when you need to transport or load large volumes of bulk (and other) materials, such as sand, crushed stone or grain.
The mini tractor itself differs in size from a full-fledged tractor. Using a bucket allows you to turn a simple tractor into a universal vehicle for a wide variety of types of work.
Front loaders have a number of advantages:
- easy maintenance;
- reliability;
- ease of installation and dismantling of equipment;
- serious load capacity for a small-sized tractor;
- ease of control due to enhanced hydraulics.
Making a ladle
You can buy a bucket for a mini tractor at any hardware store, but this is not the cheapest pleasure, so it’s easier to make it yourself. You don't need any special knowledge or materials here. To work, you need to stock up on drawings, a grinder, a welding machine and the material itself.
Advice! A metal sheet with a thickness of 6 mm or more and pipes of various diameters are best suited for these purposes.
- First you need to make the fasteners. It is welded to the box and engine, and a metal corner is welded underneath for reinforcement.
- The KUN itself is made from pieces of sheet metal. There is no point in bending the sheet to fit the shape of the ladle. It is much easier to cut rectangles of the required size and weld them together to form a ladle. The durability of the product depends on the quality of the seams. It is better to use pipes with a diameter of 100 mm for racks, and 50 mm for rods.
- The next stage is the installation of the hydraulic booster. For greater mobility, it is recommended to use a pipe with a diameter of 30 mm (it should not be more than 50 mm, otherwise the pipes will not move well inside each other).
- Now the support is welded to the front of the tractor and combined with the racks; gussets are used for reinforcement.
- A cylinder is used to control the rotation of the bucket. It is usually installed to the right of the bucket.
Safety precautions when working with a bucket
Making a bucket for a mini tractor is not very difficult, the main thing is to have knowledge and experience in working with welding, and be able to work with drawings. In order for the attachments to work correctly, you need to approach the work responsibly and do everything strictly according to plan, otherwise the result may not meet expectations, and the mini tractor itself with KUN will pose a danger to the operator.
Advice! If you have doubts about the success of the event, you should refrain from making the KUN yourself and purchase it in the store.
To ensure safety during operation, you should follow the operating rules:
- KUN can be used only for its intended purpose;
- When working, you should carefully monitor the bucket;
- When driving with a loaded bucket, you need to keep it lowered, that is, near the ground.
Features and purpose
A blade for a mini-tractor is a necessary piece of equipment, the use of which is aimed at removing snow and cleaning the area during the cold season. And also with the help of a blade you can transport bulk materials without much effort. By connecting this equipment to the unit, the work can be completed within a few minutes. Procedures without dumps take several hours. A shovel for a mini-tractor can not only be purchased, but also made with your own hands, which helps save money, as well as convenient and comfortable work. You simply cannot do without a blade in the winter season, when it is impossible to leave the yard due to snow cover. In order not to waste time manually cleaning the road, you can use this attachment for the unit.
Pros and cons of homemade structures
Among the advantages of equipment assembled with your own hands, the following positions can be noted:
- Even a person with low qualifications can make attachments;
- Any mounted unit made in home-made conditions is quite inexpensive;
- to create equipment and repair it, you will need a standard set of tools;
- it is possible to enhance certain features of the device;
- From a safety point of view, attachments can be designed to a very high level.
Among the shortcomings, the following criteria stand out:
setting up and servicing homemade equipment is a painstaking, labor-intensive process that requires skill and proper qualifications from the owner; During the entire service life, special attention is required to monitor the operation of the unit.
Self-production
to find ready-made drawings and descriptions for making one or another home-made mounted snow blower for a specific machine. After all, the unit is installed in some special way for each type of vehicle.
The mounting methods and location also differ .
Therefore, in most cases you have to:
- take drawings and methods for manufacturing a device for one machine and adapt it to another;
- draw up a drawing yourself, using a unit installed on another car as a sample.
In addition, the parts for which the drawing is drawn up are not always available.
- draw up a new drawing;
- do it the old way, making changes as you go.
You should know the three main conditions for making good mounted snow removal devices yourself: these are:
- availability of skilled and experienced craftsmen ;
- access to the necessary equipment ;
- good lawyers who can obtain the necessary documents and legalize the units.
If you decide to make some kind of snow removal equipment yourself, then make sure that all three conditions are met.
You can make the necessary equipment:
- from a not very suitable drawing;
- no drawing at all;
- looking at the finished unit.
But only such specialists as:
Types of forklifts
If you want to find out how to make a loader for the MTZ rear linkage with your own hands, it is advisable to become more familiar with the types of this type of equipment used on the farm. Loaders of various types can significantly automate the loading/unloading processes, which makes them an effective tool when frequent transportation of goods is required.
To handle cargo, a wide range of attachments can be used, including:
- a bucket that acts as a front loader when working with bulk materials or soils;
- forks used when working with single objects;
- jaw-type gripper - used in logging, as well as for working with bulk types of cargo;
- haystack - has a limited scope of application, suitable for loading hay;
- a manipulator installation capable of moving large single objects;
- KUN, which makes it possible to work with numerous replaceable elements;
- a cargo boom with a telescopic mechanism is an indispensable tool when it is necessary to move objects to an impressive height.
Various attachments can be installed on the equipment. When understanding how to make a rear-mounted loader, it should be mentioned that such devices also differ in the type of drive into mechanical, electrical and hydraulic models. Taking into account the design features of MTZ tractor equipment, as well as the operating principle of this kind of manipulators, it should be noted that manipulators, as well as buckets, are most often used for the rear linkage.
Homemade loader for a mini tractor with your own hands. Do-it-yourself loader on a mini tractor
When purchasing any agricultural equipment, every owner quite reasonably strives to use it to perform a wide range of tasks. Mini tractors have become extremely popular today, allowing them to perform a wide variety of work, from land excavation to construction. However, it is not always possible to buy such a mini tractor complete with a loader, the cost of which separately is quite high. In this case, making this part yourself can be a real salvation, since it will allow you to use the vehicle to move various bulk building materials.
Where to begin?
To make your own loader for a homemade mini tractor, you should take into account the model of the vehicle itself, since the weight of the attached unit will depend on this. In addition, it is necessary to find a diagram reflecting the mechanism for lifting the bucket to a certain height and controlling it from the tractor cabin
Considering the sufficient complexity of such a mechanism, this task should be approached very responsibly, having carefully thought out the design on paper.
In order not to reinvent the wheel, it is best to take as a basis the lifting mechanism that is used on many models of domestic tractors. The design itself consists of 3 main parts:
- The actual bucket.
- Hydraulic lift mechanism.
- Systems for attaching a loader to a minitractor and bringing control elements inside the cabin.
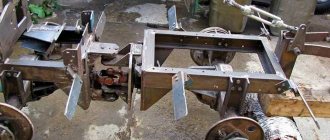
Step-by-step production of all structural elements
First you need to make a loading bucket (1), which can be made from several steel plates, at least 6 mm thick, welded at the desired angle. According to the given dimensions, it is necessary to weld the side elements, and along the lower longitudinal part - ridges that will well grip bulk building materials of various fractions. Then we proceed to the implementation of the most complex mechanism - the hydraulic lifting system, for which we will need the following elements:
- 4 levers (2) – here it is best to use a square pipe of a suitable cross-section, in which it is necessary to make holes for connecting bushings;
- boom (4) – is made of a U-shaped channel and is attached on one side to the bottom of the bucket, and on the other to the frame of the mini tractor;
- hydraulic lifts (5.6) - they are best purchased ready-made, which can be found on the market for transport parts for tractors.
In addition, this mechanism will also need bushings, pins, brackets, adapters and connecting fingers, which should be sequentially assembled and fastened together
It is very important that a homemade front loader for a mini tractor has the correct center of gravity, which will avoid accidental tipping due to overweight. The sketch under number 3 indicates the location of the vehicle wheel, which will allow you to correctly navigate the loading mechanism location system relative to the tractor itself
Key Findings
When performing the entire complex of work, it is very important to maintain the required proportions, since the slightest inaccuracy can lead to the mechanism not working. To do this, from the very beginning you should carefully approach the project, accurately calculating the dimensions of all parts
The elements used should be made of durable materials, which should preferably be treated with anti-corrosion compounds. Thus, making a loader for a mini tractor with your own hands is quite possible, which only requires attentiveness and skills in working with metalworking and welding tools.
Types of dumps for mini tractors
This attachment is used for cleaning snow and ice in the household. Mini tractors with a shovel are actively used in the public utilities and construction industries. In the latter case, they are used to evenly distribute crushed stone or sand.
There are two main types of this equipment:
- Rear blade for a mini tractor. In this case, the equipment is rear-mounted. Starting is carried out by attaching the unit;
- Front blade. The design includes a hydraulic cylinder that launches the device. The mini tractor acts as a bulldozer with a front linkage. The weight of the machine increases significantly, so slight difficulties arise when lifting the shovel during transportation.
Dumps differ from each other in the following qualities:
- Weight ranges from 65 to 105 kilograms;
- Width from 120 to 200 centimeters;
- Tractor power with a shovel from 16 liters. With.
After installing the blade on the mini tractor, you need to select the angle at which the work will be performed. An acute angle is suitable for cleaning roads; a right angle is more suitable for working in large areas.
If you have the necessary tools and materials, you can make a snow blade for a mini tractor with your own hands.
Manufacturing of attachments
Buying canopies for a walk-behind tractor will be very inconvenient for a small summer resident. A summer resident or farmer can make all the equipment himself at home, using a little ingenuity. Most of the equipment is quite simple and can be made from almost whatever is on hand.
Before you make a plow for a mini tractor with your own hands, you need to carefully study the drawings and dimensions and choose the most optimal one. It will be easier to make equipment if you have a ready-made factory circuit.
Making a hiller
To do this, you need to take 2 metal disks with a thickness of 2 mm and position them so that they open outward. When the angle is selected, they are secured with bolts or simply welded. Then it is simply secured to the hitch.
Potato planter
The structure of this unit resembles a hiller. It has a bowl on top into which potato tubers are poured. From a special hole they fall into the ground.
To make a homemade potato planter, you need to assemble wheels, an axle, pins, a hopper, sprockets, and an adjustment mechanism. All this is attached to the frame.
The wheels are covered with a metal plate at the front, otherwise the potatoes will fall out of the hopper at times when this is not needed. The bottom of the hopper is covered with rubber so that the potatoes do not fall out.
How to make a bucket for a mini tractor? For this you need tin and internal racks. 2 side and internal racks form a bucket. The rods are screwed to them.
Mills, plow
This is one of the most important equipment. Milling cutters are used for processing soft and constantly cultivated soil. A homemade plow for a mini tractor is more suitable for working with hard soils. To make a homemade plow, you need to take a plate with a thickness of 3 to 5 mm and a pipe with five-millimeter walls.
The plate is sharpened with a knife, like a scythe. Next, the blade is turned out using a grinder. The cutting part is the working element of the scythe, which is beaten on the anvil.
Milling cutters are used for processing soft and constantly cultivated soil
All parts are glued together with obligatory observance of corners. The ploughshare is placed on a steel sheet. These elements must be spot welded on both sides.
Important! The ploughshare and shaft must be joined very tightly. There should be no gaps between them
Making a trailer adapter
The design of this device includes:
- metal frame;
- hitch;
- cross bar;
- braces;
- racks, axle, wheels;
- management tools;
- trailer or cart;
- space for the operator and connection of additional mechanisms.
The frame is made of pipe (length - from 1.5 to 1.7 m). A hitch is welded at one end and a rod at the other. Wheel racks and a brace are attached to the rod.
Levers are used to control devices. By switching them, you can set the optimal position of the attachment. An additional lever is installed to adjust the applied force.
The length of the drawbar depends on the power of the walk-behind tractor. Engine power affects wheel size. Additionally, hydraulics are installed.
The hitch for an internal combustion engine mini tractor and other units can be easily done independently. It fits almost all agricultural equipment, greatly facilitates and reduces the cost of all work in the country or on the farm. Proper use of the equipment extends the service life of the walk-behind tractor.
Types and design of the device
Categories and design features of dumps for MTZ-82:
- A unit for carrying out public works, characterized by reduced weight at the expense of strength. Suitable for removing light materials (e.g. debris or soft soil), can be used on agricultural farms.
- The bulldozer-type device is made of a thickened sheet, to which plates are welded to increase rigidity. The blade is used when carrying out road work or digging trenches.
- A snow shovel is distinguished by the absence of a cutting edge; it is used for cleaning yards and roads; the tool can be used when clearing an area of soft soil.
The characteristics of the dump using the example of a municipal 2-section unit NTU-10 are given in the table.
| Parameter | Meaning |
| Width, m | 2,0-2,6 |
| Productivity, m³ | up to 340 |
| Operating speed, km/h | up to 8 |
| Structure weight, kg | 600 |
| Cost, rub. | from 135 thousand |
Additional Description
Just one tool will allow you to perform different types of tasks, such as:
- Removing freshly fallen snow and working with other bulk materials (side equipped with rubber blades)
- Carrying out light leveling work, such as: removing ice, working on soils of categories I and II (side with removable metal blades).
The universal blade has two working surfaces: one with rubber knives, the other with metal knives; if necessary, the shovel can be turned over.
Types of dumps for tractors:
- Universal hydraulic rotary blade
- Universal mechanical blade
- Municipal hydraulic rotary blade
- Municipal mechanical dump
- Bulldozer hydraulic rotating blade
- Bulldozer mechanical blade
- Bulldozer blade straight
The reinforced shovel is made of 6 mm steel and equipped with stiffening ribs. And special springs soften the impact when hitting an obstacle.
To produce rubber blade knives, a technical plate reinforced with steel cables is used, which allows the knives to be stronger and not break in the cold.
Specifications
| 2400 | 2500 | |
| - height | 795 | 895 |
| Weight, kg | 390 | 450 |
| Minimum working width, mm | 2080 | 2165 |
| Maximum working width, mm | 2400 | 2500 |
| Maximum rotation angle, ° | ±30 | |
| Lowering the shovel in a straight position below the supporting surface, mm | not less than 80 | |
| Raising the shovel in a straight position above the supporting surface, mm | not less than 320 | |
| Operating speed, km/h | no more than 15 | |
| Control | hydraulic/mechanical | |
| Can be mounted with tractors | Belarus 82.1, 82.1-23/12, 826, 892, 92P, 920, 952, 1221, 1523 and their modifications | |
| by application | Belarus 1220 |
The parts data presented on this page is for informational purposes only.
KUHN for mini tractors
This site was created for those who want to assemble a KUN for their mini tractor. The site contains drawings (not all of them yet) of the front loader that I made and tested on my tractors (T-25 and df-244).
This KUN throws snow and sand into a cart to a height of more than 2 m. KUN lifts four people weighing 90 - 110 kg.
KUN was tested in work with tractors KhTZ T-25 and DongFeng df-244.
To cut parts using a CNC laser, you will need to redraw the drawings in dxf format. Or order such drawings from me. A set of drawings for laser cutting on a CNC machine in dxf format costs 10,000 rubles. I take this nominal fee for drawings to purchase metal for my next projects. At the moment, the metal is waiting for a sawmill and a CNC coordinate milling machine, the drawings of which I will also post on the website.
What materials and tools will be needed
If the owner intends to make a blade with his own hands, then it is necessary to prepare:
- carbon steel sheet 8 mm thick for the manufacture of the main part of the scraper;
- steel channel for assembling the frame necessary for mounting the tool;
- double acting hydraulic cylinder;
- pipelines for connecting the cylinder to the pump;
- spool valve;
- swivel connectors;
- electric drill or drilling machine;
- tool for cutting steel profiles and sheets;
- welding machine;
- measuring and drawing tools;
- a thick rubber plate (in case of assembling a snow blower);
- mounting bolts and nuts (in accordance with the documentation).
Step-by-step assembly of the structure
Rotary blade assembly sequence:
Blade design for tractor
- To make the main part of the bulldozer, a steel sheet of the required blade size is cut out, and then it is given the optimal shape. The width of the shovel should not exceed the dimensions of the tractor by more than 400 mm on each of the two sides.
- Two supports are created , to which stiffening ribs from plates are welded, and a hinge joint is installed at the bottom. The supports will be connected to the cross beam, and the entire structure will be bolted to the side members. A hinge is welded to the front of the beam for attaching the hydraulic cylinder.
- A triangular semi-frame is made from two beams , on top of which a lifting hydraulic cylinder is installed. On the outer sides of the beams, in the middle of each, one hinge is attached.
- The shovel is connected to the half-frame with two hinges. The first hinge is installed at the level of the hydraulic cylinder, and the second is 200 mm higher on a special support.
- Hydraulic cylinders are installed parallel to the subframe. Attachments for them are made to the blade at a distance of 1/3 from the center on both sides. Rotating the blade provides greater functionality to the bulldozer.
A simpler method, if the bulldozer does not require adjustment of the blade position, is a fixed mount, when instead of hydraulic cylinders, two pipes are welded to the blade on the frame.