Vase made from designer parts
By collecting a large number of different parts, you can make an original and completely functional vase.
For the base you will need an unnecessary old bottle with a wide neck or a regular glass. The sequence of actions is as follows:
- sort parts by color and height;
- make a base-stand for a glass from flat parts;
- on the sides of the stand, build up the walls of the vase using parts of different colors; you can lay them out in a rainbow order, put a name or any other pattern out of them.
The photo of Lego crafts shows some of the possible options.
Tank stand
Stand tanks are becoming the most popular ideas for desktop or gift decoration. We bring to your attention two of the most original ideas.
Tank – pencil stand
As you already understood, you can create a three-dimensional model in the shape of a plastic cup or jar into which pencils will be inserted. The principle of modeling remains the same as when making a frame for a tank for a typewriter, except that now our task is to create a frame for a jar or plastic cup.
For convenience, create yourself a template from beams in the form of a square and make a tank based on it.
As an option, for realism, you can use pens and pencils not under the stand, but instead of the protruding barrel. To do this, change the model a little and make a side hole, making the model without a muzzle.
Tank – bottle holder
This option can be an original idea for decoration for a holiday or birthday. The essence of the model remains the same as in the previous version, only now, instead of a Lego barrel, its role will be played by the neck of the bottle.
Your task is to “wrap” the bottle in Lego in the form of a tank model.
Lego as a decor for liquid soap
Your favorite construction set will help persuade your child to wash their hands regularly. In a transparent container with liquid soap, the design parts look fascinating. To some, they even resemble fish in an aquarium.
All you need to do is buy a colorless transparent container and remove the stickers from it. Put the details inside, giving preference to bright ones.
Typical hive structure and components
To make your own bee house, you first need to understand its basic structure. Any model must have the following components:
- Frame . It is located in the lower part of the structure and implies the presence of special grooves on which frames are installed. Depending on the size and type of hive, their number varies from 9 to 16. As a rule, such joints are installed parallel to each other. The walls of the housing are made with insulation, which is most often velite - a heat-insulating board made of paper impregnated with bitumen. Its main substitutes are linen mats and polystyrene foam.
- Bottom. At the same time it performs two functions - the base of the structure and the “runway” for bees. The bottom can be nailed or removable. From an operational point of view, the second option is optimal because it simplifies cleaning the nest. Between the bottom and the frames you need to create a sub-frame space of at least 20-25 mm in length. It is necessary for cleaning the hive before the spring migration of bees. Some beekeepers leave a space of 40-60 mm, and place a container with insect food under the frames.
The sub-frame space forms a steam-air valve, without which the activity of the swarm state of the bee colony will decrease, since flying bees will not land on the honeycombs with brood.
- Letok. This is a hole that allows bees to fly freely and return to the hive. It is cut into the front of the case, often at the bottom, since the top hole takes about a third of the heat. It is closed with a folding valve attached to the front wall of the case using rotating hinges. Some models have two tap holes - upper and lower. The first of them opens in spring and summer and closes in winter. The lower entrance is opened slightly during the winter season to provide access to fresh air.
In the case of a removable bottom, the tap hole is often made just above the central part in the form of a semicircle with a diameter of 30 mm. If the bottom is nailed, then the diameter of the slotted tap hole should be at least 100 mm, and the length should be about 10 mm.
- Magazine (magazine extension). The section of the hive that sits above the body. The bees store honey in this compartment during the bribe period, which greatly simplifies the task of collecting it for the beekeeper. Usually the magazine is made with the same linear parameters as the body, so it accommodates the same number of frames for honeycombs. Sometimes the extension is used to accommodate a layer in the winter season, so it is insulated along with the body or made with double walls. Some models do not have a magazine.
Experts advise using the store for small bee colonies that do not produce a large amount of sweet product.
- Liner . The upper part of the house, covering the store or nesting body, to protect the shoulders from precipitation and at the same time create an air space like an attic, which helps maintain optimal temperature conditions in the hive. For ventilation and free movement of bees, a hole is made in the ceiling. If the roof liner replaces the roof, it is made of plywood or boards and sheathed with a thin sheet of steel to protect the wooden parts of the hive from moisture.
Similar structures are often equipped with the following components:
- Frames . Depending on the shape of the hive, they can be square, low-wide or narrow-high, but in any case they have equally protruding edges - folds, which rest on slats mounted on the walls of the magazine or body. The thickness of natural wood frames is often 10-40 mm. To help bees create honeycombs, stainless steel wire or thick fishing line is sometimes stretched over them. You need to leave 6 mm between the frames and the walls of the body to form an inter-frame fishing rod through which the bees will fly after building the honeycombs.
- Separators . Provide the required distance between frames. The gaps in them are made such that worker bees can fly upward. Permanent separators can be point or line. The first fasten adjacent frames at the required distance at only one point, and the second - along the entire lower bar. There are also profile side dividers in the form of an extension of the side slats in the upper part, which prevents the contact of honeycombs created by bees inside the frame. It is also called a shoulder and is usually about 100mm long.
- Diaphragm (insert board) . This is a board or wood board, the width and height of which correspond to the internal dimensions of the body. It is located inside the hive and divides it into two parts. Often used when keeping two bee colonies in one house.
- Ruberoid subframe . A sheet of roofing material, the length and width of which corresponds to the dimensions of the bottom of the housing. It is inserted into the hive through the entrance when replenishing the hive with food for the winter. During the winter season, wax crumbs and dead particles accumulate on it, so at the beginning of spring it must be removed and stored until the end of the season.
- Dividing grid . It is installed between the body and the magazine so that the queen does not move from one part of the hive to another. The grid is made of wire or plastic and has cells measuring at least 4.2 mm. Thus, worker bees pass through them freely, but larger queen bees and drones remain in the main nesting section.
- Ventilation frame . Lightweight structure made of wooden slats with a metal mesh stretched over them, the cells of which have dimensions of 3x3 mm. It is placed in the upper part of the hive instead of a ceiling panel, but sometimes a ventilation window is made in the roof itself.
- Folding panels . Used to connect the body and the magazine extension. The loops are attached to the corners on the front wall of the hive, between the body and the magazine. With their help, you can fold down or completely remove the magazine to free up the internal space of the socket housing. Some models use retractable brackets instead of hinges.
- Connecting tape . Guarantees a reliable connection between the body, magazine and liner. To do this, it is installed along the joining lines. As a rule, a steel strip tape is used, the width of which is 25 mm and the thickness is 2 mm.
The following diagram shows the basic structure of the hive, where 1 is the base, 2 is the bottom, 3 is the body, 4 is the divider, 5 is the magazine with frames, 6 is the ceiling, 7 is the lid:
Functional key holders from Lego
Such easy crafts from Lego will perfectly help children (and many adults) not to scatter their keys in different places in the apartment. To make a key holder you will need:
- wide flat base of the constructor;
- double-sided tape or nails to attach it to the wall;
- Lego parts with holes for keychains;
- consent of all household members to walk with a Lego keychain on their keys.
The base of the constructor must be attached in a convenient place on the wall or cabinet door. The keys of everyone who returns home are perfectly attached to it.
How to make stickers for a tank?
Decorating with stickers has become very popular not only in the Lego theme, but also in needlework in general.
A sticker is a sticker that can be glued to a work surface, and which will carry a certain character in its theme.
It's very easy to make a sticker with your own hands.
To do this, take an A4 piece of paper. Make a drawing or inscription on it that you want to put on it. Cut out the image.
Take regular tape and “lamine” your sticker on one side so that you can leave adhesive edges when cutting out. It is with these edges that the sticker will be glued. For convenience, you can, of course, also apply a sticker to double-sided tape.
To do this, place the cut-out image on one side under double-sided tape, without removing the bottom adhesive surface, and use regular tape on top of the image to add gloss and protection to the design.
We cut out the image to the desired shape and that’s it, now all that’s left is to detach the remaining protection from the bottom adhesive side and stick the sticker where you want to decorate it.
Night light made from transparent Lego parts
If there are a lot of transparent parts, you can make a portable night light with your child for his room.
Note!
- How to make a rose from paper - the best ideas for DIY crafts + master classes on creating a rose from paper (160 photos)
- Craft letter - TOP 120 photo reviews of craft letter. Simple diagrams + step-by-step DIY instructions
Crafts made from nut shells: the best step-by-step master classes on creating DIY crafts with photo examples of finished works
The parts are folded into a box, and an LED lighting source is placed inside. This night light has a wonderful ability - you can reassemble it every day, changing patterns, sizes and colors.
You can make a night light with a regular cartridge. In this case, be sure to ensure that the light bulb does not heat the homemade night light body.
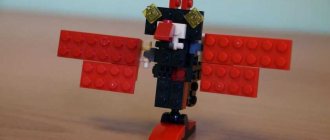
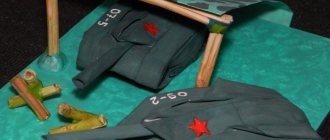
Police car
Surely many people dream of becoming law enforcement officers or love the theme of catching “villains and criminals.” Even take your favorite children's cartoons, which always accompany the theme of justice, the struggle between good and evil and justice.
A striking example and motivator can be the cartoon “Zootopia,” which tells us the charming story of the little rabbit Hops and her best friend Nick. To motivate your child, you can use this image and suggest the idea of creating a police car. How to make a police car from Lego, let's look at the options.
First we need to decide on the color of our transport. The canonical police cars from the cartoon are black and white. Start from this, but if this color is not there or the child insists on his imagination, do not limit your imagination. Let the car be interspersed with bright, different colors.
The car can be made large or small, here you should pay attention to the number of available parts. If possible, make a convenient and compact model for you. Another question is when you are working with a specific lego set. The weight is simple, you don’t need to invent anything, just assemble it according to the instructions.
You should approach the assembly of a police car in exactly the same way, but with one exception. Download or take a photo from which you want to make a model of the car. Firstly, this will visually facilitate the child’s design task, and secondly, it will set a specific goal to adhere to color, window location, scale and other parameters.
Where and on what topics can you make a fake car:
- To work with traffic rules.
- For professions, telling what kind of car a doctor, police or military drives.
- For a free topic.
As you can see, there are quite a lot of submission formats. For additional ideas, you can take anything as a basis. Next, you just need to decide on the set of available parts and make a car out of Lego.
Machine types:
- Ambulance.
- Fire engine.
- Racing car.
- Patrol services.
- Fantastic car.
- A survival machine.
What interesting cars can be used as a basis?
- Lightning McVin from the cartoon "Cars" and any other characters in the series.
- Jeep car from Jurassic Park.
- Original existing machines.
Please note that your Lego fake may or may not contain wheels. It is not necessary that the car actually drives, although in this case the fake may turn into a favorite toy.
If you don’t know what to make wheels from or how to get out of a situation where you need a car on wheels, but you have an original control car or a small model, then take the idea into service.
Lego style decorations
From bright elements, needlewomen make original jewelry - beads, earrings, pendants. Small round multi-colored details are well woven with beads in brooches and even paintings.
Schemes of Lego crafts are presented below. To create jewelry you will need:
- dense thread or wire;
- accessories (clasps, locks);
- beads and seed beads (preferably in neutral colors).
You need to make neat holes in the Lego pieces and string them, alternating with beads. The simplest version of the necklace is ready.
Materials and tools
To make a nest box with your own hands, you will need the following set of tools and accessories:
This house is preferably made of aspen or linden. Other softwoods can be used with a minimal amount of resin.
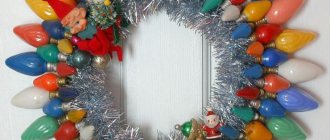
Christmas decorations
You can assemble many unique Christmas tree decorations from this construction set. Some Lego crafts in pictures are shown below. Santa Claus, Christmas trees, balls and hearts, animals and birds turn out to be somewhat abstract, but quite recognizable.
Note!
- Mushroom craft - reviews of ready-made DIY crafts + step-by-step instructions and diagrams for children (180 photos)
- Crafts from toilet rolls: step-by-step instructions for creating crafts. Master classes with simple work schemes (140 photos)
- Crafts from corrugated paper - step-by-step master classes on how to create crafts from corrugated paper with your own hands + photo diagrams
The big advantage of such toys is that they cannot be damaged. If a structure falls apart, then literally in a minute it is recreated or converted into a new one.
Zombie apocalypse machine
In modern cinema and game making, this topic is already quite widely known and does not scare anyone. There are plenty of good-natured and interesting games with the dead, but now we offer you ideas for a zombie car theme.
You can find and look at quite a lot of photographs on that topic, where you can find inspiration and an example of what you want to do. You should pay attention to the theme, since the car can be simply futuristic, or the car can be modern, but with the addition of certain functional details. Which ones?
The theme of survival will tell you that the car should be large, where things can fit, spacious, durable, and most importantly, contain additional wheels, tanks with gasoline, water, and so on.
In the version of the post-apocalypse car, you can focus on assembling a car from trash. Such a car can contain several parts in one, such as in the theme of the movie "Mad Max: Fury Road", or the car can be intimidating. She can be decorated with weapons and other details that will add to her formidable appearance.
As you can see, the topic of a Lego fake machine is quite wide-ranging and varied. Don’t limit yourself and your child in ideas, try and experiment, create not just a car, but a plane car (the movie “Taxi” immediately came to mind for oldfag fans).
Create and create in the way that suits you and your imagination, and most importantly, let your child tell you about your creation. Who knows, maybe an idea will be born from this hobby, and the future architect of a new Formula 1 car will stand in front of you.
Educational games
It has long been known that modern children learn fractions well using Lego cubes as an example. You just need to select a suitable part to represent the whole number, two smaller parts to demonstrate one second, one fourth.
It is convenient to teach children to put letters into syllables, and syllables into words. To do this, cubes of the same size but different colors are selected. You need to write letters on them with a marker - and the didactic material is ready. It is advisable to make several of the most popular letters.
We make a decorative tree from papier-mâché. Part 1
- paper (toilet paper and thicker paper - newspaper or for photocopying);
- PVA and wallpaper glue;
- sandpaper (coarse).
1. From plasticine we make a large cone of the size we need (but not too small, otherwise it will be difficult to paste over).
We make a long rope and cut pieces of different lengths for the branches.
We form branches and two roots.
We attach everything to the tree.
We smooth out the plasticine, correct everything and prepare the wood for gluing.
(Tip: it is better to place large branches and roots on the sides (on the same plane) so that it is easy to cut the tree in half, and all our branches and roots fall under the cut line).
2. In order to easily remove the paper form from the plasticine, I use toilet paper, carefully wrap our tree (the paper adheres well to the plasticine), and cover all the plasticine.
3. Now we proceed to the most dirty part of the work; we cover the wood with small pieces of glued paper. We dilute the mixture for gluing. I use wallpaper glue and add PVA glue for strength.
To make the tree strong, glue 4-5 layers of paper. It will be easier not to get confused in the layers if you glue layers of different colors. I took white paper and brown (wrapping paper), you can take newspaper (I will also glue the bottom of the tree).
Now we glue the white paper. I do not dry the product between sizing layers.
4. Place it in a dry, warm place and after a couple of days it will dry completely (don’t forget to turn it over so that the bottom also dries).
5. Remove from the mold only after complete drying. We use a stationery knife (observe safety precautions). We cut the mold in half so that the cutting line goes along all the large branches and roots (if some small parts do not come out, don’t be alarmed, just carefully pick it up with a toothpick or something thin and remove the plasticine).
6. Place both halves together, you can tie them with thread to make gluing easier. Glue with pieces of sized paper along the cut line.
7. Dry (you can use a radiator).
A well-dried form can be sanded for smoothness (but don’t be too zealous, otherwise you might make a hole).
Next, we turn on our imagination and paint it as we like (in gouache, acrylic or watercolor). I will share ideas for decorating and painting in the next part of the tutorial.
Thank you for your attention! Have a good mood and interesting creative ideas! Continued here>>
Source
Holders and stands
Lightweight and portable stands help you store neatly and never lose:
- mobile phone and charger;
- remote controls for air conditioning, TV, lamps;
- gaming joysticks;
- shaving accessories.
For office supplies on your desktop, you can assemble a cup with compartments for paper clips, buttons and other small items.
Main types of hives with drawings
You can make a hive of different shapes and sizes with your own hands. We will consider the most popular options among beekeepers separately.
Hive Dadan
Found in almost all apiaries. It is made of wood - cedar, spruce, pine, linden or aspen. As follows:
Its obvious advantages are simplicity, spaciousness and modularity. The classic model consists of 12 frames, but as the bee colony grows, it can be supplemented with new buildings or stores. Here is a drawing of a classic Dadan hive with 12 frames:
The roof can be made not flat, but 1- or 2-slope, so that raindrops roll off the roof surface better.
Alpine hive
According to the principle of construction, the structure resembles a hollow, since when developing it, beekeeper Roger Delon tried to recreate conditions for bees that were as close as possible to natural ones.
Externally, the Alpine hive is a multi-body vertical “pyramid”, since the nesting boxes in it are located one above the other. Because of this, the design is compact, but has a large height, and also includes the following features:
- there are no partitions, ventilation gaps or grilles in the buildings;
- a taphole is installed in the lower part of the house, through which natural air circulation is carried out and moisture accumulation is prevented, as well as condensation deposition;
- a feeder or ceiling is made in the upper part of the hive to create an air cushion;
- all cases, except the bottom one, do not have a bottom, so to install the frames, combs or slats are attached to the walls;
- each compartment of the general body contains from 3 to 8 frames, depending on the number of individuals in the bee colony.
There is no need to insulate the walls of the hive, since in winter it is simply covered with a plastic bag.
Langstroth-Ruth Hive
The vertical type structure is made in several floors of 10 frames and takes up a minimum of space. Experienced beekeepers create hives of this type up to 7-8 floors and with their help they collect more than 200 kg of honey in combs per season. Beginners can use a minimal version - with one body and a semi-magazine, since a large magazine attachment will significantly increase the overall volume of the structure and make it difficult to insulate the nest.
Here is a diagram of a multi-body hive:
If individual blocks of the structure are equipped with pins, a more reliable structure can be obtained.
Cassette hive
Unlike other models, in such a hive the nesting bodies are made in the form of drawers, which are installed in a common body with bars fixed on its sides - runners, on which the cassettes will run. The distance between the frames in the housing must be at least 10 mm in order, if necessary, to isolate part of the hive from the main space with horizontal bars or plywood partitions.
On each retractable body of such a hive, entrances are made, the central ones have a diameter of 25-30 mm, and the slot ones have a length of 200 mm and a height of 10 mm. If you plan to make a common door, then the holes for the entrances should be made in it, opposite the gaps between the cassettes. An arrival rail is attached under each entrance. The entire structure is protected by a pitched roof, under which there are ventilation holes.
A cassette multi-body hive with 10 frames can be assembled according to the following scheme, where 1 is a single body, 2 are cassettes, 3 are frames, 4 is a dividing panel, 5 is a layer of insulation, 6 are protective covers, 7 are sub-cassette sections:
A cassette hive requires more effort and materials to manufacture, but it is more convenient to transport than others, so it is the best option for outdoor apiaries.
Beehive lounger
Unlike the above models, this hive is horizontal and is perfect for housing several bee colonies. This design is a box divided by stationary partitions into several parts, each of which houses a separate family of bees with its own queen.
The hive can be additionally equipped with a magazine, installing it on top of the nesting compartments or between them. For each of the sections, a taphole is prepared in the lower part of the front wall. It is better to make the roof gable to protect the structure from precipitation and overheating in extreme heat.
The bed can also be made for one bee colony. Here is a drawing of such a primitive design:
Flash drive update
You can make a unique and inimitable flash drive from several construction bricks. To do this you need:
- disassemble the flash drive and remove it from the old case;
- cut a hole in the Lego piece for the connector;
- insert a flash drive into it and fill it with glue;
- close with the second piece.
The flash drive cover is glued using the same principle. On the main body (optional) you can add airplane wings, a house roof, and more.
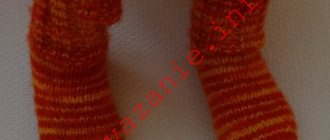
Huggy Waggy for the price of a towel
If the mini version of Huggy Waggy isn't enough for you, TikTok user @mad_max0907 showed how to make a full-size stuffed monster using craft supplies and minimal sewing skills. You will need:
- blue towel;
- pattern paper;
- foam rubber from an old pillow;
- any yellow fabric.
First you need to make a pattern out of paper, not forgetting to retreat one or one and a half centimeters from the outline to the seam. Next, using the template, you need to cut out two parts of the future Huggy Waggy from the towel and sew them by hand or using a sewing machine with the front side facing inward, leaving a small hole. The monster's paws will be made and sewn on separately.
Huggy Waggy pattern and towel blanks
Then carefully turn the product inside out and stuff it with foam rubber from an old pillow. You can also use padding polyester or cotton wool instead. When your Huggy Waggy has gained enough “mass”, sew up the hole.
Foam rubber for stuffing Huggy Waggy
We make Huggy Waggy paws using the same principle. We draw a pattern, cut out blanks from yellow fabric - the author of the video used an unnecessary T-shirt of a suitable color. Then we fill it with foam rubber and sew the toys to the body.
Huggy Waggy's Future Paw
To make Huggy Waggy's eyes and mouth, @mad_max0907 used salt dough made from flour, salt and water, and cut the teeth from a plastic cup. However, the author of Medialeaks suggests an easier way - cut it out of fabric in white, red and black and sew it to the front of the monster's head.
Ready Huggy Waggy
Although the finished toy will be different from Huggy Waggy from the store, it will be homemade cute and will save money.
Watch
Having a working clock mechanism, you can decorate it with Lego. A dial with a hole in the middle is assembled from flat parts, and the mechanism is glued into it. The numbers on the dial are also laid out from the designer.
The hands are decorated only if this does not make the mechanism too heavy and the watch will function accurately.
Special sets
The Lego company produces construction sets within various series (Duplo, City, etc.). From the parts of these Lego constructors you can make a military vehicle, for example, and many other models.
Also, highly specialized “Machine” construction kits are on sale. Such special kits include a wide variety of elements and parts, including special-purpose parts: doors, wheels, luggage compartments, headlights, etc.
Such sets sometimes include special parts that can help assemble an inertial car that moves independently with a slight acceleration, and large Lego parts from which you can make a large car.
Photos of Lego crafts
How should a squirrel house be installed?
It is not enough for the squirrel to be comfortable; it still needs to be installed correctly. The squirrel house is fixed directly to the tree trunk, and is not hidden in the branches. Animals must feel safe, so their housing should be raised to at least a five-meter height. The opening of the manhole should face either south or east, the main thing is that this side is not windward during the main period of the year.
Make sure the house is at a sufficient height
So that squirrels can improve their abode and insulate it, it is recommended to put a little tow or pieces of moss at the bottom of the squirrel nest. This is an excellent raw material for caulking cracks that can form in the walls of a house over time. For complete living comfort, you should also hang a squirrel feeder next to the squirrel farm. This will help the animals settle into their new home as quickly as possible.
A feeder next to the house will attract squirrels
Making a nest - a birdhouse from a log
If the feathered people have a choice - to live in a nest box or a birdhouse made of boards - they will choose a nest box. It is more similar to the usual “housing” - a hollow, there are no cracks on the sides and, therefore, it is warmer. They are less noticeable on the tree, which means there is a greater chance of raising offspring. These are advantages from the birds' point of view. Now about the advantages from the point of view of the “manufacturers”: a fallen tree is used for work, and it is free. If you find a suitable one, it will be enough for a large number of birdhouses. About the disadvantages - making nest boxes takes longer and is more difficult: you have to manually pick out the core, leaving the walls intact.
From the nest to flight
Now about how to find a suitable tree. Aspen is best suited: it usually rots from the inside, but remains hard along the outer edge. Therefore, we go in search of an aspen forest, and there, among the fallen trees, we look for something suitable: we cut several trunks. It is important to find one with a whole edge and a rotten middle - the work will go faster.
It is advisable to find such aspen - with a rotten core, but strong edges
Often such trees have rotten bark, which makes them look unsightly. We peel off the bark and drag the log to the dacha or house. There we cut it into logs of suitable size. Dimensions are determined by diameter. For a birdhouse, the inner diameter of the nest should be 22-30 cm, respectively, the outer diameter - 27-36 cm. For the titmouse, the sections closer to the top are suitable - the inner diameter is 15-22 cm, the outer diameter is 19-26 cm.
The height of the log also depends on the type of house - a titmouse is 20-40 cm high (but they are more willing to settle in low ones), a birdhouse - from 30 to 45 cm. When sawing, try to make the bevel that appears at the bottom level, and at the top - at a slight slope - so that sediment flowed from the roof. To make roofs and bottoms, you will need cutting boards; you can use unedged boards and slabs.
We take the cut log and begin to pick out the core with a chisel. The task is to dig a through hole. After this, even hard wood is easier to chop. To make the process go faster, you can drill holes with a drill, then break out the jumpers with a chisel.
The task is to dig a through hole
As a rule, the rotten core runs out quickly, then you have to chop off pieces of wood using a chisel and a hammer or mallet. But with a hole in the center it is much easier - the longitudinal pieces are chipped off, the work proceeds at normal speed.
We work with a chisel and hammer
The walls should remain about 1.5-3 cm. We try to work on the middle more or less smoothly, without large chips. When the walls are selected, we make a taphole. If there is a knot, you can hollow it out. Or take a crust and a drill, drill in a suitable place. If there is no crown, take a regular drill, drill holes in a circle, then, using the same chisel, cut through the remaining jumpers.
DIY birdhouse made from logs is almost ready
A piece of board 2-2.5 cm thick goes to the bottom. It is nailed or screwed onto self-tapping screws. The protruding parts are cut off as close to the walls as possible.
Attaching the bottom
All that remains is to nail the roof. The same board or slab will do. Before screwing in the screw, drill holes, otherwise the board may split.
Attaching the roof
Actually, you have already made a birdhouse with your own hands, all that remains is to secure it from attacks by woodpeckers. If there are knots on the walls, it is advisable to coat them with plasticine (regular, children's). They can also be used to seal the gaps that remain between the bottom and the roof and walls: it is rarely possible to fit everything neatly. If you don’t want to cover it with plasticine, you can caulk it with hemp rope. It is applied to the crack and driven into it with a flat screwdriver (actually there are special blades for caulking, but they are large - this is the time, and for “one-time use” you should buy them...). If it doesn't go well, you can hit the handle with a hammer.
Caulking the “seams” with hemp rope
How to set up an enclosure for squirrels
“The corner opposite the window should be allocated for the future house for squirrels”
For those who are not satisfied with just watching the squirrels frolicking in the garden, you can place them right in your home. The animals are unpretentious, but they cannot be kept in close quarters. They just need to move a lot, and such space can only be provided by equipping a good enclosure for squirrels. It is assembled by analogy with the bird one, only it has slightly different specific equipment.
Aviary for squirrels in the garden
A corner opposite the window should be allocated for the future house for squirrels. The size of the area is determined by the number of animals that are planned to be housed there. Let's consider building an enclosure for squirrels with your own hands for 3-4 residents. Let's agree right away. Animals need height, so it is better not to implement such ideas in a small apartment and houses with low ceilings. The ceiling height should be from 3 m.
The height of the enclosure should be no more than 3 meters
Assemble the frame by fencing off at least 3 m2 of floor. The supports can be strong boards or thick timber. You can, of course, assemble a completely metal structure, but it will be more difficult to fit into your home interior. In addition, the naturalness of the boards and beams will help ensure identical natural living conditions.
Cage for keeping squirrels at home
The supporting columns are firmly fixed to the floor and ceiling. In the case where the squirrel enclosure is assembled outdoors, the supporting elements are dug into the ground. The outdoor version will require a roof. You can neglect this and simply cover the top with mesh, but then the houses and squirrel feeders will remain without additional protection and may require repair or replacement much faster.
The walls of the enclosure will also be mesh. This is practical, reliable and will allow you to easily observe the behavior of the enclosure population. The mesh is fixed with self-tapping screws. It is important to ensure that the screws do not go right through the boards. Animals may be injured by their sharp ends. If this happens, bite off the excess or bend it by hammering it deep into the support.
Be sure to install a small door, because somehow you need to enter the squirrel territory to clean the enclosure and squirrel feeders. In the case of street settlements, a simple door is not enough. A whole vestibule will be needed here. This will allow you to enter without fear that untamed squirrels will break free. In a few months, everything will change. Squirrels are very attached to feeders and their habitat. They can even be let out for a walk without fear that they will run into the forest.
Squirrel enclosure diagram
Safety
It's a shame and a pity when birds' nests are destroyed. This is mainly done by cats, and also by woodpeckers. Therefore, when you make a birdhouse with your own hands, increase the roof overhang. In almost all drawings it is drawn 5 cm long. In order to protect the birdhouse from the cat, it is necessary to make sure that he cannot reach the entrance. To do this, the roof must protrude by at least 7 cm, and it is better to add a couple more - for large specimens. This ledge will also protect from slanting rain: the likelihood that the chicks will get wet becomes even less.
Another option is to put nails on the lid. The cat is unlikely to get hurt, but he won’t be able to sit comfortably - the nails won’t let him.
Make the roof overhang larger so that the cat cannot reach the chicks with his paw.
There are several ways to protect chicks from woodpeckers:
- beat the taphole with tin:
- drive several nails around the tap hole;
- nail a piece of wood on the taphole area, the fibers of which run horizontally.
All this will prevent the woodpecker from expanding the entrance and getting to the eggs or chicks. The last trick - the cover - will also complicate the cat’s task: it is more difficult to reach the chick through a long entrance.
Measures against enemies: 1 - against woodpeckers, 2.3 - against cats
They still escape from cats and possible invaders with the help of protective belts. They are made either from tin strips or from “brooms”. You will understand everything by looking at the picture. Please note that the distances must be maintained within 3-4 cm. Then the animals will not be able to jump over the protective belts. There should be no twigs, feeders or other possible supports between them and the birdhouse.
Sizes of birdhouses for different types of birds
To attract different types of birds, the size of the house should vary. It is mainly the proportions of the “body” itself and the entrance that change. The goal is to create nesting conditions that are more familiar to this species.
| Bird species | Bottom dimensions | Birdhouse height | Taphole dimensions | Note |
| Starlings | 10*10 cm | 30-40 cm | about 5 cm | a taphole is preferable to a round shape |
| Titmouse - tits, flycatchers, redstarts, sparrows, pygmy owls | 10-12 cm | 25-30 cm | 30-35 mm | round entrance |
| Lesser titmouse or flycatcher (flycatchers, redstarts) | 10*8 cm | 25-30 cm | 30 mm | |
| Poluduplyanka | 10*8 cm | 20 cm | height 33-50 mm across the entire width of the wall | taphole - a longitudinal slot across the entire width of the front wall |
As you can see from the table, basically only the height changes. The width remains more or less stable. There is no point in making birdhouses anymore. They will stimulate the laying of more eggs, and the birds will not be able to fully feed a large number of chicks; as a result, the offspring will be weak and, most likely, die.
Which birds live in which birdhouses?
If you want to attract wagtails, make a birdhouse laid on its side: its height will be 10-12 cm and width - 35-40 cm, with the same small entrance located approximately in the middle. Wagtails have weak legs, and they cannot climb a high wall to the entrance. That is why there is such a choice of nesting sites. It is also advisable to make a ladder about 10 cm wide in front of the entrance so that they can enter on foot.
Birdhouse for wagtails
The semi-duplyanka requires some explanation. Some birds are accustomed to nesting not in hollows, but in recesses between branches. They rarely settle in completely closed artificial nesting areas. If you want to attract, for example, a gray flycatcher, make it a small box in which the entrance runs the entire width of the front wall.
Half nest for gray flycatcher
Just keep in mind that some types of squirrels also like to live in such houses.
There is another nesting site that birds often like better - a nesting box. This is a birdhouse made from a piece of log. Often dried wood is cut into logs of suitable size, turning it into apartments for birds. The height and diameter are selected based on the dimensions that were indicated for a regular birdhouse. The bottom and roof of the nest are made from a piece of board.
Duplyanka - birdhouse made of logs
If the birdhouse has a small entrance, the lid is removable. This is necessary so that the insides can be treated from parasites. Sometimes this happens: birds live for several years in a row, and then stop settling. The parasites just multiplied inside. Having removed the lid and thrown out the old nesting box, the birdhouse is scalded with boiling water. This is often enough. You can also treat the inside with a weak solution of potassium permanganate (slightly pinkish).