Birch bark and its features
It should be clarified what birch bark is. This has long been the name given to the upper, very elastic layer of birch bark. When wet, this layer of bark becomes flexible and suitable for weaving and bending.
Birch bark has a number of features.
- Thanks to its layered structure, it is able to retain heat.
- The material is flexible and lends itself well to manual processing.
- Birch bark is capable of allowing air to pass through.
- Thanks to the special chemical composition of the natural material, bacteria and microbes do not live in it. For this reason, dishes and various containers made of birch bark keep food fresh for quite a long time.
In Rus', a large number of different products were made from birch bark:
- baskets and tueski;
- boxes, chests and caskets;
- cradles and shoes;
- boat frames and women's jewelry.
Modern craftsmen create a variety of products from birch bark:
- souvenir decorations and picture frames;
- book bindings and boxes;
- original interior items and even flowers.
Of course, children will like birch bark crafts and even find them useful. Such creative activities contribute to the development of creative imagination, perseverance and fine motor skills, and introduce them to ancient folk crafts.
Why is birch bark so attractive?
- Flexible and easy to process.
- Able to retain heat and allow air to pass through.
- Products in birch bark dishes remain fresh for a long time.
- Products made from it are safe for allergy sufferers.
- Beautiful, strong and durable material that is not afraid of moisture.
Preparation of birch bark
Material for creative works is stocked in June. It is strictly not recommended to harm young and healthy trees. Trees cut down and blown down by the wind are suitable for harvesting.
- Work begins with a cut around the trunk about a centimeter deep. The top layer of bark is cut vertically, then an incision is made again at a distance of 40-80 cm.
- In order to separate the birch bark from the trunk, you need to pick up its edge. In this way, layers of birch bark are stored.
- In order to remove birch bark with strips, the cut is made in a spiral.
The stored material is cleaned, straightened and slightly moistened with water.
Storage is carried out in cardboard boxes, lined with birch bark with sheets of paper. Birch bark ribbons are rolled with the white side out.
Note!
DIY gifts for February 23rd - a large selection of ideas for creating unusual gifts for Defender of the Fatherland Day
- What to give a 2-year-old boy - a list of the best options for an interesting and useful gift (120 photo ideas)
- Papier-mâché - TOP 120 photo reviews of original products. Detailed instructions for beginners on creating beautiful crafts
Storage and preparation of birch bark
Simple tips will help you keep birch bark suitable for your product.
- the storage space must be dry and well ventilated;
- in the light, birch bark loses color and burns out, so choose a dark place for it;
- thin ribbons are rolled into a skein with the white side out;
- There should be a layer between the sheets, for example, cardboard, and they should be pressed on top with something heavy.
Processing birch bark for crafts begins with cleaning. Shake off dust from the yellow side and remove dirt from the other; you can use sandpaper for this.
Next stage: delamination. Birch bark is divided into layers of the required thickness. If the material is old or the bark is thick, it needs to be soaked in a saline solution for 2-3 days. After this, it is dried under a load.
Preparation of material
Before you start making crafts from birch bark, you need to prepare it.
- First of all, the material is cleaned of dust and growths, and the surface is cleaned with sandpaper.
- The wrong side is slightly moistened with a soft sponge or cloth.
- After this, the layers and ribbons are soaked in salt water for a period of 2 to 4 days, depending on the age of the tree.
- The soaked material is sorted into layers.
- The resulting pieces are ironed until they are completely dry and sorted based on their shape and appearance.
To create birch bark products with your own hands, you will need to prepare various tools:
- knife;
- clamps for fixation;
- square and ruler;
- pencil and awl;
- staples and templates.
Additionally, a tape cutter, hole punch, and chisel will be useful.
When working with birch bark, keep dry, clean rags and vegetable oil on hand.
Tools for making birch bark crafts
For fruitful and high-quality work with birch bark you will need:
- scissors;
- sharp knife;
- staples;
- office clips for fixation or clothespins;
- tweezers;
- pencil or pen;
- compass, ruler, square;
- templates;
- awl, pliers;
- hole punch, chisel;
- a board or any hard surface for working with sharp tools;
- vegetable oil and soft dry cloth.
Birch bark crafts
Original and simple products made from birch bark will serve not only as interior decoration, but also as a pleasant souvenir for loved ones.
Crafts made from birch bark for beginners are not difficult, so children can also be involved in creating them.
We learn birch bark weaving for beginners in a detailed master class
You will need:
- Knife - cutter
- Birch bark tape (20 pieces, 45 cm each)
- A flat awl with a hook-shaped blade - kocheldyk.
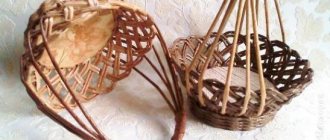
You don't need anything else. Start forming the frame of the future box; it will look like a small basket and have a handle.
Step-by-step instructions for making a box-basket:
- Weave a fabric, be sure to have a rectangular shape. As a rule, weaving must begin with 4 ribbons, passing their ends through each other.
- When you get the desired size, bend the birch bark strips upward.
- Form handles for the basket according to its size. Weave the handle on the fold.
- Continue weaving from birch bark, making a rectangular box that has a handle.
- You braid the handle with birch bark tape, which needs to be divided in half to make it thinner.
Your product is ready. We will be glad if you like our master class. Use birch bark crafts for joy, store pleasant and dear things in the basket.
Tourism is widespread nowadays and more and more foreign citizens want to visit the Russian Federation. Many of them are looking forward to bringing home numerous accessories and crafts for their loved ones and friends. One of these things may be a birch bark craft. When choosing a home accessory for a foreigner, recommend a birch bark basket, or bast shoes. This craft will not only be original, but also exotic for the guest. Anyone will be happy to learn that such a thing is not only beautiful, but also useful.
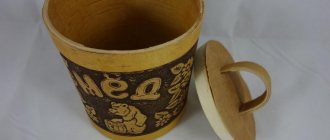
In ancient times it was not common to bake a lot of bread. It was highly valued and in short supply. For this reason, there were no problems with its safety. In the Middle Ages, only members of the royal nobility enjoyed fresh bread, and ordinary peasants received only stale crusts. People started thinking about storing bread after most people had a lot of bread. It was at this time that the need for storage arose. Then wicker baskets and small bags began to appear, which were kept suspended from the ceiling in barns. In Rus', small containers for storing bread began to be woven from birch bark. Later, wooden bread bins began to appear, which are the most popular and environmentally friendly. It was the birch bark bread bins that were a reliable storage for such a treasure.
Birch bark products
After trying your hand at simple crafts, if you wish, you can move on to more serious creative ideas.
Products made from birch bark are safe for health, practical and original looking. They will not only serve as interior decoration, but will also find their use for domestic purposes.
You just have to start
To model from birch bark you will need very little:
- PVA glue;
- punches of various shapes;
- wood burning device;
- markers;
- sharp knife.
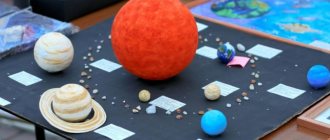
To begin with, you should try your hand at simple projects. For example, make a flower from birch bark. A bouquet of these flowers will be an excellent gift or decoration for any room. You can create a whole panel from flowers. Making this craft is quite suitable for children. Procedure:
- The birch bark plate is cleaned with fine sandpaper and soaked in salt brine. Then they are separated into two parts - yellow and white.
- A cardboard petal template is drawn 5-7 times on a yellow bark sheet.
- A 3x7 cm rectangle is cut out from the birch bark part. A fringe is cut along one edge, screwed onto a pencil, fixed with glue, and fluffed up. This is the middle of the flower.
- The petals are bent in an arc, face up. Then the narrow part is smeared with glue and glued to the middle. This is how the whole flower is assembled.
- You can use a skewer or twig as a stem, but thin wire wrapped in a spiral with thin birch bark ribbons is ideal. This allows you to give the flower any bend.
- Leaves are cut out from the remains of birch bark and glued to the stem. The flower is ready.
Children can be encouraged to do birch bark appliqué. Teenagers will appreciate the ability to burn pictures onto bark. Girls will love weaving weightless original bracelets. Tightly twisted thin strips of bark make excellent beads.
Body for berries
The product is not difficult to manufacture and will be useful in the household.
To work you need to prepare:
- birch bark leaf;
- birch bark tape;
- knife and scissors;
- awl or hole punch;
- clothespins or office clips;
- pencil.
Operating procedure.
- Cut a rectangular blank of the required size from a birch bark sheet and roll it into a cylinder.
- Fold the edges overlapping and secure with clothespins.
- Punch holes at equal distances from each other.
- Secure the seam with a birch bark ribbon (its length will be 2 times the height of the workpiece).
- At the bottom of the cylinder you need to cut the bark in 4 places and bend it inward.
- The edges of these folds are pierced and connected with ribbons.
- A couple of holes are punched in the upper part opposite each other and the tape is passed through them. This is the body handle.
If desired, it is easy to add a round lid to the box. It’s also easy to make a lid from birch bark by cutting out a round piece of the required diameter.
Pendant
To make it, you need to prepare flat sheets of birch bark and thin strips. After this you can start working:
- On a sheet of birch bark, draw the outline of the product, approximately 4x6 cm. It can be of any shape.
- Apply a drawing inside the product. It can be transferred to birch bark using a regular sewing wheel or carbon paper.
- Decorate the drawing with paint or apply a pattern using burning.
- Cut a pendant from birch bark
- Use an awl to make holes along the edge of the pendant at a distance of 5 mm from each other.
- Using the holes, wrap the pendant with strips of birch bark. Alternatively, you can use colored or silk threads.
- All that remains is to insert the pendant cord to attach it to the neck and the decoration is ready.
Advice. In the same way, you can make earrings from birch bark.
Casket
A homemade birch bark box is a pleasure to use for storing various small items and decorations. It's not very difficult to make it. It is important to first think through its appearance and design.
You can take this master class as a basis for your work.
- You need to make a template from paper. To do this, cut out 4 identical circles (their diameter is 6 cm) and a pair of strips 35 cm long. The width of the first strip will be 5 cm, and the second will be 2 cm.
- The contours of the blanks are transferred to birch bark and blanks are cut out of it to create a box.
- Round blanks are glued together in twos. This is the lid and bottom of the product.
- Wrap a wide strip of birch bark around the sleeve of masking tape.
- Glue the bottom to the sleeve.
- You can also place a birch bark bottom inside.
- The lid is decorated using a birch bark strip.
The external design of such a box depends only on the imagination of the master. It is easy to decorate the lid with birch bark flowers or carved elements.
Material procurement process
And so the tree has been selected, at the next stage it is necessary to correctly collect the material and deliver it to the place of work with it.
- Shallow cuts are made with a knife on the selected tree.
- The peeled part is carefully pryed off with any suitable tool, most often a spatula is used for this purpose.
- You should not expose a large area of bark on one tree, as this can lead to its illness or death.
- The resulting birch bark material is stacked face to face and back to back.
- It is bandaged and delivered to the place of further use.
- While the birch bark is pliable and not dry, it is split into strips or layers.
Harvesting can be done in several ways:
- Ribbons
- In layers
- Cylinders.
The easiest material to work with is tape; the tapes are intertwined in a certain sequence and create the desired product. This is exactly what a novice master should turn to.
There are two types of tape weaving:
- Straight
- Oblique.
Souvenir magnets
Original and easy-to-make crafts can decorate the interior, adding a touch of originality to it. With such a gift you can please your loved ones with or without a reason.
To work you need to prepare:
- cardboard and birch bark blanks;
- PVA glue;
- knife and scissors;
- pencil;
- awl or hole punch;
- small magnet;
- sharpener;
- birch twig;
- acrylic paint.
Operating procedure.
- Cut a small base from birch bark for crafts of any shape.
- Cut out a base-substrate from cardboard and glue it to the wrong side of the workpiece.
- Glue the prepared small magnet to the cardboard.
- Carefully sharpen a birch twig using a sharpener so that you get beautiful spiral shavings.
- The edges of the birch bark blank will be lightly painted with acrylic paint, emphasizing the texture of the material. This is easy to do with a foam sponge or brush.
- Glue improvised roses from shavings and glue them to birch bark.
By showing a creative approach, it is easy to make various souvenir magnets, complementing them with birch bark ribbons or jute cord.
Fantasy or pictures of birch bark will help you come up with scenes for such souvenirs.
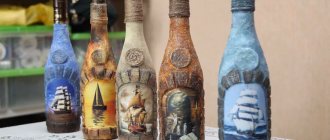
Solid fabric tunic
In a properly made container you can store milk for a long time. It also retains heat for a long time, since it is created on the principle of a thermos from an outer and inner cylinder. Between them there is a space filled with air, which is why the body is preserved.
- The outer and inner cylinders will have the same height, but the strip for the outer one is 1.5 cm longer;
- For the internal one, you will need a canvas, which is made by hollowing out a sawn section of the trunk, and for the external birch bark, removed from the outside;
- The inner cylinder must be absolutely sealed and seamless. It is made from a sawn trunk;
- The outer one of the strip is closed in a special way. At one end, a spike and an oval hole are made alternately, and this must be repeated 2 times.
- The same thing is done at the other end, but you need to make a hole first. So, when closed, the spikes and holes on opposite sides will be opposite each other;
- The inner cylinder is inserted into the outer one. The external one can be decorated using birch bark appliqué, burning, squeezing out various patterns;
- The bottom and lid can be cut out of a pine board. They will be slightly smaller in diameter than the cylinders so that they can be inserted, but the bottom should fit very tightly and the lid a little looser.
For convenience, you can make a handle on top of the lid from a strip of the same birch bark rolled into a tight roll and glue it.
Tuesok is ready.
Children's boat
From birch bark you can make an excellent ship that is not afraid of water and can go on a real voyage.
To work you need to prepare:
- birch bark sheets of the required size;
- ship parts templates;
- awl or hole punch;
- pencil, scissors, glue;
- ruler;
- a small sheet of plywood and wooden sticks.
Operating procedure.
- Using a template, cut out two parts of the ship's hull from birch bark.
- Make matching holes on both halves.
- Connect the body parts using birch bark strips.
- Insert spacers made of wooden sticks inside the body, securing them in special holes.
- Turning the workpiece over, glue the bottom of the ship.
- Complete the craft with a deck on which it is easy to attach the mast.
- Mark sails made of thin birch bark on the mast.
- The product can be placed on a plywood stand. It’s easy to add stones and shells to the pedestal.
- Add a cardboard anchor to the sailing ship.
Using a similar technology, it is not difficult to make a play dollhouse or an entire settlement of gnomes from birch bark blanks.
LiveInternetLiveInternet
Here are the earrings, fresh from the hands of the master, like hot cakes. The photo is not very good.
https://stranamasterov.ru/node/262583?tid=1626 At one time, and it was a long time ago, at the time of the formation of our craft, when we were still gaining experience and making a lot of mistakes, I broke the part of my body that is eaten , working on how to make chains out of this not particularly obedient material like birch bark. These were sleepless nights, when there was constant work going on in my head, when a picture was finally put together from many puzzles. And everything was invented. If you come across similar birch bark chains anywhere, know that their creation and manufacturing technology were born in the pumpkin-attic unit of your humble servant. All pictures are taken from the video course, randomly, so, forgive me, maybe they do not fully reveal all the nuances of this action. The material is very large and only the main points are given in this MK. There will be a second part, so don't relax. So, let's start with God's help... And the end result will look something like this... After the second part, of course.
1. Take a layer of birch bark, having first checked it for layering. Let's pull some birch bark somewhere from the edge (it's a pity this cannot be conveyed in a static photograph, only a video) and see how many layers it is divided into. The bigger, the better. Then we cut the birch bark into strips 5 to 10 centimeters wide. It all depends on the area of your palms, that is, what size birch bark you can roll between your palms.
2. Now we apply a ruler to the birch bark and measure 6 centimeters along the length of the strip. Why exactly six, you ask. I answer: “This has happened historically as a result of repeated trial and error.” WHAT I came to is six centimeters. If you want, experiment. Although the bicycle was invented a long time ago.
3. You could skip it, but if you’re going to chew it, do it to the end. We cut the birch bark into leaves.
4. We clean the birch bark from excess rubbish, that is, from the upper white-dirty layer. Try to remove only a thin film (unsuccessful). Then layer.
5. Now everyone is tense and focused, a very important moment, what you sow is what you later reap. Layer the birch bark into thin leaves. Naturally, we won’t measure with a micrometer. The eye is the main measuring tool, as my friend said, “of a professional.” The thickness of the leaves is approximately the thickness of paper for printing on a printer. This is the indicator and guideline. For this operation we need a sharp nail of the thumb of the right hand (it’s more difficult for left-handed people). So with this very tool we pry off this most optimal size. Don’t cry, a lot of birch bark will sink into oblivion without a trace until you learn, but as they say: “To layer correctly, you need to make an effort” (impromptu)
Oh, happiness, everything worked out.
6. But this is not the most interesting thing. Heat the water in a container until it boils (be careful, take care of your delicate hands). And one by one we throw our layered birch bark into this boiling water. It's better to use tweezers. However, who cares. I’m already just diving into boiling water with my fingers, and nothing. And this birch bark should curl up in boiling water, which is what we actually wanted from it.
7. Now take a rod with a diameter of 3 mm made of stainless steel. Don’t be alarmed, this is just a stainless steel “troika” electrode. Tease your peasants, they know that, and let them get this whole outlandish “tool” out of the ground for you. I foresee the question, why stainless steel? I answer. Because when a simple iron rod interacts with water, instant corrosion begins, invisible to the eye, but due to these circumstances, birch bark turns out to be dirty. That is, the compounds formed during the corrosion process react with birch bark, leading it to an inappropriate state for the given case. Although one of the principles of tinting it, invented by me, is based on this property of birch bark. But more about this later and in due time.
8. Roll the resulting birch bark tube between your palms, compacting it. (how inconvenient is the short rod, you need to change it to a long one)
9. Now removes the tube from the rod, holding it between the second and third phalanges of the fingers of the right hand (it’s more difficult for left-handed people), so that the tube does not wrinkle. Notice that I have a ring at the end of the rod. This is for unscrewing the rod from the tube, helping to remove it. That is, we hold the tube with our hand and unscrew the rod. The rod must be wet when twisting the tube, otherwise you will be tortured to remove it later. We hold our hand like this...
Or this way... Whichever is more convenient for you.
10. Well, this is in the case when the tube itself has compacted well in boiling water, and if not, we will use reinforced threads (so as not to tear) in order to fix the tube in the proper position for subsequent drying.
11. So we recorded...
12. And so you and I got these birch bark tubes.
13. Dry them in a warm place for 3-4 days. On a heating battery, for example. Or on a boiler, like me. Then we test for readiness. Squeeze it in your fingers. Oh, strong... It means ready. And (annoyingly), it’s crumpled... Give it another day, my dear. And we begin cutting into rings. The blade is optimal “Sputnik” in terms of quality and price (not advertising). Be careful, you might cut yourself. The width, or as you prefer, the thickness of the ring is 1.5-2 mm. We take a backing, mine is made from glued birch bark, and we cut on it, first by weight, so that the blade becomes less dull. And then on the plane. We cut with the heel. Movement from yourself. The heel became dull, we turned the blade over and cut again. There are four heels on the blade, this is for your general development. Again, savings. When cutting, the tube should be oriented like this; the outer end is directed away from you so that it does not ride up when cutting. (It’s difficult, however, to explain in words. Eh, where’s my video...)
14. Here's a little bigger one. And the heel is exactly the place near the blade that is on the tube in this photo.
15. Now we begin to screw one link into another. We lift the tip, pass the second link under it and begin to wind the first onto the second, until complete reunification and mutual understanding. (for the hundredth time I regretted that there was no video...)
16. These links are the basis for all subsequent connections. but more on that later. This is the chain that resulted from some simple manipulations.
In conclusion, I would like to add that you can calculate the length of the future chain by multiplying the length of your tubes by one and a half. All the best to you. Good luck.
As for labor intensity, this is a relative concept. For example, my Natasha, when we just started, could gain no more than 10 centimeters in an hour, but now it’s all 70. All labor intensity is minimized by experience. I can add that at first, I tried to use scissors and all sorts of fancy knives to solve these problems. No matter how sharp they are, they still crumple the pipe. So, through trial and error, I came to the conclusion that there is no better blade in this matter.
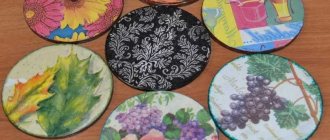
Birch bark decoration with natural stone “Wheel of Fortune”
https://stranamasterov.ru/node/250726
Birch bark craft ideas
Birch bark serves as a malleable material for making a wide variety of items.
- It’s easy to weave original jewelry from birch bark ribbons: belts, bracelets, headbands, or decorate hairpins and handbags with wicker parts.
- You can develop a lot of ideas for creating boxes, boxes and cases by looking at a photo of birch bark.
- Thin birch bark is used to make original flower bouquets and wall panels, colorful home souvenirs and symbolic amulets.
Products made from birch bark will decorate your home, delight your loved ones and be useful in everyday life.