Design features of a homemade blade
Many owners of agricultural machinery purchase a blade for a walk-behind tractor in specialized stores, spending a considerable amount of money on the equipment. However, this kind of attachment has the simplest possible design, which makes it easy to assemble it with your own hands, practically from improvised means. To do this, you do not need to have specialized equipment or expensive materials at your disposal - the snow removal attachment for the walk-behind tractor will be quite inexpensive, but at the same time, maximally effective.
The first thing you need to do before manufacturing equipment is to understand its design features. Any snow thrower for a walk-behind tractor consists of a fairly durable working element, a fastening unit, a mechanism for adjusting the direction in which snow masses are thrown, as well as a power unit that holds the shovel on the chassis of the walk-behind tractor used.
When creating a snow plow for a walk-behind tractor, it is best to focus on any of the store models. It is not at all necessary that a homemade snow blower has those additional options that are included in the design of the factory unit. To begin with, it is enough that the manufactured shovel for the walk-behind tractor successfully copes with its direct task - removing snow. Later, during operation, the homemade device can be equipped with useful additional functions.
Both factory and homemade shovels can have 3 positions:
- front;
- to the left, while the slope angle is 30 ⁰;
- to the right, while the slope angle is 30 ⁰.
Immediately before work, the homemade mounted snow blower used for a walk-behind tractor must be turned left or right, maintaining a slope angle of 30⁰. After this, the device is fixed in a suitable position using steel cotter pins.
When using a homemade shovel, its dimensions play a big role. The most productive, and therefore the most effective in small and medium-sized areas, will be a nozzle for removing snow, 1 m wide and 30–40 cm high. But in order for a device with such dimensions not to break under the weight of wet snow, the thickness of the metal must be at least 5 mm. If a nozzle with smaller dimensions is created, the material, accordingly, can be thinner.
Popular models of snow blowers
Among the huge range of products offered by manufacturers, the most popular is the following equipment:
Megaladon-0.6 rotary equipment for the Salyut walk-behind tractor for snow removal
The rotary snow removal attachment for the Salut model Megaladon walk-behind tractor is used as an attachment for clearing small areas. Installed on the walk-behind tractor from the front using a special fastening device included in the kit.
Principle of operation:
- The main working element is a screw with teeth.
- Rotating, the shaft transfers the snow mass to the center, which then falls into the crater.
- The direction of snow ejection is selected by the operator by rotating the device screen.
- The distance over which the snow will be thrown directly depends on the engine power, as well as on the angle of inclination of the snow exit device.
- The height of snow capture is regulated by special snow blower skids located at the bottom of the device.
Megaladon -0.6 to the Salyut walk-behind tractor
Model features:
- The snow blower is attached to the front of the walk-behind tractor, which eliminates the need to turn the steering wheel and work in reverse gear.
- The ability to continue the operation of the snow blower after stopping the walk-behind tractor due to the transmission of torque from the engine.
- The screw is made using the latest laser equipment from high-quality material.
- Meets all required safety regulations.
- The snow blower chain is located in a special protective cover and is separated from the direct work area.
- The high-precision design of snow ejection ensures that all selected parameters are met.
- Lightweight design of the snow removal attachment.
Technical specifications:
| Characteristic | Meaning |
| Snow fence width | 60 cm |
| Height | 25 cm |
| Snow jet throw range | 7 m |
| Movement speed range | From 2 km per hour to 4 |
| snow blower | Single stage |
| Weight | 42 kg |
| Price | RUB 15,150 |
Snow plow Texas 92000160100 for the “Texas” walk-behind tractor
A specialized snow plow is installed on the Texas walk-behind tractor (as well as on the Husqvarna walk-behind tractor) from the front. The cutter is replaced with wheels. Used for clearing loose snow on narrow paths and small areas around the house. The kit includes a mount along with the blade.
Texas 92000160100
The width of the snow cover is 75 cm. The country of origin of the attachment is Denmark. The average retail price on the market for attachments for garden equipment is 6,436 rubles.
Attachments for Texas walk-behind tractors are selected individually for a specific model, since each auxiliary device is manufactured for a specific machine, taking into account its design features and capabilities.
Sm-0.6 snow thrower for walk-behind tractor "Cascade"
The snow removal attachment for the Cascade walk-behind tractor, model CM 0.6, captures and throws snow using rotating augers driven by the walk-behind tractor engine.
Technical specifications:
| Characteristic | Meaning |
| Snow fence width | 65 cm |
| Height | From 15 to 20 cm |
| Snow jet throw range | From 3 to 5 m |
| Movement speed range | From 2 km per hour to 4 |
| snow blower | Single stage |
| Weight | 50 kg |
| Manufacturer | Russia |
| Price | 14,500 rub. |
| Guarantee period | 1 year |
Snow removal attachment for the Mole walk-behind tractor
Technical parameters of the snow blower for the Mole walk-behind tractor:
| Characteristic | Meaning |
| Snow fence width | 66 cm |
| Height | From 15 to 20 cm |
| Snow jet throw range | From 3 m to 5 m |
| Movement speed range | From 2 km per hour to 4 |
| snow blower | Single stage |
| Weight | 42 kg |
| Manufacturer | Russia |
| Price | RUB 18,900 |
Sp-56 attachment - snow blower for the Tselina walk-behind tractor
The principle of operation of the Sp-56 on the Tselina walk-behind tractor is to break ice and compressed wet snow with the augers of a snow blower and move the resulting snow mass to the ejection impeller.
Snow is thrown through the gutter visor at a distance of 12 m, and the direction of the throw is regulated by a special lever at an angle of 190 degrees.
SP 56 on Tselina walk-behind tractor
Technical specifications:
| Characteristic | Meaning |
| Snow fence width | 56 cm |
| Height | 51 cm |
| Snow jet throw range | Up to 15 m |
| Height of snow waste column | 5 m |
| Visor rotation angle | 190 deg. |
| Dimensions | 67*56*100 cm |
| Movement speed range | From 2 km per hour to 4 |
| snow blower | Dual-circuit |
| Weight | 48.3 kg |
| Manufacturer | Russia |
| Price | RUB 19,372 |
| Guarantee | 1 year |
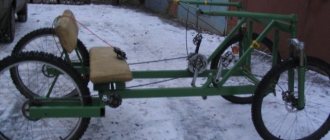
Homemade dumps
Nowadays, many people prefer to live in their own homes, and accordingly the surrounding area occupies a large area. To work on a personal plot, motor cultivators, walk-behind tractors and mini-tractors are purchased.
In winter, snow removal turns into a competition to see who can beat whom. And owners who have motorized equipment prefer to remove snow with its help. Attachments for a walk-behind tractor are not cheap , so craftsmen prefer to make them themselves.
The domestically produced walk-behind tractor "Neva" is widely used. It has standard places for hanging devices and rubber wheels that are suitable for driving on loose snow. Most of the homemade dumps were made for the Neva.
On the Internet you can find many descriptions and drawings of a shovel for a walk-behind tractor with your own hands. But before manufacturing, you should familiarize yourself with the characteristics of the dumps. Product composition:
- executive (working) body;
- rotation mechanism;
- mounting bracket.
Rotation angles:
- to the right by 30°;
- left 30°;
- directly.
Turning the shovel to the side allows you to remove the snow mass while moving. By going to websites for amateur craftsmen, you can find a lot of information on how to make a blade for a walk-behind tractor with your own hands.
Blade from a cylinder
One of the available materials for making a dump is a gas cylinder. Its height is just over a meter, and the recommended shovel width is 1000 mm. Manufacturing work proceeds in the following sequence:
- Release excess pressure from the cylinder, if any.
- Trim both sides of the lid so that the width is equal to a meter.
- Cut the resulting pipe lengthwise into two halves
- Using a welding machine, connect these two halves so that the height of the blade is about 700 mm.
- The mounting bracket is made as follows. Cut a scarf from thick metal. Drill several holes in it to rotate the shovel in different directions. Weld a piece of pipe to the gusset.
- Weld the resulting device to the shovel at the height of the bracket on the walk-behind tractor.
- Installation is done using a thick finger.
The thickness of the cylinder is sufficient and no reinforcement is required. But the lower part can be equipped with dense rubber, which will remove loose snow and not spoil the compacted road. To do this, you need to take hard rubber from a rotary conveyor.
The width of the rubber sheet is 100−150 mm. Use an electric drill to drill holes in the blade to secure the rubber. To securely fasten the canvas you need a metal strip 900x100x3 mm. Drill holes in the strip and in the canvas, first marking them along the blade. Secure with bolts.
Sheet steel blade
Some craftsmen prefer to use new material rather than used elements. This way you can make a homemade dump shovel from a steel sheet 3 mm thick. To strengthen the structure, take strip steel with a thickness of at least 5 mm.
The material is cut according to the drawings. The blade of the shovel itself has four parts: frontal, lower and two side. The welded structure needs reinforcement. To do this, elements cut from the five are welded in the vertical direction.
Next, the rotating mechanism is manufactured. It is an ear with a hole for an axis. The ear is welded to a corner that is attached to the blade. The axis is fixed at one end of the pipe, and the other end is fixed to the walk-behind tractor. The required angle of rotation is fixed with a finger (dowel).
3 mm - the thickness is small, so reinforcement is required. Cut a strip of 850x100x3 from a 3 mm sheet. You can secure it with a bolted connection, but you will have to first drill or weld the strip.
As you can see, to carry out the work you will need:
- working material;
- grinder with discs;
- electric drill with drills;
- bolts with nuts;
- welding machine with electrodes;
- spanners;
- round or profile pipe.
If you have certain skills, the job is not difficult. And the resulting structure can be used not only in winter, but also in summer. Level the site after construction work, level out a place for a children's sandbox and much more. Which design to choose is up to you.
Do-it-yourself blade (shovel) for a mini tractor - stages of modernization
People who live in rural areas for a long time and have a fairly large plot of land are increasingly purchasing mini-tractors, which make it much easier to carry out various household chores. In addition to the mini tractor, equipment for it is also purchased. One of such equipment is a shovel for a mini tractor. With its help, you can move various bulk loads without much effort; in winter, it is perfect for clearing snow. The snow dump consists of only three parts: a shovel, a grader fixation unit and a device for setting the angle of rotation.
Types of dumps
According to the method of fastening and placement, several types of equipment are distinguished:
- The front blade has a hydraulic cylinder, thanks to which the equipment is brought into working condition.
- The rear blade is located behind the mini-tractor and is activated using the unit’s hitch;
Mini tractors with a front blade can most often be found on construction sites or during road work. Dumps may differ from each other, but there are ways in which they are similar:
- the width of the shovel ranges from 120 to 200 cm;
- The tractor power must be at least 16 hp. – for light equipment, and 20 hp. – for heavier ones;
- The weight of the device ranges from 65 to 105 kg.
Mounting it on a mini tractor with a blade located in the front makes it possible to use the equipment as a small bulldozer. With its help, you can level paths on the site or remove snow.
Front-wheel drive attachments add mass to the unit, which increases traction. But with such equipment, a problem arises: how to lift it into position for transportation.
You can immediately buy a ready-made blade for a mini tractor or make it yourself, as many owners of such equipment are doing now. A homemade blade can save you a little money, and you can create the kind of blade that you need yourself.
Tools for creating equipment
To recreate the dump, in addition to all the drawings, you will also need the following materials and tools:
- grinder and drill;
- pliers;
v sets of screwdrivers and wrenches;
- welding machine;
- bolts, screws, nuts and rivets;
- steel pipes, an old barrel or an old boiler;
- strips of rubber and steel.
Modernization stages
When wondering how to make a shovel yourself, first of all you need to understand that making a homemade reliable blade for a mini-tractor is not so difficult, but in order to do everything right, you need to take your time and do everything correctly. First you need drawings; finding them on the Internet will not be difficult. Such drawings should show absolutely all the components that will be needed for the mini-tractor. After this, you need to collect all the necessary materials and parts.
A shovel for a mini tractor is made from a steel pipe with a diameter of at least 70 cm and a wall thickness of at least 8 mm. You can also create a shovel from an old barrel, if it is suitable in size. The pipe must be cut longitudinally, approximately ¾ of the entire circumference. This is necessary so that the shovel has the correct bend. The width of the shovel is selected depending on the size and power of the mini-tractor itself. On average, a shovel on a mini-tractor protrudes no more than 40 cm on each side.
To do this, you need to strengthen the device with additional longitudinal stops. An excellent material for this would be a square pipe with a cross section of 40x40 mm. The bottom of the shovel needs to be reinforced with a special knife. A steel strip 5 millimeters wide is perfect for this.
Advice from professionals
When assembling a blade blade for a walk-behind tractor with your own hands, experts advise using sheet steel 3 mm thick. Thin sheet metal will bend under load. Thick metal will increase the weight of the hitch, which will create additional load on the walk-behind tractor engine.
Rubber for the knife is a must. It is attached so that the edges touch the edge of the metal bus. With this arrangement, the rubber wears off less and prevents the steel blade from destroying the hard paving surface.
When clearing snow drifts, anti-slip chains or lugs are placed on the wheels of the walk-behind tractor.
A walk-behind tractor with a mounted blade is optimal for removing snow drifts more than 50 mm thick. If there is not enough snow, instead of a shovel it is better to use another attachment - a brush. To prevent the wheels from slipping, wear anti-slip chains. When cleaning an area without a hard surface, instead of transport wheels, you can install metal devices - lugs.
During cleaning, do not allow the walk-behind tractor engine to overheat. Periodically it is given time to cool down. If the snow is wet, the shovel quickly sticks. It needs to be cleaned more often. In case of damage to the blade or towbar, work continues after the defect has been eliminated. Otherwise, when some parts are bent, the entire attachment will become distorted, which will lead to serious damage.
Trailers for MTZ
Since the characteristics of the MTZ walk-behind tractor allow you to transfer up to 300-500 kg of cargo, it is simply impossible not to use this opportunity. It is very convenient to transfer not only the harvested crop, but also various materials, tools and other cargo.
Relatives from the manufacturer
For walk-behind tractors, Belarus Smorgon Mechanical Plant presents its branded trailer PM-00.000. Externally, the cart is a classic version, which uses a hitch as an attachment to the walk-behind tractor. The advantage of the model is that there is a seat made in the form of a tank into which you can put the tool. The seat is very comfortable and it is easy to reach the steering wheel of the walk-behind tractor.
The PM trailer can transport up to 300 kg, despite the fact that its weight is 200 kg. Stability is achieved through the installation of pneumatic wheels with a ground clearance of 27 m. Durable steel was used in the manufacture of the body. The body volume is 0.705 cubic meters. The disadvantages include the design features, which do not provide for a tipper unloading option, since the body is welded to the frame.
Third-party analogues for MTZ
An analogue is the improved MP-480 model, which has a number of advantages: the ability to transport cargo weighing up to 500 kg and a folding body type. The reinforced design prevents the trailer from tipping over during cargo transportation. The cart comes with additional shields that can be used to increase the height of the side using special fastenings. The seat is made in the form of a convenient box in which you can store the necessary tools.
From different manufacturers you can find a large number of trailers, not only of different shapes, but also of carrying capacity. Belarusmash presents models TM-360 and 350, Akimov Metallurgical Plant - TM 500-700. The design principle is the same, but there are differences in some nuances, for example, the presence of wings above the wheels or the ability to fold down the side of the body.
Homemade version for MTZ
Just like many other equipment, you can make a cart with your own hands. Moreover, the homemade version will in no way be inferior to the branded one.
It is only important to carefully study the diagram presented below
Trailer manufacturing technique:
- Make a frame from a square pipe.
- The best option is a dump body with folding sides, so we will do that. Weld the body from sheets of iron or aluminum, depending on what is at hand.
- Attach the frame to the body, providing for the possibility of tilting the body independently.
- Install the seat at the front of the body. It is necessary for comfortable movement on a walk-behind tractor. It is necessary to calculate the distance from the steering wheel to the seat so that it is convenient to control.
Video review
The video review demonstrates how to assemble a trailer for Belarus yourself
Review of the dump trailer for the MTZ walk-behind tractor
Reviews from owners confirm that using a walk-behind tractor for transporting goods is quite realistic and very common. In fact, a walk-behind tractor can replace a tractor.
Alexander:
I didn’t intend to make a trailer myself for the simple reason that my hands were in the wrong place. That's why I bought the TS-350 and didn't regret it. I have to work almost every day, and with a trailer it has become easier not only to move around, but also to transport crops. It's easy to handle. My Belarusian can handle uphill and downhill very well.
Valentin:
Of course, it’s good to use a trailer, but it matters on what road. If the soil is washed out and there is dirt everywhere, then Belarus may stall
And on a good road, speeds of up to 10 km/h can be achieved. If it slips, then you need to reduce the amount of cargo. But this is better than nothing.
An adapter for a walk-behind tractor is a device that can be aggregated with single-axle tractor equipment and is equipped with mechanisms for installing and securing various types of attachments.
Externally resembling a single-axle trailer, the walk-behind tractor adapter can significantly expand the capabilities of the walk-behind tractor and increase its productivity.
By turning a single-axle walk-behind tractor into a mini-tractor, it allows you to quickly and effortlessly carry out pre-sowing tillage, sowing crops, hilling and cultivating crops, and can also be used as a vehicle and a device for removing snow and debris.
Making a dump from a barrel
For a ladle, you need to select a barrel with thick walls. The best option is a stainless steel product. If you don't have a strong barrel, you can use a regular one.
The work is carried out in the following sequence:
- Markings are applied to the barrel. Along the bottom and sides it is divided into 3 identical sectors of 120º. After this, the object is cut with a grinder. The remaining parts of the bottom are cut along the chord. The end parts are needed to give rigidity to the bucket.
- If the tin is thin, then the 2 parts are folded together and fastened. It is advisable to lubricate the parts with hot bitumen before joining. This will prevent corrosion, increase the weight of the bucket and reduce noise from metal hitting rocks and curbs. The parts are fixed with rivets or bolts.
- The perimeter of the resulting bucket is reinforced with a steel strip no less than 3 mm thick. Fastening is carried out using welding, bolts or rivets. The upper and lower parts of the bucket are reinforced with semicircular inserts from the scraps of the barrel.
- A conveyor belt is attached to the bottom of the bucket. The width of the protruding part should be within 3-10 cm, depending on the conditions in which the snow blower is planned to be used. The belt should be removable in order to use the blade for working with bulk materials.
- The finished product is cleaned of rust, deposits and scale. It is treated with anti-corrosion agents and painted.
A similar method is used to make a ladle from a gas cylinder. Since its walls have sufficient strength, their additional reinforcement is not required.
Since the steel on the dump will constantly wear out and become thinner, it is advisable to immediately make a replacement blade. As soon as the service life of the first-stage product expires, a replacement can be immediately installed in its place.
Refinement of the scraper
I cut a slice at 60 degrees. It turned out that the blade sector is approximately 120 degrees. That is, from one barrel you can already make 3 scrapers. I left the side edge as a sector; I didn’t cut it along the chord, because the side is so high and wide, snow won’t fall out of it.
It is advisable to take Russian-made barrels that are currently being produced. Their metal is thin. The old Soviet ones are too thick, the snow removal tool will turn out to be heavy. Birch cuttings. They are mainly used on blades because they work on bending and are stronger than pine. They are not needed on the scraper. Birch is about 1.5 times heavier than pine, so if you can get your hands on it, the master will change both the guides and the handle to pine ones. Then the scraper will be completely airy.
Although a huge amount of snow falls in the Altai Territory, this is only the 4th snow region. And somewhere there are 5, 6, where such precipitation falls 1.5 times more. So stock up on shovels and scrapers and face the winter fully armed.
How to make a blade for a walk-behind tractor from a barrel
An old metal barrel makes a good material for a shovel. However, the thickness of the metal should be at least 2 mm, and preferably 3 mm. Thin sheet metal will simply bend under the load. To obtain the required oval blank, the barrel is cut lengthwise into three equal segments with a grinder.
The next step is to measure the length of the workpiece, on which the width of the shovel will depend. If the barrel was about 1 m high, this will be enough. When there is low capacity available, the length of one piece is not enough. The cut segments are welded together. The blanks are overlapped and the joints are welded on both sides. To strengthen the seam, you can drill holes and put rivets.
If the segments cut from the barrel are small, they are welded together to obtain the required shovel width
To ensure that the self-assembled blade for a walk-behind tractor from a barrel cleans the snow well and does not scratch the sidewalk surface, the shovel is equipped with a knife. In its lower part, along the edge, a metal bus with a thickness of at least 5 mm is fastened with rivets or bolts. Additionally, holes are drilled at 100 mm pitches for bolts for fastening the conveyor belt strip. The rubber pad will prevent the metal tire from leaving scratches on paving slabs or asphalt.
The next step is to manufacture the frame of the towbar and the adjusting unit for rotating the blade. First, the middle is found by the height of the shovel. At this point, a piece of profile pipe with a cross section of 40×40 mm is welded over its entire length. A semicircle cut with a grinder from metal 8 mm thick is welded in the center of the jumper. Three holes are drilled in the plate: one in the center and two indented so that the bucket rotates sideways by 30 degrees.
The frame of the towbar itself is welded from a profile pipe of a similar cross-section. The bracket is shaped like the letter “G”. One side of it will be connected to the walk-behind tractor, and the other will be connected to the turning adjustment unit. So that a homemade shovel on a walk-behind tractor for snow removal can be adjusted in height, an adjusting screw lever is adjusted. One side of it is attached to an L-shaped bracket, and the other is inserted into the hole in the profile pipe of the tow hitch.
How to make it yourself
To make a blade, you need tools and equipment that are available in every home workshop.
To work you will need:
- welding machine;
- Bulgarian;
- electric drill;
- roulette;
- square;
- durable knife;
- adjustable wrench;
- core;
- sandpaper;
- paint brush.
Necessary materials:
- steel barrel 200 l;
- 2 springs from UAZ or GAZ;
- profile pipe 20x40 mm;
- iron corners 30x30 mm;
- hardware (bolts, washers, nuts);
- car tire;
- acrylic paint.
To make a blade for an UAZ with your own hands, drawings should be prepared for 4 components of this product: an installation device, a subframe, a knife and a lifting mechanism.
The work sequence is as follows:
- Making a shovel. It is cut out of the barrel, half or a third of it is used. Along the perimeter and in the middle, the workpiece is reinforced with a steel angle, which is welded or screwed to it. The width of the shovel can be in the range of 100-200 cm, and the height - 40-80 cm. A knife made of a 100x20 mm steel strip or a cut tire is installed on the lower part.
- Installation kit. It can be central or frontal type. It is preferable to choose the second type, which is more durable and reliable and allows you to evenly distribute the load across the shovel frame. 2 brackets are made from a profile pipe with eyes for fastening. A rotation mechanism is provided.
- Stretcher. Made from durable metal. Designs are made of removable or stationary type. Removable mounts are attached to the bumper, while stationary mounts are rigidly screwed to the car frame.
- Lift. To adjust the height above the ground, a standard or separately purchased electric winch is used. A simpler solution is a manual winch, but you will have to leave the cab to lift it. The simplest option is to attach steel skis with level adjustment to the shovel.
After the individual components are manufactured, they are assembled and installed on the machine.
Homemade attachments
The user can make a hitch on the mini tractor with his own hands. To do this, you will need design drawings that will indicate the parameters of the equipment being manufactured.
Before you begin assembling the KUN, you need to decide on the dimensions of the attachment and prepare the tools:
- metal profile (metal thickness depends on the type of proposed work);
- 3 hydraulic cylinders;
- swivel type connections;
- welding machine and gas cutter;
- wrench and wrench.
KUN manufacturing process:
- Cut the inner frame from two metal sheets.
- Make an arrow, where 70% of the length is a support that will connect to a large cylinder.
- Using hinges, attach the middle part to the base.
- Attach a bucket to the middle part (it is made from a prepared metal profile).
Bulldozer blade
In order to make such a homemade product for a mini tractor with your own hands, prepare the following tools:
- steel barrel;
- steel corner 10-15 mm;
- steel square 30 mm;
- 2 hinges;
- 3 hydraulic cylinders;
- fitting;
- hoses;
- transport tape (thickness 20 mm);
- rivets.
- Cut the top off the barrel, then cut it into 3 parts.
- Using pliers, bend all edges 3-5 mm.
- Make reinforcements from a corner (10-15 mm) and weld the slots. There should be 2 amplifiers at the edges, and the rest should be placed at a distance of 20 cm from each other.
- Weld a square along the entire frame from the bottom and top.
- Weld the braces.
- Install hydraulics between the corner and the square.
- Using hinges, hydraulic cylinders and angles, make a lifting and turning system.
The plow is made from a surface in the form of a cylinder (it is recommended to use steel to avoid bending of the blade). The workpiece is given the desired shape: it is fed to the rollers at an angle of 20-23°, bent, and then refined with a hammer according to the template.
A hitch is used to attach the hitch to the tractor.
The plow can also be made from a steel pipe, the diameter of which is 55-66 cm and the thickness is 4-5 mm.
A template is made from cardboard, applied to the pipe and outlined with chalk. The blade is cut out using gas welding and treated with emery. If necessary, modify the shape with a hammer. For attachment to tractor equipment, a rear linkage is used.
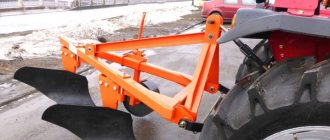
Homemade plow
For walk-behind tractors, among the attachments there are plows: horse plows for plowing, reversible plows for loosening, hilling and others. Recently, Zykov’s plow has begun to gain popularity, drawings whose dimensions can only be found on specialized resources.
Its main distinguishing feature from mass-produced ones is the carefully calculated angles of the moldboard share for intensive mixing of the earth. If we compare it with conventional models, we can see that the skimmer on the Zykov model is located in front at a greater distance, so the lifting angle follows an arc.
The plow is attached to the walk-behind tractor vertically. There is an adjustment for the blade extension. Fastening is done by bolting. Do-it-yourself plow drawings for a mini tractor differ from those intended for a walk-behind tractor.
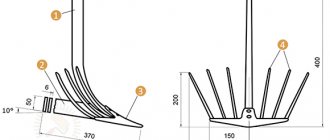
Features of manufacturing a snow plow
Let's consider another option for making a shovel, which is not too different from the previous one. For the blade itself you will need a 3 mm steel sheet, and for the racks that provide additional rigidity, you need to take thicker steel. It is necessary to make holes in the racks for attaching the shovel to the rods. It is very important to ensure vertical placement of homemade attachments in relation to the front of the power unit.
- shovel;
- rods;
- bracket for attaching the rods to the walk-behind tractor;
- craving.
Scheme of a walk-behind tractor with a blade
Making a shovel blade for a walk-behind tractor
Blade dimensions for walk-behind tractor
The working tool is made from sheet metal 3 mm thick. For stiffeners, four-millimeter racks are used, which are located inside the structure. To fix the blade to the rods, special holes are made in them. In this case, it is important to achieve a vertical arrangement of the equipment relative to the front of the mini-tractor.
The dimensions of the blade for the walk-behind tractor are 850*220*450 mm. To fasten it, a bracket is fitted, which is mounted using M10 bolts on the legs of the motor unit, where the folding front support is located.
The equipment is strengthened with two adjusting rods. In the non-working position, they provide unloading to the bracket. A knife is mounted on the bottom of the device using bolts.
To prevent the snow dump from burying itself in the ground, its bottom is additionally lined with annealed sheet steel.
Model range of walk-behind blades
We invite you to familiarize yourself with popular factory models.
Characteristics:
- Weight, kg: 30
- Brand Country: China
- Plow rotation angle, degrees: 30
- Working width, mm: 900
Characteristics:
| Width | 100 cm |
| Weight | 13 kg |
Can be mounted on Neva and Salyut walk-behind tractors
Characteristics:
- Working width 80 cm
- Can be aggregated to VT401, VT403
Characteristics:
- Working width: 100 cm.
- Grip height: 40 cm.
- Weight: 16 kg.
Characteristics:
| Working width, mm | 800 |
| Overall dimensions L/W/H, mm. | 850/280/370 |
| Displacement angle, degrees. | 30 |
| Weight, kg | 16 |
Characteristics:
| Working width, mm | 1000 |
| Shovel height, mm | 450 |
| Displacement angle, degrees. | 30 |
| Weight, kg | 28 |
Making a shovel without a lifting mechanism
The design of attachments will be much simpler if the blade frame is fixed in one position, but the mini tractor blade can rotate left and right.
Fixing the hitch is done as follows:
- An iron disk with a diameter of 15 centimeters is welded to the shovel;
- Several holes are drilled on the disk for convenient use. Optimally - three holes;
- To fix the shovel, an L-shaped pin is inserted into the holes to hold the entire structure;
- An extended handle is attached to the bucket;
- The bolts on the structure are tightened and fixed;
- The finished structure is painted.
A ready-made homemade canopy can not only remove snow. In summer, a mini tractor with a blade can be used as a bulldozer to level the soil. The shovel can be replaced with a brush for cleaning the area. The operating principle of factory shovel blades is the same, but their design is not reinforced, and therefore cannot boast of reliability and durability.
The design of such a mounted device is easy to assemble and use. You can also make a clutch for a mini tractor with your own hands and other components if you have the necessary materials and study the drawings and video instructions in detail.
What is better: do it yourself or buy a ready-made blade for a walk-behind tractor?
Each manufacturer of walk-behind tractors also produces dumps for them. Well-known brands include walk-behind tractors:
- domestic companies Neva, Salyut, CASCADE;
- Ukrainian - Motor Sich;
- German - AL-KO;
- Italian – Eurosystems, Oleo-Mac;
- Chinese - Centaur, Zirka, Aurora, ZUBR, Rotex, KAMA, SADKO, etc.
The main advantage of a snow plow is its inherent maneuverability
If you strictly follow the instructions, a homemade shovel will clear the snow just as efficiently as a factory-assembled snowblower model.
Important! The main advantage of the snow plow is its inherent maneuverability. Even loose snow up to 30 cm high will not be an obstacle for it.
The main advantage of homemade products is their low cost. Making your own shovel for snow removal requires the availability of materials, tools and skills in assembling and welding metal structures. Therefore, if you are not sure that the assembly on your own will be successful, it is better to buy a ready-made blade designed for the existing walk-behind tractor model.
To reduce vibration and protect against mechanical damage, spring-return mechanisms are sometimes installed on factory walk-behind tractors. In fact, homemade snow removal devices mounted on walk-behind tractors move slowly, so there is no need to equip them with a damping spring mechanism.
A device for turning and lifting is also optional, which makes the use of shovels for hand-made walk-behind tractors as cheap as possible.
Required materials and tools
In order to make a shovel for a walk-behind tractor with your own hands, you will need some materials and tools. Depending on the chosen model, these indicators may differ, so you should clarify all the data ahead of time. As a rule, they are indicated on websites where drawings for certain models are located.
But for a universal design you will need the following set of tools :
- steel barrel with a volume of 200 liters;
- iron strip of approximate dimensions 90x105x4 millimeters;
- profile square pipe, 1 meter 40x40 millimeters;
- a set of bolts and nuts of the required parameters;
- metal drills of suitable sizes;
- pliers;
- a set of keys for the corresponding nuts;
- rubber sheet;
- thick sheet of steel;
- Bulgarian;
- a set of discs for an angle grinder;
- welding;
- electric drill.
After all the necessary materials and tools are ready, you should begin assembling the shovel for the walk-behind tractor with your own hands. The simplest snow removal mechanism can be made from a 200-liter old barrel, since from the very beginning it will have a perfectly round shape, which is just right for such a “gadget.” This avoids unnecessary labor costs when heating a sheet of metal and giving it the desired shape.
To begin with, in such a barrel you need to cut off the lid and bottom using a grinder. Then the barrel is sawed lengthwise with a grinder into three parts equal in width. The left and right curved parts must be welded together, thereby forming a bucket for the future apparatus, and the remaining strips must be cut into small pieces. These parts will subsequently be used to improve the rigidity of the snow blower. They need to be evenly welded to the ladle using welding and do not forget to weld two strips on the sides.
In order for the device to be reliable and of high quality, it is necessary to weld a knife at the bottom of the bucket. To do this you will need a strip of iron 800x95x3 millimeters. It is necessary to drill three holes of 5-7 millimeters in it. The distance between stripes should not exceed 110 millimeters.
Such actions are mandatory, as this will strengthen the rubber gasket and prevent damage to the asphalt in the area. The knife will be attached to the structure using bolted connections.
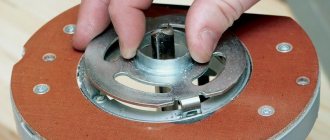
How to properly assemble and install cutters on a walk-behind tractor
To start working with a mini-tractor, first assemble the cutters from the standard set. It includes: 8 pairs of knives (a pair consists of 1 left and 1 right knife), fasteners (nuts, washers, bolts). The parts are supplied with assembly instructions, which are carefully studied. The following recommendations will also help you avoid problems:
- the cutting elements are laid out in pairs to make it easier to identify the right and left knives;
- the knives are installed on the rotor axis perpendicular to each other;
- 4 knives are combined on one block and attached to the gearboxes;
- check the correct assembly;
- tighten the fasteners.
Important!
The movement of working cutting plates is always directed counterclockwise.
When assembling, make sure that the active sharpened part crashes into the ground during operation. Errors in balancing the axle will lead to the machine skidding when cultivating the land. If you do not deviate from the instructions, assembly will take no more than 60 minutes, and the part will be durable.
If an experienced summer resident copes with the previous stage alone, then they usually install the assembled part on the motor cultivator together. This allows you to avoid injuries and also not damage agricultural equipment. First, the minitractor is lifted. The steering wheel is supported by ready-made trestles made of wood or boards knocked down crosswise. The optimal height of the support is 50 cm. If the machine is stable, the wheels are removed from it, instead of which the previously assembled cutters are installed. Special plates are installed on both sides, which allow the walk-behind tractor to move smoothly and make it more stable.
Description of the device
To understand what drawings you will need when assembling the tool yourself, you need to understand what a shovel blade for a walk-behind tractor is. A fully equipped walk-behind tractor (Neva or another model) consists of the following parts:
- pen. It is often made in the form of a “telescope”. This allows you to adjust its height. In addition, there are convenient handrails on both sides of the handle itself. With their help, the unit (Neva or another company) is guided during movement. All parts of the handle are firmly attached with nuts;
- ladle. It is attached with nuts to the base of the electric motor.
- electric motor It is located under the body and at the bottom has the main ones for connecting various attachments.
In this case, the walk-behind shovel itself consists of the following parts:
- the shovel itself;
- a device for adjusting the angle of rotation of the shovel;
- fastening unit.
This addition can have various modifications depending on the type of walk-behind tractor (Neva, etc.). But common features and operating principles are characteristic of all models. The structure can be rotated at the following angle:
- to the right (with a slope of 30?);
- to the left (with a slope of 30?);
- forward.
As you can see, the shovel blade for the walk-behind tractor acts as an attachment. Drawings for this tool can be easily found in specialized literature or instructions for the unit (Neva, etc.). Using them you can easily make it yourself. Such a homemade blade shovel will be used no worse than its factory counterpart.
Design Features
First, let's define the design itself. A walk-behind shovel is a curved working surface that consists of the following elements:
- rigid frame;
- stiffeners;
- curved steel sheet 2 mm thick;
- heels (2 pcs.);
- knives (metal and rubber).
A metal knife is used for excavation work, when it is necessary to level the ground, etc. In cases where areas are cleared of snow, debris, etc., a rubber knife (gentle) is used, which will protect the nozzle itself from damage upon contact with solid covering, and pavement (tiles, asphalt, concrete).
Blade shovel
A standard shovel is 100 cm wide and 40 cm high.
There are two types of walk-behind blades, which have some visual differences in their design:
- Blade shovel.
- Ladle.
A shovel blade for a walk-behind tractor is intended only for clearing areas of debris, snow, and is used for leveling crushed stone, soil and sand. The bucket is closed at both ends with welded plates, so in addition to the actions already described, it can also be used for loading the same sand, earth, snow, garbage, etc.
We invite you to look at the photo, which shows how a shovel differs from a bucket:
Shovel for walk-behind tractor
Bucket for walk-behind tractor
Installation type relative to walk-behind tractor
Due to the relative simplicity of the design, relatively low weight (up to 16 kg) and great functionality of the work performed, the dumps can be attached to both medium and heavy walk-behind tractors.
Depending on the design of the walk-behind tractor itself, the canopy can be attached to:
- to the front;
- behind the motorized device, taking into account that the steering column of the latter rotates 180 degrees around its axis.
Location of the working body
There are two types of dumps:
- adjustable (rotary);
- unregulated.
Rotary blades are universal, as they allow you to set the required angle of attack:
- right tilt;
- left tilt;
- direct installation.
Non-adjustable canopies are rigidly fixed in the position required by the operator (straight, right, left) and are not subject to adjustment.
We invite you to watch a video of a walk-behind tractor using a straight and rotary blade:
Types of hitches for walk-behind tractors of famous brands
The hitch is an indispensable device that comes complete with a walk-behind tractor, which allows you to aggregate various attachments. Depending on the brand of walk-behind tractor and its design, the configuration of the hitch itself also changes. In addition, hitches are also adjustable (angle of attack, horizontal) and non-adjustable.
There are several types of fastenings:
Type “Zirka”-41 “Neva” Removable mount Zirka-105
Type "ZUBR"
Forte type Universal
Kit hitch equipped with front lift mechanism
Types of lifting mechanism
Lifts allow you to raise and lower the working element (blade for a walk-behind tractor), and perform loading and cleaning work. There are several types of lifts:
- manual or mechanical (lever);
- hydraulic (using a hydraulic pump).
Tools
Without special tools, metal processing can become quite difficult. The following tools and devices should be prepared in the craftsman’s workshop:
- Welding machine. Handicraftsmen often use small transformer or inverter devices that allow them to carry out work mobile. Remember safety precautions when working with welding.
- Angle grinder, popularly called an angle grinder. Remember to protect flammable materials from sparks, which can fly up to fifteen meters during operation.
- A drill or hammer drill with a set of metal drills of different diameters. Holes for bolt and pin connections will be required.
- Clips and clamps can be useful when working without an assistant.
Attaching the bucket to the walk-behind tractor
As a rule, all motor cultivators have a standard bracket for attaching attachments. It is quite suitable for attaching a front blade. If necessary, an adapter is made to allow the bucket to be rotated to the right or left.
The fastening is made in this way:
- A profile pipe is welded from the back of the bucket. To ensure secure fixation, it is advisable to duplicate the welding seam with several bolts.
- A semicircle with a diameter of 20-25 cm is cut out of sheet metal 10 mm thick. The workpiece is welded to the profile pipe. Holes are made along the edge at intervals of 20 mm to adjust the angle of the bucket.
- A holder in the shape of the letter “L” is made from a square pipe. The short side of the holder is fixed to the rotary sector, the second end is rigidly fixed to the bracket of the walk-behind tractor. To adjust the height of the knife, bolts screwed into the adapter are used.
A simpler connection method is a system of lugs and clamps made of thick sheet steel.
How do you deal with snow removal in areas?
Homemade snow blower for walk-behind tractor
Not everyone can afford to buy a professional snow removal unit. And is it worth doing this if it will only work a few times a year? On the other hand, it is not at all necessary to clear the area manually - you can make a quite decent snow removal unit for the walk-behind tractor yourself.
The simplest option is a snow blower. It consists of two main elements: the adapter and, in fact, the blade. The first consists of a pair of metal rods and three brackets. Using rods, the blade is attached to the frame of the walk-behind tractor, and the brackets provide the ability to adjust its position horizontally and vertically. This can be done manually or using a traction or lever mechanism. The basis of such a system is a rotary unit, which can be borrowed from various self-propelled vehicles or made by hand, using the front wheel units of a passenger car as a basis.
To make a bulldozer blade, you need to make a metal frame, which is sheathed on one side with a 1-2 mm sheet of tin. The height and width of the snow blower are selected in accordance with the parameters of the main unit - the walk-behind tractor, as well as the characteristics of the area being served. If the paths in your yard are no more than 70-80 cm wide, the ideal option would be a 50 cm blade, which you can easily maneuver while clearing snow. A knife is installed on the lower edge of the blade, located at an angle relative to the main axis of the frame, using bolted or riveted connections. The greater the tilt of the knife, the easier the blade cuts off hardened layers of snow. A small angle, on the contrary, allows you to move the snow mass without a significant increase in engine power.
Tags
Blade to help the blade is possible if the blade is made Classification of blades for Motoblock blade shovel motoblock blades Blade to make a blade to cover the blade. move the blade. The weight of the snow will be able in high snow to better shovel snow from snow removal turns to remove snow from loose snow. loose snow and from snow. clearing snow is possible for a walk-behind tractor with your own for a walk-behind tractor for a walk-behind tractor is intended for a walk-behind tractor to the walk-behind tractor regarding the walk-behind tractor to heavy walk-behind tractors. The work of the walk-behind tractor with the walk-behind tractors of the famous Neva walk-behind tractors. To make with your own hands with your own hands from with your own hands is represented by a handle. with your own hands with your own hands from
framegarbagephoto