Options
To choose the right bearing puller, you need to know what parameters it must meet.
When purchasing, you should pay attention to the following points:
- Maximum permissible load. This parameter is determined by the strength of the central body of the puller and the power bolt. For mechanical tools, this parameter ranges from 1 to 4 tons. Hydraulic pullers have a force of about 20 tons (but they also have a corresponding price). However, to dismantle elements such as the wheel bearing, mechanical tools are sufficient.
- Working progress. It depends on the reach of the power bolt and the length of the grips.
- Dimensions of the puller legs (in particular, the width and height of the stop).
- Minimum and maximum gripper opening.
Standard design
Your task is to pull a well-pressed object from its seat - a bearing. You must grab its clip from the outside with two paws with protrusions (hooks), rest the power bolt - the central body of the mechanism - on the fulcrum on the object being dismantled.
The screw and gripper arms are attached to one common beam, in the center of which there is a nut that matches the size of the bolt. The grips are attached to the edges of the bar with movable joints to regulate the working stroke of the paws. By rotating the threaded rod you will create a dismantling force.
If the tabs on the feet point inward, you will pull the bearing by the outer race. Once you have deployed the hooks, you can remove the bearing by hooking it onto the inner race.
There can be three grips, which is more reliable. But the beam on which the entire structure rests must, in this case, be replaced with a metal circle. This is the design of a simple universal puller.
Analogue bearings
Which wheel bearing puller to choose or how to make it yourself.
As an alternative, you can consider the products of two manufacturers:
- "Weber", product catalog code - "BR 1118-3020";
- "Pilenga", part number - "PW-P1313".
The products of these companies have proven themselves well. The cost is approximately 1 thousand rubles. The contents are identical to the original delivery.
In practice, it has been revealed that a bearing from a VAZ-2108 may be suitable for the LADA Kalina hub, but it is a few hundredths of a millimeter narrower. Experts do not advise leaning towards this alternative, since there have been cases when the product rotated inside the hub.
Blueprints
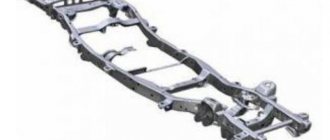
The car's chassis suffers from uneven road surfaces, especially the parts responsible for damping vibrations. First of all, the front and rear hub mechanisms are destroyed. To restore them, you need a hand-made wheel bearing puller.
Creating a mechanism begins with calculations, do-it-yourself drawings of wheel bearing pullers, selection of materials and tools.
You can think through the drawing and create it yourself, or pick up a ready-made one on the Internet.
Mandrel
Universal wheel bearing puller
It is not at all necessary to buy a mandrel; you can make it yourself in a few minutes from a scarce material: from the same bearing that needs to be pressed into place. If you are too lazy to bother, you can buy a mandrel or even buy a whole set and use it for your health. Whatever is more acceptable to you, then choose.
We take an old unnecessary bearing that is still capable of rotating. We bring the bearing to the wheel of the sharpening machine and grind the cage a little: if the bearing is turned across the stone, the work will go much faster
There is no need to sharpen the clip, literally a tenth of a millimeter is enough
We cut out the inner ring by welding
For ease of operation, we weld a washer onto the holder
Purpose and features of the device
If a hum or noise appears in the area of the car wheels that confuses you, this indicates that the wheel bearing has broken. It is not recommended to delay repair or replacement of this unit. If you are not a specialist in this field, then contact the nearest service station as soon as possible, where the car will be inspected and given a consultation.
However, it is not always possible to use the services of professionals; in some cases you have to act on your own. One of the most difficult repair operations is the dismantling of bearings. This requires special tools.
The most primitive wheel bearing puller is an item consisting of the following elements:
- metal rod;
- gripper arms (2 pieces) with ends curved inward.
The device has a movable connection and the gripping distance can be easily changed. The paws can be used to remove and fix the following:
- rings;
- ball bearings;
- gears.
If the tool has three gripping paws, then it has more possibilities, since the paws can be deployed and used to remove internal elements. It is called an internal bearing puller.
The most versatile device is the combined pressing tool, which has the properties of both a two-legged and a three-legged tool. Its design includes special clamps through which damaged particles can be easily removed.
Mounting and dismantling bearings requires applying manual pulling force to seat or remove one or another element. The success of your work, as well as your own safety, depends on how correctly you choose the tool.
Purpose of the puller
DIY oil filter puller
According to the car's operating manual, problems with how to unscrew the oil filter yourself cannot arise in principle:
- When changing the oil, a new filter is installed;
- the sealing rubber must be lubricated with lithol;
- tighten the consumable element by hand;
- tighten 1/3 turn with slight force.
In this case, the rubber sealing ring does not stick to the ebb of the engine housing; the filter can be removed by hand without a puller. In case of severe contamination of the housing, use a piece of sandpaper - the hand does not slip, the abrasive material ensures reliable grip of the palm on the filter housing.
A piece of sandpaper for unscrewing the oil filter
These requirements are often violated by the users themselves:
- there is no lubrication of the rubber ring; at high pressure and temperature it loses elasticity and sticks to the filter housing and the engine seating surface;
- It is not clear for what purpose the car owner tightens the thread with both hands, tightening it and flattening the rubber seal.
Even in this case, you can try to do without a puller:
- tap the rim in a circle on the side of the sealing ring to ensure its mobility relative to the filter housing or the ebb of the groove of the seating surface;
- pierce the rubber seal with a narrow screwdriver, separating it from the low tide side.
Tapping the rim in a circle
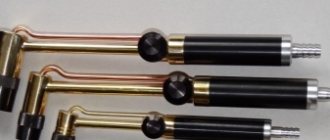
In all other cases, you have to use special devices to twist this consumable item. Since access to the filter is difficult, and its outer size differs on different machines, the question of which puller is better, in principle, does not make sense for the following reasons:
- there are turnkey or head pullers with their own handles;
- some tools are made for a specific filter diameter;
- other pullers have adjustable gripping devices of several sizes;
- Universal sliding devices are suitable for any passenger car filters.
Purpose of the oil filter puller
To purchase or independently manufacture a specific puller model, you should familiarize yourself with the design of each of them.
How to unscrew it if it's stuck?
I’ll tell you a few ways that will 100% help you unscrew this element, so here we go:
Trite with your hands. Often you just don’t have enough strength, just call a “more powerful” person and everything can work out. I will say this in 80% of cases they unscrew it by hand. YES, and you need to tighten it again with your hands, tightly! IT'S ENOUGH!
Special key. I already wrote about it once, you can read it here, of course it’s not always at hand, but if you have a friend with a car, he can drive to almost any spare parts store and buy it. I personally even saw it in several supermarkets, the cost is a penny, about 200 - 300 rubles. Everything with it is quite easy and simple, we hook it on and unscrew it, of course, the body of the element will get wrinkled, but actually we don’t need it anymore.
Rope and screwdriver (another lever). Sometimes they also use an old alternator or timing belt. What we do is twist a loop around the filter, tighten it with a screwdriver, tightly. And we try to unscrew it. The main thing is that the rope or belt does not slip.
Next come barbaric but effective methods. The most important thing is that they are dirty, that is, you will get dirty in oil anyway, if you are not afraid, then they are for you.
A hammer and a long, strong screwdriver. Actually, this method is used to unscrew most intractable filter elements. Since the walls of the element are soft, they are usually aluminum, or tin, and other soft metals. It breaks through very easily (just like a tin can). What we do is drive a long and strong screwdriver all the way through, that is, so that it goes in on one side and comes out on the other. And then we unscrew it like a lever. The most important thing is that everything can be done without a special key, and actually using those tools that are always in the garage. The only downside is that your hands are dirty, because some of the oil is always inside.
Hammer and chisel. This is generally the method that they say “ATAS”, there is nothing to explain here, we take a chisel and “fuck” it with a hammer, the most important thing is to hit closer to the bottom, to the place of fastening, and counterclockwise. The case, of course, will be all dented, but the most important thing is to unscrew it. The downside here is not only that you can get dirty, but also that you can hit the engine block with a chisel. I personally recommend the method with a screwdriver, it is still less dangerous.
As you can see, there is nothing complicated, you can do without a special key, just pierce the housing with a screwdriver.
Now we are watching a short video.
And that’s all for me, read our AUTOBLOG.
(17 votes, average: 3.94 out of 5)
How to properly press in a wheel bearing
At 145 thousand km, such a hum began that all passengers began to unmistakably determine that it was the front wheel hub making noise. But about which, right or left, opinions are divided. Unfortunately, hanging the wheels was not determined. When turning right, the noise disappeared, so one might think that the right bearing stopped humming as it unloaded. Based on this theory, it was decided to change the right one (before the replacement, I drove another 5,000 km, wishing the bearing a speedy death, but it still did not fall apart). Looking ahead, I will say that this decision was wrong, although not useless (the wear of the bearing raceways was already clearly visible). After replacing the right one the hum remained. I had to buy another bearing. After replacing the left one the noise disappeared. An autopsy showed that the noise disappeared when turning right, since the pitting was in the upper part of the outer raceway of the left bearing (and if there was wear on the inner raceway at the top, it would not make noise in the left turn). Conclusion: If hanging the wheels does not determine the specific culprit, then: 1. We change any! (budget option, maybe you can guess), 2. We change both. (especially if the mileage is more than 140,000 km).
So the actual replacement.
If you have hands, more free time than free money, and (or) no desire for car service specialists to study and break repairs for your money, you want to drive after replacement not only to the garage, you want to ruin PSA (since they stopped sell C5) you can replace it yourself. Remove the steering knuckle.
I recently shared with subscribers about refining a homemade hydraulic press
. And also about how it was used to press out and press in the Ford hub. There were questions from subscribers and just guests about how to properly press the hub without damaging the bearing. I'm telling you. There are three options for pressing the hub into the fist:
Method 1
: The simplest one is to bluntly press the hub into your fist with a press. In this case, all the hydraulic pressure from the inner race of the bearing passes through the balls to the outer race. In this case, 99% of cases end in damage to the balls and cages and the hub will begin to rustle after 2-3 thousand km. This is usually done by those who press out the hub in this way.
homemade bearing puller
Really the simplest, self-made bearing puller, we make of old stuff, with our own hands. This video shows and explains how to use improvised means...
Do-it-yourself bearing puller for covers of various parts. Hairpin 16mm. Strip 40/4mm —— Bearing bearing…
A simple homemade puller that allows you to remove bearings located close to the impeller or manifold...
CashBack service LETYSHOPS buy at a discount https://goo.gl/EIqFDX Thank the authors https://www.donationalerts.ru/c/theonlytime PR/Collaboration…
CashBack service LETYSHOPS buy at a discount https://goo.gl/EIqFDX Thank the authors https://www.donationalerts.ru/c/theonlytime PR/Collaboration…
I made a bearing puller out of scrap trash. Metal strip 30×4, two screws with nuts, and a worm...
https://www.youtube.com/watch?v=_BppOE4ydGw Link to Mark Fisher's channel.
Hello, in this video I will show you how to make a beautiful, effective puller for steering wheel ends, made...
The procedure for removing the rear generator bearing using a special puller. The main aspect when…
Generator bearing puller (REVIEW) https://postavto.ru/shop/instrument.
Wheel #Bearing. Wheel bearing puller. The best thanks to the author is DONAT, here...
He showed and explained in detail how to make a simple puller for bearings that cannot be caught on...
Link to website - https://dnipro-m.ua/ Link to channel - https://www.youtube.com/watch?v=SW2tSIbzwJA Hello everyone, friends. Today, together with...
Bearing puller www.avtonabor.com.ua/semniki-podsipnikov.
Universal wheel bearing puller.
I show you how to make a universal homemade puller with your own hands from simple material in just...
Two metal plates 150*30*2.5; stud with nuts; two M8 bolts with nuts; two open-end wrenches 22x24; and steel...
Donat: https://www.donationalerts.ru/r/libral1973 Puller dimensions: https://libral1973.ru/tekhnika/413-s-emnik-svoimi-rukami-razmery-s-emnika.html …
Link to 3D model: https://goo.gl/8dIRYT Detailed 3D model of a universal bearing puller. Even more 3D fashion...
How to make a bearing puller using 4 nuts as a basis. Taking as a basis the part that I made from...
Hi all! I have this set in use. Initially purchased as a “base of mandrels” for a press, for pressing...
One of the ways to make a small puller from scrap materials is considered. More information...
DIY universal puller. A very useful tool in everyday life, especially in the garage.
Repair Izh Planet.
Small bearing puller.
Force 666A035 Bearing puller 19-35 mm My affiliate program on You Tube: https://www.air.io/?page_id=1432&aff=1338.
Replacing a wheel bearing on an ATV without removing the hub.
Dear friend! Jesus wants to save you. Hurry to Him in repentance with faith. The time of grace ends......
Puller from China - https://ali.ski/RDUpK —————————————————————— More Puller - https://ali.ski/wpWi7 ——— —————————…
A simple homemade puller for small bearings. #diy.
This video shows you how to make a small bearing puller yourself.
homemade puller made from trash.
A homemade press for removing and installing bearings on the armatures of power tools, you can remove pulleys...
Another washing machine tank repair. All the time I cut off the clip with a grinding machine. But then I decided to show how...
Powerful wheel bearing remover from garage junk.
DIY puller.
Making a universal CV joint puller from scrap iron. Suitable for all drives...
???? ????? ???? ?? bluestacks clash of clans cihaz?n?z bu surumle uyumlu degil hub serverler sabri agunzagun erkan 1100 dolar iki basamakl? carpma facebook hesap ele gecirme k?rpmadan profil resmi yapmak cam 4 hile sketchup agac ekleme
Homemade gearbox bearing puller: photo of production
Homemade bearing puller for gearbox: photo and detailed description of the homemade product.
The author decided to make a bearing puller with his own hands, we suggest you look at the photo and description of the homemade device.
Materials:
- The puller grips are made of metal square timber - 20 x 20 mm.
- M10 studs, 80 mm long - 2 pcs.
- Plate 12 mm thick.
Tool:
- Welding machine.
- Drill.
- Drills: - M10, M12, M10.5.
- Bulgarian.
- M12 tap.
- Files - rectangular and round.
The puller manufacturing process is as follows:
Take a metal square and cut pieces of 4 cm - 2 pieces. Using a grinder, we grind the shape of the grips into pieces as shown in the photo.
We cut out a groove for the bearing at least 18 mm in height, the hook part will be approximately 3-4 mm thick, and the depth of the groove is approximately 5 mm.
We weld the pins straight to the grips; if the pin becomes crooked, the grips will slide off the bearing.
We drill holes in the plate, one in the middle by 10.5 mm. Next, we drill 4 holes of 10 mm, drilling them so that we can use a file to make two oblong holes of 20 mm each.
The plate initially had a couple of large holes, so we don’t pay attention to them, they don’t interfere with anything.
Plate.
Bearing dimensions:
- Outer diameter 62 mm.
- Inner diameter 25 mm.
- Height 17mm.
To properly drill holes in the plate, you first need to drill a 10.5 mm hole in the center of the plate, then measure in each direction along the radius of the bearing, this turns out to be 31 mm, well, I took 28 for myself so that with this puller I could remove the stuck race on the hub .
Using a round file, I made the holes a little longer so that it would be 68 mm instead of 62 mm. After drilling the holes, take a 12-point tap (see the thread pitch yourself under the central screw) and cut the thread or weld the nut.
Then I took a piece of pipe and a bolt, do it as follows, put a piece of pipe on the shaft, insert a bolt into it, throw a ball from the bearing into the hole and put a puller on top of it all.
Hex screw.
Homemade author: Alexander Govorukhin.
sam-stroitel.com
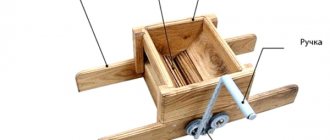
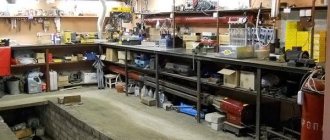
Thrust jack and trolley for moving machines
How to move a heavy machine to the workshop?
You can, of course, dismantle the wall or roof, order special equipment (the same crane). But this is all very difficult and time-consuming.
To make your task easier, you can make do with homemade devices. And in this review, the author shows how to make a thrust jack and a trolley with rollers for moving machines.
To make these devices you will need:
- a number of large diameter studs and nuts for them;
- thick-walled channel;
- metal scraps;
- sheet metal;
- tools for work - welding machine, angle grinder (grinder) and marking tool.
Main stages of work
From a piece of channel we cut four identical parts.
In two of them we cut small grooves on the side walls and weld nuts (with a screwed-in pin for better centering).
Approximately in the center of the top shelf we drill a hole equal to the hole of the machine legs. We fix the rollers (wheels) on the stud, clamping them on both sides with nuts.
Next, we will make the trolley itself for transporting the massive machine.
To do this, cut out a square blank from thick sheet iron and round the edges.
We weld the third section of the channel to one edge and weld a pin perpendicular to the side walls of such a length that it does not extend beyond the boundaries of the thrust table.
We drill a hole in the front of the table and prepare the base for the swivel bearing.
We install the fourth piece of channel on this base and engage the wheels. We will install a wheel rotation limiter to prevent them from being worn out.
To lift the machine itself above the ground, we need a hydraulic jack, which can be reinforced with a lifting platform and a thrust platform.
To do this, all supporting parts are cut out of thick iron sheets according to the drawing and welded together.
If everything is done correctly, the jack will fit freely under the machine. Having raised the front part of the machine, we will install a thrust table on wheels under it.
We lift the back part and also install the same wheels that we assembled at the very beginning. We secure everything using bolted connections.
Our homemade product is ready!
For a detailed description and production, see the video below. The idea belongs to the author of the YouTube channel TeraFox.
Not a WEAK device made of channel, profile pipe and metal from the reception!!!!ENG SUB
DIY bearing puller | DIY crafts
We continue the series of homemade machines and devices, and this time we will look at how to make a bearing puller with your own hands, photos and videos are attached.
To make a homemade device for bearings, you will need the following materials:
- A pair of wrenches.
- Small metal plates - 4 pcs.
- Threaded stud.
- Bolts and nuts.
The entire process of making a homemade product is shown in detail in these photos. You need to make these blanks from wrenches.
These are bearing grips.
We drill holes in the keys for the bolts.
We will make blanks with holes from the plates.
We weld a knob to the stud at one end and assemble the structure.
This is what the assembled puller looks like.
Operating the device is quite simple, just hook the bearing with the grips, rest the pin in the center and remove the bearing from the axis of the part with rotational movements.
Using this device, you can also remove the inner bearing; insert the pin inside the bearing and screw on the nut.
We put stops and rotate the pin.
This is how we remove the inner bearing from the part.
We recommend watching the author’s video, which shows in detail how to make a bearing puller and the operating principle of a homemade device.
samodelki-n.ru
Simple manufacturing method
Craftsmen consider separator pullers to be reliable repair tools. The supporting part (platform) is the two halves of the separator. They are placed under the bearing and connected with bolts. Then attach the pulling part with side pins.
Cage Bearing Puller
The power pin is directed to the axis onto which the bearing to be removed is pressed. When the equipment is installed, they begin to tighten the central bolt - the part breaks out of place. It is not difficult to make a mechanism with the principle of this action in a garage.
Necessary materials
The work will require:
- Bulgarian;
- tap;
- electric drill with a set of metal drills.
Also prepare regular wrenches and other hand tools.
For a homemade puller, find thick metal plates with two bolts each to connect the separator and the pulling part.
Kinds
Tools are divided into two groups.
Hydraulic. When they operate, hydraulic traction is used; removal and landing are performed in semi-automatic mode. The main part of such a puller is a hydraulic nut, the internal cavity of which presses on a special piston. This, in turn, transfers the force to the desired part. The hydraulic model is in demand among owners of trucks and other large vehicles - with its help you can easily remove the most massive internal parts.
This is what a hydraulic bearing puller looks like
Mechanical. They operate from human muscular strength and are in demand for mounting/dismounting wheel bearings. There are two-jaw, three-jaw and internal ones. Two-grip ones are the simplest. They are used where maximum process control is needed. Three-jaw machines are equipped with three paws and are used for working with the front hub and generator. Internal options are useful for removing ball and needle roller bearings; in addition, they can be used to dismantle various brass couplings.
Mechanical three-jaw model
Bearing pullers can come in different sizes, but the most popular are universal ones. Their parameters can be adjusted manually, adjusting them to any diameter.
You can make different tools with your own hands, but it is best to make a universal three-jawed version - it is convenient to use.
Diagram of a two-jaw puller
Characteristics and Use of Hydraulic Bearing Pullers
Pullers are designed for dismantling parts pressed into structural elements. But most often they are used for dismantling various bearings in service stations. Since the removal process requires a lot of force, a hydraulic system has been added to the design of the device.
Purpose and design features of pullers
Hydraulic puller with support legs
Removal of complex structural elements must be carried out according to certain conditions. An important one is maintaining the original shape and avoiding damage. That is why a hydraulic puller should be used to perform this type of work.
Structurally, such devices consist of a hydraulic system that acts on the support rod. To fix the structure relative to the part being removed, various types of support platforms can be used - platforms, clamping claws, etc. First, the hydraulic puller is installed on the structure with the bearing (or other element), then the rod is positioned. With the help of a hydraulic system, pressure is exerted on the part being removed, as a result of which it is dismantled from the socket.
Using this device, you can carry out work on removing the following structural elements:
- bearings of various shapes. For auto repair shops, it is important to use a hydraulic puller when repairing hubs;
- bushings and pivots;
- couplings, gear transmissions;
- dismantling car components - brake discs and crankshafts.
But in addition to car service, hydraulic devices of this type can be used in repair shops. They have a fairly simple design and can operate without connection to external energy sources - electrical networks, compressed air supply systems, etc.
For the puller to operate, it is necessary to ensure that the working rod stops. To do this, fix the structure on the part using special elements. It is important that they can withstand the maximum load on the body.
Types of hydraulic pullers
Puller Component Locations
The design and technical characteristics of hydraulic pullers can be varied. To select the optimal model, you should carefully analyze its operating conditions. For example, for a specialized service station, mobility, the ability to install the device in hard-to-reach places, and operational reliability are important.
First of all, it is necessary to determine the maximum force that is generated as a result of the operation of the hydraulic system. For work in a car service center, a model with a pressure value of up to 15 tons will be sufficient. If dismantling of large bearings is required, you should choose more powerful pullers.
Depending on the design features, the following selection options can be distinguished:
- pump type - built-in or remote. In the first case, the compactness of the model increases. But for working with complex structures, it is recommended to choose a hydraulic puller with a remote hydraulic system;
- the method of increasing the pressure in the hydraulic cylinder is manual or using external devices. These can be hydraulic pumps or compressors. Such devices allow you to quickly create the required pressure in the device;
- type of clamp - platform or paws. The first is used if it is possible to make mounting holes for mounting a puller. The paws are used for installation on the structure without violating its integrity.
To increase functionality, some models provide the ability to install clamps of various designs. But in addition to this factor, the mobility of the device should be taken into account. Stationary models are designed for dismantling bearings or similar components after installing the structure in the machine. Mobile ones are mounted directly on the hub or other component of the car.
The applied force must be monitored using the built-in dynamometer. This makes it possible to avoid damage to the component being removed.
List of technical characteristics
Mobile hydraulic puller
Having determined the optimal design of a hydraulic puller, you can begin a detailed analysis of its technical characteristics. However, it should be remembered that they directly depend on the specifics of a particular model and its layout.
To work with large units and assemblies, it is recommended to use mobile models. They are installed directly on the unit to be dismantled and then the bearing is removed using a hydraulic system. Therefore, the determining parameters are the small size and weight of the hydraulic puller. With the exception of manual models, the hydraulic system is often located separately from the device. This makes it possible to minimize the size of the structure and its weight.
In addition to the dimensions, when choosing a hydraulic puller, it is necessary to take into account the following parameters:
- the magnitude of the force of the hydraulic system;
- maximum removal and length of the working rod;
- type of fixation;
- the ability to install attachments of various diameters for removing bearings of any size;
- rod extension. Necessary if the standard length is not enough to complete the job.
DIY wheel bearing puller
To carry out repair work at home, some craftsmen use simple, homemade designs. However, it is always compatible with all sizes of journal bearings. Only with those whose diameter does not exceed seven centimeters.
So, how to make a puller for wheel bearings. To do this, you will need a bolt no more than 90–100 mm long, two metal washers, a fastening nut, and a metal spacer. Moreover, the diameter of the spacer must be such that it fits into the hole for fitting the support bearing with minimal clearance. Thus, after dismantling the wheel, it will be necessary to assemble the above puller and begin to tighten the fastening, as a result, part of the support bearing will be on the outside. Then it's a matter of technique.
A homemade wheel bearing puller is applicable for both the front and rear sections of the chassis system of a domestic car. For foreign brands it is better to use the factory version of the equipment.
Powerful bearing puller
If you need a powerful bearing puller (for example, you need it to disassemble large electric motors), you can make one from a car bottle jack.
From a piece of thick key made of hardened steel, the author cuts two blanks 200 mm long.
After this, one hole with a diameter of 16 mm must be drilled in each workpiece.
DIY bearing puller
The background is this: the vacuum cleaner engine suddenly began to work with extraneous noise. Having disassembled the housing and examined it, it became clear that the upper rotor bearing had collapsed. It is not possible to remove it without a special puller without damaging the rotor, so attempts were made to find a puller from friends, but they were unsuccessful. I considered it a waste of money to buy this tool in a store because it was a one-time job. In the future, this is how it turned out - making a simple puller with your own hands turned out to be very easy. It took 20 minutes of time and a minimum of details. The only condition is the presence of a welding machine and the ability to use it at least a little.
So, in order. There is a motor rotor with bearings, one of which needs to be replaced.
To remove the bearing from the shaft, you need to place some kind of stop under it. Moreover, this stop must be of a certain strength and minimum thickness, since the distance between the bearing and the armature is several millimeters. An ordinary metal washer was suitable for this. So that it can be placed under the bearing, we will make a cutout in it. To do this, hold the washer in a vice and use a grinder to cut out a quarter of its circumference.
We check on the rotor - it fits.
Now let's think about what to make the puller body from. A piece of profile pipe was found in the barn. Let's cut off a 5-centimeter part from it. In order for the puller to be placed under the bearing, it is necessary to cut through one wall of the pipe, and the width of the cut should be greater than the diameter of the bearing. We clamp the pipe in a vice and cut out a strip with a grinder.
Next, we place the pipe on the end, place the prepared washer on it and weld it with electric welding. The connection must be strong so that the washer does not fall off during operation.
We turn the puller body over, installing it with the washer facing down. You need to weld a nut on top into which the bolt will be screwed in order to press out the bearing. The diameter of the nut is smaller than the size of the pipe, so you need to install some kind of support under it. Anything will do: a washer, any plate, a cut pipe wall. In my case, there was no washer of a suitable diameter, so I placed 2 nails under a washer of a smaller diameter and welded them to the puller body. I placed a nut on top and welded everything thoroughly. The bearing puller is ready.
All that remains is to install the puller on the rotor, secure it in a vice, screw the bolt into the nut and, tightening the bolt with a wrench, press out the bearing. The rotor shaft into which the bolt rests has a thread cut. To avoid damaging it, before removing it, you need to screw the nut onto it, and then push the bolt into the nut.
It only took me 20 minutes to make the puller, and in a couple of minutes the bearing was removed from the rotor.
Finally, I’ll show you how to quickly and easily press a new bearing onto a shaft. To do this you will need a vice, a piece of pipe and a washer.
We install the bearing on the shaft, then press the washer against it, then a piece of pipe and clamp this structure in a vice.
When the vice is compressed, the pipe presses on the washer, which presses on the bearing. Under the action of compression force, the part is pressed onto the rotor shaft. The main thing here is to install the structure level, make sure that the rotor shaft fits into the hole of the washer and pipe, and does not rest against their walls, and not bend the rotor with excessive force.
This is how quickly you can make a bearing puller with your own hands, using a minimum of materials, almost free of charge. The design is simple, reliable, and most importantly, it works. The disadvantage of this device is that this puller can only be used for small bearings. For larger ones, it is necessary to make a more powerful design.
How to unscrew the crankshaft pulley
Depending on the design of the crankshaft, the pulley is attached to it either with a nut or a bolt. On rear-wheel drive vehicles, the pulley is usually secured with a nut.
The engines of some rear-wheel drive cars can be started with a special crank, for which special protrusions are made for engaging the crank. This handle is also called a “crooked wrench,” and the engagement for this wrench is called a ratchet.
The pulley fastening nut is installed with a size of 36 or 38 mm on a wrench. Use a socket wrench. The key is strengthened by welding a long handle or putting on a tube to increase the “shoulder”.
How to unscrew the pulley nut:
- Place the car on a pit or overpass.
- Apply the hand parking brake.
- Turn on 4th gear at the gearbox, put chocks under the wheels.
- Do not tap too hard on the edges of the nut.
- Throw on a socket wrench, extend it with a pipe and remove the stuck nut.
If the pulley nut does not come off:
- Move the gearbox handle to neutral.
- Remove the spark plug wires from the spark plugs to prevent the engine from starting.
- Place a socket wrench on the nut and extend it with a pipe. Place the wrench in such a way that the pipe rests against the ground or the machine spar on the right side to prevent the pulley from turning clockwise.
- We make a couple of short sharp turns of the ignition key to turn on the starter. The starter will begin to rotate the flywheel, the flywheel will rotate the crankshaft, and the pulley will be secured with a key. In this case, the stuck nut usually “comes off” quickly.
The crankshaft pulley on front-wheel drive vehicles is generally secured with a bolt. To remove the crankshaft pulley of a front-wheel drive car, you must proceed in this order:
- Raise the front right side of the car with a jack. Place a trestle, stump or a pair of wheels with rims.
- Remove the wheel.
- Dismantle and remove the air filter with housing.
- Remove the protective cover.
- Loosen the belt tensioner and remove the alternator belt.
- To fix the crankshaft, you need to remove the plug in the clutch housing, then insert a pry bar into the hole and rest it between the flywheel teeth.
- Now you need to put on the socket wrench, extend it with a pipe and sharply try to turn it counterclockwise. The main thing is to remove the stuck pulley bolt.
If it is not possible to remove the bolt from its place, then we use the method of unscrewing it with a starter. This method is shown above.
Helpful advice from locksmiths who have seen a lot: use solvent or WD-40, or a similar rust preventative. After spraying it on the thread (if the pulley is secured with a nut), you need to wait 15 minutes, then try to unscrew it. If it’s a bolt, then it’s not easy to apply this product to the threads, although if you spray it around the bolt, it’s possible that liquid will pass through the micro-cracks and decarbonize the joint.
Product delivery options
Note! Below are the shipping methods available specifically for this product. Payment options may vary depending on the delivery method.
Detailed information can be found on the “Delivery and Payment” page.
Parcel by Russian Post
Available payment methods:
- Cash on delivery (payment upon receipt)
- Using cards Sberbank, VTB, Post Bank, Tinkoff
- Yandex money
- QIWI
- ROBOKASSA
Shipping throughout Russia. Delivery time is from 5 to 12 days.
Parcel by Russian Post 1st class
Available payment methods:
- Cash on delivery (payment upon receipt)
- Using cards Sberbank, VTB, Post Bank, Tinkoff
- Yandex money
- QIWI
- ROBOKASSA
Shipping throughout Russia. Delivery time is from 2 to 5 days. More expensive than regular delivery by Russian Post, approximately 50%. Parcel weight up to 2.5 kg
Express Parcel EMS
Available payment methods:
- Cash on delivery (payment upon receipt)
- Using cards Sberbank, VTB, Post Bank, Tinkoff
- Yandex money
- QIWI
- ROBOKASSA
Shipping throughout Russia. Delivery time is from 3 to 7 days. More expensive than regular delivery by Russian Post, approximately 100%.
Transport companies
Available payment methods:
- Using cards Sberbank, VTB, Post Bank, Tinkoff
- Yandex money
- QIWI
- ROBOKASSA
Delivery is possible to any locality where there is a representative office of the transport company. Delivery time is from 2 to 10 days. Sending large parcels is approximately 50% more profitable than by Russian Post.
Courier delivery in Togliatti
Available payment methods:
- Cash upon receipt
- Using cards Sberbank, VTB, Post Bank, Tinkoff
- Yandex money
- QIWI
- ROBOKASSA
Delivery time from 1 to 12 hours.
Pickup from our warehouse
Available payment methods:
- Cash upon receipt
- Credit, installments
- Using cards Sberbank, VTB, Post Bank, Tinkoff
- Yandex money
- QIWI
- ROBOKASSA
Pickup times must coincide with store opening hours.
Details about the universal “crab”
The “crab” puller consists of two plates, which are the body, and 3 grippers installed between them. There are notches on the working surface of the paws that prevent them from sliding over the surface of the filter. The grips are controlled by a clamping mechanism located in the middle of the crab body and between the rotary mounts of the legs.
The mechanism itself, like the puller as a whole, is activated by a special key supplied - this is one of the design types - or by an end or cap tool, for which a corresponding tip is provided, extending from the body. The scheme of working with the “crab” is identical to the process of unscrewing the filter with a “cup” puller. You must first attach it to the end of the cleaner. It is in this part of the work that the “crab” is fundamentally different from the cup, which makes it universal. In the initial position, its paws are spread apart and are able to cover the filter with the maximum diameter allowed for its design.
Universal “crab” for removing the filter element
After placing the grips on the smaller cleaner, the clamping mechanism is activated. In this case, the “crab” will be able to grab a filter whose diameter corresponds to the minimum allowable for the puller design. After the paws grab the cleaner, you must continue to work with the key placed on the drive of the clamping mechanism. This will unscrew the filter. Moreover, the stronger the applied force, the more reliable the grip of the “crab” paws will be - slippage is excluded.
Fourth stage
All welds will need to be thoroughly cleaned. A sanding disc can easily handle this task. It will be convenient to collect the residual slag with a wire brush. The entire product is ready, all that remains is to coat it with special anti-corrosion paint. To ensure long service life of the structure. Before using the puller, you will need to lubricate the threads to improve the quality of work.
Let's test our homemade product. Bearings from a drill are suitable for testing. As we can see, the product copes with the task. Now you can repair your instruments without fear or risk, without fear of ruining them. The design is also suitable for removing bushings. If while using the puller you notice that the axle is too thin, you can place a stand under the bearing being removed or make a smaller puller. All in your hands.
Let's look at what the design of a bearing puller is
A bearing puller is a device, usually made of steel, consisting of several claws and a metal rod. This type of tool is used to firmly grip the bearing in order to remove it. The bearing removal process occurs due to tightening force. The ease of operation of the puller and the absence of the risk of injury depend on the quality of the design.
Types of mechanical pullers:
- Pullers with two gripping arms.
- Pullers with three gripping arms.
- Internal pullers.
Pullers with two gripping arms are a fairly simple and reliable mechanism. Made from high strength steel alloys. Allows you to easily control the work process.
Pullers with three claws are the same pullers with two claws, but improved. As a rule, they are made of hard alloy tool steel.
Internal pullers are used to remove coupling shafts when the part is firmly attached to the structure.
There is also another unofficial type of puller - this is a special one. As a rule, it is used to remove generators, cylinders, and motors. These pullers are exclusive, made to your specific dimensions. This is the main advantage of such a product; you can be sure that the puller one hundred percent fulfills its promises.
Today we will look at how to make a reliable and, most importantly, simple puller that will help you out in difficult times. For this we need:
- A piece of thick pipe.
- Steel plate.
- Nut, bolt.
- Dye.
- Kernel.
- Welding machine.
- Bulgarian.
- Drill.
- Lathe.
- Sanding disc.
Device
The main element in the design of this element is the central bolt. This is what makes the puller work. The bearing is thus squeezed out of the working place or, conversely, pressed in (depending on which direction the central bolt is turned). Some devices are equipped with a hydraulic cylinder (for example, a hydraulic bearing puller, as in the photo below).
The design also includes grips. They come in two varieties:
- Grips that engage with the object being removed using a special tool. They operate independently of the bolt action.
- Pressing the part due to the force of a bolt or hydraulic cylinder.
Pulley removal
Unscrewing a fastening bolt or nut is only half the battle. Next you need to pull the pulley out of the shaft. The pulley cannot be removed easily by hand unless its seat is broken. In addition, if the pulley fits tightly onto the shaft, it is also secured against turning by a key.
There are special pullers for removing the pulley from the shaft. There are mechanical and hydraulic pullers.
The design of a mechanical puller is simple. Usually it has three legs, with which you need to hook the pulley itself, and rest the central rod against the shaft. After which, you need to rotate the rod, the legs will straighten and pull the pulley towards you.
There are even simpler pullers that you can make yourself. If there is no removable device for the pulley, then you can use pry bars. If one person is filming, then take turns, moving it a little on each side so that there is no distortion. If there are two, then at the same time, from different sides, the pulley is pressed out from the crankshaft with a sharp movement.
It also happens that when using a puller, the walls of the pulley grooves cannot withstand and break off. Therefore, when using pry bars, they must be engaged as close to the shaft as possible.