Recommendations for arranging a garage
For comfortable operation of a room intended for car storage, you should adhere to certain recommendations:
- the tool must be as accessible as possible;
- storage spaces equipped with shelves/racks are much more convenient;
- workbenches, inspection pits, homemade machines and do-it-yourself garage accessories expand the capabilities of the car owner;
- the cellar allows you to save space;
- The productivity of work and minor repairs depends on the quality of lighting.
Organization of work space inside the garage
Depending on the dimensions of the building, the area occupied by equipment, fixtures, and communications should not be more than 10–20% of the size of the garage floor.
Other useful ideas
Useful accessories for the garage with your own hands can be made from used dishes, equipment, and materials left over from construction. For example, by gluing the lids of plastic cans horizontally/vertically, the owner receives convenient transparent containers for equipment or hardware, which are always at hand.
Device for storing small parts, tools, hardware
Interesting rack for storing screwdrivers made of PVC pipe
Homemade machines
From power tools you can assemble homemade machines and accessories for the garage:
- drilling - a drill fixed with clamps in a device that moves with a gear along a rack;
Drilling machine from a drill
- cutting - an angle grinder clamped in a similar way with equipment for metal or wood;
Angle grinder cutting machine
- wood lathe - the front headstock is made of a drill, the back headstock is made of a chuck, mounted on a frame made of a square pipe.
Drill lathe
The advantage of the machines is more accurate positioning of the equipment relative to the workpiece. The equipment turns out to be dismountable, the drill and angle grinder can be removed and used for their intended purpose.
Hydropress
The simplest design of a hydraulic press is obtained from a car hydraulic jack. To press out/press in bearings and press/compress parts, you will need to build a frame and a removable movable stop. The frame consists of 4 channels welded to each other. At the top, the structure is reinforced with stiffening ribs (kerchiefs), and at the bottom, transverse corners are added, giving the frame stability.
Do-it-yourself hydraulic press from a jack
The stop is pulled in the normal position to the top crossbar of the frame by powerful springs. A hydraulic jack is installed between them, pressing the stop against the lower crossbar of the frame as necessary. The press force is regulated by a jack, the dimensions of the working area are selected depending on the size of the workpieces.
And finally, a few more examples of useful things for the garage.
Shelving near the ceiling
Pockets for storing cutting discs from disposable plates
Device for convenient use of threads and ropes
PVC pipe scraps are an ideal material for creating convenient storage areas
Convenient pull-out racks for storing tools
Storage areas, racks, workbenches
In 80% of cases, do-it-yourself garage fixtures are built to store accessories, tools, and vehicle equipment. It should be taken into account that the most bulky parts of the car are sets of winter/summer tires, depending on the season.
Tire storage rules
It is more convenient to store wheels on brackets of the following design:
- two triangular frames from a corner, connected by jumpers from any rolled metal;
- the triangles are attached to the wall, the wheels are installed perpendicular to the supporting structure, falling slightly between the jumpers.
Wheel storage brackets
This is the most economical option for storing tires in the off-season. The most popular among car enthusiasts are straight and corner workbenches. The lower space is usually filled with shelves or drawers; sharpening machines and a vice are located on the tabletop.
Homemade garage workbench
A folding workbench can be very convenient
Wood is a universal material for both workbenches and shelving
It’s easier to build a wooden workbench yourself, but it has a shorter lifespan than its rolled metal counterpart, which needs to be welded. If corners for shelves are not built into the load-bearing walls during construction, it is easier to make racks from rolled metal or lumber.
Homemade garage shelving
Use for glass bottle racks
Built-in wardrobes are very compact
Original hanging shelves are suitable for storing long items
The design and arrangement of shelving inside each garage is too individual to follow general recommendations.
Step-by-step construction instructions
The construction of any home-made structures begins with the design stage. You need to make a slipway that is convenient to use. It is important that it does not take up too much space, blocking free movement.
The second point is always the creation of the structure's frame. The last point is to install fasteners and tightening devices yourself.
Drawings and dimensions
First you need to make suitable drawings. Ready-made options can be found below. The markings are made according to the dimensions of the vehicle. Afterwards the stage of preparation and selection of tools and materials begins. We will also need to make a mounting system large enough to fit our vehicle. It would be nice to cook it with the ability to change the height.
- Once all the drawings are ready and the materials have been selected, you can start working. First you will have to remove moisture from the materials and coat them with a primer. You can paint them right away, or you can leave this step for last.
- Now weld the metal corners to the base profile.
- Weld the profile (this will be the stand). It is secured with bolts.
- Now the chains, hooks and retractable devices are welded.
Frame making
The frame is responsible for fixing the car. Therefore, you need to be careful when creating it.
- Before creating the frame, you need to create the outer frame. It is to this that the frame will be mounted.
- A metal profile is suitable as a material. A stand and grips are attached to it (they are needed to fix the car threshold).
- Now the thresholds are being made. They are created from metal corners.
- Thresholds are installed on beams and secured with bolts.
- After installation, all elements will have to be secured by welding.
Fastening the body to the slipway
Clamps are required for fastening. If you can't buy them, make your own. You will need railway platforms (what the rails are attached to the sleepers). Each of the platforms is cut in half, and metal is welded onto the inside. It is cut into diamonds using a grinder.
You don't need to do anything to the outside. A plate 4 millimeters thick is also welded to the inside. It is important that the clamping device fixes the threshold and does not bend during use.
Inspection pit and cellar
A necessary accessory for a DIY garage is an inspection hole. Moreover, the owner does not have to carry out all the repairs himself. Underground communications can be used in the following cases:
- inspection of the chassis, steering, and brake systems before a long trip;
- oil change, which allows you to save money and does not take much time;
- minor repairs that can be carried out by the owner's qualifications.
Inspection hole in the garage
It is more convenient to make the entrance to the cellar from a hole, as this will allow you to concrete several steps instead of using an extension ladder.
Cellar under the garage
The main nuances of these designs are:
- swelling of clay soils is harmful to underground structures;
- therefore, all elements of the pit and cellar are insulated from the outside with expanded polystyrene;
- sand or crushed stone is used in the underlying layer before concreting and backfilling of the pit sinuses;
- Drains are laid along the perimeter of underground structures at the base level to collect and drain water.
The width of the pit should allow the driver to enter it without lighting.
Spotter
The spotter is used for body repair and helps, like a reverse hammer, to tap small deformed parts. This is one of the methods of machine straightening, which is performed point by point using similar equipment. In this regard, this miniature device has many advantages over a conventional device:
- The straightening work is carried out efficiently.
- The working time with the spotter is short.
- There is no need to disassemble the car to perform auto repairs.
- The unique operating principle allows the spotter to eliminate mechanical damage and defects of the body, including the hood, fenders, and sills.
Straightening with a spotter will allow a car owner who wants to repair the car themselves to save on costs. To choose the right spotter, you should take into account the nature of the damage to the car.
Lighting and ventilation
In garages, parallel circuits of lighting fixtures are more often used. One lamp allows you to use a specific area, several devices are turned on during a major renovation or a visit to the cellar. Minimum energy consumption is ensured by LED lamps. Daylighting devices have a great resource.
Cars use toxic, harmful fuels and lubricants, so do-it-yourself garage ventilation devices that allow you to create air exchange are becoming relevant. The influx is organized from below:
- garage - vents in the masonry, protected by bars;
- cellar - pipe from the garage or from the street.
Ventilation of the garage and cellar underneath
The hood is mounted under the ceiling of the cellar, the roof of the garage, or has the form of vents in the main walls at the highest points.
Related article:
Ventilation in the garage with your own hands. From this publication you will learn why garage ventilation is so important, what air exchange schemes exist, and installation nuances.
Auto repair tools
Many car owners, in order to save some money, do not go to a service station, but, if possible, try to repair the car themselves. At the same time they gain experience.
Therefore, today various auxiliary tools and devices made by hand are in wide demand.
Perhaps one of the most common homemade products is a homemade foam generator, which is suitable for both interior cleaning and washing. You can make it from a fire extinguisher.
We also recommend reading: how to remove a deep scratch on a car’s paint. Do it yourself and don't overpay for repairs.
Often you have to repair a car while being directly underneath it. And if there is no inspection hole, you will definitely need a safety stand under the car. For step-by-step instructions on how to create it, follow the link.
It can be made from a metal profile pipe and a wheel. Moreover, the manufacture of such a design will not take much time. But welding will be needed.
We also want to share with you a simple but proven method (or rather, a recipe) for preparing homemade sealant for a car radiator. Surely, for many car owners this information will be useful and necessary.
To lift a car in a garage, you can use a pneumatic jack made from an air spring.
You can’t take such a jack with you on the road, because it needs a compressor to work, but in the garage it’s just the thing. But be sure to use safety stands and stands under the car.
If you need to check the functionality of a car's spark plug, you can make a homemade device for this.
The peculiarity of this device is that the test is performed in the most natural operating conditions - under pressure. Making this device is not difficult, but you will have to get a little confused.
And, of course, we simply cannot help but share with you an interesting idea on how to make reliable protection against gasoline draining from a car’s gas tank. Be sure to take this idea into account - it will come in handy.
You can find other homemade products, ideas, all kinds of do-it-yourself tuning options, as well as useful tips and tricks on the pages of our website.
Video: homemade garage gadgets
Save time: selected articles delivered to your inbox every week
A garage is more than just a place to park a car. It is also a workshop, a place of relaxation, and a club of interests. Therefore, the arrangement of the garage should be convenient and thoughtful. You need to place a lot of things in a small area, and they should be convenient to use. Homemade products for the garage will help with this. What people don’t do with their own hands. From a simple shelf to a complex device. You can make all this yourself. But you need to know how. Several ideas for modernizing a garage and a plan for their implementation are in the article.
Making a slipway
The frame is assembled by welding. That is, skills in working with a welding machine are required.
Stages of work:
- First of all, a rectangle is assembled from a metal profile of the estimated length and width; exactly in the middle it needs to be reinforced with an additional profile. The frame is assembled as the future owner of the slipway deems necessary. He may want to further strengthen the longitudinal sides of the frame, perhaps the transverse ones. There is no definite principled position on this issue.
- To increase the stability of the car on the slipway, it is necessary to weld heights in its corners that will prevent the car from possibly sliding off.
- The next stage is installing fasteners on the longitudinal sides of the frame. Fasteners are clamps with jaws that are required to securely fix the vehicle frame when loads are applied to it. There cannot be a strict location for fixing the fasteners; they must be able to move along the entire length of the frame. Making clamps with your own hands is also possible, but if they are on sale, then there is little point in this, since a homemade clamp will cost about the same as a factory one.
Homemade garage: ideas for arrangement
Setting up a garage is a long process. You won’t be able to do everything right away. You have to constantly modernize, change, and create something new. In this case, they mainly use homemade products for the garage. It requires less money and is also a pleasure - making the right thing out of garbage is worth a lot.
Even in a small area you can fit everything
Tire and wheel storage
Every car owner is faced with the problem of storing out-of-season “shoes” for the car. Where to put the tires is a sore point. In general, the way tires are stored depends on whether they are mounted on rims or not.
Tire storage methods
So tires with rims can be hung or stored lying down - in the form of a stack, stacking them one on top of the other. To hang tires, you can use luggage straps, chains, or a metal cable with a diameter of 4 mm or more in a polyethylene sheath. Fasten the belts to the ceiling, wall, or beam located above.
Another available method is to drive pins or hooks with a small bending radius into the wall. The distance between the hooks is slightly larger than the diameter of the tires. The length of the pins should be such that they do not protrude beyond the tire. You can fill them almost to the ceiling so that the wheels fit.
Tires without rims can only be stored standing up. Special shelves are made for them. They are usually welded from profiled pipes. 20*20 mm, maximum 30*30 mm. You can also use a corner. It is inconvenient to weld a round pipe, but cross members can be made from it - the tires fit and hold better in this case.
The width of the shelf is 4 times the width of the tire, plus a margin of 10-15 cm for some freedom. The height of the rear wall is slightly higher than the outer diameter of the wheel. The design is simple = from the side it resembles a right triangle. Having an inverter welding machine, welding such a shelf will not be difficult.
Such shelves are usually hung on the wall. But the place must be chosen so that light does not fall on the rubber - this will deteriorate it. Not the most complicated DIY projects for the garage, but very useful.
Workplace
Probably the largest number of homemade projects for the garage is related to the equipment of the workplace and tool storage systems. Moreover, shelves and racks in the garage are not the only way to solve this problem. First of all, you need to decide where the workplace will be located. There are three options:
- The entire width of the far wall. If the garage is of sufficient length and it is possible to “steal” about 1.5 meters. The advantage is that everything is located compactly, at hand, and does not interfere with walking along the car. The disadvantage of this solution is that you have to carry tools far away if work is carried out outdoors.
A table or workbench for a garage is made of boards and covered with plywood. Inexpensive, quite reliable. If you have a welding machine and verification skills, you can weld a frame from a corner or profiled pipe. Again, it is better to sheathe it with moisture-resistant plywood. The result is a smooth, abrasion-resistant surface. You can, of course, use laminated chipboard (chipboard), but the laminating layer is quickly damaged.
Tools and materials for creating a structure
We will need the following materials and tools:
- Metal profiles.
- Extended profiles (needed for racks).
- Metal corners.
- Welding machine.
- Bolts and nuts.
- Fastening mechanisms.
- Paint and primer.
- Chains and hooks.
- Hydraulic equipment.
- Spray gun.
- Power rack.
Homemade carriers for the garage
Even with very good lighting in the garage itself or on the street during the day, visibility under the bottom of the car is very low. To illuminate the front of the work, portable lamps are used. These are the simplest DIY projects for the garage. With them you can begin the epic of arranging and equipping your garage space.
The most common type of garage carrier. Homemade ones are usually made very similar
In its simplest form, it is a cartridge attached to a wire; a small screen with a hook can be attached to it. This is such a simple thing. The light bulbs used are ordinary ones - incandescent or economy ones with a standard socket. Everything is not bad, except that these light bulbs break very often, you need to figure out how to hang them so that they shine in a specific place. In general, the design needs improvement. There are several modification options.
Unbreakable lamp socket
This plastic bottle lampshade perfectly protects the fragile bulb of an energy-saving lamp. You can also use an LED lamp, but an incandescent lamp will not work - it gets too hot. The design is simple - a cord with a plug and a cartridge at the end.
The main task is to find a plastic vessel with walls made of translucent milky plastic of medium thickness. Transparent will not work - it will not scatter light, too thin walls will not save the lamp from impacts. After you have found a suitable vessel, some small change remains:
- cut a window approximately ¼ of the diameter of the bottle;
- cut the neck so that you can insert the lamp, but so that the screwed-in bulb presses it against the socket;
Straightening tool
Straightening is bringing the appearance of the processed product to the original. In other words, straightening is necessary to restore the appearance of body parts after they have been damaged. Ideally, to perform straightening work, a car mechanic should have the following body repair tools and equipment in his arsenal:
- Straightening hammer (is a tool in the form of a handle and an attachment):
- with convex round and square strikers;
- with flat round and square strikers;
- with one flat round striker and a convex square striker;
- with one round convex striker and a pointed striker on the other;
- with large round and square strikers;
- Inertia-free hammer;
- Rubber hammer;
- Vacuum hammer with suction cup attachments (if the car owner knows how to use it - the vacuum method is not widespread enough due to the requirement for high professionalism of the worker);
- Straightening straightening (curved tool with a sharp working edge):
- two-sided;
- "whistle";
- "heel";
- "paperweight";
- corner;
- Mallet with a cylindrical striker (a tool made of homogeneous components);
- wooden;
- rubber;
- Spoon:
- straightening;
- universal;
- pulling;
- convex;
- shock elastic;
- for performing internal straightening;
- Percussion canvases;
- Shaped rods.
Despite the impressive list, all this tool will not take up much space in the garage, but if necessary, it will greatly facilitate body repairs. As an option, it is possible to use, for example, one handle for a hammer or mallet and several striking attachments, that is, it is not at all necessary to have a separate handle for each attachment.
Also, to perform this type of body work you will need:
- Anvil. Despite its association with a bulky floor device, a straightening anvil is a hand-held tool that can be used to effectively straighten dents.
- Homemade notching blocks are equipment that allows you to perform strikes as accurately as possible.
- The first type of grinder is a tool used to remove uneven metal.
- Welding spotter is a universal equipment necessary for straightening.
- Jack - the benefits of this type of equipment are difficult to overestimate. Where reliable vehicle support is needed, jacks are indispensable. Particularly valuable, but also expensive, are rolling jacks that can work synchronously.
To improve the quality of straightening, body parts are removed and laid out on a flat surface covered with felt, which significantly reduces the impact load. Therefore, there should be a small supply of this material in the garage.
Attach the carrying cord to the ceiling
Convenience comes from little things, and very simple homemade products for the garage help with this. For example, you can remove the cable from a portable lamp that always gets tangled under your feet. Carrying is usually done with a cheap cable. It is not the most flexible, does not fold well, and its coils on the floor get under your feet. In general, it is inconvenient to use. You can protect yourself and carry it by hanging the cable from the ceiling. The solution is simple but very effective.
You can make this “suspension” to the ceiling for carrying with your own hands in an hour
- Two anchors with a ring at the end.
- Cable tie.
- Clamp clamp.
- Metal cable. The length depends on the size of the garage - it needs to be from one wall to the other.
- Steel/plastic rings or steel wire and a piece of pipe to make these rings.
- Carrying with a long cable - its length is approximately double the length of the garage.
The cable is stretched along the long side of the garage. It’s more convenient - not far from the “working” wall, where the workbench or other equipment is located. A little work:
- On the ceiling, on one side and the other, at a distance of 30-50 cm from the corner, drill a hole in the ceiling and screw in the anchors.
- On one side we attach the cable to the tie.
We install anchors with loops, fasten the cable
We hang the carrying cable on the rings to the cable
We make a hook (or several) for hanging cable loops
Well, that's all. You can use it. With such a device, the carrier can be carried to any end of the garage without the cable getting tangled or caught. Convenient, takes little time.
Direct and secondary damage
Direct and indirect (secondary) damage can be divided. Direct damage is the area of the body panel that was in direct contact with the object that caused the damage. This place may have a violation of the integrity of the paintwork or a metal rupture.
Indirect damage has bent and distorted metal located in the area adjacent to the direct damage. Sometimes secondary deformation can be located several tens of centimeters from the area of direct damage. It is difficult to fully define and analyze.
When repairing damage, the repair method is determined by the possibility of accessing the damage from the back of the body panel. If there is access from both sides of the damage, then the straightening method is used with a hammer and support. If there is access only from one side, then other repair techniques are used, such as pulling with a spotter, using an adhesive system or a vacuum suction cup.
When repairing damage, you should try to choose the easiest path. Even if you have special equipment, this does not mean that it needs to be used everywhere and always. If possible, use simple tools, and if necessary, use more complex ones. Sometimes a dent can be squeezed out from the back side by hand, without any tool. It must be remembered that now automakers use fairly thin metal in the production of body panels, so it does not require much effort to restore the deformation.
DIY garage compressor
A compressor is needed in any garage. And, by the way, this is not the most difficult homemade product for the garage. A low-power compressor for the garage for inflating tires and other small jobs can be made with your own hands from auxiliary materials. For example, from a compressor from a refrigerator. For this you will need:
- refrigerator compressor;
- a sealed cylinder with thick walls (you can use a fire extinguisher flask or a small gas cylinder);
- safety valve 8 atm;
- pressure gauge;
- fitting;
- oxygen hoses with couplings (select the length based on the size of your spare parts);
- base for the compressor - a thick board or piece of plywood will do.
In order not to pump any nasty stuff into the tires, it is advisable to also install a filter to separate oils, dust and other contaminants. The diagram of a homemade compressor is shown in the photo.
Homemade compressor diagram
The compressor must have a starting device. We plug it into the network, see which tube the air is sucked into, and mark it. You can put a car filter on it - clean air will be pumped in.
We assemble an oil separator receiver from a cylinder and a safety valve. To do this, we cut two fittings into the cylinder - for air inlet and outlet. We place a safety valve on the inlet hole and connect the compressor outlet to it using an oxygen hose.
Homemade compressor for the garage based on a compressor from a refrigerator
We install another automobile oil filter at the outlet of the oil separator receiver to completely remove the oil. We connect the filter to the pressure gauge, and from it comes a hose, which is connected to the tire through the appropriate adapter.
Assembly is complete. But in order to carry this device comfortably, everything needs to be secured in some way. You can weld the frame to size, attach wheels and a handle for easy transportation. One of the compressor options for inflating wheels is described in the video. There is no receiver, but its functions are performed by an oil filter. You can do it this way, but with a receiver the design is more reliable.
Since the compressor in the refrigerator is low-power, it may take a long time to inflate the tires. You can make it more powerful by installing two compressors that will start simultaneously. Accordingly, the pressure will build up twice as fast. But such an installation requires a more robust security group. Such homemade products require a little more equipment, since the circuit is still more complicated.
Reverse hammer for body repair
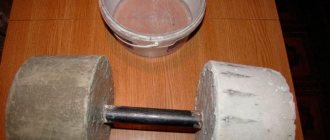
We suggest considering another simple option for a homemade device that will help remove (straighten) dents on the car body. The author uses an old steering rod from a car as the basis for the homemade product.
First, you will need to clean it from rust - for this it is convenient to do this as follows: clamp the end of the steering rod in the chuck of an electric drill, then turn on the drill and treat the metal surface with sandpaper.
Next, we need a steel round timber - cut a piece 12 cm long from it. It will be necessary to drill a through longitudinal hole in it so that it can be put on the steering rack.
You will also need another part of the steering tip, which fits the threads of the steering rod, and a metal plate with notches. See photo below.
In this case, the plate shape is rectangular. But you can make it round or square.
We weld part of the steering tip to a metal plate - as a result, we have a replaceable nozzle. We put a round steel blank on the steering rod, at the end of which we weld a thick metal washer.
To attach the plate to the surface of the body, you can use some kind of “sticky” adhesive composition - for example, from a vapor barrier film, which is used when installing plastic windows.
In fact, this device is practically no different from the first option. Except perhaps for the method of gluing to metal.
In the first case, the author glued the “suction cup” using hot glue, and he had to wait a while for the glue to set. The use of an adhesive composition from a vapor barrier film greatly speeds up the completion of body work.
The step-by-step process of making a homemade product, as well as its application and capabilities, can be seen in the video below. This idea was shared by the author of TEXaS TV.
You'll be surprised! What can be made from an old steering rod
Supports, they are also anvils (anvils) and backing stamps
In most cases, straightening requires a variety of supports. These are massive metal bars that best fit the shape of the body that needs to be straightened. It is advisable to have a set of supports for different areas with different radii of curvature, thickness, weight and dimensions.
As a rule, the straightening anvil and hammer are an inseparable pair, which are placed on opposite sides of the straightened area. The more carefully the backing stamp is selected according to its configuration, the faster and easier the work process is.
If you do not have purchased or self-made support at hand, then, as a last resort, you can use those items that you have on the farm as such. This could be a large hammer, a sledgehammer, an axe, a plate from an old iron, a piece of channel wood, etc.
The surface of such an improvised anvil must be thoroughly cleaned and polished; its condition will largely determine how noticeable the unevenness on the car body surface will remain after the straightening process.
Spoons and impact blades
Spoons are used to pull and bend the metal of a car. They can also be used instead of supports where access to the back of the body is difficult. The selection of this tool depends on the original shape of the surface to be straightened, ease of access and the necessary actions (punching or straightening).
- Correcting a car roof can be done using a universal spoon rather than a crooked support. Possibility of using a pad to protect the spar from local damage and reduce pressure in this place by distributing the pulling force at the support, depending on the gap in this area. Pulling the spoon upward with constant effort, accompany your actions with external blows on the mounds. This way you will restore the original shape of the metal.
- Spoons for internal straightening. Car doors have a double structure. You can straighten them using similar body spoons. Having disassembled, place the door on a workbench, if you don’t have one, then on the floor, and lay two fairly high wooden blocks under it. This is necessary so that the coating does not scratch; in addition, you will have space for movement when applying force to the instrument. After rough straightening the surface, you can turn the spoon over so that, using a hammer and the lining technique, you can straighten it. The level of freedom of the tool inside the door depends on the degree of bending of the area that needs processing. When direct access is not possible, use a backing punch that has a long handle. If this cannot be done, drill technological holes in the door (in the inner panel). They will then be covered with the inner lining during assembly.
- Pull-out spoons can be used to separate the inner frame from the outer panels when they become damaged and pressed together. The tool is inserted between the frame and the panel, and moves up/down or from side to side until the parts are separated. The blade of the device can be used as a backing stamp to straighten the outer or inner panels.
- Lightweight and resilient impact scoops (impact blades) are used to remove protrusions. Such a tool for straightening the body is placed on the surface of the part, then sharp blows are applied to it with a hammer. Their force is distributed by the canvas over the surface of the entire damage.
The intensity of impacts must be carefully controlled so as not to damage the paintwork and the metal surface itself. Impact trays are not designed to pull out defects.
The simplest devices for recharging the battery
Having a full-fledged car charger is good, but sometimes it’s quite expensive, especially since cheaper devices can also perform its function. So, a laptop charger can handle a full charge of a car battery with a capacity of up to 75 ampere-hours.
Moreover, there is no need to make any alterations, but simply plug in a 12-volt 55-watt car lamp into the circuit and periodically monitor the battery charge level with a multimeter.
When the indicator reaches 13 - 13.5V, you should stop charging - the battery is fully charged. In addition, it is extremely important not to confuse the polarity. This use of the adapter does not harm it at all.
In general, without any modifications, chargers for 12-volt cordless power tools handle the recharging function quite well, and most of them also have LEDs indicating that the battery is fully charged.
An old computer power supply can also slightly recharge a dead battery to a level sufficient to start the car. It has an output voltage of 12V, and to fully charge it needs to be up to 14V, but minor modifications can provide this voltage.
Stands and mini-overpasses in the garage
A jack is a standard tool included with a car, but it is strictly prohibited to carry out even minor work under the bottom of the car when it is hung on a jack. And sometimes it is necessary to lift its entire front or back part.
In this case, you can’t do without goat stands.
Sometimes the stands are made in the form of mini-overpasses that the car runs over.
In addition to the general requirements listed below, an important element of such stands is the travel limiter at the front of the structure.
It doesn’t matter what they are made of, but the requirements are the same:
- stable wide support;
- safety margin for the design weight of the vehicle;
- minimal gaps between moving elements for height-adjustable stands.
The video shows the simplest coasters with a drive-in:
But in this case, we would recommend increasing the support base.
FakeHeader
Comments 23
There is also one like in the first photo, still left from the case...
it's simple. Thank you
You’re welcome, it’s interesting to see who did what themselves.
DEFINITELY BOOKMARKED!
You can’t go anywhere without a homemade tool!)
The first stray thing I have, I didn’t think they made it themselves
the stray thing is needed, just to remove the tips.
haven't tried it yet. But one of these days I will test the chassis with the steering wheel and restore it
Well, I couldn’t resist, sorry. At the beginning of “IN THE SHARE” it hurts your eyes. The phrase comes from the word “DAL”. Plus in your text “AWAY” is written together.
It's okay =) Besides, I see that you are not from Russia. Therefore, there are no complaints. But it’s still worth fixing the mistake.
I just don’t understand how the steering rod puller from an open-end wrench works
it is welded to the puller itself from below
I just don’t understand how the steering rod puller from an open-end wrench works
you put a piece of key on the rod, and a knob in the welded head, and turn it
I just don’t understand how the steering rod puller from an open-end wrench works
There is such a store-bought gadget, it essentially has a pipe, a groove is cut into the pipe, and a sponge is inserted on a hinge from a gas wrench. and a 1/2 square under the knob is welded on it. you throw it on and twist it, the knob lies along the steering rod. It’s very convenient to tighten, not like trying to do anything with a wrench.
Car repair is a serious and responsible job that requires certain knowledge and skills. There are operations that even a beginner can handle. But many types of repairs require serious experience and certain training.
However, any car repair specialist was once a beginner - each of us once did even the most familiar work for the first time.
Therefore, if you are determined to master the ability to repair a car with your own hands, do not be afraid to start. Study, be careful, pay attention to every detail, and after some time you will acquire all the necessary skills.
You will also need special tools for car repairs - as you understand, it is impossible to do without them.
To do many jobs with your own hands, you will need various tools and materials - they will be used to fix assemblies, assemble and disassemble, repair defects, etc.
Let's figure out what special tools and devices you may need when repairing cars yourself.
Basic tools for car repair
Don't throw away the old Zhiguli jack. Idea for a car mechanic
Good day, dear readers. The Zhiguli jack is such a popular thing that I even found it in my garage. After interviewing neighbors in the garage, I found 4 more, even though I walked half the floor and looked into 9 open boxes on Saturday evening.
Photo of an old jack from a Lada.
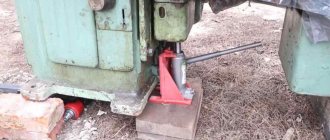
I remember how at the beginning of the not-so-distant eighties, I helped my father tinker in the garage, then the still moderately new Zhiguli, I learned the basics of the mighty Russian language and developed straightness of hand. However, I will no longer hold the reader’s attention with memories, and let’s get down to business. The homemade product is quite simple, and at the same time very useful for those who repair their car themselves, or earn money by auto repair. For it we will need the jack itself, a steel plate, a section of 25mm profile pipe, an angle grinder, and a welding machine. Let's start the process, and first use a grinder to demolish the base (patch) from below. Let's cut a piece 30 centimeters long from the 25 profile pipe and weld it to the jack, thereby increasing it. Now we attach the base to the end of the pipe.
Refinishing the frame. We go around the neighbors and find the old flywheel. We will weld the jack patch to its center. The result is a tall contraption with a strong and stable base.
We increase stability. After that, we cut off its original hook from the jack, the one that is inserted into the groove under the threshold of the car.
We cut off the excess. We weld a U-shaped structure from the same pipe and fix it by welding perpendicular to the moving part of the mechanism. You will get such a moving fork.
Stop number one. Cut a flat fork from a metal plate, as shown in the figure below, and weld it to the top of our device.
Stop number two. Our powerful shock absorber strut spring remover is ready.
Schematic representation of the puller. We squeeze the rack between the forks, turn the jack up, and with minimal effort, and quite safely, we disassemble the rack and remove the spring. Image of practical application of the device. Source