The concept of a console table appeared during the reign of Louis XIV. In those distant times, these interior items were very popular, and they are no less in demand today. Console tables come in a variety of designs, but they have one thing in common: console means narrow. This type of furniture is very convenient to use in small spaces; it does not take up much space and is not far from the wall.
Console is a narrow table with straight or curved legs, suitable for different interiors.
Such different tables
Decorative console decorated with carvings
We will not talk about variations of console table models, because there are countless of them. Let's talk about the scope of application of this piece of furniture. The furniture looks great in hallways and living rooms, acting as an alternative to a buffet.
The console table in the hallway has both decorative and practical significance.
In the living room, consoles replace tables attached to sofas.
You can turn this furniture into something like a mini bar, or place a framed photo on it. An original idea to use a console table in a boudoir or for storing cosmetics.
Modern console table in the bedroom
Store your keys on a table in the hallway and place a candlestick or picture on it. And in the bedroom space, you can install a DVD player or TV on the console.
Forged console table for figurines in a modern interior
If you have your own office, store cigars or beautiful figurines on the table. And in the children’s room, place toys on this piece of furniture, put markers or boxes with construction sets.
White console table with drawers for various small items
Console with drawers for children's room
We'll tell you about creating a console table with your own hands - it's a simple, fun activity that will help you save a lot of money. To do this, you will need to purchase some tools and be careful and patient.
Types of consoles
A small decorative piece of furniture is sometimes called a "half-table", and it was once so. A small plane attached to the wall rested on two graceful legs.
Today, a long console in a hallway or corridor is often used as a shelf on which you can put gloves, an umbrella and a handbag at the threshold, and put shoes underneath.
A couple of centuries ago, it was a kind of analogue of a dressing or cosmetic table, which was placed against the mirror in the luxurious boudoir of the favorites of the French kings. Soon the white console table became a common piece of furniture among European aristocrats.
In design variations today you can find “legless” consoles that are mounted directly into the wall. This is convenient in a small room decorated in the spirit of minimalism.
Today this item is not so often found in a traditional setting, but the console table in the interior successfully replaces:
- bedside table;
- folding tabletop;
- cosmetic table;
- panel for equipment;
- dressing table with mirror;
- mantel;
- bookshelf;
- stand for small accessories in the interior.
In addition to two-legged and “legless” consoles, which have only triangular supports for attaching to the wall, there are also ordinary narrow shelves with supports.
Sometimes they have all 4 legs like a regular table, but they still have a long, narrow top that makes them look better along the wall.
How to make a DIY console table from an old table
We cut the table into two parts lengthwise
You can use an ordinary old table that has served its purpose to create your own masterpiece.
| Old table | Main part |
| Saw | Saw off the required part |
| Sandpaper | Clean up |
| Dye | Paint |
We fix the metal corners on the back side - in the center and edges
Glue the fabric to the tabletop in order to get an original console
We attach it to the wall and get an original console in the hallway
Saw off the required part from the table and process it. The photo shows examples of such creations. If you want to create a masterpiece from scratch, read on for a step-by-step guide to action.
A bedside table on two legs from a sawn table is made in a similar way
Console under the TV in the bedroom and a bedside table in the hallway from one table
Console for the bedroom buy in Moscow
A console is a furniture element that is located near the wall. This is a narrow table with a long length. The table is often attached to the wall and resembles a wall shelf.
This furniture is used to fill voids. The table can decorate a small hallway, niche, wall. The console houses lamps and vases, photo frames, candlesticks, and porcelain figurines. Mirrors are hung above the wall table, and large floor vases are placed nearby.
The console in the bedroom replaces a small table or cabinet. Your small laptop and other gadgets are always at hand. The model with drawers is suitable for storing jewelry, glasses and cosmetics.
A console table for the hallway, custom-made tabletops can be purchased from our consultants. Our staff will advise you on how to choose furniture based on the design of your home.
Steps to creating a console table
Step 1. Make or buy legs. The console table has beautiful legs. Surely you do not have a suitable machine for turning curved baluster legs: this is not a problem. Visit a hardware store: you will find a variety of table leg models and choose the appropriate part.
Large and massive wooden legs for a console machine
Step 2: Cut the board. To create the top and bottom of the table, use a three-meter board, ten centimeters thick, 20 centimeters wide. Cut the board with a saw. You will need four boards with a length of 150 centimeters. Cut out the parts with a saw.
We cut the board to make the top and bottom of the table
The table will take four boards, ten centimeters thick and 145 long. You will place them in a vertical position, attaching them to the previously cut boards. Four squares will be placed at the edges, you will see this in the picture.
Decorating
Finished painted table in the living room interior
We recommend simply painting the resulting table. Nowadays a wide range of different wood varnishes are sold. For example, paint a walnut-colored finish on the table and use Vaseline to lubricate the structure after the paint has dried. Apply the last layer of gray paint (when this coating dries, sand the end elements). As a result, you will get a shabby table with beautiful legs. This piece of art is perfect for any living room or hallway. As you understand, making a table is very simple.
Long console table with decorative elements in the interior
Master class on making a flower table
To work you will need:
- piece of plywood 5 mm thick
- a piece of furniture board 3–5 cm thick
- baluster
- façade paints in green and gray-green colors
- gold acrylic paint
- boat varnish
- long screws
- screwdriver
- jigsaw
- paper
- pencil
- scissors
Operating procedure:
1. Draw a large silhouette of a clover leaf on paper (its diameter should be 40–50 cm). Or draw a small sheet and then use a special photocopier to enlarge it to the required size. Cut out the “clover leaf”, place it on the plywood and trace it with a pencil.
2. Use a jigsaw to cut out the future table top strictly along the drawn contour.
1. Draw a large silhouette of a clover leaf on paper. 2. Cut out the tabletop strictly along the drawn contour
3. Sand the edges.
4. Saw off the top of the baluster to create a footboard 45-50cm high.
3. Sand the edges. 4. Saw off the upper part of the baluster 5. Cut a circle with a diameter of 30 cm from a piece of furniture board.
6. Connect all the parts of the table with long screws. First, fasten the baluster to the base circle.
5. Cut out the base circle. 6. Attach the baluster to it
7. Attach a shaped table top to the top.
8. Paint the table with green exterior paint and dry thoroughly.
7. Attach the tabletop. 8. Paint the table with green exterior paint. 9. Apply broad strokes of gray-green paint to the entire surface of the table.
Video: Making a console table with your own hands / DIY Making a Console Table
Making furniture with your own hands is considered a creative and interesting process. Every person can create stylish and budget-friendly products. The master has the right to independently choose an interesting design for furniture, equipping it with interesting details and high-quality fittings. The easiest way is to make your own console that will fit perfectly into the interior of the living room.
Product for a narrow room
If you have an old table that has lost its former appearance, then it can be used as the main raw material. This option attracts many craftsmen because the work requires a minimum of tools and financial investments:
- Pieces of beautiful fabric 130 cm wide.
- Rectangular table (IKEA or ISALA are ideal).
- Screwdriver, pencil, jigsaw, aerosol glue, sandpaper, sharp scissors, one metal corner, two self-tapping screws.
The prepared table must be cut lengthwise into two even parts. All edges should be cleaned with sandpaper. If the table has removable legs, then you need to securely fix two of them. On the back side of the console you need to secure a corner (in the center). The edges of the table are covered with regular masking tape to prevent glue from getting in. A piece of fabric prepared in advance is sprayed with an aerosol product. There should be no bubbles on the surface. Excess fabric on the sides of the tabletop is cut off with scissors. After the glue has dried, you can carefully remove the tape. The free part of the metal corner is screwed to the wall as firmly as possible so that there are no gaps.
Nutrition
*Blog change. Thanks to a comment from one of the commentators, I decided to change the structure of the power supply. On advice, I scoured the Internet on this topic and found a rather interesting solution. There is such a foreign channel “The Wrench”, the guy makes various interesting electronic things. So, in one of the videos about creating a pocket PC, he showed a good way to make a miniature power supply. All in all. We will need three mini 18650 batteries (yes, they are quite bulky, but it's not that bad). We glue them together, but so that the middle battery is turned in the opposite direction relative to the other two. Next we will need wire and the ability to use a soldering iron. We solder a piece of wire to the centers of the middle and right battery, do the same only on the other side and with the middle and left battery. Next we need two small wires. We solder each of them to those places that we did not work with.
The next element we will interact with is a battery protection board called 3S BMS. It costs a penny.
We solder everything according to this diagram
Next we will use the power outlet. It, like many other things, can be found on Aliexpress. Solder the wires from the socket to the plus and minus on the board.
Now we need a 5 volt regulator and an old USB cable.
Solder the wires from the cable as shown in the photo
Now we solder the wires from the battery itself
Next, connect the old USB to a suitable slot on the LattePand.
All that remains is to solder the remaining two gray wires to the miniature switch and you're done.
Application of cinder block
From this material you can make your own console with an original design. To work, you need a minimum of materials: two strong wooden boards and four cinder blocks. This option is quite simple, since it only takes 30 minutes of free time to make it. A cinder block is placed on both sides, and varnished boards are placed on top. Then the actions are repeated again. You can lay out your favorite books on the middle board, but it’s better to put photo frames, candles and flower pots on the top shelf.
Aristocratic model
This option is in greatest demand. Using a minimum of materials, you can make your own console, which will decorate not only the living room, but also the room of a young fashionista. The master will need:
- Roller and brush.
- An old console or chest of drawers.
- Plain gift paper with an interesting pattern.
- White paint.
- Sandpaper.
- Wallpaper glue.
- Scissors.
You need to sand the surface of the chest of drawers and remove all the fittings. The product is cleaned of dust. All surfaces need to be coated with two coats of paint. It is necessary to cut a blank from gift paper to the size of the table top with a small margin. The product is glued to the chest of drawers. It is necessary to remove all air bubbles by running a cloth from the center to the edges. Excess paper needs to be trimmed and the outline highlighted with white paint. All that remains is to screw on the fittings and the product is ready.
Compact and refined
From scrap materials you can make a console with your own hands, which will look harmonious in any interior. To work you will need an old dining table, two blocks and wood paint. All actions correspond to the standard scheme, but there are some differences:
- It is necessary to shorten the legs quite a bit, since the bedside console is not high.
- The table should be cut crosswise rather than lengthwise.
- Those products that are painted in a bright, solid color look more aesthetically pleasing.
- The console is attached to the wall not with corners, but with a pair of wooden blocks. They are fastened together in advance and screwed to the wall. The prepared bedside table is simply “put on” on top of the bars.
Decorating the console using imitation frescoes
I present to your attention an idea for decorating a hallway during the renovation process.
I noted the high complexity, because the base was made by a master.
In a one-and-a-half meter wide hallway you can’t run away with the furniture, but when you enter the apartment, you immediately need to put something somewhere.
The idea for the design was born during a major renovation of the apartment; I really wanted to use my decoupage, design, and artistic skills.
Every day throughout the summer, while “walking” through construction stores and markets, my gaze lingered on the balusters...
First of all, I prepared them.
They shortened the length and sawed off excess. The wood was sanded, covered with acrylic primer (a huge canister was purchased for the walls), you can get by. But I still advise you to prime it before applying the first layer of paint.
Materials: black acrylic paint (I had a black primer), burnt umber, metallic copper, glossy varnish, candle, palette knife.
I paint the ends and grooves with burnt umber, or any other. I always do a metallic base. Metallic doesn't go well on wood.
I paint these same places (ends, grooves) with metallic copper. Dried out. I rub it with a candle.
I paint the entire baluster with black acrylic a couple of times. Using a palette knife, I remove the paint from the ends, develop the copper, and age it.
I cover it with a glossy varnish of 4 layers or more with intermediate drying.
The balusters are ready!
Now the master gets down to business.
Baluster legs are attached to the floor. Holes are drilled in the tile and in the wood. A screw is screwed into the tile, a leg is screwed into it, and liquid nails are added to secure the fastener.
Mster makes a tabletop from drywall and a metal corner (very quickly). The corner is attached to the wall with screws. Everything is solid.
Now I'm putting on gloves, preparing the tabletop for decoration. Dirty work, hypocardboard needs to be puttyed. I apply two layers. With a wide metal spatula, the first is a coarse mixture (rotband), dry, skin, wipe. And the second layer with a more gentle solution, finishing putty. We dry it again, sand it, and wipe it with a damp cloth.
Using a stencil with a rubber spatula of a suitable size, I apply a decorative element to the ends of the tabletop. Those who are not confident in the dexterity of their hands ask for help, or attach the stencil with tape.
Next, we decorate according to the same scheme as the balusters. Instead of a palette knife, we show the copper with a damp cloth.
I paint the polyurethane molding separately, remove excess paint with a damp cloth, shade the convex elements, and age it.
We glue the molding to the tabletop using liquid nails, it doesn’t work ((Place a weight and let it dry.
I tinted the paint and selected the appropriate shade for the floor tiles. I paint the tabletop three times with a roller.
I apply the design using black acrylic through a stencil, use a sponge or stencil brush, and remove excess paint to avoid smudges.
Using a thin synthetic brush, I paint with copper metallic and shade individual lines of the drawing.
I age the ends.
I varnish the entire tabletop. Particular attention should be paid to corners and edges. Putty mortars do not adhere well to a metal base. It would be more accurate to say that they fit, BUT there may be chips during life and use. The edges are vulnerable and they always get it. Therefore, we varnish with high quality!
We decorate the second, lower part of the console, or simply the shelf, in the same way. Wooden shelf, smaller in size. We attach it to the wall on three metal corners.
The baguette was cut for us at the store. We glue it to the wall using liquid nails and frame the frescoes.
Perhaps that's ALL!
It's time to put the right things on our console! And enjoy the result! But...((without jambs((
The issue with the telephone wire was not resolved. he hung treacherously in plain sight.
At first it worried us, but over time you get used to everything.
A year has passed, the frescoes are not boring, the console is still working. It doesn't bother you with its size, it's convenient.
And a few more words to continue the theme of decorating the corridor space. Maybe it will be useful to you too?!
Balusters known to us. We sawed off the required size for the required height. Everything is clear with painting.
The first photo is to sit down, put on your shoes, put your purse down. Materials: board, synthetic foam, tapestry.
Second photo: board, thick foam rubber, tapestry. There are two laundry baskets under the seat.
Thank you for being with me until the end!
I wish everyone quick repairs, interesting ideas and inspiration!
Best regards, Natalia!
Transforming old drawers
Long cracked and shabby chests of drawers are considered an excellent material from which you can make stylish furniture for your home. For a clear example, you should study numerous photos of consoles. You can build unique products with your own hands from standard wooden boxes. To make furniture you will need:
- Boards for the frame.
- Two plywood boxes.
- Screws.
- Primer.
- Screwdriver and drill.
- Sturdy board.
- Dye.
- Circular.
- Wood glue.
- Furniture clamps.
First of all, the craftsman needs to sand the drawers and coat them with paint. Using a circular saw, you need to make the necessary parts and frame. The blanks are fastened with screws and glue. All irregularities are carefully filled with putty. After complete drying, the product is coated with primer and paint. Boxes are placed on top of the frame and secured with glue and self-tapping screws.
Sarah Dorsey's proposal
You can make such a console table with your own hands in just a few hours. The technology is in great demand in different parts of the world, since it is possible to use both sawn parts at once. One blank can be used as a stylish TV stand, but the second can be installed as a bedside table in the living room.
- You need to take an old round table and remove all the paint or varnish from it. Thoroughly sand all uneven surfaces to apply a thick layer of primer.
- A jigsaw is ideal for cutting tabletops.
- The edges need to be sanded and painted in the desired color, which will harmoniously match the interior of the room.
This is a great option for transforming an old table into two original consoles.
Console as a TV stand
Using a console instead of a TV shelf is not that common, but this technique is still used. It is suitable for those for whom the monitor and diagonal size are important. After all, with such a configuration, it will be impossible to carefully arrange all the accompanying elements of the stereo system and other electronics, because in this case there is nowhere to hide them or the wires. Therefore, think carefully in advance about how firm you are in your decision not to use additional devices. If in doubt, it is better to place the console in a different location.
This item does not fit well into the above list, but it is worth special mentioning the complex works of industrial design, which are almost on the verge of art. Consoles of this kind, regardless of the room in which they are located, of course, primarily serve as an aesthetic “magnet”. They set the tone and mood of the entire organization of space. The production of such masterpieces is often purely individual, time-consuming and expensive. But it's definitely worth it.
As you can see, the console is a very convenient element of the interior. It is compact, elegant and very stylish. In addition, it provides a wide range of possibilities for use for different purposes and in any room. Therefore, if possible, be sure to use the console in the design of your home. The only thing you will regret is that you used it only once. Which, for our part, is not difficult to fix. Inspiration and good ideas to you!
A budget option
Experienced craftsmen know many options for making a console with their own hands. You can make interesting products from PVC and old kitchen furniture. For beginners, it is best to make multifunctional products from suitable-sized cabinets, which must be connected into one, long structure. Be sure to put a strong board on top. A small bar is attached to the back of the table. The board itself may be rough and unpolished. If desired, it can be refined, thereby constructing a less weighty and bulky product. If the master has the necessary skills, then you can use all your imagination to create a truly original console.
Variety of materials
To furnish your personal home, you can use different types of furniture. A console for the living room allows you not only to emphasize the existing design, but also to create an additional corner for placing personal items, flower pots or cosmetics. In order for a handmade product to last as long as possible, you need to choose the right consumables. In factory conditions, pine, oak, ash, mahogany, and beech are most often used. Of course, such furniture is not cheap, which is why not all citizens can buy it.
To save your family budget and get high-quality furniture, it is best to choose veneer products. This material is absolutely safe for humans and is resistant to the negative effects of moisture and mechanical damage. The surface of the slabs can be decorated at your discretion: stick a laminate, fill it with high-quality polymer, use PVC film. Not only the amount of costs, but also the durability of the console depends on the choice of a specific material. Among ready-made furniture, stone models have become very popular: granite, marble, turquoise. These materials are durable and expensive. A forged product will fit perfectly into a classic interior. Thin rods make refined coils.
A console table makes it possible to complement the interior with a compact and beautiful object. At the same time, the creation of this piece of furniture does not require high professionalism. Next, we offer simple instructions that make it possible to get not only high-quality furniture, but also aesthetic pleasure from independently creating a high-quality product with your own hands.
Materials for the manufacture of furniture consoles: exclusive and budget design
Manufacturers use various materials to make consoles. On their basis, an unusual and original product design is created.
The most popular consoles on the market are those made from the following materials:
- glass;
- wood;
- chipboard;
- plastic;
- MDF;
- metal
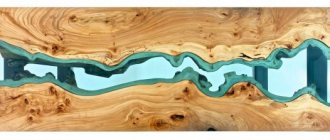
Console table made of natural wood and stone
Glass structures are used to create an elegant and light interior. Tempered glass is used to produce such products. This type of material can withstand high loads. Tempered glass is not afraid of even strong impacts.
If you want to purchase an environmentally friendly piece of furniture, you should pay attention to wooden consoles. Such tables fit perfectly into country style. Coloring compounds are often used as a finishing touch, with which the product can be given any shade. White wooden console tables can be a great addition to a Scandinavian-style interior. However, the most common models on the market are those left in their original form and coated with a transparent varnish.
The budget category of products includes consoles made of chipboard. They are often used to create standard interiors. Considering the cost of these structures, you should not count on their high quality and attractive appearance.
A metal console is perfect for a high-tech interior
Plastic products are characterized by a huge variety of shades. However, the design of such consoles cannot be called luxurious or solid. The surface is easily damaged. As a result of mechanical stress, chips and scratches remain on the plastic. Such damage can only be repaired with professional sanding.
Metal pieces of furniture are suitable for interiors decorated in high-tech style. Forged console tables are an excellent decorative component that can decorate any room.
Related article:
Console in the hallway: a practical and original piece of furniture
Product characteristics. Execution options. What are consoles made of? Design style. How to make a console table with your own hands.
Many manufacturers use MDF to make beautiful, durable and high-quality consoles. This material allows you to create products in different colors and styles.
Materials for creating luxury furniture consoles
Manufacturers of luxury consoles sometimes use various combinations of materials to create unusual designs. In addition, the appearance of the product is complemented by decorative details that serve as additional decoration.
Console tables can be decorated with mirror inserts
Common decorative design options for consoles:
- the use of inserts made of precious metals or glass;
- mirrored console tables (the products are decorated with pieces of mirrors or are equipped with a full-fledged mirror, which is attached to the wall directly above the structure);
- creating a unique design by painting products in different shades;
- tables covered with natural veneer;
- decoration using painting, and patterns can even be applied by hand;
- the use of natural stone in the design of the tabletop or console support legs;
- decorating the edge of a product using decorative carvings.
Glass consoles look elegant and airy, they are suitable for different style trends
Helpful advice! If the console will be used as a stand for lighting fixtures or accessories, it is better to give preference to models with a laconic design, the style of which matches the overall design of the furniture in the room.
The essence of a console table
This furniture option is extremely narrow, it measures half the size of a simple table or even less. They say that these tables appeared quite a long time ago and were first used at the royal court in France, starting in the 17th century. It is likely that some palaces had rather narrow corridors, and such furniture could also be relevant for the bedroom.
For the most part, these tables stand against the wall and fit tightly to it with their canvas. Therefore, it is quite possible to use only two legs that support the canvas, and simply use wall mounting.
Types and forms
Console tables can combine a variety of functions if they are complemented with a sliding mechanism. Usually this is a narrowed table of the usual appearance. A console table can replace a dressing table or become a stand for lamps, vases, boxes and some other decorations. Small drawers increase the functionality of the product and give it practicality.
There is often an opinion that a console table is purely decorative, but in reality this is not the case. It is difficult to find the best way to compactly replace shelves, a stand for a vase, a watch, several gloves, keys, phones, small bags. Yes, this is not a very capacious product - but a large capacity is not required.
Console tables with an oval mirror perform exceptionally well in a classic interior. Such solutions should be thoroughly decorated - mosaiced, painted, or topped with natural stone with excellent decorative properties. When space saving considerations come first, the folding type turns out to be one of the best. It can be either square or semicircular - engineers and designers have long mastered both of these options and know how to skillfully use them.
Wall-mounted (mounted) consoles cannot be confused with an ordinary shelf mounted on brackets - it does not have such an elegant tabletop. It is made teardrop-shaped or oval, and can be decorated with carvings or figured elements.
A corner console table is considered by most experts to be more convenient than a regular one; they note the opportunity to make better use of corners and occupy that part of the space that usually remains idle. If you need to master every centimeter of a small apartment at any cost, this is a very good solution. Corner consoles made of wood are suitable for classic corridors and living rooms; In a distinctly modern interior, you can use metal and even concrete products. The theme of retro style can be highlighted favorably through designs with rich, intricate carvings.
Width and height, as well as depth, are largely chosen according to individual taste, but you also need to make sure that the size will be sufficient and will not create any problems. Otherwise, there are no special recommendations in this regard. Consoles are narrow by definition, so excessive dimensions are contraindicated for them.
The simplest option
First, let's point out the simplest option, which requires the least amount of work. Almost any old table can be used for this. The task is to cut such a table in half or even make a narrower part, which will remain as a console table.
Note. This means old tables that can be used normally; if there are defects somewhere in such a table, then only the normal part should be left.
After the workpiece is received, you need to perform decoration. Since we are talking about an old table, as a rule, such a table is sanded, and then primed and painted. It is quite possible to use other compositions, mixtures and decor.
Features and purpose
When you visit any online furniture store, you will probably come across a wide selection of console tables. Moreover, there will be wide and narrow, white and black, forged metal and cheap plastic. Even finding a hanging option through Avito or other resources will not be difficult. What I mean is that the assortment is huge these days.
But it is important to take into account that in its classical presentation, the KS is precisely a decorative piece of furniture. In spacious houses and large apartments it is used exactly this way. But in modern realities everything is somewhat different. This is a functional stand or pedestal of sorts that decorates a room while providing added practicality.
Therefore, the console table can safely be called an elegant and sophisticated stand. Although previously the console was positioned as a protrusion on the wall, necessary as a support. If you prefer a classic interior style, you will need KS for antique clocks, beautiful vases, lamps, and rare decorative items. But modern people use the console as a shelf for their phone, tablet, keys, bags, laptop, etc.
Additional Variations
Of the additional variations, quite interesting are those that use improvised materials, things that can be thrown away and not used:
- old door leaves;
- window frames and windows;
- furniture parts;
- simple boards (unedged);
- leftovers from plastic window sills.
In general, any planes that will look more or less aesthetically pleasing and at the same time have sufficient size and strength.
Here the question arises of what to make the legs from and the answer will also be to search for available and free materials that could perform such a function. For example, if you approach the work competently and with imagination, then it is quite possible to take, for example, PVC pipes, which are used as a support for the table cloth. Also, the legs can also be simple boards or bars; if the table is made in the style of natural materials, then halves of untreated timber can be used.
Note. When choosing legs, evaluate the likely load; you should make a design with a sufficient margin of safety, even when talking about a simple coffee table.
It should be noted that the console table is not always attached to the wall; it may be separate. At least there are such models. Then they are simply a separate thin table for a variety of purposes.
What are balusters and their types?
We previously looked at how to make a cantilever structure using store-bought pre-made legs, but it can look more attractive if you make the supports yourself. Next, we will look in detail at how to make table legs from balusters. But first, let's figure out what it is. Why made of baluster?
The fact is that these carved columns have a very original shape, thanks to which they were previously widely used in architecture by the ancient Romans and Greeks. Modern architecture does not require the presence of such decorations, but, nevertheless, balusters are often used to decorate stairs, balconies and furniture. They themselves are functional due to their unusual shape. Depending on this parameter, balusters are divided into three types:
- In the form of bodies of rotation. Outwardly, they resemble a regular cylinder or a flowerpot of any shape. They are made on lathes, thanks to which each post has a finished look. This form is considered the most popular.
- Slotted. They are made from boards, so they are mainly used in attics, that is, technical stairs. They are decorated with through figured holes.
- Sculptural. Such balusters have a more complex arbitrary shape, which is why they are made exclusively by hand or using a machine with a large number of axes.