Advantages and disadvantages of a gasoline burner
Among the main advantages of BG are the following:
- Proper functioning of the burner at an altitude of 3-4 thousand above sea level.
- The burner can operate normally even at minus 40 degrees Celsius.
- Fuel such as gasoline costs much less, especially when compared with gas.
- Light weight burner and ease of use.
- You can take the burner anywhere, for example, fishing, hunting or just on a hike.
- This device is convenient to use during installation work.
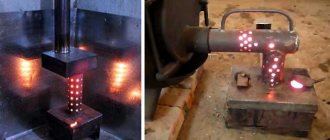
- The high temperature at the outlet allows you to work with various types of metals and alloys.
- You can use other fuel: kerosene, alcohol or diesel fuel.
But a gasoline burner also has disadvantages:
- High fire hazard, especially during fuel filling.
- Most often, the fuel torch is uneven.
- Soot may appear during operation.
- It is important to use pure high-octane gasoline, otherwise the throttle hole will quickly become clogged.
Types of burners
Jewelry burners come in two main varieties:
- gasoline;
- gas.
Gasoline
This type of burner is most often used for soldering products in domestic conditions . The units are designed for soldering individual elements together using molten metal. Gasoline models help create hard and reliable solders. But at the same time they will become fusible or refractory. Such samples necessarily have a separate compartment for gasoline. Gasoline-air samples may have different designs.
But the basic options, in addition to the fuel compartment, also include an air compressor, special gas-resistant hoses (they provide fuel supply) and a stand.
Gas
Such models of jewelry units are most often used for soft and hard manual welding . These burners have a thin and thread-like flame. Often such products are used for complex spot work; they allow micro-soldering. These mini-burners are capable of performing high-quality work even in the most inaccessible places in the structure. Masters use this type of apparatus using replaceable gas cartridges. Sometimes also called gas cartridges, they can be purchased at a hardware store. You can connect to such an element through hoses.
Do-it-yourself gasoline torch for soldering
First of all, it is important to say that gasoline burners made independently are no worse than factory ones. BG made by hand is just as productive and safe.
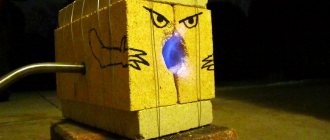
It is important to note that the temperature at the flame can exceed 1000 °C. Therefore, such a burner will easily melt refractory solders, perform heat treatment of small tools, melt various metals and even glass.
You will need:
- Frame.
- Fittings.
- Cotton wool (cotton and basalt).
- 2 valves for regulating the supply of the air-fuel mixture.
- Silicone pipes.
- Flexible plastic ties.
- Copper tube.
- Emphasis.
- Sealed metal can.
- O-rings.
- Pen.
- Rubber bulb.
- Filler.
The process of creating a gasoline burner with a compressor with your own hands:
- The body is created on a lathe; the workpiece can be a steel alloy of any grade. One end of the tube should be closed with a stopper, and the other will be open. It is necessary to drill a hole in the plug 0.2 mm larger than the supply tube. Then the housing will move successfully along the tube, while the tightness will be maintained.
- Several pieces of steel mesh and basalt wool should be inserted into the housing. This is done so that if the flame breaks out, the fire does not reach the fuel container.
- After this, it is important to make a sleeve with a hook and a resting element. It can be made from a sheet of steel 2-3 millimeters thick.
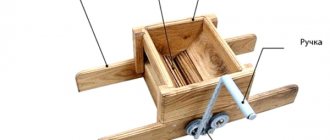
- The handle can be cut from ash or oak.
- Two through holes are drilled carefully. In this case, the projections of the drilled channels must be equidistant. Then the handle is sanded with sandpaper, then you need to apply 2-3 layers of colorless varnish.
- After this, the copper tubes are passed through the handle, after which they are sealed with refractory solder. Next, holes are drilled into them using a 0.3 mm drill.
- At the outlet of the tubes from the handles, 2 valves are installed, then there is a transition to silicone hoses. They are connected through fittings to a metal can, it is important to embed one fitting in the upper part of the can, and the second in the lower part, this is done so that concentrated gasoline vapors flow through one tube, and less saturated ones through the second. Don't forget to install O-rings on the fittings to prevent the mixture from leaking. The bottom of the jar is tightly packed with cotton wool. A bulb for pumping air is also connected to it.
- This completes the assembly, now you can fill the cotton wool with gasoline, seal the jar hermetically and test the device. To do this, air is pumped into the system with a blower, and then the combustible mixture supply screws are opened and set on fire.
Even such homemade gasoline burners will function properly, especially if you made the device according to our instructions.
Remember! If you do not have knowledge of the operation of burners and experience in using burners of this type, then it is better to buy a production version of the device.
Below you can see a photo of a DIY gasoline burner.
Materials and tools for work
Tools for work
To make a regular burner, you will need the following parts and tools:
- drill;
- Bulgarian;
- hammer;
- sandpaper;
- brass blanks for nozzle and divider;
- thin brass tube Ø15 mm;
- wooden bars;
- vice;
- FUM tape or silicone seal;
- connecting hoses;
- control valve.
Preventing clogging
During use, the channels or nozzles for supplying the combustible mixture may become clogged.
To prevent this from happening, it is important to follow these recommendations:
- Use gasoline with the lowest octane number.
- Each use of the burner must be completed by thoroughly cleaning the device.
- Once a month, add high-quality injector additives to gasoline.
- Systematically clean the system with carburetor cleaner. Such products fight very well against various deposits in fuel channels and jets.
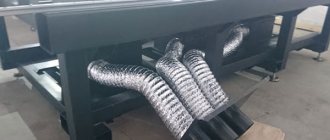
Waste oil burner
Used oil of various types can be used for space heating if the burner is installed on water heating boilers and air generators.
- Do-it-yourself kokoshnik: 80 photos of making and recommendations on how to make a beautiful headdress
- DIY bows - the best ideas and a master class on how to make a beautiful bow quickly and easily (100 photos)
- What are paintings by numbers?
A homemade waste oil burner will allow you to recycle used oil, heat your room in cold weather and save money.
It is quite possible to save your budget and make a burner for household needs with your own hands. The main thing is to follow safety precautions and use them carefully.
Buy or make a burner yourself
Buying a gasoline burner in a store is the easiest option. Understanding which model is best for you is quite a difficult task, because everything depends on the design features.
Sometimes burners are heavy, so you won’t be able to take them with you, especially if you don’t have a vehicle.
Factory-made burners are extremely expensive, and for their stable operation you need to buy only high-quality fuel.
- Creating a BG yourself has certain advantages.
- Firstly, you can refuel such burners with the most affordable fuel, and secondly, you can create a drawing of a gasoline burner and make exactly the device you wanted.
- And thirdly, you can install accessible consumables that you can quickly change while using the burners.
We are confident that this article will help you create a homemade gasoline burner. We wish you good luck!
Peculiarities
A gasoline torch for do-it-yourself soldering occupies an important place in the household. It can be used to connect metal structures. The torch is especially useful for refractory solders that require high temperatures. The design operates on the basis of a flammable mixture of gasoline vapor and air.
The operating principle is simple:
- Gasoline enters the tubular part of the structure using air pressure. The pressure is created using a piston pump and then maintained by heat.
- In the tube, gasoline heats up and begins to evaporate.
- Gasoline vapor passes through the nozzle.
- Gasoline vapor mixes with air and burns in the burner.
Unlike a gas burner, a gasoline burner is more compact and lighter, it is easier to take with you, for example, on a hike, and fuel is easier to obtain. If gasoline runs out, this will not affect the operation of the device in any way, while the gas will begin to liquefy and the flame will go out. A gasoline burner works well at low temperatures and in thin air.
Source activefisher.net
Photo of a homemade gasoline burner
High pressure kerosene lamp. My experience, advice
There is a neck with a lid on the tank, into which a pressure gauge and a pressure release screw are mounted. By the way, a lot depends on the performance of the pressure gauge.
On the other side is the pump.
Nearby is the “Rapid” valve of the burner for warming up the steam generator, for a quick start. More details below.
Handle for cleaning and adjusting the supply of kerosene. To the left - clean the nozzle, to the right - to open.
Inside you can see a special container. This is a container for alcohol, which is used to heat the steam generator. For a soft start.
There is a special hole on the side of the casing for filling it. It can be seen from behind, behind the container.
There is a carburetor under the hood.
Note. The photo clearly shows the nozzle cleaning needle.
I think it is unlikely that they will be able to get any wrong mixture, but an untuned carburetor is the reason for the excessive noise of the lamp during operation.
The valve is disassembled, washed, lubricated and screwed back on.
It is not necessary that you will have to deal with all these problems. But it’s not a fact that you won’t have to face something more serious. So one forum member had to go through the entire fuel system.
Now, taking into account the above, without delay, let’s move on to the question of whether it’s worth buying.
So, it seems like all the issues have been sorted out. The pump pumps, the pressure gauge reads.
The question is extremely important. One genius wrote up a whole article in RuNet on the topic of how stupid the Chinese are, you see, they installed plastic o-rings, which leaked during the first start and dirtied the entire lamp. It was not enough for the genius to open the instructions and read it. And it says something like this: “Before first use, be sure to remove the plastic transport rings!” That is, it is already clear that they are needed so that the glass does not move during transportation, but apparently not for everyone. Okay, basically take off the rings.
The note. Store kerosene in a dark, warm place to avoid “waxing.”
Why do I say non-illusory? Because they told me, I didn’t listen. Broken glass. And finding something new is not so easy. Nevertheless, let's consider both.
They also produce special caps for the lamp to replace the stationary one, with which the lamp can be used to heat food.
Step-by-step manufacturing process
The assembly sequence of a homemade device is as follows:
- Manufacturing of the body. A familiar turner can best handle this task. There are no requirements for the type of material. One side should be open, and the other should be closed with a cork. I drill a hole in it for the tube.
Important! The gap in the plug should be increased by 0.1 mm. In this case, the housing will move while maintaining tightness.
- Installing the ring into the body. It should be made of metal mesh.
- We cut out a sleeve with a hook from a steel sheet.
- We make a holder from hardwood.
- We bring the end of the tube to the level of the burner, passing it through the body.
- We solder the tube output.
- Drill a hole and insert a fuel nozzle of the appropriate size.
To solder the tube, you should not use soft copper solder, since its main requirement is refractoriness. With certain skills, you can make solder yourself.
Device design and advantages
Regardless of the type of unit, the main components are:
- fuel storage tank;
- manual pump for pumping air;
- connecting petrol-resistant hoses;
- burner with nozzle;
The burner consists of the following elements:
- adjustment ball;
- O-rings;
- limiter;
- valve;
- burner nozzle.
If the main purpose of the torch is welding and soldering, it is equipped with special tips for feeding filler wire. Such devices are called gasoline welding units due to the similarity of the technological process.
In addition to the simplicity of the design, the device has other advantages:
- Dimensions and weight . There are many models, from which you can choose the appropriate size and weight - from mini devices for working with jewelry to massive burners for hiking.
- Mobility . Thanks to its small size, the burner can be used anywhere, without being tied to local conditions. The only requirement is the availability of fuel.
- Process stability . Provided that the settings are correct and the quality of the fuel is normal, the burner flame is highly stable.
- Temperature adjustment . A special mechanism allows you to regulate the temperature effect over a wide range.
Wick for kerosene lamp
A kerosene lamp is an indispensable tool on a hike for lighting when you don’t have a flashlight or its batteries are dead. She is not afraid of either wind or frost, she will help illuminate the path at night, and provide illumination when the fire goes out. However, you need to keep in mind that this is a source of non-directional lighting, and it will not be possible to illuminate the road beyond one or two meters. If you run out of consumables, making a wick for a kerosene lamp is easy to do with your own hands, just like the lamp itself.
What to make a wick for a kerosene lamp from
In past times, kerosene lamps contained wicks made from asbestos fabric. Today it is little used, since asbestos releases a large amount of carcinogens when burned. It was replaced by cotton wicks.
Therefore, today it is easy to find replacements for factory wicks. The main thing is that they do not contain artificial fibers, since the fabric will spark or melt; in addition, they must be woven from several rows of threads so that the wick is well saturated with fuel and holds the fire for a long time. The weave of the fabric allows the flame to more easily rise up the microcapillaries.
Sock wick
The simplest, “camping” option for making a wick is from a sock. To do this, you need to twist it into a sufficient thickness so that it does not burn out immediately. The top of the wick should not form a fringe. It must be completely soaked in kerosene or oil, placed in a regular tin can.
Sock for making wick
Using an old sock as a wick, you can make your own oil or kerosene lamp from an ordinary light bulb. To do this, you need to carefully open the copper disk at its base and remove the central part with pliers. It may not be possible to remove it entirely, then you will have to remove it in parts, breaking it with a screwdriver. The main thing is to preserve the integrity of the glass surface of the lamp.
If the lamp has an internal white coating, you can remove it using salt, a tablespoon of which should be poured inside the flask and shaken. The fastening for the wick will be a disk cut from an aluminum can. You need to make a hole in the center of the disk. A narrow strip is cut from an old sock, but it should not fall apart into fibers, it can be twisted. The filter is threaded through a hole in the aluminum disk and its long end is lowered into the light bulb. You need to pour kerosene into it and wait until the wick from the sock is completely saturated with it. It should protrude about one centimeter from the flask, otherwise it will smoke.
In order to be able to tighten the wick as it burns, its end is fixed with a wire twisted into a spiral. To prevent it from smoking, it is recommended to moisten it with vinegar before installation.
Carbon wick for kerosene lamp
An alternative to a fabric wick can be a carbon one. To do this, you need to take a piece of charcoal, process it, giving it the shape of a little finger 2-3 cm long. The wood fibers should be located along the wick.
Carbon wick
After this, the workpiece must be soaked in heated paraffin to impart strength. The coal is then wrapped in metal foil, which will prevent it from burning with a large flame. One part of the wick should be left uncovered, protruding 5 mm above the foil.
Next, a holder is formed from the same foil, paper clip or wire, which is wound around the coal billet. The end of the holder is bent with a hook to hang on the edge of a glass container with oil. You need to make holes in the walls of the foil wrapping the coal to allow fuel to access the wick. It is desirable that the exposed surface of the coal is flush with the fuel. The homemade lamp is ready, you can light the charcoal wick.
DIY wick for a kerosene lamp
The wick for a kerosene lamp should consist only of natural fiber. This could be a lace, a cotton piece of fabric, a piece of insole with a cellulose composition, or a sock. Wool fabric is not suitable for this role.
To create a simple wick you will need a wire of 1 mm and a cord made of natural material. If there is no lace, you can twist a piece of cotton fabric several times. You need to clamp one end of the wire with pliers and start winding it so that you get something like a spring with a diameter of 1 cm with five or six turns and a distance between them of 2 mm. The last turn should be wider than the rest; it will hold the entire spiral with the cord in a vertical position.
The other end of the wire is bent with a hook. A cord is inserted into the wire, its end (5-8 mm) is clamped with the top turn. Then it is placed inside a glass jar with oil, which should soak the wick, and the hook is thrown over its edge. You can pull out the ignition cord using the holder.