Flexible dryer
There is another amazing device for drying shoes that you can make with your own hands. The main element will be a flexible corrugated pipe and a fan. To manufacture the device, you must purchase from a specialized store: a 220/12V power supply and a connector for it, a plastic distribution box for outdoor use, a rotating cooler and a one-meter long corrugated pipe.
- First you need to remove the rubber plugs in the junction box.
- Next, you need to divide the corrugation in half and insert it into the hole that was formed after removing the plugs.
- You need to make a hole at the bottom of the box, place the cooler there and secure everything with self-tapping screws. The air flow will be supplied into the corrugated pipes.
- If there is a gap anywhere, it must be eliminated. This will allow the airflow to move in the desired direction.
The flexible dryer is ready for use. It not only allows you to return your boots to their original appearance, but also preserves their quality properties, as it dries from the inside. It is very simple to use; both ends of the corrugated pipe are inserted into a pair of shoes, after which the device turns on. In order for a homemade device to cope with its task, it requires at least five hours. Therefore, the boots are completely dried overnight. If you only need to lightly dry or ventilate, then it can handle this in a couple of hours.
What is especially important is that no overheating occurs in the boots, and an unpleasant odor will never appear there. If everything is done correctly, the device will last for many years.
Options for DIY electric dryers
Homemade electric dryers differ from each other only in the materials from which they are made. In the selection of available materials, the creativity of do-it-yourselfers knows no bounds. Here are a few examples of amateur electric dryers that have proven themselves to work.
Dryer from an old refrigerator
Old Soviet refrigerators such as “Saratov” or “ZIL” usually live out their lives in dachas. Nothing lasts forever, they eventually fail and the best option would be to make an electric fruit dryer out of them with your own hands.
- As a component of the dryer, you only need the refrigerator body. Therefore, the compressor, refrigeration radiator and freezer should be carefully removed. It is important not to damage the housing to maintain tightness.
- When heated, plastic sheathing and thermal insulation will be a source of harmful substances and unpleasant odors. It is necessary to remove them, leaving only the rubber band as a door seal.
- To organize airflow, install a household fan in place of the compressor. Install heating elements in the lower part of the refrigerator, where air flows from the fan will pass.
- The shelves are made of metal mesh stretched over a frame of wooden slats. The air flow from the fan should pass freely through the mesh cells. The size of the shelves is larger than the original ones from the refrigerator by the thickness of the heat-insulating layer.
- To install shelves, secure wooden slats or aluminum and stainless steel corners to the side walls of the refrigerator. The distance between them should create the possibility of good airflow of dried vegetables and fruits, while making maximum use of the space of the refrigerator body.
- Exhaust ventilation is placed on the top wall. A section of sewer pipe is inserted into the hole, in which the exhaust fan is located.
- It is important to ensure the housing is sealed. In addition to the door seal, the fastening of the door to the body should be equipped with additional clamping loops.
- Covering the inner surface of the body with aluminum foil will significantly increase the service life of the electric dryer.
Electric dryer from a homemade cabinet
A wooden cabinet is used as a body for the dryer. Since kitchen furniture is made mainly from fiberboard and chipboard, it is not recommended to use this industrial option for drying vegetables and fruits. These composite materials contain harmful substances such as adhesives. It is impossible to guarantee protection using thermal insulation.
The option of making it from birch, oak and similar wood will create the necessary conditions for obtaining a high-quality dried product.
- We decide on the size of the cabinet. We make blanks from boards. The box is fastened with self-tapping screws.
- A hinged door is attached to the finished box. To create an airtight interior, it must be tightly closed, for example, with latches, as shown in the image:
- To prevent heat from being transferred to the wooden walls, the entire internal surface, including the door, is lined with reflective material in the form of foil. It is absolutely harmless when exposed to elevated temperatures. It is better to fasten the foil using self-tapping screws with a large head.
- Support strips are installed inside the wooden frame covered with foil. They can be made from wood or as shown in the image from aluminum angle.
- To make shelves for vegetables and fruits, it is better to use a mesh made of food-grade stainless steel. Other options, for example, reinforcing mesh for plaster or mosquito net, contain materials that, at elevated temperatures, release harmful substances that accumulate on dried products. The mesh is placed on a frame made of wooden planks connected to each other by building corners. The size of the shelf along the depth of the body should guarantee a gap (about 5 cm). By staggering the shelves as shown in the image,
the air circulation process improves - it passes freely along both (back and front) walls. - The choice of heating elements is quite wide: from conventional heating elements to industrial floor-mounted household fan heaters. The best option is when air supply and heating are combined in one device in accordance with all the conditions of electrical safety rules. In a wooden case, problems arise in installing heating elements. In addition to choosing a stand (in no case asbestos), you need to secure the heating tubes well.
- For a specific type of vegetable, fruit or berry, there is its own optimal drying mode. Therefore, temperature adjustment is mandatory. You can purchase a temperature sensor and thermostat without any problems at a specialized electronics store. You can connect the thermostat via a power supply, and connect the temperature sensor to a digital thermometer.
- Humid air can be removed through a plastic pipe inserted into a hole in the upper wall of the wooden case. The temperature of the exiting air flow will no longer be so high as to heat the plastic until it releases harmful substances.
- The dehydration process in a wooden case requires periodically changing the shelves in order to obtain uniform drying of all products. Those located closer to the heat source lose more moisture than shelves on the upper tiers.
How to make the simplest version of an electric dryer
Not everyone has the ability to work with wood or it is not possible to find food-grade stainless steel mesh. In this case, there is a dryer option, which is called for the lazy. The following materials and components are used in production:
- household fan heater;
- fruit storage boxes;
- stretch film.
The order of work is as follows.
- A seat for the fan heater is made in one of the boxes. It is securely fixed in it. It is placed on top of the same box in order to organize free space for air intake.
- The required number of boxes is built in a similar height as the first two. The column of boxes is wrapped in 6–8 layers of stretch film (except for the bottom one). Next, cut the film with a knife along the borders of contact between the boxes.
- Organize access (you can cut out windows in the box) to the regulators of the fan heater operating modes. After loading the prepared boxes, the required mode is set and a simple do-it-yourself fruit and vegetable dryer performs its assigned function. To combat insects, cover the top drawer with gauze.
It is important to choose the right plastic from which the boxes are made. In some hot countries, where temperatures are below 40 °C, a special polymer material is used that allows fruits to be stored at high temperatures for a long time without harming them. For the above design of the electric dryer, these are the boxes that are used.
How to properly assemble a dryer
The first step is to accurately determine the main dimensions of the structure (its height, width, depth), as well as the number of shelves and the distance between them. When deciding on all this, you should focus, first of all, on the total number of shoes in the house. After this, you should select the required number of pipe sections
In the process of cutting them, it is important to ensure that all sizes match exactly - this is the key not only to beauty, but also to the tightness and strength of the future structure
Once everything is ready, you can proceed to the most important step - assembling the bottom shelf, which will be the base. After soldering it, vertical posts should be installed, having previously installed tees with Mayevsky taps for them (they are necessary in order to periodically bleed air that will accumulate in the pipes).
White or red? Unusual roses combine petals of two colors at once
What days of the week are dangerous for you? Calculate using date of birth
Doctors explained why women get headaches more often than men
Next, you should make the remaining shelves for the dryer according to this scheme.
Now
The main module of a compact shoe rack is a cabinet for storing out-of-season shoes (item 1 in the photo) with compartments for shoes without high tops and with tops/tops. The first ones are usually made 3 (spring, summer, autumn), and one high, but those living outside the city need 4 low and 2 high compartments; “extra” for placing work shoes. They will not hurt in the city, for children's shoes.
A shoe rack in the hallway is complemented, if there is enough space, with a bench or banquette for ease of putting on/taking off shoes. It is advisable to make openwork shelves under the seat for drying shoes (item 2), but in general it is better to dry shoes, especially for country residents, in a separate dryer, see below.
If there is very little space, you can get by with a pouf instead of a bench. A single owner can fit shoes out of season under his seat (item 3), but the conditions for storing them in this case are not entirely favorable. It is better to keep shoe care accessories in a pouf (see the drawing on the right), and place the supply of shoes in a separate organizer, see below. If the now unnecessary shoes are still in the pouffe, its drawer for ventilation should be equipped with holes in the bottom, and vents should be cut out under the seat.
The width of the pouffe seat and a regular bench is approx. 400 mm. In a narrow hallway with them there is less room for passage than ergonomics require, and even a hanger with clothes is right there. Therefore, the so-called petal shoe racks (item 4); shoes are stored in them in a vertical position on the shelves of folding trays, reinforced between the sector rotary sidewalls - petals. It is possible to make a petal-type shoe rack with a width of 250-260 mm: sitting down is enough, and in the hallway 1.25 m wide there is a passage of approx. 1 m, which is acceptable. In addition, the petal shoe rack provides good ventilation of the contents both with closed and open trays. And if you fold down the tray, the shoes dry in it better than on the shelves under the bench.
Due to their compactness and large capacity, petal shoe racks are often combined into monoblocks with other pieces of furniture for the hallway. A common option is a bedside table in the hallway with a shoe rack, pos. 5. With dimensions in plan (600-800) x (250-270) mm, it can accommodate the everyday shoes of a small family. If there is enough space (approx. 1.1 x 0.4 m in plan), the monoblock is supplemented with a seat (item 6).
If there is an unoccupied corner or niche in the hallway (which is not uncommon in old houses), then it is convenient to store shoes here in a carousel shoe rack, pos. 7. Dividing the contents into 4 seasons in the carousel shoe rack is achieved in the most natural way. To store winter shoes (boots, ankle boots), the shelves are partitioned asymmetrically, see fig. on right.
Studying
We disassemble the dryer. Remove the grilles and unscrew the lid. And we see this:
In the middle there is a pipe with a heating element inside. Next to it is a fan with a motor, the kind that were once installed in record players. On the front there is a power switch and a thermostat with a rotary knob. Everything is very simple and modest. The manufacturer even spared the glass fuse. Although, to be fair, the thermal fuse was still placed right inside the pipe with the heater:
The principle of operation is simple. An impeller installed on the fan draws air through holes in the bottom of the dryer, passes it through the heater pipe and throws it upward to the nets with vegetables/fruits. The thermostat handle, depending on the angle of rotation, presses the bimetallic plate, which is wrapped with nichrome wire, more or less. As the wire heats up, the plate bends and opens the contacts. That is, in essence, this is regulation not by air temperature, but by the heating time of the plate. Which strongly depends on the environment and is selected approximately “by eye”. Hence such amazing “accuracy” and “stability”.
In a good way, for the maximum drying effect, the air must circulate in a closed circuit, and water vapor must be removed from it by an absorbent. There is none of this here, the circuit is not closed, there is no absorbent. Nevertheless, and oddly enough, the dryer copes quite well with plastic.
Having studied the design, we proceed to remodeling.
How to choose a place to dry clothes
There are a lot of options for choosing a place to dry your clothes. First of all, you need to start from the presence of free space on the site where children will not play, light a fire or cook food. And it shouldn't be a street with car exhaust fumes.
The drying area must be well ventilated.
Drying should be well ventilated. Ideally, avoid direct sunlight to prevent colors from fading while drying. A cool, shady, well-ventilated place would be an ideal choice for hanging washed clothes.
There should be no fires or exhaust fumes nearby.
Estimate in advance how much free space you will need for drying clothes if a strong wind blows. The edges of the fabric should not hit fences, trees, walls or other foreign objects in bad weather.
Children should not play in the area where laundry is dried.
What do we need for the plane?
All components are required, if one of the components is missing, your plane will not fly, and as for the weight of the aircraft, it should be no heavier than 700 grams, so none of the components should be replaced with another, since the ones listed below are fully tested and give a very light weight.
- Set of inexpensive HobbyKing Donkey S3007-1100kv motor and regulator (thrust about 920 grams);
- Battery Turnigy 2200mAh 3S 20C Lipo Pack (enough for 20 minutes of flight);
- Receiver transmitter Hobby King 2.4Ghz 6Ch V2 (range of about 1 kilometer, provided that there is no interference nearby);
- 4 servos (designed to control flaps, etc.);
- Propeller 9×5;
- Ceiling tiles (foam plastic).
Below you will see what the components look like...
In general, all this will cost you 3,000 rubles. A motor with a regulator costs about 600 rubles, a receiver-transmitter costs about 1,400 rubles, a propeller costs 100 rubles, servos cost 89 rubles each, and a battery costs no more than 600 rubles, although it all depends on which store you order all this from.
Popular articles Egg Tray Train
I would recommend purchasing these components from the online store parkflyer.ru as they have the lowest prices. As for the ceilings, they cost 5 rubles each and can be found in any hardware store.
How to make an electric shoe dryer
The easiest way to dry your shoes in the slush is to put them on a radiator. However, it is not always possible to do this, since the heating season lasts from November to April. And during the unheated period, the shoes do not dry out.
A homemade electric dryer made from a shoe rack, a thermal cable and a sheet of metal looks aesthetically pleasing and does the job of drying.
- The size is measured according to the size of the bottom shelf and a metal plate is cut out. The basis for drying is metal 0.8 mm thick
- A self-regulating heating cable with a power of 30 W/m, reaching a temperature of 85 0 C is cut into pieces. The cable regulates its temperature along all sections of the length
- Remove the top sheath of the wire and connect the three sections into a network in parallel. Cable contacts are protected with electrical tape
- To increase heat transfer, the cable is attached to a sheet of metal using aluminum tape. Several layers of adhesive tape securely fasten the wires and increase thermal conductivity
- The lower part is covered with a reflector, and the upper part is painted black. The finished dryer is placed on a shelf and plugged in.
Temperature measurements showed that the shoe dryer heats up not only on the lower, but also on the upper tier.
From the cooler
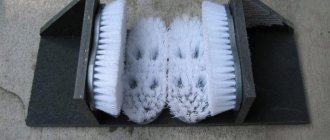
Make your own air dryer for shoes from coolers from a broken microwave oven according to the instructions:
- The corrugated pipe for electrical wiring is divided into 2 parts. 2 holes are made in the junction box at the end sides. Junction box with rubber elastic plugs
- The cooler is placed in the box so that air enters the pipes. The blades are trimmed if necessary
- The gaps are filled with a rubber gasket. The bottom is glued with a vibration isolator. The cooler is attached to the base of the box with screws. Connect the wires and check the functionality of the dryer. A hole for the wire is cut in the rubber plugs
From small fans
A do-it-yourself electric ski shoe dryer is assembled from the following materials:
- sewer drain 2 pieces of 25 cm each, with a cross section of 5 cm;
- 2 plugs, diameter 5cm;
- power unit;
- 2 fans from an old computer;
- 2 tubular resistors OPEV-30, resistance 24 Ohms;
- 2 grilles for the fan;
- 1 m of double stranded wire PEV 0.75;
- electrical tape, soldering iron, knife, shrink tape.
- A hole is soldered into the plastic plug. Install the grate. The fans are attached to plastic plugs. The wires are routed out. Mark the fan with a marker and use a soldering iron to melt a hole for fastening
- The wire is bent and placed in a resistor. With the bare wires down, install the part to the plastic plug with the fan. The wires are soldered. Bent wire prevents resistors from moving within 25cm sections
- The network cable is brought out and connected to the power supply in parallel. The workpieces are put into pieces and tested. The wire is insulated. The red “+” wire is attached to the power supply
When the device was turned on, the air temperature in the room increased by 8 0 C.
From thermostatic cable
- Cut pieces of the thermostatic cable 35 cm long. Prepare the electrical cord, terminal block and thermal cable
- Electrical tape is used to insulate the cable on one side. The wires on the second side are exposed. The sheath is removed and the veins are freed
- Attach the terminal block. All wires are carefully insulated
- The segments are bent into a loop and soldered to the electrical cord. The joints are carefully sealed with heat shrink tape.
The finished shoe dryer is connected to a 220V power supply.
The video shows instructions for assembling an electric shoe dryer with your own hands:
From plastic pipes
For production you will need:
- hair dryer;
- plastic pipes;
- corners for PVC connection;
- hacksaw;
- soldering iron for PVC products;
- clamps.
Assembly instructions:
- Prepare pipe sections 20 cm long. At a distance of 2-3 cm from the ends, a hole is made for air to escape. Elements are cut at an angle of 40 0
- The corners are attached to PVC. Corner fasteners are soldered to pipe sections
- A tee is attached to the corners. Using a soldering iron, connect the tee and corners
- A hairdryer is attached to the hole using clamps and a pipe. Testing the device
How to make a heating dryer
This method is considered the most effective.
But it requires a little more time to manufacture compared to the previous version.
Materials and tools
For production we will need the following.
- Polypropylene pipes.
- Polypropylene fittings.
- 2 ball valves.
- 7 steel pipes 1 m long.
We also need the following tools.
- Pipe cutter
- Soldering iron for pipes.
Manufacturing process
- Solder a small piece of polypropylene pipe into the heating system, then install the tap and turn it off.
- Then run the pipe to the location of the future dryer.
- In the same way, you need to do it in the heating area after 2 m. Solder a piece of pipe through the fitting, and then install a closed tap. After this, a pipeline is created to the intended location of the dryer.
- Now we need to create the outline itself, which will dry the shoes. To do this you need to use polypropylene fittings. It is necessary to solder steel pipes into them. You need to create a closed loop. The elements must be parallel to each other. The distance between them should be approximately 5 cm.
- When the heated circuit is created, it will be possible to solder it with the pipes that we connected to the heating system.
A huge advantage of this dryer is that it can be turned off and on as needed.
To do this, we installed taps.
Therefore, you need to install a wooden grate or dense synthetic material on the pipes. In this case, there will be no close contact and no damage will be caused to the boots.
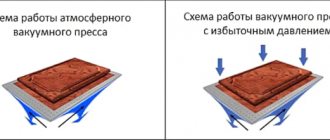
How to make a climate chamber for drying with your own hands?
In an apartment setting, there are usually two camera options available.
- Climate chamber from a regular household refrigerator.
- Chamber made of polystyrene foam or polystyrene foam. It can be built on an insulated balcony or loggia.
Below are the pros and cons of each option. I will share my experience; most likely, it will be useful for you, because you do not always understand in advance what you will encounter in practice.
Climate chamber from a domestic refrigerator.
This is the fastest option you can think of. The truth is also the most insidious and ambiguous.
A refrigerator is a product that itself is suitable for storing food. Moreover, it is designed to maintain a certain temperature regime.
The catch is that a household refrigerator maintains the temperature inside the chamber within the range from +5°C to +10°C. This temperature is too low for dry-curing meat. We need a temperature from +15°C to +20°C.
The second difficulty, and this is also the main one, is that we need a stable humidity of 75%, which is not available in the refrigerator.
This suggests the simplest way to resolve all issues. Use a temperature and humidity controller. It seems enough to turn on any household refrigerator through such a controller and purchase a small air humidifier, put it in the refrigerator and also turn it on through the controller.
The simple path is not always the shortest. Looking ahead, I want to say that setting up a chamber for the cheese-making machine on the balcony turned out to be much more interesting than making it from the refrigerator. But first things first. We meet the controller.
Climate chamber controller for drying
What kind of controller is this? It consists of a two-in-one sensor. The same housing contains both a temperature and a humidity sensor. The processor is controlled using a four-button keypad on the front panel. The display shows the climate condition inside the chamber. Alternately, with an interval of a couple of seconds, it shows temperature and humidity. In addition, special light indication icons display ongoing processes. It is immediately obvious, for example, that the humidifier is now running.
I offer a budget controller on Avito. Look, if this link is still relevant, it means it is in stock. If the link does not work, write in the comment, I will answer. I can also make a controller according to your technical specifications. In addition, you can make such a device yourself if you have skills in electrical installation and wait a month to wait for a package with a humidity thermostat from China. Buy devices like ZL-7830A or ZL-7801C. Their functionality is slightly different.
The website contains a detailed description and installation diagram of the temperature and humidity controller ZL-7801C in Russian.
Attention! Correctly position the universal sensor inside the camera. It should not be hidden somewhere in a corner, or too close to a source of cold air. It is better to place it as close to the center of the refrigerator compartment as possible. Being close to the door is not scary. When you open the door, there will be a partial loss of the established climate. Also, natural ventilation of the internal volume will occur. As soon as you close the door, the climate will quickly restore.
What are the advantages of making a climate chamber from a refrigerator?
- Quick start of drying. You can start almost right now. Plugged it into the controller and everything worked!
- Small size. Even in a small apartment you can find space for one refrigerator.
- Versatility. It is enough to turn off the refrigerator from the controller, and it again becomes a household refrigerator, and the controller can be used for a larger project or sold, depending on your intentions.
The downside of the refrigerator is that it is used as a drying chamber.
- Humidity problems. I will write a separate article on how to solve them and why you can’t use an ultrasonic humidifier. This is a big topic. Refrigerators are all different, I was lucky and got a problem-free one. There was even an illusion that everything was so smooth with all refrigerators. It turned out that this was not the case.
- Small volume. If we are talking only about a hobby, then it is quite enough. If you want to go beyond your hobby and earn a little money, you will most likely be disappointed with the word “a little.” Learn more about drying cheese as a small home business.
Whatever you say, appetite comes with eating. Personally, this is what happened to me. At first, store-bought sausages stopped appearing in the house, due to the fact that they were incredibly inferior to homemade ones. Then it turned out that delicacies are good gifts for friends on all sorts of holidays. And the larger your social circle, the more people know about your hobby and the more difficult it is to satisfy the demand for treats.
Don't make the mistake of buying a refrigerator specifically for your camera. A small refrigerator is a waste of money. Manufacturers are sensitively responding to demand and are already positioning bar mini-refrigerators like gemlux gl-bc-38 as climate chambers for sausages. Well, what can be done in such a volume? Hang 5-6 sausages and that’s it? Dry 1.5 kilograms for a whole month? The game is not worth the candle.
Chamber for drying on an insulated balcony or loggia.
Since you can’t store much even in a large household refrigerator, the option with a balcony looks quite attractive. At least I gradually came to him. Although the refrigerator is also still in use.
As the classic said, “All happy families are alike, every unhappy family is unhappy in its own way.” You can also say the following: “All refrigerators are similar to each other, each loggia is insulated differently.” Therefore, it is not possible to give universal drawings and recommendations. I'll tell you how I set up a small climate chamber on my loggia balcony.
The frame consists of four 50*50 mm bars, the bars are connected to each other by 20*50 mm slats. Everything seems to be clear here. The walls are made of expanded polystyrene foam 50 mm thick.
The climatic chamber body is made of bars and slats
Polystyrene can be easily cut with a regular knife. It is better to attach it to the bars using special dowels.
Dowels for fastening foamed polystyrene
The pieces can be glued together with sealant or polyurethane foam.
The door to the cell had to be abandoned due to the fact that there was so little space on the balcony. On my balcony, besides the camera, the only room that fits is a freezer.
I’ll describe how to install a freezer on the balcony a little later. In short, I installed a flexible heater on the compressor and a regulator to turn it on with a temperature sensor. The regulator first checks the temperature of the compressor; if it is below +10°C, it turns on the heating; if it is higher, then the compressor immediately turns on. It's simple.
There was simply nowhere to open the door. So I just made one wall collapsible. Several panels are placed one on top of the other. I calculated the height in such a way that the last panel of the wall was inserted tightly against the ceiling. Thus, it fixes the entire wall.
Another design feature. In addition to the balcony door, there was also a small window in the wall (you can’t call it a window). So, I assembled the camera in such a way that the window opened directly into it. It turned out to be very convenient.
Window from apartment to climate chamber
Heating is not needed in winter. Energy saving. Agree that round-the-clock operation of the heater in winter, and we have long winters, will contribute to the already high cost of the product. It turned out that the flow of warm air from the apartment into the chamber through the slightly open window was sufficient. Moreover, at first I also planned to install a fan in the window opening, but the natural air flow turned out to be enough. The gaps that were not sealed when installing the panels helped.
The second benefit is the opportunity to look at the sausages directly from the apartment, without going out onto the balcony, and without dismantling the front wall of the chamber (in my case, maybe you can make a door).
Now about the “brains”. The climate chamber controller is connected to the air conditioner and humidifier. Yes, if you are going to do drying in the summer, then you cannot do without an air conditioner. The smallest air conditioner, designed for 8 m², is enough. This summer I will be installing an air conditioner, and I will give you a photo report about this event.
In winter, a heater can be connected to the controller. If it is possible to organize heating using warm air from the apartment, I recommend this option. Then, instead of a heater, you will need to buy a fan to blow warm air onto the balcony. Although, if the drying chamber itself is well insulated, then perhaps, as in my case, you won’t even need a fan. I repeat, I used 50 mm polystyrene foam. thick. On the balcony itself, the temperature practically never drops below 0°C. For such conditions and with a constant flow of heat from the apartment, the thickness of the panels was enough.
Pros of a camera on the balcony.
- Large load of sausages and meat, 3-4 times more than in the refrigerator!
- Saving usable space in the apartment itself.
Minuses.
- Costly in terms of time and finances. In addition to such necessary things as a controller and a humidifier, you will need to install an air conditioner, purchase thermal insulation and other materials, and lengthy installation.
Clothes dryer - step by step instructions
You can choose the shape of the dryer at will
Let's look at how to make a portable clothes dryer from plastic pipes with your own hands. The appearance of the manufactured dryer resembles an easel. To make it you will need:
- pieces of plastic pipe of different lengths;
- two connecting corners;
- several tees (their number is exactly twice the number of drying jumpers);
- two clamps for fastening pipes.
The dryer consists of two rectangular parts of the same length but different widths. The width of the second rectangle should be 10 cm smaller. The width of the product itself should be determined to your taste based on conditions such as the amount of laundry and the stability of the dryer. For an example of a simple clothes dryer on a radiator, see this video:
The clothes dryer is ready. When drying clothes, it is installed in the shape of the letter “l”, and clothes are hung on the crossbars. It is very convenient in the household. When it rains, it can be quickly moved under a canopy. For the secrets of quick and smooth fitting of tubes, watch this video:
As you can see, making a dryer from plastic pipes is very easy, quick and interesting. Thanks to the positive characteristics of this material, such a product will last quite a long time, since the plastic is not susceptible to corrosion and does not require periodic repairs.
Do not be upset if you made a mistake in the calculations when planning the life support systems of your home, for example, when arranging water supply or heating. Remains of pipes (even the smallest scraps) and fittings that were not used when installing pipelines can become the basis for some unusual interior item. In this article we will talk about some interesting solutions and share interesting ideas.
Types of homemade dryers for fish and meat
Depending on your desire, you can make absolutely any dryer, both in size and type of assembly. We offer you several options for making dryers from scrap materials with your own hands:
- Hanging dryers are generally small in size. This is where their practicality lies. This dryer can be hung on any tree and even on the balcony. They are convenient to store and do not take up much space.
- fish and meat dryers The huge advantage of such a dryer is that it can be made in fairly decent sizes, but when folded, it will fit even under a sofa, or in some inconspicuous corner of your apartment. Such dryers are most often used in suburban areas, where they can be easily assembled and installed right on the premises.
- Stationary. If you are an ardent hunter or fisherman, and you constantly have something to dry, then a stationary fish and meat dryer is what you need to have. A stationary dryer is no longer a toy. And if you are planning to make such a dryer on your site, then you need to approach it responsibly and do everything according to the drawings so that no mistakes are revealed during assembly.
- With fan . Such dryers are used if it is not possible to dry fish in the fresh air, or if meat needs to be dehydrated in winter. Making such a dryer with your own hands is very simple.
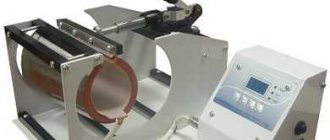
In this article we will tell and show you how to make a fish dryer with a fan with your own hands. To make such a dehydrator, we don’t need any fancy materials or tools. This will be a regular dryer, only with an integrated fan for more powerful air supply. The most common PC cooling fan is perfect for this purpose. It operates silently and consumes very little electricity. Well, let's go and make a dryer.
What you should pay attention to
To make such a structure, it is best to use polypropylene or metal-plastic pipes that have the ability to withstand pressure of about 10-15 bar and temperature of almost 100 degrees. PVC pipes are not suitable for this purpose, as they soften very quickly, as a result of which they lose their shape.
If you want to increase the functionality of such a dryer, you can equip it with mats or trays made of rubberized material - dirt falling from shoes, as well as running water, will accumulate in them.
The top shelf can be equipped as a dryer for gloves, socks, hats and other small accessories - for this it is recommended to install a grid made of plastic on the surface.
It is recommended to equip such a drying shelf with an additional shut-off valve - it can be used if the structure suddenly loses its tightness. Such a valve should be placed on the shut-off pipe.
Once you try your abilities in installing PVC water pipes, you will understand that working with the material and the way of connecting plastic elements opens up a wide range of creative possibilities. From plastic pieces and various elements for connecting them, you can make almost anything that has a frame base, a piece of furniture, or a useful device for a summer house. It could be a chair, armchair, stand, table, bed. Do-it-yourself shelves made of PVC pipes are perhaps included in a separate group, since it presents products that are varied in purpose, size and appearance.
Popular articles Funny Easter greetings in verse, SMS and prose
Working techniques
Considering that the essence of creating crafts from scrap materials is to use the ordinary for unusual purposes, we can say that the techniques for their implementation operate on the same principle. It’s more important to figure out how to translate the idea into reality.
In most cases, everything is simple: if something can be cut, we cut it, if it is held on by bolts, we twist it.
Rather, inspiration and creativity play a larger role than the working methods themselves. After all, making a candlestick from water pipes is much easier than coming up with the idea itself and seeing the picture in your head.
Therefore, take a closer look at things and start imagining.
Shoe dryer made from pipes and hair dryer
The steering wheel broke and I needed to mow the grass in the yard.
Post-apocalyptic swing
Wrench on a stick - for the most remote corners of the kitchen
Eternal Hammer
When it snowed the most
Hammer + rubber bands = mallet
Engineering lifehack
The main thing is convenience
I had heard a lot about whipped coffee, but I didn't have a mixer...
When you really want to swing
Colored lampshade
Lamp lamps made from PET bottles are a godsend for crafters. They can be sculpted again and again, and each new one will not be similar to the previous one.
The scheme is as follows: the top of the PET bottle is used as the base for the cartridge, the rest is cut, melted, twisted, and bent to form the most beautiful elements of a lamp or one of the lampshades.
Choose whatever decor you like. This is either a simple lampshade made from the top with a neatly trimmed edge, painted in your favorite color, or assembled from many small parts that are connected to each other.
From it you can make: flowers, stars, voluminous balls and flounces, just tubes or fringe. If you also let light through all this riot, then the homemade lamp will sparkle with thousands of lights and shimmers.
Looking at the play of light and shadow from such a lamp will be pleasant not only for you, but also for your loved ones, and it is doubly pleasant to realize that you did not just throw away an element that had been decomposing for a long time in nature, but breathed a second life into it.
Original storage container
Another way is to separate the bottom halves of two bottles and place one on top of the other. This tiny container is perfect for small items. In addition, plastic can not only be cut and melted, it can also be stitched with a needle and thread.
Containers made from large 5L bottles with the top cut off and the edge trimmed with fabric are very practical. You can sew on handles or laces to tighten the fabric like a bag.
If you connect several pieces together, you will get an organizer that is already familiar to us. You can put children's toys, yarn, Legos or some food there, for example, pet food.
Ladder shelf
Let's take a closer look at what has been stored for a long time, but was not taken out, for example, from the garage.
If you have a stepladder, a long tall ladder, a folding ladder, or even a rope ladder, this is an excellent opportunity to design some interesting shelving.
Actually, the structure itself is almost created; all that remains is to securely fasten the ladder to the wall or ceiling, using metal brackets, hooks or dowels.
Do not forget that a strong fastening will not allow your things to fall off the newly made shelf and will not disappoint you in the future.
The design options are as varied as the ladders available in the arsenal - a straight one, attached horizontally to the wall, turns into a stylish hanging shelf.
You can store books, photographs, pencils and markers, vases or pots of indoor flowers on it. If the composition is wooden, you can open it with stain or varnish.
A stepladder can become a modern shelving unit if only you attach boards to each step. If you turn it over like the letter “V” and install it against the wall, then everything will take on a completely different look, and if you take two or three stepladders at once, the structure will develop into a designer composition.
You can decorate the outside by finishing the boards in an antique style or, conversely, by treating the wood with enamel in fresh tones.
Even cable cars can be hung from the ceiling and shelves can be laid between them. Looks very creative. It is important in this case to calculate the correct number of shelves: if there are two of them, then fastenings to the ceiling are enough, if it is a huge rack, it is worth fixing the ropes in the floor too.
Wine cork stand
Wine corks are formed from the bark of the cork oak tree - this is an environmentally friendly wood, it has antimicrobial properties and is hypoallergenic. Such properties are very useful for the atmosphere in the kitchen, so this stand will be very useful on your dining table.
To prepare for creating a cork rug, it is important to decide what you want it to be, how thick it is and what it will be used for. Everything is simple with the form - whatever you like, we’ll make it.
The thickness can be different: from whole corks, from cut in half or from sliced plates or circles. How hot the dishes that you place on the mat will depend on how the plugs will connect to each other.
For cup holders, glue is suitable, with which the parts are glued together or glued to the formed base; For very hot food and drinks, it is worth taking something instead of glue, for example, you can sew them together with an awl and thread.
Combine beauty and practicality in your product so that there are no more traces of wet dishes left on your table.
Cardboard box organizer
Creating an organizer is a special field for activity. On the one hand, everything is very simple: take a box, cut it, add suitable partitions or additional boxes, glue it together and that’s it.
But you can decorate it endlessly - use whatever your heart desires: you can cover the cardboard with colored sequins, sparkles, lace, you can trim it with ribbons or wrap it with a cord.
Shelf made of tin cans
Used cans of coffee, tea, condensed milk or canned food are great for recycling, especially in the hand-made sector. Shelves are easy to create from them - fasten the cans together.
Now you can cover everything with ribbons, lace patterns, strands, or simply paint them.
Such shelves are suitable for cutlery, screws, beads or beads for weaving.
Putting things in order in your space is easier than it might seem at first glance; you don’t have to spend extra money from your budget to do this; it’s enough to allocate just a little time and effort for painstaking work.
Upholstering furniture with old clothes
Another opportunity to recycle old items and at the same time update the furnishings is to decorate furniture with outdated clothes. It is better to choose a thicker one so that the upholstery or cover does not have to be cut again in a week.
Small samples can be made from one piece of material, for example, for the seats of chairs, strong trousers or even a coat with a fur lining would be good.
If your skills allow you to upholster an ottoman or armchair, then you can safely introduce the “patchwork” style and sew the fabric of the required cut from individual pieces.
Shade
Everything made of paper bends, curls and bends. It's a pleasure to work with her. In addition, such products very beautifully convey the play of light rays, which is why such lampshades are especially impressive.
The basis for them can be, for example, simple Chinese lanterns, onto which small paper diamonds or triangles, twisted or curved petals, or stripes of patterns are glued. In general, the origami technique in this design is very useful.
Craft from a plastic bottle “Butterfly”
| Crafts made from plastic bottles provide a huge scope for imagination and creativity. Today we will try to make a butterfly from this material. We will need materials such as a transparent light plastic bottle, a butterfly stencil, a permanent felt-tip pen or stained glass outline, scissors, glue, glass paints, acrylic paints or nail polish, wire, beads |
Paper craft for children “Snowman”
| Paper crafts for children are an excellent method for developing imagination, creative skills, and fine motor skills. It is also a way for a child to learn about the world around him. This article brings to your attention a technology for creating toys from crumpled paper. |
Craft from tires “Flower bed”
| Today, the issue of recycling used tires has not been resolved. Where should we put them? Try making crafts from tires that will not only solve the issue of their disposal, but can also become a worthy decoration for your yard, cottage, or garden plot |
Craft from a plastic bottle “Pencil holder”
| Crafts made from plastic bottles are a great way to recycle waste that is harmful to the environment, as well as an opportunity to decorate your home or cottage. Let's try to make a pencil holder |
Craft made from shells “Sea Candlestick”
| While relaxing on the banks of a river or sea, you have the opportunity to collect many beautiful shells and pebbles. Later you can simply put them in the aquarium or show a little imagination and make unique things |
Wire craft “Man with a balloon”
| Wire crafts are a wonderful opportunity to spend long winter evenings interestingly by yourself or with your children. In addition, thick wire produces real masterpieces that will become a worthy decoration for your apartment. |
Craft for home and garden "Stand for a block of paper 'Giraffe'"
| Crafts for home and garden should be made with soul. After all, how nice it is when you use something made not by soulless machines, but by warm human hands |
Craft box “Box for small items”
| The box occupies a special place in the making of crafts. Very often, needlewomen make various boxes from scrap materials. After all, this craft perfectly decorates the room, and also has a practical purpose, serving as a repository for various designer accessories. |
Children's craft master class "Pencil holder 'Bird'"
| Children's crafts, master class - this is what you can find in the articles in this section. Such information will definitely be useful both for parents who want to make a creative person out of their child, and for leaders of various clubs and studios |
DIY craft for the garden “Decorative jar”
| Do-it-yourself crafts for the garden make it possible to create a cozy corner in which you can relax both body and soul. In addition, such handicrafts are much cheaper than their store-bought counterparts, and in quality and beauty they are not inferior to them at all. |
Craft in kindergarten “Little Man”
| Crafts in kindergarten should be easy to make and interesting for kids. Such simple crafts introduce children to the world of creativity, teach them to work with various materials, and use imagination and imagination in life. |
Original craft “Creative bag for seeds”
| Original crafts decorate our life, making it more interesting and creative. Often a person’s imagination leads to an improvement in his life and makes it possible to find a way out of even the most difficult situations. |
Fun craft “Napkin Ring”
| Funny crafts are a great way to amuse friends and acquaintances who will admire your masterpieces. But from the most ordinary object, irreplaceable in everyday life, you can make a unique thing, completely unlike anything else and reviving new life in the material used |
Craft from plastic bottles "Pencil holder 'Cheerful'"
| Crafts made from plastic bottles allow you to save a lot of money, which would be spent on purchasing various household items and decorating the room. This is how you can make a wonderful, fun children’s pencil holder from an ordinary plastic bottle. |
Shelf styles
Like any other piece of furniture, the shelf must match the chosen interior style of the room. For high-tech and loft, simple models made of metal and pipes are suitable. This option will look especially colorful against the backdrop of the “branded” brickwork in the hallway. For a group of rustic styles headed by Provence, open-type wooden shoe racks are suitable. The surface of the product is covered with discreet paint and artificially aged. This option will look great in combination with wicker boxes-baskets, which are placed on the upper tiers. For country music, you can choose a model from boxes that are placed on top of each other, after which the entire structure is secured with glue. For minimalism, original options are used. For example, a product that can hardly be called a “shelf” in the truest sense of the word: a row of vertical poles on a stand. Each one is “put on” a boot. For classic styles, luxurious closed models with carved doors are used. They also go well with elegant banquettes on twisted legs with a storage system located under the seat.
What types of designs are there?
An outdoor dryer must be massive and strong. Hanging laundry in a gusty wind creates a sail effect and can fly off the cord. For outdoor use, wall and ceiling models of stationary dryers, as well as homemade ones, are used.
Clothes on the dryer must be secured with clothespins.
Attach the fabric to the slats using wooden or plastic clothespins. They do not leave marks even on light-colored materials.
An outdoor dryer must be well secured.
Homemade
You can find a way out of any situation. Even if the need to hang up wet clothes finds you far from home, a homemade laundry dryer will come to the rescue. Basic models are created from improvised materials, pipes, wooden slats and even reels of thick cardboard. It is especially convenient if there are already pillars or piles built into the ground:
- any structure driven into the ground in the shape of the letter “P” turns into an excellent assistant for drying things;
- It is enough to stretch a few strong cords between the T-shaped crossbars so that you can dry any wet clothes.
Ready-made designs
Ready-made structures are divided into stationary and mobile. The first ones are massive and can withstand strong winds and any bad weather. The latter can be removed or folded as unnecessary. Mobile, transforming models are made of durable but lightweight materials that can be cleaned from dust and dirt.
Do-it-yourself dehydrator for meat and fish
A dryer for meat and fish can be easily made from a plastic container. For this you will need:
- fan;
- plastic container equipped with a lid;
- steel rods with a cross section of 5 mm or studs with threads, washers and nuts;
- pipe cut or coupling.
The entire process of making a dehydrator for drying fish, meat and drying other products from a plastic container is demonstrated in the video:
It’s easy to assemble a dehydrator for fish, meat, vegetables, fruits and other products from scrap materials: plywood, boxes, a refrigerator. Various working old fans are suitable for blowing. In each case, you will, of course, need to think over a way to secure them, but the economic costs will be reduced. In small installations, you can use a fan from a computer, having previously provided the required supply voltage. If you automate the dryer, then in terms of functionality it will be able to compete with factory analogues. When drying meat and fish, it is imperative to prevent flies from entering the interior of the installation so that they do not spoil the products.
Connecting components
Below in the picture you will see in what order you need to connect the components (the image shows third-party components since I have not yet received the ones we need).
You can find a drawing of the aircraft on the Internet. The drawing shows what dimensions each part of our aircraft should have and how to cut the ceilings correctly.
As a result, you will get a plane similar to the one shown in the picture below.
As soon as all the components indicated in the article arrive by mail, I will make the same plane and show it to you on my YouTube channel, so stay tuned for the news, or better yet, subscribe to updates on my website. The subscribe button is located on the left edge of the screen.
And don't forget to comment :-). Good luck.
Simple airplane made from a plastic bottle
You will need: plastic bottle, scissors, knife, colored cardboard, pencil, ruler.
Master Class
- Draw 2 identical stripes for the wing on the cardboard, then cut them out.
- Draw 3 small stripes for the tail, then cut them out.
- Create a propeller: trace the cover onto the paper, then make a larger circle and draw the blades.
- Cut out the propeller, place it on the neck of the bottle and close the lid.
- Using a knife, make 3 cuts in the tail area and 2 cuts for the wings.
- Insert 3 strips into the cuts to form the tail of the airplane.
- Secure the airplane wings.
A simple airplane made from a plastic bottle is ready! I recommend watching this video!
Installation of a heated towel rail
Installation of the device is carried out in several stages:
- water distribution for the heated towel rail is being prepared;
- the device is installed.
Pipe preparation
Before installing the device in the chosen location, it is necessary to provide pipes to supply the heated towel rail with water. As mentioned earlier, water can be supplied:
- from the apartment heating system;
- from the hot water supply system.
To prevent supply pipes from spoiling the interior of the bathroom, they can be removed. How to hide pipes from a heated towel rail? There are two ways:
- lay the pipes in the wall, in a niche specially prepared for them, formed by gating;
Laying pipes inside the wall
- cover the pipes with a plasterboard structure. To do this, it is necessary to build a special frame from metal profiles, which will serve as the basis for the future box.
Special box for hiding pipes
Both when gating and when arranging the box, the final finishing of the room is done with the selected material.
Making a homemade fish dryer with a fan
Our dryer will be almost no different from a simple collapsible dryer. You can start making a regular dryer from wooden slats, and then integrate a fan into it, which will help the fish or meat dry out faster. You are very lucky if you have an old dryer that is missing this very fan. You can fix this situation in 5 minutes, but we will tell you how to make a fish dryer with your own hands.
STEP 1: preparing materials . The simplest dryer design will be a rectangular cabinet with dimensions of 1500 x 500 mm and a height of 500 mm. To make it, we will need small wooden planks and a special fine mesh, which will protect the fish from attacks by insects and animals. The design will be quite small, so all connections will be permanent. We fasten all the planks using ordinary wood screws and mounting angles.
STEP 2: make the frame . To make the frame of a fish dryer with a fan, you need to prepare wooden planks. We will need:
- 4 strips 1500 mm.
- 10 strips 500 mm.
- Self-tapping screws.
- Metal corners.
- Screwdriver.
As mentioned earlier, the dimensions of the frame are 1500 x 500 x 500 mm. We assemble a frame from wooden planks. First we make the main skeleton, and then we attach additional strips to increase the rigidity of the structure of the fish dryer with our own hands. The top of the dryer must open and close to allow access to the fish. Therefore, we attach it to the simplest curtains. To close the gap between the cover and the frame, you need to stick a seal around the entire perimeter. To prevent the top cover from opening on its own, two hooks must be installed on the sides of the structure.
Dryer frame Finished dryer frame
Cover fastening
Locks on the lid
STEP 4: frame processing . To give a beautiful appearance and protect the wooden frame of the dryer from external factors. We treat the frame with stain. After the first layer has dried, you can process the frame with a sander to remove various surface roughness and unevenness. Next, apply one more, final layer. We got a cherry-colored frame.
First layer of stain
Sanding the frame Second layer of stain
STEP 4: Grid . At this stage of creating the dryer, you need to select and cut suitable pieces of mesh. When choosing a mesh for the dryer, it is worth considering the diameter of the hole. It is advisable to take the smallest one. If you need to make a dryer quickly, then ordinary gauze will do, but it is worth considering that the performance characteristics of gauze are very poor compared to mesh. And so, we should get two pieces of mesh measuring 500 x 500 mm, and four pieces measuring 1500 x 500 mm. We also cover the lower part of the dryer for meat and fish with a fine mesh.
STEP 5: Attaching the mesh . Now we need to secure the mesh to the frame of the dryer as well as possible to avoid the possible penetration of insects inside. To do this without any problems, we used wooden window beads. We cut it to size and secured the mesh around the perimeter. To do this you need to use a 25 mm nail. But, you can make it easier and secure the mesh to the frame using a stapler.
Frame with mesh Mounting hooks in the dryer
At this stage of our step-by-step instructions on how to make a fish dryer, we have an ordinary portable design. You need to make small hooks inside so that there is somewhere to attach the wire with the fish. Next, we have to introduce a small but very efficient fan into this design to improve dehydration in the product. Don't worry, you won't need to redo anything, you just need to make some modifications.
Electric dryers
Electric dryers are special devices aimed at home use or use in the service sector.
They come in several types, which differ in a number of parameters:
- appearance;
- principle of operation;
- cost, etc.
Principles for choosing an electric dryer:
- Quality of material.
- No damage to the housing or power cord.
- The size of the working part allows it to be easily placed inside any pair of shoes.
- The longer the cord, the more convenient it will be to use the device.
- It is advisable that the heating time be about a quarter of an hour. A longer heating period will require more time to dry the steam.
- The heating temperature should be up to +50 or +60°C. A higher heating rate is not desirable, as it can lead to damage to shoes, and low heating is ineffective.
Professional industrial shoe dryers are designed for use in laundries. And they are extremely rarely used at home.
They are quite bulky, have a high cost, and consume a lot of electricity. For children's shoes, separate models designed for small sizes are available.
Models with flexible heating loops or two blocks
The cheapest option is simple electric dryers. Many are a flexible, insulated loop that fits comfortably inside your shoe.
They are universal, suitable for drying a wide variety of models, making this process as soft as possible - using heat. There are also options for more complex construction and design that have a similar operating principle.
The advantages of this choice:
- simplicity of the device;
- ability to use on the road, on business trips, etc.;
- compactness;
- soft effect on the shoes themselves;
- low cost (from 130 rubles).
Flaws:
- takes quite a long time to dry completely;
- very cheap designs can be fragile.
Wooden heating pads
Wooden stands are made from moisture-resistant plywood. They are used not only for drying shoes, but also for warming up the threshold area, heating the feet, etc.
To dry, shoes are placed on plywood and the device is turned on. It takes several hours for the pair to dry completely. Cost – more than 1,000 rubles.
Advantages:
- Easy to use.
- Multifunctionality, which allows you to use the device for other purposes, not just drying shoes.
- Ease of use.
Disadvantages of use:
- It takes a lot of time to dry shoes after washing.
- Dimensions of the stand.
- Inconvenient transportation.
- Relatively high cost.
The action of such a local electrical appliance is similar to a heated floor.
Ultraviolet dryers
A shoe dryer with ultraviolet radiation allows not only drying, but also antibacterial treatment. During operation of such a device, unpleasant odors and microorganisms that cause fungus are eliminated.
For example, the Shine ECB-12/220k model with a power of 12 W, according to the manufacturer, can cope with almost all common fungi and many bacteria, including staphylococcus, in a few hours of operation (from 3 to 6).
Advantages:
- efficiency;
- suitable even for delicate shoes;
- presence of a timer (many models);
- fungus prevention.
The disadvantage is the high cost (about 900 rubles for a model with a timer).
Ionizers
The supply of fresh ozonized air removes odors and moisture from shoes, leaving them feeling fresh. An example of such a device is Zenit xj-300, which provides the production of 1000 ions per 1 cm³.
Advantages:
- Efficiency.
- Quiet operation.
- Light weight (about 0.2 kg).
- Elimination of odors.
Flaws:
- It takes time to dry.
- Need batteries.
- High price (about 1,500 rubles).
The presence of additional functions leads to higher prices for models.
Popular articles Happy Forgiveness Sunday 2021
What climate should there be in the drying chamber?
Such a chamber must maintain a certain temperature, humidity and slight airflow of the product. The interior walls of the chamber and parts in contact with the product, such as shelves, should be easy to clean with household detergents.
Temperature.
To ripen dry-cured sausages and meat, it should be in the range from +15°C to +20°C. Different delicacies have their own cooking technologies, but the temperature needed is approximately the same. Why is it important?
- At low ambient temperatures, beneficial microflora develops slowly. The cooking time for dry-cured products becomes unpredictable.
- If you create sausages with noble white mold, you will have to take into account its heat-loving properties.
If you are using starter cultures to successfully ripen sausages, the correct temperature conditions will be even more important. This is because the crops are quite expensive. Failure to comply with the conditions of their maintenance will lead to the fact that the money spent will simply be thrown away.
Humidity.
The chamber is maintained at 70 to 80% humidity. A household refrigerator is not designed for this. Quite the contrary, modern nofrost systems are designed to remove excess moisture from the chamber. The air in a household refrigerator is too dry. This is due to two factors:
- Dry apartment air, especially during the heating season.
- Freezing of moisture and turning it into snow-ice crystals on the walls of the evaporator already in the refrigerator itself.
Meanwhile, humidity is a very important element in the technology of drying. Insufficient humidity causes a defect called hardening. Hardening is the formation of a thin dry crust on the surface of the product. The crust prevents normal gas and moisture exchange between the insides of the sausage and the external environment. The microflora we need either does not develop or dies. There is a high probability of food poisoning, because putrefactive processes can begin under the dry crust inside the sausage loaf.
Without the necessary moisture, you can easily ruin your meat, your mood, and your digestion.
Air circulation.
It is recommended to maintain the air flow speed during drying from 0.1 to 0.2 meters per second. In industrial chambers this is achieved using fans that create such a slow air flow. At home, natural air movement is quite enough. This movement is created when the refrigerator is turned on/off, when the cooled air from the evaporator falls down, and warmer air, on the contrary, floats up. A working humidifier creates a fairly intense movement of cold steam. Plus, periodically opening and closing the chamber door mixes the air in it.
The main thing is not to place the product in “dead” areas, in the farthest corners. Corners are the least ventilated. If possible, make small ventilation slots in the corners. It would be enough.
Conclusion.
The most important element for successful drying and safe, predictable results is the climate chamber.
How to choose a shoe dryer
It is important to pay attention to the following details:
Material. Aluminum devices have optimal thermal conductivity. It’s good if the device has ultraviolet light that kills germs.
Design reliability
It is important to check how well the parts are secured and how reliable the device is.
Drying time. The optimal drying period is 1-2 hours
It largely depends on the heating temperature and the uniform distribution of warm air.
Versatility. Some models are used for drying socks, gloves and even food.
Size and weight. Small dimensions allow you to take the dryer with you on the road.
Other parameters It is necessary to focus on the safety of the model and the length of the cord.
Appearance plays a secondary role, and the price varies depending on the quality and versatility of the product. All that remains is to get acquainted with the best dryer models.
How to fix a dryer?
Before you begin repairing a shoe dryer, you must disconnect the dryer from the electrical outlet. A working electrical appliance must not be subjected to any mechanical impact in order to avoid electrical injury. If only one of the heaters does not work, then the cause of the breakdown is a disconnected wire from the heating element.
Fixing the problem will consist of several stages.
- Unscrew the fixing bolts on the rear panel of the plastic housing.
- Open the case.
- Check that the power wire is connected to the heating plate. The heater is a ceramic resistor covered with a thin layer of foil and located directly under the radiator grille. In case of a break, the wire will have to be reconnected using a soldering iron.
- After the wire is soldered, it is necessary to wait until the alloy has completely cooled, since elements that have not completely cooled after soldering may become detached from each other at the time of assembly.
- After making sure that the connection is reliable, you can install the heating plate in its place, connect the body parts to each other and fix the structure with bolts.
If none of the heaters in the device works, and the cord has visible damage, such as creases or bare areas, then the cord has become unusable and needs to be replaced. Repairs can be made in several stages:
- unscrew the bolts;
- open the housing of both heaters;
- determine the connection point between the power cord and the plate;
- unscrew the bolts holding the wire to the plate and remove the damaged cord;
- install a new wire on the existing fastenings, secure with clamping bolts;
- assemble the body.
If one or more backlight diodes burn out, then it will be impossible to do without a multimeter to check the serviceability of these elements. The renovation job involves a number of steps.
- Disassemble the heater housing with non-working backlight.
- Determine where to mount the LEDs.
- By connecting the multimeter probes to each LED one by one, determine the faulty light bulb. If the light element is working properly, the arrow of the device will show a value other than “1”. All non-functioning LEDs must be replaced with new ones.
- Using a soldering iron, disconnect the non-working ones and install new LEDs, check for the presence of alternating current with a multimeter.
- If all LEDs work, proceed to assembling the housing and checking the functionality of the device.
The simplest dryer for fish and meat
If you are lazy and do not want your dryer to have a beautiful attractive appearance, but only to fulfill its purpose, then this design is just for you. To make it, you will need a perforated sheet of galvanized iron, several boards, nails and some kind of wire. Don't know how to make a dryer yourself? Well, let's start making!?
STEP 1: make a cylinder . We need to make a cylinder from our perforated galvanized sheet. We secure this cylinder with rivets. This cylinder will serve as protection against insects and animals.
STEP 2: spacers . Inside the cylinder you need to make spacers from wooden planks. They will act as a hanger on which fish or meat will hang and dry. We secure the spacers of the fish dryer with nails as shown in the photo.
STEP 3: fish hanger . And we will hang the fish on a regular wire. After the fish is placed on the wire, we hang it on spacers and fix it on nails, as shown in the photo. You need to lay a fine mesh on top and secure it with wire to the cylinder. We cover the whole thing with a lid and wait for the result.
This design can be assembled in 5 minutes, if you have all the necessary materials. This homemade dryer is designed for dehydrating products in an open space. But in winter you will not be able to use it. Therefore, building a dryer with a fan is more appropriate.
How to make an electric shoe dryer
The easiest way to dry your shoes in the slush is to put them on a radiator. However, it is not always possible to do this, since the heating season lasts from November to April. And during the unheated period, the shoes do not dry out.
A homemade electric dryer made from a shoe rack, a thermal cable and a sheet of metal looks aesthetically pleasing and does the job of drying.
Installation steps:
- The size is measured according to the size of the bottom shelf and a metal plate is cut out. The basis for drying is metal 0.8 mm thick
- A self-regulating heating cable with a power of 30 W/m, reaching a temperature of 85 0C, is cut into pieces. The cable regulates its temperature along all lengths
- Remove the top sheath of the wire and connect the three sections into a network in parallel. Cable contacts are protected with electrical tape
- To increase heat transfer, the cable is attached to a sheet of metal using aluminum tape. Several layers of adhesive tape securely fasten the wires and increase thermal conductivity
- The lower part is covered with a reflector, and the upper part is painted black. The finished dryer is placed on a shelf and plugged in.
Attention! To increase heat emission, the metal surface is painted black. So the power of the device increases from 30 W to 50 W
Temperature measurements showed that the shoe dryer heats up not only on the lower, but also on the upper tier.
The device dries the shoes of all family members overnight
From the cooler
Make your own air dryer for shoes from coolers from a broken microwave oven according to the instructions:
- The corrugated pipe for electrical wiring is divided into 2 parts. 2 holes are made in the junction box at the end sides. Junction box with rubber elastic plugs
- The cooler is placed in the box so that air enters the pipes. The blades are trimmed if necessary
- The gaps are filled with a rubber gasket. The bottom is glued with a vibration isolator. The cooler is attached to the base of the box with screws. Connect the wires and check the functionality of the dryer. A hole for the wire is cut in the rubber plugs
From small fans
A do-it-yourself electric ski shoe dryer is assembled from the following materials:
- sewer drain 2 pieces of 25 cm each, with a cross section of 5 cm;
- 2 plugs, diameter 5cm;
- power unit;
- 2 fans from an old computer;
- 2 tubular resistors OPEV-30, resistance 24 Ohms;
- 2 grilles for the fan;
- 1 m of double stranded wire PEV 0.75;
- electrical tape, soldering iron, knife, shrink tape.
Work algorithm:
- A hole is soldered into the plastic plug. Install the grate. The fans are attached to plastic plugs. The wires are routed out. Mark the fan with a marker and use a soldering iron to melt a hole for fastening
- The wire is bent and placed in a resistor. With the bare wires down, install the part to the plastic plug with the fan. The wires are soldered. Bent wire prevents resistors from moving within 25cm sections
- The network cable is brought out and connected to the power supply in parallel. The workpieces are put into pieces and tested. The wire is insulated. The red “+” wire is attached to the power supply
When the device was turned on, the air temperature in the room increased by 8 0C.
The device reaches operating mode in 10 minutes
From thermostatic cable
Assembly steps:
- Cut pieces of the thermostatic cable 35 cm long. Prepare the electrical cord, terminal block and thermal cable
- Electrical tape is used to insulate the cable on one side. The wires on the second side are exposed. The sheath is removed and the veins are freed
- Attach the terminal block. All wires are carefully insulated
- The segments are bent into a loop and soldered to the electrical cord. The joints are carefully sealed with heat shrink tape.
The finished shoe dryer is connected to a 220V power supply.
The temperature control cable heats up to a temperature of 40 0C
The video shows instructions for assembling an electric shoe dryer with your own hands:
From plastic pipes
For production you will need:
- hair dryer;
- plastic pipes;
- corners for PVC connection;
- hacksaw;
- soldering iron for PVC products;
- clamps.
Assembly instructions:
- Prepare pipe sections 20 cm long. At a distance of 2-3 cm from the ends, a hole is made for air to escape. Elements are cut at an angle of 40 0
- The corners are attached to PVC. Corner fasteners are soldered to pipe sections
- A tee is attached to the corners. Using a soldering iron, connect the tee and corners
- A hairdryer is attached to the hole using clamps and a pipe. Testing the device
DIY fish dryer with fan
Why do you need a fan in a dryer? I repeat for readers who started reviewing the article from this point. If you do not have the conditions for normal ventilation in the dryer or you dry fish or meat on the balcony in winter, then a fan is simply necessary. A small fan greatly increases the process of product dehydration by constantly recirculating air in the dryer. Let's not pull the cat by the tail, and we'll tell you how to install a fan in a fish and meat dryer.
STEP 1: select a fan . Through many different tests, we found that the most optimal would be to use a cooling fan from a personal computer. Such fans consume very little electricity and have high efficiency. Although the fan is small in size, it will provide sufficient airflow to dehydrate fish and meat.
STEP 2: site preparation . To install an electric fan in your dryer, you do not need to cut any holes in the mesh. If this is done, insects may enter through the fan and ruin all the products. We install the fan inside the fish dryer on wooden slats. To do this, you can use hot glue or secure it in some other way.
STEP 3: installation and connection of the fan . We install an electric fan in the upper corner of the dryer so that the air flow is directed towards the area where the products will be located. We apply hot glue to both sides of the fan and lean it against the wooden planks. You need to hold it until the glue hardens (1-2 minutes). To fix the fan more securely, you can attach 1 more wooden strip to the bottom of the fan. Connecting such a fan is very simple. You just need to connect it through a special 12 V voltage converter. This is the operating voltage of this type of fan.
In this simple way we figured out how to make a dryer with a fan. If you already have a conventional dryer, then converting it will not cause any difficulty and will not take much time. A dehydrator of this kind will never be superfluous in the household of a real hunter and fisherman. But, if you don’t want to bother too much, you can make a very ordinary fish dryer in 10 minutes. Interested!? Then we will now tell you how to do it.