Unfortunately, lately, dynamos for bicycles have been undeservedly forgotten. We will not delve into the reasons for this, but rather make a headlight for a bicycle with our own hands, powered by a dynamo generator.
Advantages of dynamo-powered LED bicycle lights:
- powerful beam;
- constant availability of power (batteries can run out at the wrong time);
- unlimited work time;
- no need to replace batteries or charge batteries.
The design of this type of flashlight for a bicycle is described on this resource (it is recommended that you read it): link
✔ CHARACTERISTICS
Number of LEDs
: 128
Patterns in memory
: 18
Self-programming of new pictures
: Yes
Switch
: manual push-button switch + smart induction
Lamps
: RGB 5050 LED lamp
LED service life
: 100,000 hours
Battery
: 18650 Rechargeable battery (included)
Battery life
: up to 15 hours
Waterproof level
: IPX6
Product length
: 530 x 90 x 50mm
Weight
: 432g
Warranty
: 1 year
Package included:
1 x DIY Programmable Cartoon Style IPX6 Colorful 128-LED Bike Cycling Wheel Light,1 x 18650 Battery, 1 x Battery Charger, 1 x USB Cable, 1 x Bag of Cable Tie, 1 x User Manual
✔ PACKAGING AND EQUIPMENT
The thing is not fragile, but the store additionally packed the box in thick cardboard.
Although the sides were a little damaged. The packaging says nothing about either the model or the manufacturer - the original “no name”.
Inside the cardboard box, in separate foam niches, there are all the parts of the “light wheel”.
General equipment, sorry, the focus has disappeared.
The packer apparently drank tea, or put a cup on the instructions =). I recommend viewing the instructions once to understand how to attach, switch and record drawings.
Thanks for the disk with software and various pictures, but the link to the file storage is more relevant.
To charge the Li-Ion battery, the kit includes a universal charger with a European plug. Produces 3.7 V and 450 mA.
To connect the device to the USB port of a PC and upload images, the kit includes the following cable.
In addition, various fastening ties and a magnet.
A box with a battery; double-sided tape is glued to the sleeve at the attachment point.
Button to turn the device on or off.
Inside there is a 18650 battery with a capacity of 2200mAh.
There are rubber O-rings on the threads.
The device itself is a strip of LEDs, with a small extension for connecting power or programming emanating from the plastic part in the middle.
Rubber sealing ring for moisture protection.
The LEDs are placed on a substrate resembling textolite, with the entire surface covered with transparent varnish.
Control buttons, mode switching and reset.
The total power is 0.6 Watt.
At one end of the LED strip, in the white square, there is a magnetic field sensor (Hall sensor). Complete with a magnet included in the kit, necessary for adjusting image positioning.
The length of the strip is 52 centimeters, width is 2 centimeters. Weight - 432 grams. Suitable for wheels 26″ and above.
The first switching on - blocks of LEDs of different colors light up chaotically.
Main conclusions
Bicycle lighting has no practical value, but is a very impressive decoration. It enjoys considerable popularity, which is confirmed by high demand and multiple supply in retail chains. Installing lights on a bicycle requires experience and some skills, but the result is usually well worth the time and effort. Please share your installation options in the comments on this page.
Previous
LEDs Lighting for the toilet: what is it for, advantages, recommendations for selection
Next
LEDsAll about the operation and connection of a diode laser
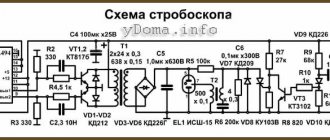
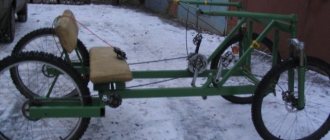
↑ Drawing a diagram
Each stabilizer will be mounted in the body of its “own” flashlight. Diode bridges - any one-ampere. The larger the capacitance of the electrolytic capacitors of the filters, the more stable the lighting will be at low speed, when the generator frequency is low. Operating voltage of capacitors: not less than 25 V
.
To power the circuit, you can also use 12-volt
battery, which provides the necessary current. Or make a combined option and install the “generator - battery” switch:
In wet weather, when the dynamics slip, we switch to the battery, and in dry weather, or when the battery is discharged, we use a generator. The polarity of the battery connection in this case does not matter, since there are diode bridges. But if you plan to power it only from the battery, then they can be removed, and then you need to observe the polarity.
↑ Practical implementation
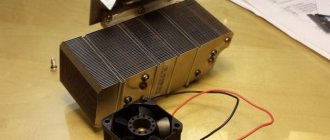
Since the scheme is very simple, I immediately drew the tracks with a marker on foil fiberglass, and then etched them in ferric chloride. I chose the sizes of the boards to match the lamp housings. There are two boards in the rear light - the stabilizer board itself, and the board on which three 8 mm LEDs are installed.
I thought for a long time about how to fix the board in the front light. I decided to screw it with one screw to the contact blade where the light bulb had previously connected (I left the switch unused). The same screw presses the stabilizer chip to the radiator. The radiator is composed of three U-shaped copper plates. It turns out this “sandwich”:
A copper radiator removes heat more efficiently than an aluminum one, so its dimensions will be smaller with the same heat transfer. During the tests, I checked its heating - it does not heat up much.
We fix the board inside the lantern:
To prevent it from shaking from shaking, I lined it around with this kind of foam material that is used in packaging:
We solder one of the wires going to the diode bridge to the corresponding contact on the flashlight, or through the terminal block to the generator. We connect the second wire to the bicycle body - this is “ground”. Attention! Neither LEDs, nor a radiator, nor any other circuit element can be connected to ground!
It is necessary to exclude an accidental short circuit to the body, which can occur when shaking while driving.
One more point: Observe the polarity of connecting the LEDs!
When connected in series,
“-”
of the previous LED is connected to the
“+”
of the next one. During installation, you can use colored wires, and if they are the same color (for example, like mine - MGTF), then we mark them somehow in advance.
To mount one-watt LEDs in the front light, I came up with the following design:
In the larger hole (central) there are M12 washers on both sides, in the smaller one - M10. Two holes are drilled in the washers for M3 screws, which secure the washers together with the LEDs. The washers also serve as a small additional heatsink for the LEDs. We drill another hole for wiring. On the LED side, do not forget to place insulating washers under the screw heads to prevent short circuits. (see photo at the beginning of the article). On the reverse side, we place washers and screws under the nuts to prevent self-unscrewing.
Making a mount for a bicycle headlight
Install a bicycle headlight on the handlebar using special mounts that you can make yourself.
Preparation of fasteners
A clamp is used as fastenings, which is made from 2 metal brackets with a diameter of 2 mm. Holes are carefully made in the brackets.
Base
An aluminum corner is used as the base. To prevent it from slipping, it is glued with a rubber gasket on both sides. Drill a hole in the corner and screw it to the steering wheel with a screw and nut.
Trailer connection
A car trailer is very important when transporting large cargo. Its stable, uninterrupted operation can be ensured by properly installing the lights. First of all, road safety depends on this. The most popular are seven-pin connectors. The necessary parts are purchased in advance: a socket and plug, a mounting kit, and a power cable.
The Russian scheme looks like this:
- 1 contact is the left turn signal (yellow);
- 2nd contact - refers to the fog lamp;
- 3 outputs to ground;
- Pin 4 is the right turn signal;
- 5 - reserve;
- 6 contact goes to the brake light;
- 7 is responsible for dimensions.
When choosing a socket, special attention is paid to its appearance. There must be a seal on the inside. It provides waterproofing.
If the towing vehicle has LED lights, install a relay box and run a power cable. It must be stranded and have a cross-sectional size greater than 1.5 mm. If the car is inexpensive, you can connect through the rear lights. The socket is attached to a bracket on the towbar.
To properly install a lighting system on a trailer or bicycle, you do not need to buy expensive devices. You can get by with structures you assemble yourself. The main thing is to follow basic safety precautions.
Write comments, additions to the article, maybe I missed something. Take a look at the site map, I will be glad if you find anything else useful on my site.
Materials for lighting
Answering the question of how to make an LED strip for a bicycle, initially, you must prepare the following materials. They are not difficult to find; any store has them.
- LED strip (recommendations above).
- Battery holders.
- Two 9 V batteries.
- Switch buttons.
- Silicone sealant; if desired, you can also use regular hot melt glue.