DIY chocobox: easy and beautiful DIY gifts
- To make a shockbox, first of all, you need to select a template and print it on paper with a density of 220 g/dm. For example, let’s take a template for a box and wrappers for 9 “Bird’s Milk” candies.
- The printed template must be cut out. Now, using a knitting needle, you need to make creasing along all fold lines.
- We glue the outer edges of the future box with double-sided tape. Now glue the sides of the top and bottom of the shockbox as in the pictures below.
- Now all that remains is to wrap the candies with labels and pack them in a shockbox. You can tie it with a ribbon or decorate it with additional decor, such as butterflies or paper flowers.
Making your own wrappers
It's nice to receive chocolate as a gift, wrapped in a wrapper with a photo from a summer trip, with a picture drawn especially for you, with a Valentine's card.
The easiest way is to make a wrapper on a ready-made chocolate bar bought in a store. To do this, first of all you need to remove the one that was on the tile initially. It is recommended to do this with medical gloves, otherwise your fingerprints will remain on the chocolate.
After this, you need to take measurements from the old packaging. For this purpose, you need to take a piece of cardboard or whatman paper, attach the packaging and carefully trace it with a pencil. In this case, you will get a packaging template that will not wrinkle or tear too much. This is useful for further work.
Having cut out the template, we proceed to making the wrapper. To do this, you can use a photograph printed on a printer, a child’s drawing, or simply beautiful wrapping paper. It all depends on your goals and taste.
Having attached the template to the drawing, you must carefully trace it so as not to tear the future wrapper. After cutting out the candy wrapper, place a candy or chocolate bar in the center and wrap it in the same way as the original packaging was wrapped. If this is a chocolate bar, then the wrapper will have to be secured with glue. For candy, it may be enough to wrap the paper so that the packaging does not come off.
Using the template you have made, you can make packaging for chocolate in the form of snowmen, animals, or simply decorate the tiles with flowers, fir branches, and toys. To do this, you need to cut out a wrapper from thick paper using the prepared template. You can paste a paper napkin with a pattern onto the resulting blank, or cut out part of the pattern and stick only that. You can draw a face on the wrapper and add a funny cap, an apron, or a basket with paper flowers that are attached to the wrapper using hot glue. In the same way, you can secure cones, twigs, gold or colored ribbon.
If you are familiar with Photoshop, you can make a wrapper based on the template. provides your template. In it you can replace the girl’s face with another one, and also change the name.
You can make the template and the cover itself, but this requires certain skills and not everyone can do it.
But anyone can make a wrapper—a box for a finished chocolate bar—with their own hands. To do this, take a sheet of thick paper and attach a chocolate bar to the upper left corner without removing the original wrapper from it. The chocolate must be applied so that it touches the top and left sides of the sheet. Mark below where the chocolate ends. Then, using a ruler, draw a straight line on the sheet to mark the bottom of your chocolate bar. Cut off the excess part of the sheet. Place the tile back on the cut piece so that the top, bottom and left edges match. Carefully wrap the chocolate around the paper, smoothing the left and right edges. You should have 5 sections of wrapper. The front and back are the same size as the chocolate bar, the left and right are the same size as the sides of the bar, and on the right there is another piece of paper covering the front side. If it's too big, trim it so it can tuck under the front section.
That's it, your packaging is ready. Now you just need to decorate the wrapper with a drawing, applique, photograph (whatever you like best). All that remains is to pack the chocolate bar in a new wrapper without removing the old one, and tie it with an elegant ribbon. The gift is ready.
A chocolate gift will be even more interesting if you make the chocolate itself with your own hands. Moreover, at home you can prepare both traditional and white chocolate.
Shockbox template for educator
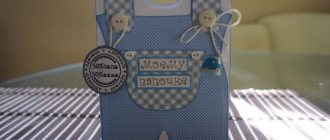
A chocobox is an ideal way to give a small but original gift to a teacher. As a rule, exclusive packaging consists of a pencil case or box and individual candy wrappers.
shockbox for teacher
Shokobox (box and wrappers) for the teacher “March 8”
chocolate boxes: templates
chocolate box template: bird's milk
Shokobox for “Bird's milk” (9 pcs.) for the teacher and nanny
Shockbox cover
Box base with sides
Shokobox option for the head of a kindergarten:
Chocolate Recipes
The simplest recipe is made from cocoa powder. You need to take the butter, melt it in a water bath or just let it soften at room temperature. Add sugar and cocoa powder there. Mix everything, put it in molds and put it in the refrigerator.
If you want milk chocolate, you need to add milk powder to the mixture. If you add delicious-smelling vanilla, the sweetness will be very tasty. You can choose the proportions yourself. The more cocoa, the more chocolatey your chocolates will be. Homemade chocolate is not as hard as store-bought chocolate because it does not contain lecithin. But all the ingredients are natural, and you can vouch for the quality of the product.
If you want the chocolate to turn out “like real”, you will have to put in a little more effort. To prepare you will need cocoa beans and cocoa butter. It is quite difficult to grind cocoa beans at home, so it is better to use grated cocoa beans. You can buy both beans and butter at a specialized confectionery store.
For 3 parts of grated cocoa beans, take 3 parts cocoa butter, 4 parts powdered sugar, if you want milk chocolate, add 2 parts milk powder.
Grind cocoa butter and grated cocoa beans with your hands, heat in a water bath, stirring all the time, so that they melt, add powdered sugar and milk powder. Mix everything thoroughly. Remove from the water bath, add vanilla, nuts or any other topping you like. Let cool a little, but not completely. While still warm, place into silicone molds. Place the molds in a plastic bag or close them in another way so that the chocolate does not absorb foreign odors.
You can also make white chocolate at home. To do this you will need cocoa butter, milk powder and powdered sugar. These ingredients are taken in equal parts; it is advisable to add vanilla for flavor. Melt the cocoa butter in a water bath, slowly and stirring all the time, add the remaining ingredients. Stir so that there are no lumps. If desired, milk powder can be replaced with infant formula. Pour liquid chocolate into silicone molds, as it will be very difficult to remove it from any other molds. Let cool, then cover and refrigerate for several hours.
Shockbox template for teacher
chocolate chocolate box template
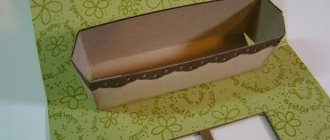
A set of excellent shockboxes will be an appropriate and beautiful gift for your favorite teachers. For example, this could be packaging for chocolate and a box for sweets, such as dried fruits or nuts:
shockbox template for teacher
Shockbox template in soft colors for a present for a teacher:
Lid
Bottom of the box
Wrappers
template for March 8
Set of templates for shockbox on March 8th:
first teacher template
Wonderful shockbox for the first teacher:
Miniature shockbox for three candies:
template for the class teacher
Original template for chocolate wrapping:
Gift box and candy packaging templates:
Step-by-step master class
I offer you my master class with step-by-step photos of a beautiful gift of sweets. It has such a simple bouquet assembly scheme that this method is easily suitable for beginners.
So, we will need the usual set to create such a candy bouquet: a carbonated drink (or just tea in a bottle), Red Poppy, Cherry, Mamba, Skittles, Kit Kat candies, a large Alpen chocolate bar Gold", "Mentos".
We must attach each candy to a skewer using narrow tape. If the chocolate or sweet is large, then use several skewers. We fasten it on the reverse side, as in the photo.
You will have to tinker with the bottle. You need to attach more skewers to it, because... it's quite heavy. Use large tape and attach the skewers around the entire bottle, but not above half the height.
Well? Have you prepared everything? Then it's time to collect the bouquet.
Place the largest components at the back of the drink. They will peek out from behind the bottle and thereby additionally create a base.
Then place the new prepared sweets in front one by one. So I close the skewers on the drink.
Don’t forget to rewind everything at once with small tape.
Place one candy against it and immediately secure it with tape. This will make it easier for you to collect a bouquet.
Well, finally, it's time for little sweets. We place them everywhere to completely close our skewers and create volume.
Now we cut off the excess length of the skewers and make the handle the same length. And wrap it with wide tape.
So, when you give such a gift, the child will definitely not prick himself or get hurt.
It's time to pack. I used plain wrapping paper for this.
I arranged the paper lengthwise into a rectangle. I folded the edges inward and wrapped the bouquet. To make it easier to wrap, I made a cut along the bottom.
Additionally, I folded the paper and placed it at the back. I also did some pounds on the front. And here is the result. At the end you just need to tie it with a ribbon.
Teacher's day shockbox template
Chocolate box for chocolates:
chocolate template for teacher
Beautiful “Happy Teacher’s Day” chocolate box for sweets, consisting of a pencil case and 12 candy wrappers:
template for sweets for teacher
Candy wrapper templates for shockboxes:
Exclusive wrappers for chocolate 100 g:
chocolate boxes for candies
No. 4 Multi-tiered cardboard cupcake stand
This method allows for variations in stand width and number of tiers because you can cut the cardboard to the size you need.
So you can strictly follow the instructions below, or you can take it as a basis and make your own adjustments.
Necessary materials:
- Several polystyrene foam disks (you can also use something else, wide and quite low, to serve as a base)
- Tin cans for support between tiers (you can also use polystyrene foam cylinders as shown in the top left corner, but cans guarantee a more durable end result)
- Cardboard circles, two of each size, here we used circles with a diameter of 30 cm, 25 cm, and 20 cm, for a three-level stand
- Cardboard to cover the top of each level (optional), base and dividing posts (you can also use fabric or tape to cover the base and posts).
- Glue gun
- Ribbon for decorating tiers
- Ruler
- Stationery knife
- Pen
- Scissors
- About 30 minutes of your time (or 45 if you take photos as you work :))
How to do:
Step 1: Making the Base
First, you need to make the base of the stand by gluing the polystyrene foam discs together into an even column using a glue gun.
Step 2: Making Cardboard Circles
Glue together two cardboard circles of the same size, with the less beautiful side facing inward. I also use a glue gun.
The result will be a double layer.
Repeat with remaining measurements until all cardboard circles have been doubled in size.
Trace each of the cardboard circles onto thin cardstock and cut out. This will cover the tiers.
Glue these circles to our double cardboard circles using a glue gun (only on one side, which will be the top). Now they are ready.
If desired, the edges of these circles can be trimmed with decorative scissors to create a scalloped border, adding another detail to the overall look.
The result is these three circles.
Step 3: Making partitions between tiers
Now you need to cut out two strips of cardboard, the length equal to the circumference at the bottom of the cans, and the width equal to the height of the cans.
Use a glue gun to secure the cardboard strips to the tin can. Repeat the same for the second jar. The bottom column of polystyrene foam should be covered with cardboard in the same way as cans.
Tip: The glue can be very hot - too hot to touch - so you can use a ruler to press the cardboard strip firmly against the surface until it clicks into place.
You should now have two columns and a base covered.
Step 4: Putting all the parts together
One thing to keep in mind when assembling all the components is to position all the cardboard seams covering the Styrofoam cylinder and can columns to one side so they can be the "back" of the stand and not visible to guests. Simply place the stand with the side with the seams facing the wall so that they are not noticeable.
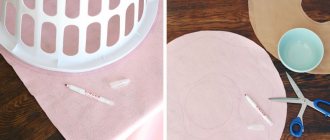
- To connect, you need to mark the center on each circle; this can be done in several ways: with a ruler, compass, thread.
- Now glue the styrofoam base in the center of the bottom tier (be sure to glue it to the bottom, the uncovered side of the cardboard circle).
Then glue the tin can column in the center of this circle, but on the other side. Now glue the next cardboard circle on top of the column. Check the stability of the structure.
Tip: Since the lid of the can may not have a smooth surface, you will need to glue the edges to ensure that the can has a firm contact with the cardboard circle.
Repeat the previous steps again until all the pieces are in place.
Step 5: Decorate the edges of the tiers with ribbons
- Cut three pieces of tape equal to the circumference of each cardboard circle.
- Apply hot glue along the edge of the cardboard circle and press the tape down, being careful to leave the top edge of the tape slightly above the surface of the circle.
Tip: it is not necessary to glue along the entire perimeter; you can apply glue every few centimeters.
- If the tape you choose is thin and shows through, you may need to add a second layer to make it look less translucent so the edges of the cardboard don't show through.
- The tape used here was thick enough that one layer was enough.
Repeat the same steps with the middle tier, and then with the top, until you get this result:
Now you can fill the stand with cupcakes or other goodies and be ready for your guests to arrive!
Shokobox for September 1: templates
Not only teachers, but also schoolchildren will be pleased to receive a shockbox on September 1st. Therefore, it won’t hurt to prepare a large, beautiful shockbox for the class teacher and small gifts in themed packaging for schoolchildren.
knowledge day template
Shokobox “Day of Knowledge! For 4 candies:
shockbox for a first grader
Template for a chocolate gift for first graders:
Template for “Martian” candies (80 g):
Another set of templates for students:
small chocolates template
Template for Toffifee Chocolate Box:
Template of gift box and wrapper for sweets with congratulatory inscriptions:
The tuxedo
On February 23, you can present chocolate in themed packaging. For example, you can wear a chocolate bar with a shirt, tie and jacket.
Materials:
- cardboard;
- colored or designer paper;
- glue.
Step-by-step instruction:
- Cut out a rectangle 22x17 cm.
- Using designer paper, separate the center section of the package and the two side sections.
- Cut out a pocket from cardboard.
- Decorate the front part with stickers. And attach small pockets for tea or coffee bags to the back wall.
You can also wrap a chocolate bar in checkered construction paper and attach a fabric tie on top or style it as a jacket with buttons.
Shokobox Teacher's Day: templates
chocolate box
A set of templates for the teacher - a chocolate box for 100 g chocolate, individual packaging for mini chocolates, a cube for assorted chocolate:
Chocolate box for Ritter Sport chocolate:
Shockbox template (box and candy wrappers) for 5 candies, for example, bird's milk:
chocolate box for chocolate
Universal templates for unnamed shockboxes in the form of a box:
What to make it from?
To build bags at home with your own hands, you will need any thick cardboard. A piece of cardboard is rolled up and glued together. This will be the basis of the blank, thick paper can be of any color, after which the accessory is decorated depending on the style of the celebration. The decor itself depends only on imagination, preferences and the theme of the holiday.
How to make a keychain with your own hands - many master classes and creative photo ideas
Knitted overalls for newborns - choosing a model, patterns, tips for beginners
Shockbox template for mom
A hand-assembled shockbox will be a warm and joyful gift for your mother for her birthday or other holiday. Using a ready-made template, you can think through the contents of the box, as well as personalize it and add heartfelt wishes.
A set of shockbox templates - a box and wrappers for mom’s favorite candies:
Chocolate box template with meaningful chocolates (box and 8 wrappers):
box of sweets as a gift
CDs for bouquets
There are many ways to create frames for a sweet gift. So how to make the basis for a bouquet of candies from scrap materials? Let's get started!
Stock up on the following materials:
- CD.
- Satin ribbons.
- Wide lace.
- Plastic bottle.
- A foam ball - the diameter is slightly smaller than the diameter of the disk.
- Lighter, scissors, glue.
At the beginning of the work, sew the lace with large stitches, pull it together, forming a round shuttlecock. Stick it to the bottom of the disc.
Next, cut the satin ribbon into pieces about fourteen centimeters long, fold it in half into a loop and glue it on top and bottom of the disk in a circle.
Next, cut the bottle and roll it into a tube - this will be the base leg. Glue it and wrap it with satin ribbon.
All that remains is to cut the foam ball in half, wrap it in paper or cloth and glue it on top of the disk.
The base for a bouquet of foam candies and an old CD is ready! The most interesting thing remains - to make flowers from candies and attach them to the base!
Chocobox for grandma: templates
A case for Toffifi candies and a shockbox in the form of a box for Bird's Milk candies with a cozy design will especially appeal to grandmothers who are handicrafts.
Candy case:
Template for a gift box with sides “To my beloved grandmother”:
Unnamed chocolate boxes for sweets that you can give to your grandmother:
template for chocolate Alenka
Box for chocolate “Alenka” (100g) in delicate watercolor tones:
New Year's shockbox: for grandma
Polyurethane foam for perfect results
Very convenient and easy-to-process foam is perfect for making the base for a bouquet of sweets with your own hands. Some needlewomen do not like it because it does not lag behind the base in which the bouquet is made, and further use of the item is impossible. But you can make a layer of foam separately, on paper, and then cut out the required shape from the dried paper.
It is very easy to cut with a knife, it does not crumble. But when sticking toothpicks or skewers in repeatedly, it becomes deformed. Because of this, clearly mark the places for fixing the candies.
Chocobox favorite: templates
You don’t need a reason to please your loved one with an unexpected surprise. But even without a reason, the gift should be creative and unexpected. If your surprise is sweet, then pack it in a delicate shockbox.
2 options for a chocolate box with romantic cats for your beloved with 4 candies that will remind her of your feelings:
Lovely shockbox pencil case for Toffee:
A caring chocolate box for candies with a sweet couple, which can be given to your loved one for any occasion:
Inspiring shockbox template for your beloved with a delicate design (3 parts):
Bottom of the box
chocolatebox chocolate
chocolate box for candies
If your loved one loves surprises, give her this mysterious shockbox in the form of a women's clutch. There are no inscriptions or other clues on it that would indicate the reason for giving the gift, or the contents of the box.
Shokoboxy for your loved one for candies, dragees, nuts and other delicious surprises:
shockbox for you beloved
Chocolates for chocolate boxes for your loved one can be wrapped in bright wrappers:
Wrappers today
Nowadays, the number of different wrappers or candy wrappers is unusually large. Confectioners call them differently: candy etiquette.
Candy labels are made from different materials. First of all, sweets and chocolates, as before, are wrapped in waxed paper. It does not allow moisture to pass through and has a so-called twist effect, that is, it remembers the shape that was given to it. Thanks to this, the wrapper does not unwind. It’s unpleasant to open a package and find that some of your favorite candies are there without wrappers, the candies have crumbled and you no longer want to eat them.
Films that are used today for candy wrappers also have a twist effect. They make bright and colorful transparent candy wrappers. In addition, they preserve sweets better.
But most often, chocolates are wrapped in a so-called confectionery composite. This means that the wrapper contains many layers. Inside there is waxed paper, and outside there is a metallized or film coating. All these packages are created by professional designers. Could we do something similar ourselves?
March 8 shockbox template
March 8 is not complete without sweet gifts, so templates for bright, spring, and festive chocolate boxes will come in very handy. Templates for standard chocolates, candies such as Raffaello and Toffifi, as well as kits for creating gift boxes with small chocolates are offered to suit your taste.
Spring shockbox templates for ladies:
Comic shockbox for March 8:
Pencil case for a box of chocolates - template:
Shokobox for Raffaello:
No. 2 Foam cake stand
This type of stand can be made in different heights and widths. Using the same scheme, you will get a two-level stand, only the polystyrene foam circles in this case need to be taken not of the same size, but of different sizes (for example, one circle with a diameter of 15 cm, and the second with a diameter of 30 cm). Let's now look at what we need and how to do it all.
Necessary materials:
- 2 polystyrene foam circles (you can use squares or rectangles if you wish). In this case, the height of each circle is 5 cm and the diameter is 30 cm.
- Kraft paper and crepe paper in your chosen color
- Glue, brush
- Pencil
- Scissors
- Double sided tape
- Thread matching the color of the crepe paper
- Ribbons/decorations
Step-by-step lesson with photos
Step 1: Cut out the top cover Place two polystyrene foam circles glued together on craft paper and trace along the outline with a pencil. After this, cut out the circle with scissors.
Step 2: Apply Glue Apply glue (PVA glue will work) to the top of the polystyrene foam cylinder. Use a brush to spread the glue evenly over the surface.
Step 3: Glue the paper on top of the stand Then place the cut out circle of craft paper on top of the cylinder and press down with something heavy so that it sticks evenly to the entire surface.
Step 4: Making Crepe Paper Side Decorations Cut a long strip of crepe paper.
- The width should be the same as a polystyrene foam cylinder + 2-3 mm. Fold it in the middle so you can see where to sew.
- Then unfold this strip and sew it with a simple stitch in the middle. Gently pull the strip together to create gathers.
- Secure with a few stitches to keep the gathers from falling apart. Repeat, making these voluminous strips until there are enough to cover the entire circumference of the cylinder.
Step 5: Attach the crepe paper Glue the strips you made in the previous step to the side surface of the cylinder in three layers to make it more fluffy. The glue needs to be applied little by little and not over the entire surface, but in places, so that the paper (which is thin in structure) does not fall apart.
Step 6: Add Ribbon Tie the side over the crepe paper with double-sided tape. Do this in the center, thus overlapping the thread used to stitch the paper.
Step 7: Additional decorations The stand is already ready and looks soft and airy. You can place the cake or cupcakes on it right now and serve. Or you can add a little more decoration to your taste, for example, more ribbons or sparkles.
Whatever stand you choose, it will wonderfully complement the holiday table and make it more perfect. Good luck!
You can also decorate with beads or gold fabric!
Shockbox template for February 14, Valentine's Day
Valentine's Day is still on the road, but there's no need to relax. Now is the time to think about future Valentines. A great idea - a sweet present, packed in original packaging. Hearts, teddy bears and kisses look beautiful as ornaments. For a special charm, you can wrap each candy or chocolate in individual colorful packaging.
Shockbox template on the theme of the legendary Love is... (box and candy wrappers)
chocolate boxes:
Elegant template for men's shockbox for February 14 (box + candy wrappers):
Shockbox with balloons for the conference box:
Shokobox (lazy box + candy wrappers) for Valentine's Day for sweets:
I love the shockbox
Template “I love you” for 4 candies (box + candy wrappers):
The basis
Lid
Wrappers
Cover template for Alyonushka chocolates for Valentine's Day:
sweet valentines: templates
Template for sweet valentines:
How to pack chocolate beautifully in winter
On Christmas days, you can present a chocolate bar in a chocolate bowl instead of a banal card. The main thing is to beautifully decorate the packaging in accordance with the New Year's theme. To make the decoration of the chocolate bar look truly New Year's, use glitter, broken glass, foil, serpentine, figurines and pictures of New Year's characters.
Christmas deer
To package chocolate in an interesting way, the bag is made with the face of a deer that is carrying Santa Claus' sleigh. Cut out ovals for the nose and eyes and glue them to the bag. The nose is smeared with glue and sprinkled with pink glitter. Horns are made from wire wrapped in thick threads.
Snowflakes
A simple and cute way to package chocolate beautifully is to cut out and glue a paper snowflake onto the packaging.
With lace
White lace looks great on Christmas gift wrapping. They create a winter atmosphere, reminiscent of fluffy snow.
Cones
To create a winter atmosphere and beautifully wrap a sweet gift, they use pine cones and twigs. They can be sprinkled with white glitter to imitate snow.
In a beautifully made package you can pack only sweets, but you can also invest money, other gift products and things, or a card with wishes. They present a sweet gift in a formal atmosphere, holding it carefully so as not to damage the created decor.
New Year's boxes: shockbox templates
Fill the New Year with a sweet mood! Be sure to please your loved ones and friends with chocolate chocolate boxes.
New Year's shockbox with Santa Claus (box with lid and candy wrappers):
New Year's chocolate and candy boxes:
Chocolate box for New Year's candies:
How to quickly pack a small gift or candy
If there is a party or children's party planned, then you can prepare treats for little guests. In order not to serve sweets in banal candy bowls, you can pour candies into regular or decorated disposable cups. Then decorate them with openwork paper napkins and satin ribbons.
How to quickly pack a small gift
Gift packaging in a cup
Shockbox template Mother's Day
On Mother's Day, it is customary to congratulate mothers with all our hearts. They remember not only their own mothers, but also their godmother, mother-in-law or mother-in-law. Please your dearest women and give them a sincerely created shockbox.
Soulful shockbox for sweets for mom:
An unusual solution - a shockbox with a place for a photo of your mother:
Beautiful shockboxes for mom for Mother's Day:
Shokobox for the expectant mother:
Floral sponge base - “Oasis”
This material has several varieties. The one that is suitable for freshly cut flowers has a crumbly structure and is not very dense. The second, for dried flowers and artificial filling, is denser, but here the price is higher.
Despite this, it is the best option, it is very easy to cut with a knife, and can be adjusted to fit any container.
And yet, this material has its drawbacks: if you decide to glue candies directly onto it, then be prepared for the fact that they will fall off along with pieces of this sponge. As a result, you will ruin the entire appearance of the craft.
But there is a way out - the prepared piece of “Oasis” just needs to be wrapped in corrugated paper or cloth.
Shockbox sister template
Chocobox for the best sister in the world with designer wrappers:
Shokobox for my sister's birthday:
Comic shockboxes for your sister for a great mood:
Templates for chocolate and candy boxes for sister:
Packaging Features
Where did the tradition of wrapping sweets in colorful pieces of paper come from? Who invented the first candy wrapper? Edison, a great scientist and inventor, famous for his serious inventions in the field of electricity, also came up with such a seemingly frivolous thing as a candy wrapper. It was his idea to create waxed paper, which became the first candy wrapper. And although the history of the candies themselves dates back to Ancient Egypt, they began to be wrapped in pieces of paper only at the end of the 19th century.
Shokobox for a friend: templates
You can give your friend a glamorous printed shockbox with cosmetics for the holiday. Inside there will be 9 candies in designer packaging.
The “Girls, such girls” chocolate box will be the most pleasant sign of attention to a friend (a book-like box and candy wrappers that fit together like a puzzle).
Comic shockbox “Three Girlfriends”:
Shokobks for a cheerful friend “First Aid Kit”:
Templates of unusual chocolate boxes with animals and more for 100 g chocolate bars:
A simple base made from a plastic bottle
You can make frames for bouquets from things you never even thought of. Yes, regular lemonade bottles!
To work you will need:
- Plastic bottle.
- A tube with a thickness equal to the width of the neck.
- Glue.
- Corrugated paper, foil.
- Ribbons.
So, first, let's cut the bottle crosswise. We insert a tube into it and pour a little glue at the joint. Turn it over and wait for it to harden.
All that remains is to wrap the base with corrugated paper or foil, satin ribbon and decorate with beads.
That's it, quick and easy!
Lace
Materials:
- scissors;
- scotch;
- textile;
- lace;
- transparent glue;
- decorations;
- brown paper;
- chocolate bar.
Step-by-step instruction:
Step 1. Wrap the chocolate bar in brown paper. Use tape to glue the folded edges and the joining line.
Step 2. Prepare two wide pieces of thick lace and two narrow pieces of thin lace.
Step 3. Wrap the edges of the chocolate with tight lace pieces. Use clear glue to secure. Trim off excess fabric. Wrap thin lace blanks along the upper border of the thick lace and secure them with glue.
Step 4. Wrap the open part of the gift wrapping with pastel-colored fabric.
Step 5. Finally, the finished packaging can be decorated with a satin bow, paper flowers or a card with wishes.
Pencils in a pencil case
Materials:
- cardboard;
- colored paper;
- black marker;
- stamp and paint;
- glue;
- portioned chocolate bars.
Step-by-step instruction:
- Cut out pencil blanks from cardboard according to the template. Adjust the size and shape of the packaging according to the size of your chocolate bars.
- Cut out the ends for pencils from light paper and glue them onto the blanks, separating the lead from the main part of the craft.
- Outline the sharpening boundaries with a marker.
- Using a stamp, apply the same design to each package. Or draw a pattern using a stencil.
- Fold the packaging along the dotted lines and glue each pencil.
- Insert portioned bars into prepared packages. For greater realism, you can darken the edges of the pencils with a stamp pad.
- Lay the tiles in a row and measure what size pencil box you need.
- Build a box from cardboard and decorate it.
Creating chocolate packaging using photoshop
In this Master Class we will make a Box - Packaging for chocolate, or rather its template. We will create a document in Photoshop from the very beginning.
So, first of all, download and save the files for MK from the topic on the forum.
1. Open Photoshop. We create a document in A4 format, this is exactly the format we need to fit the template.
To do this: click (1) “file” - (2) “create”, in the Set line select (3) - International paper format, Size (4) - A4, (5) - OK.
We have created a document - the “base”.
You should see a sheet and a window containing layers appear on your screen. The window in which the layers are displayed is called the “layers panel”; if it is not displayed, you need to activate it by pressing F7.
2. Now we need to insert an image into our “base” - a “pattern” file.
To do this: minimize Photoshop and open the folder in which you saved the files for MK, select the “pattern” file! Do not click on the file itself so that it does not open in the photo viewer! Move the cursor to the desired file icon, hold down the left mouse button and drag this file into Photoshop. If Photoshop appears on your screen and your image is crossed out with two lines diagonally, then you did everything correctly. Press Enter, now the picture has been added to your “base” document, and added as a separate layer (this method of adding an image to an open program file allows you to add an image and it will automatically fit into the format you specify). We will need the added pattern in order to correctly place pictures and inscriptions on the template, so that in the future everything will be in place when we make the finished box. The inserted image of the pattern needs to be corrected, and in order for the correction of the file inserted in this way to be possible, it is necessary to make the following: Move the cursor to the layers panel and right-click on the line of the layer with the name pattern, select the line “rasterize layer” and click on it (this is necessary for further editing of the picture).
Next, let's work with the Toolbar - For me it is a vertical strip on the left side of the screen, for you it is most likely located there. The tools used in our MK are available in any version of Photoshop, but their names may differ.
3. Now you need to get rid of the white background around and inside the pattern for this:
For clarity, hide the “background” layer. Please note that on the line with the name of the layer, at the very beginning there is an “eye” icon (1), with its help we can hide unnecessary layers (although completely unnecessary ones can be deleted, for example, erroneous ones, the easiest way is to select the layer and press delete) .
On the toolbar, select the “magic wand” tool (2), move the cursor to the area located outside the pattern (3) and click the left mouse button, we see that the space outside the pattern image is highlighted with a dotted line, press Delete, and the selected area is deleted on the layer with the pattern, then do everything the same, but highlighting the space inside the pattern image. This is how it should turn out
4. Now we begin to create the packaging template itself.
Insert the “snowflake background” file into the “base”. Don't forget to rasterize the layer. And remove the white background using the “magic wand”. We now have a template background to which we will add text and images. But for the correct placement of text and pictures, the “pattern” layer should always be on top of the other layers. The arrangement of layers can be changed by moving the cursor to the desired layer, holding down the left mouse button and dragging the layer up and down (all this is done in the layers panel).
5. Now let's add the caption:
(1) The letter "T" stands for the "text" tool. We left-click on it once, then move the cursor to the place where we want to place the text. The exact location down to mm is not important, because the location can be edited later. Place the cursor and type our text (I used the “Entered” font, your text will be in the default font), after writing the text you need to press Enter to save the layer with the font. (2) Name font and its other parameters (size, color, etc.) will be displayed at the top of the window, this will happen immediately after you activate the “text” tool, i.e. Click once on the letter “T”. (3) By clicking on this icon, along with the layers panel, you will see the “Character and Paragraph panel”, a panel designed for text correction. If necessary, you can move the text using the “move” tool ( 4). We activate it by clicking, then move the cursor over the object and, holding the left button, move it to the desired location. (Don’t forget, all tools only work with the active layer, so if you switched to other layers and then decided to adjust the text layer, you need to activate this layer by clicking on it in the layers panel) If you need to edit the text after writing, move the cursor to line of the layer with the text and click on the layer image twice, i.e. the text is highlighted and can be adjusted. If we need vertical text (in our case, “New Year's Chocolate”). To do this, there is a button with the image of the letter “T and arrow on the side and bottom”, located on the top panel. We activate this button and we can immediately print vertically, or first horizontally, and then, by selecting the layer with the text, make the inscription vertical.
6. Now let's place the image on our template.
(1) Just as we inserted our background with Christmas trees, we also insert Santa Claus. The layer with the DM will be inserted above the layer that was last active. Please note that the layer with DM should be above the layer with snowflakes, but below the layer with text, move it wherever necessary (do not forget to rasterize the layer for further work with it). Now we need to get rid of the white background on which the DM is located (by the way, the problem of removing the background can be solved if you use clipart drawings). We already know about removing the background using a magic wand, here the background merges in some places in color with the picture, so the magic wand will not help, let’s consider another method: (2) select the “eraser” tool, when we click on it, it will be displayed at the top line for editing this tool. (3) click here and the eraser settings panel will open, you can select the size, hardness, shape, etc. Experiment and select the one you need (it is advisable to reduce the hardness to a minimum, then the edges of the eraser will be soft - fuzzy). Next, we move the cursor over the image with the DM, hold down the left button and move over the white background, you can continuously, you can with separate clicks, the size will have to be changed in the process of removing the background (if you suddenly erased something unnecessary, you can fix everything, or go to the top panel: click edit - a step back, or with the key combination ctrl+alt+z). As a result, we get a DM with an “aura”)))), you can, of course, take a hard eraser and erase the entire white background, but this is a very painstaking work and in In our case, there is no need for this. (4) In the process of work, we will come across the fact that we will want to see some elements closer, for this there is a “scale” tool.
7. The layer with the picture may not fit into the template frame; to change its size, press ctrl+t and layer correction will be activated. By placing the cursor on the edges of the layer and holding down the left mouse button, you can change its size, but in order for the change to be made proportionately on all sides (for example, so that it is not unnaturally elongated or, on the contrary, compressed), for this you will need to hold down the shift key when changing the size.
Well, we learned how to insert objects and make inscriptions.
When creating this kind of product, other tools are generally used, but I see no point in describing them here. If you are interested, you can find tutorials on working with Photoshop on the Internet. Personally, I learned a lot using the lessons from the Photoshop Master website.
Remember: 1. When performing any actions in Photoshop, they are performed only on the active layer, carefully monitor which layer is active and which one you want to work with.2. If you made a mistake, then everything can be corrected by canceling the action (well, except for closing the file without saving)))))
3. It is better to paste different objects on different layers; this is convenient for correcting individual elements.
For those who do not have the time or desire to perform all the steps described, but want to make a box for chocolate, I have attached a template with a ready-made design, where you only need to enter the name. I wish you all creative success and boundless imagination! If you have any questions, I will be happy to answer and help in any way I can, questions can be asked both in the comments and in the discussion topic on the forum. On the forum you can now download the psd file in which I worked when creating the packaging, it will work with it much easier, just go to the layer you need, double-click on the picture with the layer image and edit the layer.
Good luck.
Gift packaging in the form of a shoe
Do you want to surprise the little guests who come to your child’s birthday party? Then we suggest you pack sweets in boxes in the form of boots or sneakers.
How to make such packaging, see the photo below.
Gift packaging in the form of a shoe
Shoe made of cup and corrugated paper