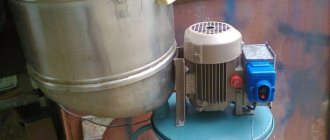
In Russia, approximately 2-3% of recycled waste is plastic waste. This type of material can be easily cleaned from organic residues, which makes it suitable for recycling. Opening a waste processing plant requires an investment of more than a million rubles. If there is a lack of funding, you can open a workshop that performs only part of the operations: receiving raw materials and crushing them, for example. To do this, you will need a small room and a plastic crusher, which you can assemble with your own hands.
How to choose a branch chopper for a walk-behind tractor and not regret the purchase?
A branch chopper, or wood splitter, is a specialized practical attachment for trimming grass vegetation and branches. The recycled material will serve as a good fertilizer for the garden.
The purchase of a shredder should be well thought out, since the cost of such equipment is not at all small.
Indicators for choosing a wood chipper for a walk-behind tractor:
- Type of motor. It comes in electric and petrol versions;
- The power of the wood chopper is especially important;
- Funnel diameter;
- Type of crushing system;
- Garden waste recycling methods;
- Equipment weight;
- Practicality of the nozzle.
Electric crushers for mini tractors are less noisy than gasoline ones, and they are also easy to operate. However, their operation is affected by voltage drops in the network, and the largest diameter of branches that they can process is 45 mm. Gasoline wood shredders are distinguished from the former by greater power, which allows them to process virtually any waste.
crushed stone processing machine stone crusher
Federal Center for Standardization and Standardization The purpose of the work is to improve the quality of crushed stone Gravel Crushed stone Marks of turnouts 17, 26, 14.5, 15, 16, 13.5 If the soil is mobile, groundwater lies close.
China is a famous equipment supplier.
powdered mineral roller mill mesin crusher batu kali kharga You can contact our head office directly, also you can contact overseas offices Tel.: +86-21-58386189, 58386176 Fax: +86-21-58386211
Concrete wall blocks 20x20x40: Wall.
Concrete blocks for the foundation 20x20x40, the price of which depends not only on their hollowness, are also distinguished by their strength.
Argentina stone crusher in China
stone crusher and quarry plant in emissions caused by stone crusher plant stone crusher Goathland drobilki: stone crusher price in China drobilki is tracked by us since April, 2013 Over the time it has been ranked as high as 5,214,299 in the world get price
We study Ukrainian language. Advanced course.
I.R.Vykhovanets, E.A.Karpilovskaya N.F.Klimenko Studying the ZhRAINIAN LANGUAGE Advanced course Self-instruction manual Edited by V.M. Rusakovsky Approved by the Ministry of Education of Ukraine as a teaching aid for.
Do-it-yourself mushroom cutting diagram
2019-12-10 · Do-it-yourself mushroom cutter diagram 2 budget options for homemade grass cutters: design and details We were wondering where to put the grass that...
Homemade Shredder: Branch Shredder.
2019-5-30 · HACK Angle Grinder - Shredder Shredder Shredder Costume from Teenage Mutant Ninja Turtles Learn how to use a homemade confetti grinder! Shred the paper
norm-load
STATE AGRICULTURAL COMMITTEE OF THE USSR. TECHNOLOGICAL DESIGN STANDARDS.
design
2021-8-16 · 2.19. After milling, the chopped wood should be evenly distributed throughout the depth of the treated soil layer. Related Blog-2.3.01-83 - CA Water Info 2.19. After milling, the chopped wood should be uniform.
VNTP 19-86 Technological standards.
20 Crushed corn 0.57-0.64 44-47 21 Crushed corn on the cob 0.40-0.46-22 Crushed millet 0.56-0.61 39-42 23 Crushed wheat...
beer crusher
Handmade Beer Brewing Machine Malt Mill Roller Grain Mill $13.00 - $16.00/piece Source High Quality Malt Crusher…
how to grind on granite
How to Chop Garlic: 10 Steps (with Pictures) How to Chop Garlic. Knowing how to chop garlic is a very important skill in the kitchen because garlic is used in so many dishes.
VNTP 19-86 “Technological standards.
20 Crushed corn 0.57-0.64 44-47 21 Crushed corn on the cob 0.40-0.46-22 Crushed millet 0.56-0.61 39-42 23 Crushed wheat...
stone processing roller crusher.
roller crusher Zenit Company. roll crusher dvg 600 400 stone crusher, jaw crusher O Gulin roll crusher used Zenit GR 100 Company 5) Roll crusher dvg 200x125; AVZ 180 NVZ 150 (used.
Feed chopper Elikor 1 version 4 reviews.
2021-8-16 · This machine does it extremely poorly, worse than the smaller, less expensive Cuisinart versions (like the Mini Prep Plus). By the time I had scraped the bowl a few times, I could just slice it myself (I never didn't have to clean it.
50TPH European version of impact crusher
Portable Rock Crusher Jaw Chassis Cone Portable Coal Cone Crusher for Hire Nigeria. L&M Heavy Industry is a manufacturers of jaw Crusher, cone Crusher, sand making machine, vsi impact crusher, mobile crusher plant and vertical .
Do-it-yourself branch chopper for walk-behind tractor
A crusher for a walk-behind tractor is an indispensable thing in any household, but it is quite expensive to purchase. However, there is a way out in this situation, namely to do it yourself. The work, of course, is not easy, but the result will make you very happy.
The positive qualities of a homemade attachment for a walk-behind tractor of this type are:
- Any number of knives can be installed;
- equipment power;
- low price.
The design of the chopper is not heavy and consists of the following elements:
- Metal frame;
- Gasoline or electric engine;
- Cutting mechanism;
- Hopper for feeding and unloading material;
- Main gear.
A branch cutter for a minitractor, made on your own, looks like a cutting mechanism mounted on a frame. Photos of the equipment are shown below.
Materials necessary for production: knives, pulley, bearings, sheet of metal, shaft, channel, fasteners.
Tools you can hardly do without: hammer, drill, inverter, angle grinder, tool set, pliers.
The order of work on manufacturing a branch chopper:
- We take a channel, an angle and a pipe and make the base for the frame. After this, we weld the frame;
- You need to put a package of saws and washers on the shaft of the cutting unit;
- then we put bearings on both sides of the shaft;
- screw the pulley on the longer end of the shaft;
- using bolts and nuts we secure the shaft to the frame;
- a small diameter pulley should be installed at the end of the shaft;
- Next, you should attach the motor to the frame so that the pulleys are located on one side;
- We put a belt on the pulleys, the tension of which can be adjusted by moving the motor;
- It is necessary to make blanks from steel to protect the casing and hopper;
- We weld the resulting workpieces;
- using the parts used for fastening, the casing and hopper must be attached to the frame;
- We connect the resulting product to the motor and check its functionality.
Diagram of a homemade garden shredder.
A self-made grass and branch shredder for the Neva walk-behind tractor will be an excellent assistant in cleaning the area near the house and garden. It is also worth saying that the recycled material can be used as fertilizer and for home heating.
Operating principle of the crusher
Shredding of plastic waste occurs as it passes through the cutting mechanism of the device. For this purpose, designs with one or two shafts are used, on which knives are placed that cut the plastic into small pieces. Obtaining crumbs of the required size is achieved by installing a sieve in the outlet hole. The performance of the device is affected by the following characteristics: speed, number of knives, engine power. To shred elastic plastic waste, instead of a shaft structure, special scissors are used, which solve the problem of winding raw materials onto the shaft.
Branch chopper for walk-behind tractor
Any owner of a summer cottage and gardener loves that his plot is always clean, and to make the owner of a summer house comfortable and easier to maintain order, he needs a branch chopper. A chopper for branches, also called a wood splitter, for a walk-behind tractor? This is a special, practical attachment for processing grass and branches. Shredded branches turned into sawdust are also an excellent fertilizer for your garden.
Required tools and materials
To assemble the chopper, you will need metalworking, welding and grinding tools: drill, file, grinder. Welding joints are usually used to connect the frame and body, and bolted joints are used to attach the engine and cutting part. The materials you will need are metal elements:
- sheets;
- corners;
- stripes;
- pipes and profiles;
- hardware: bearings, bolts, pulleys, coupling (the list depends on the design).
A bucket or tank with solid walls is suitable for the storage tank to prevent the loss of fine particles. The rotary motor is connected to the shaft using a drive, and knives or circular saws are placed on the axis.
Indicators for choosing a branch chopper for a walk-behind tractor
If you decide to purchase a chopper for a walk-behind tractor, you must know what parameters to select:
- type of motor;
- unit power;
- funnel diameter;
- type of crushing system;
- what types of garden waste does it process?
- chopper weight;
- practicality.
Main ? pay attention to the blade system (disc or milling) and the type of motor (electric or gasoline).
Electric shredders are quiet, easy to maintain but sensitive to power surges, and process branches up to 4.5 cm in diameter. Gasoline? powerful, process almost any waste, but noisy.
Recommendations for self-design
The main task of creating a crusher with your own hands is to save money relative to purchasing a ready-made crusher. To save money, it is necessary to use improvised means during assembly.
The use of new ones is not recommended, because in the event of design or assembly errors, these elements will be damaged. After assembly, it is necessary to check the functionality of the device and its resistance to vibrations at idle. Making your own plastic crusher is only suitable for those who know how to work with tools and have basic knowledge in the field of materials science and drawing.
Do-it-yourself garden branch shredder
Branch chopper for walk-behind tractor? It's a good thing, but not everyone can afford to buy it. Thanks to this the best solution? make a shredder of trimmings and herbs with your own hands. This is naturally difficult work, but it is worth it.
There are many advantages to a homemade branch chopper: the ability to independently select the number of knives needed for the job; unit power, branch diameter and, naturally, low cost.
The design, if understood correctly, is incredibly simple. The grinding apparatus consists of:
- steel frames;
- gasoline engine or electric motor;
- cutting mechanism;
- bunkers for feeding sticks and unloading wood chips;
- main gear.
A self-made branch chopper for a minitractor is a cutting mechanism mounted on a frame.
Materials for production: knives from an electric plane, pulley, bearings, sheet metal, shaft, channel, bolts, nuts.
Tools: hammer, drill, welding, angle grinder, set of wrenches and pliers:
- We make the base for the frame from a channel, angle and pipes.
- We weld the frame.
- We put a package of saws and different washers on the cutting block shaft.
- We put bearings on the 2 ends of the shaft.
- We assemble the pulley at the longest end of the shaft.
- We secure the shaft to the frame with bolts and nuts.
- We install a small diameter pulley at the end of the shaft.
- We attach the motor to the frame, taking into account that the pulleys are located on one side.
- We put a belt on them and control the tension by moving the motor.
- From steel we make blanks for the casing with a protective function and the bunker.
- We weld the pieces together.
- We secure the casing and hopper with bolts and nuts to the frame.
- We connect it to the engine and check its functionality.
A homemade device is an irreplaceable assistant for your garden, easy to use and, it’s also worth saying, easy to make with your own hands. At a minimum, it will free you from unnecessary branches, and the resulting sawdust will serve as fertilizer or for heating your home.
Crusher design
A plastic shredder consists of several elements:
- engine;
- cutting mechanism;
- drive;
- sieves (filters);
- loading pocket;
- storage capacity;
- frames and housings.
The main unit that ensures the operation of the entire shredder is the engine and the cutting mechanism. They are connected by a drive, and all components are fixed on a frame, which is covered with a housing to comply with safety regulations.
The entire design of the device is based on the choice of engine type: single-shaft or double-shaft.
Otherwise, the design is approximately the same, and its elements are designed in accordance with the conditions of safe and convenient operation.
Single shaft shredders
Single shaft design is suitable for plastic crushing to increase the density of raw materials. When passing through a single-shaft structure made from plastic waste, it will not be possible to obtain crumbs suitable as finished recyclable materials. The cutting tools are placed on a single shaft, which rotates to cut the plastic into small pieces.
A single-shaft plastic waste shredder is the simplest do-it-yourself shredding device. To do this, a shaft with knives is placed inside the housing, which rotate when a rotary engine, sometimes supplemented with a hydraulic press, operates. The design is compact enough to fit into a home and is used for the primary processing of large and solid plastic waste.
Twin shaft crushers
Higher productivity and precision during crushing is ensured by the double-shaft design of the crusher. Two shafts are designed so that the cutting elements are staggered relative to each other. Due to this, the entire surface of the loaded raw material is crushed. This is in contrast to the single-shaft design, where the plastic can slip through the knives and large pieces must be “driven” through the shaft several times.
In a two-shaft design, each axis rotates towards each other, ensuring that plastic is “sucked” into the knife mechanism, so additional reinforcement through a hydraulic press is not necessary for a two-shaft design.
Schemes and drawings
Self-assembly of the chopper must be carried out only according to the drawing. This will protect against damage to materials, help organize work and take into account the nuances in the design of the device. When drawing up a diagram or drawing, the operating conditions, assembly conditions, and the availability of available materials are taken into account in order to reduce the cost of purchasing new ones.
A ready-made diagram or drawing can be downloaded from the Internet, but in this case there is no full guarantee of the functionality and safety of the structure. There is no point in drawing up such drawings according to the rules of design documentation, so their interpretation may be complicated due to the author’s specifics.
Initial data for design
When drawing up the project, the types of waste that will be crushed in the device are taken into account. The choice of design, type of engine and cutting elements, and size of the device depend on this. In addition to the composition of the waste, it is necessary to consider the volume of input that will be processed in the shredder.
A universal grinder for producing fractions of different sizes allows you to change the number of knives and sieve density. By compacting the knife mechanisms and the sieve, a fine fraction can be obtained.
If it is expected that homogeneous waste will be processed, then it is sufficient to design the shredder with a rigid structure.
Video and photo recommendations for making a grinder with your own hands at home
The device has gone through more than one modernization, and now there are many “clones”. For a person who is at least somewhat knowledgeable in mechanics, it is possible to repeat such an assembly with a little patience and perseverance. Let's take a closer look at the details of the process.
What to make a grinder drive from
The drive is the most important part of any mechanism. It is important to choose the right motor for the machine. The grinder requires an engine of one and a half to three thousand revolutions per minute with a power of 0.75 kW.
You can also use high-power motors, kilowatts or more, but there is a danger that the sanding tape will break
The performance of the device depends on the engine power. It is very convenient if it is possible to manually adjust the drive to solve various types of problems. When starting to make a simple grinder with your own hands, rummage through the trash in your garage or shed: there are probably suitable motors from units that have served their purpose.
Read also: How to calculate power in a serial connection
Is it worth making a homemade grinder with a washing machine motor?
Let's start with the controversial issue of making a grinder with your own hands based on an engine from a washing machine. It is controversial for one simple reason: during operation, a lot of dust and shavings, paint particles and other waste are generated on the device. They get clogged in the holes of the washing machine motor, and the structure quickly fails. But, nevertheless, for some craftsmen, such units work successfully. An example of such a device in this video:
Step-by-step recommendations on how to make a grinder from a drill
A drill is a must-have tool in every home. Often something breaks in it, the body or the anchor, or maybe a new, more powerful and convenient model just comes out, so the old one gathers dust somewhere in a box in the garage.
Using a drill drive, you can build a fairly powerful grinder
How to do this in practice - we will analyze the process in detail in photos and video instructions:
| Illustration | Description of action |
| Prepare the bed. It will require wooden blocks: one with a semicircular recess for the drill body and two for the handle. Install a switch on one side of the handle mount, which will then connect to the drill wiring. | |
| Install the drill as shown in the photo. The handle is fastened through with a metal pin. | |
| The front part of the drill body is fixed with a metal coupling and self-tapping screws. | |
| To protect the air intake openings of the housing from dust, make a protective casing from a strip of plastic. You can use a PVC profile or a regular plastic bottle. | |
| The first working surface of the machine is a regular grinder disc. It is attached through an adapter from the output shaft of the angle grinder. | |
| For the belt tensioner you will need two pieces of duralumin with holes for attaching the roller. | |
| To make a roller, you will need a pair of motorcycle bearings, a metal bolt of a suitable diameter and a ring. | |
| The bearings are placed on the roller. If the diameters do not match slightly, use electrical tape to seal. | |
| When assembled, the video looks like this. | |
| The drive roller of the grinder is the drill chuck. To prevent the tape from jumping off it, it should be covered with rubber. | |
| The base for the drill is a piece of board with a recess in the shape of the bed. | |
| Secure the backing to the frame with several self-tapping screws. | |
| This is how a homemade tape machine works |
Do-it-yourself grinder from an angle grinder: drawings and ready-made attachments
An angle grinder, or in common parlance, an angle grinder, is an almost ready-made basis for a blade grinder. On its basis, a machine is assembled using the same algorithm as the above-mentioned device from a drill. The scheme is like this:
Drawing of a blade grinder based on an angle grinder
As a result, you will receive a DIY mini-grinder that will sharpen knives and scissors. There is an option not to bother with homemade products, but to purchase a factory nozzle. It is attached to the angle grinder using a bracket. Finding such a device is not easy, but in our age of online commerce, nothing is impossible. Such a gadget is convenient because it is possible to use a working angle grinder without fundamentally disturbing the design of a working device.
This grinder is suitable for straightening seams after welding. For other work, you will have to think about a stationary mount
How to make a grinder from a grinder with your own hands: video instructions
Another easy-to-make version of a homemade blade grinder is made from a regular grinder. Almost all you need to do is mount the device on a workbench and set up a system for turning it on and off. More details about this in the video.
How to make a grinder with your own hands: drawings with dimensions from different authors
Each craftsman brings something different to the design, so before you start making a grinder sharpener with your own hands, explore the possible options. Here are some example drawings:
How to glue grinder tape with your own hands and special requirements for it
When developing a homemade grinder with your own hands, it is better to use a standard size sandpaper belt. Standard sizes are lengths of 1830, 1600, 1230, 915 and 610 mm and widths of 100 and 50 mm. Then you won’t have to rack your brains on how to make a grinder ribbon with your own hands. The tape, homemade or factory-made, must meet the following requirements:
- elastic fabric base;
- high ability to withstand angular speeds;
- abrasive resistance;
- possibility of extension without breaking the integrity by 10-15%;
- minimal heating during long-term operation.
Advice! Do not use tapes longer than 1230 mm for your homemade tool; for them you will have to increase the dimensions of the structure, and this puts forward additional requirements for its placement.
When making the tape yourself, try not to make more than one joint. All gluing points are stretched during the grinding process and the tape weakens
Read also: Thickness of cutting discs for cutting metal
How to glue tape at home:
- Cut a strip of sandpaper to the desired length and width. Cut the edges of the tape diagonally.
- Connect the edges and pre-glue them on the abrasive side with masking tape.
- Secure the cut with a few drops of superglue.
- Apply glue to the cut area and a piece of silk ribbon, press the surfaces together.
- Wrap the glued area with paper and secure it with a press overnight.
Before using the belt on the belt sander, let it hang slightly under a light load.
How and from what to make grinder rollers with your own hands
The first rule is that the rollers should not be too heavy, otherwise the engine will not be able to immediately turn the heavy parts, and an inevitable jerk will follow, which can damage the belt. For this reason, it is not recommended to turn heavy steel rollers. At best, the steel roller should be hollow, and for this the turner will charge you almost twice as much. A good solution is to use duralumin: it is both light and hard enough to complete the task. To prevent the tape from jumping off the roller, you need to make an end groove on it.
Important! The surface of the rollers should be rough within 1.25-2.5 Ra. If the indicators are higher, the tape will wear out quickly. On smooth rollers the sandpaper will rotate.
Bearing assemblies must be closed to prevent debris from getting into them. Cotter pins are used to secure the rollers on homemade blades.
How to make a pulley for a grinder with your own hands: video recommendations
The pulley for the tape machine can be made from a motorcycle wheel, ordinary plywood, wood or other available material. Here is an easy-to-make example of such a part:
Rotary table for grinder
Without a table, the grinder will not be able to process complex parts. The rotating mechanism with the ability to fix the part provides many advantages and allows for precise processing. This device is made of duralumin. A bracket is attached to it so that the table can rotate horizontally. The thickness of the duralumin sheet is at least 1.5 cm. A thin sheet may not withstand the load.
A clamping frame is used to secure the table to the machine.
Assembling a homemade unit
To produce a chopper you will need to prepare:
- Set of circular saws for wood with large teeth made of carbide – 25 pcs. Sold at points of sale. The landing (inner) diameter of the saws is 20 mm, the outer diameter is 180 mm.
- Threaded rod M20 – 1 pc. used as a shaft. Sold at points of sale or can be made to order.
- Separating washers with a thickness of 5 mm, an outer diameter of 130 mm and a hole of 20 mm - 24 pcs. Make without outside help from plastic or plastic.
- Galvanized steel sheet with a thickness of 1.5 - 2 mm for the production of a bunker and casing.
- Ball bearings – 2 pcs. internal diameter 20 mm. Can be used.
- Fastenings to ball bearings – 2 pcs.
- Profile pipes, channel and angle for frame production.
- Pulley for the electric motor shaft – 1 pc. outer diameter 60 mm. Choose or do.
- Pulley on the cutting block shaft - 1 pc. External diameter 120 mm. Choose or do it yourself.
- M20 nuts – 2 pcs. for the block shaft.
- Nuts, bolts and screws for fastening various parts (bearings, moving components of the belt tension system, etc.).
- Drive belt - 1 pc.
- Electric motor 3 kW. Can be used.
- Wire and contactor for supplying power to an electric motor.
The shredder is assembled in the following sequence:
- Blanks for the frame are cut from pipes, channels and angles.
- Weld the frame.
- A package of saws and separating washers is assembled on the cutting block shaft.
- Bearings are mounted on the two ends of the shaft.
- A large diameter pulley is installed at the long end of the shaft.
- The shaft is attached to the frame with bolts and nuts.
- A small diameter pulley is placed at the end of the electric motor shaft.
- The motor is fixed to the frame so that both pulleys are on the same side.
- A belt is put on both pulleys, the tension of which is changed by moving the motor.
- Blanks for the receiving hopper and casing are cut from sheet metal.
- The blanks are welded.
- The hopper and casing are mounted in their own places and fixed to the frame with bolts and nuts.
- A wire with a contactor is connected to the electric motor.
- A test run is performed and the operability of the unit is examined.
- Welds and metal are cleaned, coated with primer and painted.
Minuses:
- chips get stuck between the saws and that’s when cleaning is required.
A small branch chopper will be a good helper for garden maintenance.
Watch the video in which an experienced customer explains in detail the structure of a wood chipper made with his own hands: