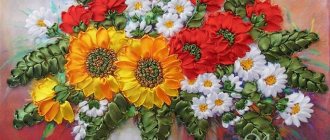
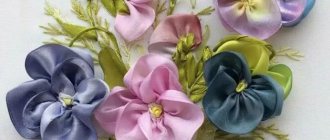
A popular hand-made craft technique using crystals is diamond embroidery. In the photos of the finished works you can see various thematic paintings - landscapes, still lifes, abstractions, images of people and animals. A special feature of needlework is skillful embroidery without needles and threads.
Unlike other techniques, even a novice master can handle the creative process of mosaic laying. Before you start filling the picture with diamonds, you need to familiarize yourself with the existing types of sets, instructions, algorithm, as well as the features of laying out the elements.
a brief description of
Diamond embroidery, or artistic mosaic, is the process of filling patterns partially or completely using acrylic crystals. For comfort and simplicity, beginning needlewomen can use ready-made patterns that are also suitable for cross stitch.
Unlike classical embroidery techniques, diamond mosaic does not require a needle and thread, and less time and effort is spent on production. As a result of laying out the pattern with rhinestones, the picture turns out to be voluminous, textured, and the diamond shine gives the finished work a special luxury.
The stones are attached directly to the surface of the canvas, onto which a thin adhesive layer has previously been applied. The algorithm for such unusual painting with colored rhinestones has its pros and cons.
The main advantages of the technology include:
- ease of execution, which allows you to create a hand-made masterpiece without prior preparation;
- short turnaround time compared to traditional cross stitch or satin stitch;
- the spectacular shine of finished paintings, which is achieved through a special cut of rhinestones;
- volumetric appearance and texture;
- ease of storage, since finished paintings do not need to be protected with glass.
Relative disadvantages include the following:
- the process of laying out crystals is long and painstaking and requires skill;
- the price of ready-made kits with diagrams and materials is quite high;
- the presence of defective elements with mismatched shapes, inclusions of other shades, air bubbles inside the crystals.
Despite some shortcomings, the technique is distinguished by creative novelty and simplicity. In order for diamond painting to be enjoyable, done professionally and have a neat appearance, you need to familiarize yourself with the layout algorithm, as well as select the optimal set with a ready-made diagram.
How to solve problems with adhesive base
It happens that the adhesive base dries out or does not stick due to debris. Then the rhinestone does not stick, comes off, or constantly falls out. It is not always clear what to do in this case. In such a situation, I use glue. A crystal or other transparent glue is suitable. You need to grab the rhinestone with tweezers, apply a thin layer of glue to the flat side and carefully place the stone in the desired place on the diagram.
If the diamond mosaic does not stick due to a violation of the manufacturing technology of the base for laying, or there is no adhesive base on the canvas in large areas of the pattern, then it is not difficult to fix it. In such cases, it is easy to make an adhesive base; just replace it with ordinary double-sided tape. To do this, the tape is carefully glued to the area of the diagram, after which the diagram is laid out, gradually removing the protective layer.
Important! It is best to first test diamond mosaic glue on an inconspicuous area of the canvas to make sure it will not damage it.
What shape are rhinestones?
Diamond embroidery (photos of finished works can be seen below) is a modern type of needlework, where rhinestones are the main element when creating paintings. Manufacturers offer material in various bright and nude shades, textures, effects and shapes.
Depending on the effect that you would like to achieve in the end, you must first of all choose the optimal shape of the shiny elements. It should be noted that finished paintings created according to the same pattern, but using diamonds of different shapes, will look different.
The shapes of crystals for painting are:
- square;
- round.
In addition to the main shape, there is a separate type of material - 5D and 3D square or round. There is no clear answer as to which form is best for the job. Experienced craftswomen recommend that beginners familiarize themselves with all types of rhinestones to determine a more convenient option.
The choice of shape and texture is individual, depending on the effect that you would like to achieve in the end. Round and square rhinestones have their own characteristics that novice diamond mosaic masters need to know about.
Square
Diamonds have a regular square shape, so this type of material is best chosen for beginners. The elements are easily grabbed with tweezers and laid in even lines, tightly adjacent to each other.
Each element has a small cut. The material is made of high-quality durable plastic and is presented in a varied palette of shades, which allows you to create beautiful visual color transitions in the paintings.
Round
Round rhinestones are intended for paintings that need to be given a special shine. These can be landscapes depicting the sea, sun glare, dew on flowers, sparkling winter landscapes. All round crystals are cut with 9 or 13 transverse and diagonal faces.
Thanks to their special texture, round rhinestones have a reflective property, which allows you to create a beautiful lively shimmering effect. The elements are made of acrylic, similar to glass, and therefore have a special transparent-colored structure.
Diamond painting - a new type of needlework
Rhinestone embroidery is a new type of needlework in which decorative diamonds are used instead of threads.
- This process is labor-intensive, but easier than embroidery, because the work consists of gluing rhinestones of the desired colors to the base according to the pattern so that a mosaic is obtained.
- And although in essence this is the process of laying out a mosaic, and not embroidery or painting, it is customary to call this type of needlework diamond embroidery, diamond mosaic or diamond painting.
- The first kits for embroidery with rhinestones began to be produced by Chinese manufacturers.
- This kit contains all the materials needed for the job and detailed instructions.
- The diamond laying technique poses virtually no difficulties. Even a child can cope with such embroidery.
- To prevent the finished product from deteriorating over time, it can be varnished.
With 3D and 5D effect
Diamond embroidery is a type of creativity where diamonds are laid out on a canvas according to a given design pattern with a layout of shades. In the photo of the finished work you can see the differences in the layout of round and square elements. In addition to classic diamonds for painting, manufacturers offer material with a special 3D and 5D texture.
The elements are brilliant 3D Glass Diamond and 5D Round Diamond with a foil base. The marking indicates the number of measurements. The 5D indicator includes several measurements that determine width, height, convexity, several types of bevels, and mosaic crystal cuts. 3D diamonds have fewer dimensions, so the work appears less voluminous.
A special feature of the material is that D-type crystals of the same color have different orientations of the edges, creating the effect of beautiful geometry, making the flickering of the picture more natural. This material is used to fill mosaics with partial lining.
This allows you to give the product a special brightness and voluminous effect. For manufacturing, 3D and 5D crystals with sizes from 2.7 to 3 mm are used, stitch size is 9 ST.
Development of Diamond Mosaic
Like any method of decorative art, diamond embroidery has developed and modernized. In the Middle Ages, the so-called bugles first appeared, which became the progenitor of diamond embroidery. Already in these times, canvas was used as a canvas, on which there were symbols for cross-stitching. Colored pieces were laid out on it along the contours, having previously soaked the canvas with wax.
Bugle beads began the spread of this technique in Russia
In Russia in the 19th century, noble women and court servants sewed beads. Using glass beads we made:
- Wallets;
- Paintings and icons;
- Robes;
- Bracelets and jewelry.
At some time, the method faded away and lost popularity, but was revived with the development of arts and crafts techniques in the mid-twentieth century. It was at this time that the concepts of “diamond embroidery” and “diamond laser mosaic” began to be used.
Round rhinestones with edgesIn the 21st century, technology has been improved even further. Today it is used to decorate panels or decorate interior items. All you need to get started is to purchase a special kit at a sewing store or online. You can master the principles using the instructions that are often included in the kit.
Diamond set
Special sets
For beginners and experienced craftswomen in the diamond painting technique, manufacturers offer ready-made sets with schematic drawings applied to a plastic or fabric base. Working with such a kit is simple and convenient; the whole process is streamlined with instructions and a ready-made diagram.
Each creativity kit necessarily includes 3 elements:
- Canvas with a printed color key scheme.
- A set of colored acrylic or plastic elements, selected in a special palette of shades and textures for a given painting.
- Instructions for making a mosaic with a “legend” - a list of shades of crystals by number, as well as corresponding symbols.
To simplify the process, an adhesive layer is applied to the canvas in advance, securely covered with a protective film. According to the instructions, the color number is marked on each package with decorative material, and the corresponding symbol is indicated on the diagram.
The main flagship products for diamond mosaic embroidery are considered to be manufacturers from Korea, China, and Russia. They may differ in the quality of the material, complexity, and cost.
The most popular manufacturing companies are presented below:
| Brand name | A country | Equipment | Price |
| Granny | Russia | The set includes a roll of canvas, key diagrams with full filling, and a set of shades of square rhinestones. | 2000 – 4000 rub. |
| "Diamond painting" | Russia | The set includes a linen base, a key with full or partial lining, and a set of round or square textured decorative elements. | 500 – 2500 rub. |
| Snow White | China | Sets are offered with canvas without a stretcher or on a solid base, with full or partial lining, various shapes and textures of diamonds. | 1500 – 2000 rub. |
| ANYA | Korea | The budget set includes a canvas roll, diagrams with partial or full laying, a set of round or square diamonds. | 800 – 1100 rub. |
| Color Kit | China | A wide range of kits for making paintings using any layout method and all types of diamonds to choose from. | 1400 – 2800 rub. |
| Transformed | Russia | Thematic kits for making icons with thermal rhinestones. The kit includes a solid base or canvas in a roll, a set of hot-melt and sew-on rhinestones. | 500 – 1800 rub. |
Among the wide range of prepared sets, you can buy key diagrams with different motifs, with any types of mosaic crystals, for complete or partial filling of paintings.
Some companies offer services for creating diagrams based on the customer’s sketch - family photos or any other subjects. When choosing, it is important to take into account not only your own taste and wishes, but also the degree of complexity of the future mosaic.
Storage and processing
After completion of the work, an equally important stage begins - registration. You can design the canvas yourself or use the services of a framing workshop. You can arrange it only in a frame, you can add a mat, or you can have a complete set: glass, mat, frame. It all depends on your taste.
And if you don’t have time yet and the design is waiting in the wings, you need to roll the canvas with the diamonds facing out and put it in a case, away from dust.
Author — Natalia_lari
When decorating yourself, the canvas must be carefully and tightly glued to a plywood base or very thick cardboard using glue or double-sided tape. When using glue, apply it to the base and gradually glue the panel, gradually smoothing it - pressing it with a rubber roller so that nothing bubbles or bends.
Author — Natalia_lari
For an example of how to design work using diamond technology into a baguette, see the video from Irina Safronova:
Materials and tools
To make panels using the diamond embroidery technique, you need to prepare the following arsenal of tools and materials:
- Stylus. A special stick is used to place rhinestones on the adhesive layer. This can be a wooden stick with a sharpened end or a plastic pencil with a metal tip. For professional work, you can use a tool with a soft nozzle. Illuminated stylus for diamond embroidery. Photo
- Tweezers. It is recommended for use by beginners; the tool provides a firm grip on the decorative element. It is especially convenient to use the tool for filling plots with square crystals. These tweezers have a thin, curved grip. Metal devices are more convenient to use and hold the element better. Plastic tweezers are inconvenient because the parts slide off the smooth surface.
- Stationery knife. It will be needed to fragmentarily remove the protective film on the painting. This way the adhesive layer can be protected from premature drying.
- Container for decoration. This could be a saucer or any other container. It is better to use a special plastic tray with high sides, the bottom of which has convex stripes for easy turning over of diamonds.
- Glue. The kit often includes a special adhesive solution, which will be required in situations where the adhesive coating begins to dry out. You can also lubricate the base of a stylus or pencil with glue to better pick up small elements.
- Rhinestones. The main element of the picture, depending on the choice you can achieve one or another decorative effect. Rhinestones can be round, square, glossy or matte, plastic or acrylic, color filled or translucent.
Ready-made kits include all the necessary tools and decorative materials. Having prepared everything you need, you can start working on diamond painting.
Tweezers and stylus in diamond embroidery
Sparkling panels are conventionally called embroidery. In fact, the pebbles are not sewn to the base, but glued. For convenience, special tools are used. Ready-made kits always include a plastic stylus (a stick for installing rhinestones) and tweezers. Using a stylus, it is convenient to remove an individual rhinestone from the total mass in the tray and install it in the desired place in the design. Recently, there are styluses that allow you to grab and glue 3 parts at the same time, to save time. Using tweezers, crooked elements of the composition are corrected.
Basic execution steps
Diamond embroidery, photos of finished works of which can be seen below, is a step-by-step process. In order for the work to be neat, voluminous, and to convey all the shades and color transitions as naturally as possible, it is necessary to follow the layout algorithm.
Main stages:
- Preparatory.
- The main stage with laying out the elements.
- Varnishing the finished painting.
- Decoration of the painting.
Each stage has its own implementation features, so beginners are advised to strictly follow the instructions.
Preparing for work
At the preparation stage, it is necessary to properly organize the workplace, prepare materials and tools, conveniently arranging them in the order of use. It is also necessary to create good natural lighting, since painstaking work with small details may tire the eyes.
It is advisable to arrange all the pebbles in a special organizer, sorting them by color; on the sorters you can sign numbers and symbols according to the placement scheme. It is important to read the instructions before embroidering.
Main stage
Having prepared the workplace, materials and tools, you can begin the creative part - filling the canvas with diamonds. To do this, you need to remove the protective film by sectors of the painting, and then lay out the elements according to the algorithm and in accordance with the key.
Having completed one fragment, the flap of the protective film is removed again, and the work is repeated according to the given algorithm. If the adhesive layer does not provide a sufficiently tight adhesion to the diamonds, it is necessary to additionally apply a little glue to the base.
When laying out rhinestones, you do not need to press hard on the elements, so that in case of an error you can replace the rhinestone. You need to press the diamonds well only after completing all the work.
Varnishing
The finished diamond painting must be varnished. This technique is necessary to create aesthetic completeness, as well as to securely fasten the rhinestones to the canvas.
For varnishing you can choose:
- artistic varnish with a matte effect;
- glossy acrylic coating;
- craquelure varnish.
Gloss is most suitable for diamond embroidery, as it will further emphasize the spectacular shine of cut diamonds. The basic rule when varnishing a painting is to apply the composition in a thin layer, picking up a little varnish on the brush. Otherwise, it will flow between the elements, forming air bubbles between the diamonds.
Decor
At the final stage, the painting can be framed or stretched on a stretcher. This can be done in a special workshop or independently, leveling the finished canvas on a solid base and securing it on the sides with a stapler. To make your work look richer and more beautiful, you can frame it with a mat - a special insert between the work and the frame.
The final stage
To create a completed work of art, the painting must be framed on a stretcher. Some sets are sold as a complete set. In addition, you have the opportunity to turn to professionals at a framing workshop or purchase a frame of suitable size from an art store.
In addition, when decorating, you can add mats and glass. This will help protect the painting from moisture and dust. If it is not possible to complete the design in the near future, the finished work should be rolled up with the crystals facing up and carefully packed in a case.
Methods for laying out a diamond painting
Diamond paintings can be standard or in the form of a triptych - 3 separate parts that form an integral composition. Beginners should initially choose smaller-scale paintings in order to gain experience and dexterity in working with small details. According to the method of laying out, diamond embroidery is divided into 2 types - partial and full filling.
Each type of work has its own characteristics:
- Painting with partial display. The peculiarity of this technique is that the diamonds are laid out in separate areas of the canvas, and the picture itself is already printed in advance. Beginning craftsmen can begin their acquaintance with creativity by performing partial diamond embroidery. Round translucent rhinestones are often used as the main elements for partial laying out, which make it possible to give the finished work additional volume.
- Fully filled embroidery. This technique involves completely filling the pattern with rhinestones. Such paintings look especially luxurious, visually reminiscent of beadwork. To achieve uniform, complete filling, sets often use square-shaped diamonds.
In addition to standard kits, manufacturers also offer ready-made patterns with a combination of handicraft techniques. In such paintings, individual fragments are filled with diamonds, while others are embroidered with a cross, ribbons, beads, and French knot.
Where to put leftover rhinestones
The manufacturer always puts a supply of rhinestones for a diamond painting. If you don’t lose them and spend them according to the plan, the diamonds will remain. They can be used for other types of creativity, for example, glued to a greeting card, inserted into a drawing made with paints, or decorated with a frame under a picture.
You can just leave the rhinestones for next time - in case the desired color runs out. Craftsmen who create new patterns themselves often face a shortage of stones of the desired color, so they never throw away the extra ones.
Working with round diamonds
Round rhinestones are often used for partially or fully laid out paintings. As a rule, the material is made of transparent acrylic, so the rhinestones have the appearance of sparkling crystals. Manufacturers offer a varied palette of translucent shades, as well as chameleon rhinestones that change color.
There are also elements with a matte, opaque structure made of plastic. Paintings with partial laying out can be chosen by beginners, since full laying out of round elements requires special skill. Diamond embroidery with round rhinestones, made in accordance with the instructions, always looks impressive, sparkling and shimmering with the edges of the crystals.
Step-by-step instruction
Work must be carried out on a perfectly flat surface. As a rule, this is a desk. Working with rhinestones is painstaking and time-consuming, so you need to take the equipment of your workplace seriously. Particular attention should be paid to lighting. The workplace must be sufficiently lit. The technique itself is not complicated, but in any case you need to read the operating instructions.
Working with square rhinestones
Painting with square rhinestones is a more convenient way to fill out schematic drawings. The correct shape of the elements allows them to be laid in even, neat rows, which is why they are often used in fully filled techniques.
Square-shaped rhinestones are made of durable plastic, which is given the desired shade to create a finished composition according to the color key. The key diagram is included in the kit. The peculiarity of such paintings is the effect of a three-dimensional image, as well as an exquisite glossy shine and textured surface.
Final work
Upon completion of the layout, it is important to correctly design and frame the diamond embroidery, then the mosaic will remain in its original condition. Master Class:
Master Class:
- Before performing, you should lay out the canvas on a flat surface.
- During the work, some crystals may have shifted, fallen out, or moved away. You can return the loose stones to their place and secure them using a regular rolling pin. To do this, cover the spread canvas with a thin cloth and carefully roll it with a rolling pin, pressing on it.
- Next, you need to inspect the drawing and return the missing rhinestones to their place.
- To remove small debris, carefully sweep the mosaic with a clean synthetic bristle paint brush.
- Then I cover the embroidery with water-based acrylic varnish in two layers; some people use a special glue for coating diamond mosaics. This step will not only preserve the painting, but will also firmly fix the stones in place. You need to cover it carefully, in a thin layer, going over the picture vertically and horizontally. This will fill the spaces between the crystals.
- The finished painting should be left to dry in a well-ventilated place. During drying, you will have to make sure that no debris, hairs, wool, etc. get on the canvas.
Next, the finished canvas must be placed under glass to secure the rhinestones as firmly as possible. After which you can decorate the interior of the apartment with mosaics. It looks beautiful on the wall or shelf.
Important! The canvas with the layout diagram is sometimes initially stretched on a stretcher. In addition, the diagram is placed on plywood, attached to a tree that is attached to the frame
Then I simply coat the finished work with varnish; it will not be possible to place it under glass.
Tips for Beginners
Diamond embroidery, photos of finished works of which will help beginners get acquainted with creativity, is a labor-intensive and painstaking process. To make it easier for beginning craftswomen to choose their first diamond embroidery kit, you should follow a few simple tips:
- You can start with works where diamonds partially fill the design.
- For your first creative experience, you can buy a set with square rhinestones; working with them is easier and more convenient.
- As a motive, it is recommended to choose simple plots with a minimal set of shades.
It is ideal to start your acquaintance with diamond painting with landscapes. Natural lines are initially devoid of symmetry, so small mistakes of beginners on such canvases are less noticeable. The base can be of 2 types - plastic or canvas. It is easier to work with a hard plastic base, but on canvas the painting looks richer and more natural.
Handling the Canvas
Any kit for diamond embroidery must include a base. It can be plastic or canvas. Working with canvas pre-stretched on a stretcher is much more convenient. After finishing the display, the work is ready to decorate the interior.
But there is also a significant disadvantage: during work, the stretched canvas can be damaged, stretched, deformed by pressing the fabric with tweezers or a stylus. If the set contains canvas without a stretcher, rolled into a roll, it must be prepared for work. The fabric should be ironed from the wrong side with a slightly heated iron or placed under the weight of books for several hours.
Subtleties of working with protective film
Protective film is the main element in the production of diamond mosaic. Its main function is to protect the adhesive layer applied to the canvas from drying out and dust particles. It is not recommended to remove the film in advance. The layer is removed gradually and fragmentarily, carefully cutting off with scissors or a stationery knife in the area that is filled with crystals.
If the film has been removed with reserve and the adhesive layer has dried, to fix the decor you must use a glue gun to securely fix the rhinestones using a thermal method. If dust particles get onto the canvas during the process, they must be removed with a cotton swab dipped in water. Rhinestones are attached to this area using glue, applying it to each element one by one.
How to take a rhinestone correctly
Faceted crystals are easy to hold with tweezers. Smooth round parts are more difficult to work with. They can be grabbed with a special stylus stick with a soft end.
In a beginner’s kit, you must have not only tweezers with a thin metal grip, but also a glue stick with a sticky tip, with which you can easily bring the element to the desired filling area.
How to choose a diamond mosaic tray
The diamond embroidery kit includes a tray for rhinestones. It is more convenient for beginners to work with a special organizer - a plastic box divided into separate compartments for storing rhinestones of different shapes and colors. To work with this technique, there are special trays with a textured bottom to make it easier to turn the crystal over during the picking process.
How to align rows of rhinestones?
If the adhesive layer applied to the canvas is of high quality, it will firmly hold the stones. The base is plastic, so individual elements can be easily moved during the laying process. At the beginning, the row may not be even enough. To straighten them, you can use a ruler as a construction trowel and move the slipped stones into an even straight row with the smooth side of the tool.
What to do if you run out of pebbles of the desired color?
The set includes a sufficient number of crystals of each color; manufacturers put them in reserve. In rare cases, if you run out of stones of the desired color and the area is not yet filled, you can use elements from the set that are similar in color.
If you don’t find any, you can buy more rhinestones at an arts and crafts store.
How to take a rhinestone correctly
It is easier to grab a square rhinestone by the sides with tweezers . It is important not to scratch its surface, so the material should not lie in bulk, but each separately. If you squeeze the tweezers too hard, the stone will pop out and get lost - you need to adapt here.
Smooth or round items are more difficult to grasp with tweezers. It may be more convenient to use a glue stick or stylus , taking the rhinestone by the top. The soft rod will not damage the coating.
If the mosaic is very small, a damp wooden toothpick . To wet it, you need to place a small container of water nearby.
Selecting a tray for diamond mosaic
Mosaic trays come complete with pattern and canvas. Some are inconvenient to use, since the soldered lid gets in the way, and the container itself is deep. You can replace this with an empty box of watercolor paints that children buy for school. It is not too bulky, but it is more convenient to turn over stones. It is recommended to immediately sign where each color is placed (the number is on the bag).
Professional craftswomen use a rhinestone organizer . The container is expensive, but very convenient because of the drawers. The organizer can be used to pour materials into smaller containers, such as saucers or single containers.
Do you need protective glass?
Diamond embroidery (photos of finished works can be seen below) is a fascinating needlework process. The special structure of the crystals and the material from which they are made create a finished look without protective glass. Diamonds are not afraid of ultraviolet rays, and shades do not fade.
To care for the painting, just wipe off the dust from the surface. If you cover a painting with glass, you can ruin the aesthetics of the work, since the noble gloss and shine will be hidden under the coating. Protective glass may only be required when making matte mosaics. This technique will create a radiant effect.
Diamond embroidery, which is easy to perform, allows you to create beautiful subject paintings, still lifes, and original abstractions without using a needle and thread. For beginners, photos of finished works can become motivation and a visual aid for making mosaics.
Article design: Vladimir the Great
Photos, flower paintings, diamond painting
Diamond mosaic painting Flowers 5D effect
Diamond painting 5D – Flowers in a basket Diamond painting – Three scarlet roses
Diamond mosaic, painting "Scarlet Rose" Diamond painting 5D - Scarlet roses in a basket
Diamond painting 5D – Bouquet of roses
We study a step-by-step work plan in a simple master class
The most important thing for a needlewoman is her workplace. It should be rid of unnecessary things that will simply get in the way under your hands. It is not worth mentioning that ideal lighting and a flat surface are prerequisites for work. Only in this case the creative process will bring joy and be productive.
The second step is to release a piece of the diagram from the adhesive tape. It is better not to tear it off entirely from the entire picture, as the adhesive layer may wear off and not adhere to the rhinestones. Therefore, you need to open as much as you can do at one time.
Pour the rhinestones from the bags into separate convenient containers, which for better orientation should be numbered in accordance with the colors.
Next comes the embroidery process itself. Taking the required pebble with tweezers (at the beginning it is better to check the diagram and make sure that the desired color and location are selected), place it in the cell of the diagram and lightly press the tweezers to fasten the element to the canvas
It is important to calculate the pressing force, otherwise it will not be possible to eliminate the error in the future.
Classically, embroidery occurs in order in a horizontal direction, moving forward as in bead embroidery. However, many people prefer to embroider by color or individual elements. There are no strict restrictions or boundaries, because creativity presupposes flight of thought and freedom of action. If a non-standard approach to work brings pleasure, then why not use it?
Under no circumstances should you use defective stones, because the overall appearance of the painting depends on them! Rhinestones with chipped corners and holes should simply be put aside.
Video tutorials often skip this step. To give the product a neat look, you need to take a simple ruler and slowly move the horizontal and vertical rows. Reducing the distance between the pebbles will make the picture more complete.
Gradually, according to a given algorithm, all the glue pieces of the diagram are filled. If you have problems with fastening, you can use a master class created by professionals. You can find similar articles on the Internet.
Having finished gluing the rhinestones, you again need to resort to using a ruler and trim all the edges.
Having finished the work, use scissors to trim the edges of the work strictly along the edge. The main thing is not to cut too close to the outer rhinestones, otherwise the work may begin to crumble.
Diamond mosaic technique step by step
Of course, I began to figure it out, watch video tutorials on how to assemble a diamond mosaic. They really helped me understand the essence, but in the process, while I was getting used to it, I also developed my own rules, which I want to share with you.
Workplace organization
This question is extremely important. To engage in this type of activity, you first need very good lighting.
- Choose a comfortable place, a table at which you will sit. There should be a light source on the top left.
- It would be nice to arm yourself with a magnifying glass. But I made do with just glasses, although it was a little difficult sometimes.
- To make it more convenient to work with numerous rhinestones, it is recommended to pour them into small boxes and stick the numbers of the rhinestones on the boxes. But I had nowhere to collect such a huge number of boxes and I tried to take rhinestones... straight from the bags! It turned out that it was very convenient! In addition, the numbers do not need to be re-glued; the packages can be closed, rearranged, placed on top of each other at any time, and can even be dropped without loss!
- Although the package with the parcel contained a full set of accessories, I only needed tweezers, since my diamond mosaic contains square rhinestones.
Laying out diamond mosaics by numbers
1. The sticky diamond mosaic sheet is covered with paper. You don’t need to remove it all at once, otherwise it may stick during work, it will be very inconvenient and it will not even be possible to lay out small rhinestones. You need to open the diagram gradually, starting from the upper left corner.
2. Determine which color is greater in the fragment that opens and find these rhinestones by number. Pour some into a special small container. At first, the rhinestones will fall chaotically, but if the container is slightly shaken back and forth, most of them will settle in the rows of the container with the stops with the convex side up, as they should be when laying them out.
3. I simply found rhinestones of additional colors, those that are smaller in this part of the picture, by numbers and laid them out directly in bags next to the place of work. She opened the bags and pushed some of the rhinestones to the edge.4. Using tweezers, take one diamond, place it on the corresponding cell of the diagram with the flat side and lightly press it with the same tweezers.
5. It is better to lay out rhinestones not in a row in a line, but in a checkerboard pattern.
I took an enlarged photo.
It is noticeable that not all the rhinestones lay flat, although in reality it is difficult to see clearly. But the rhinestones can be easily corrected and re-glued. They are also aligned in the process of laying out other rhinestones next to those already laid out.
6. There is no strictly precise order of layout. It was convenient for me to glue rhinestones first of one color from a container or an open bag, and then of another, rather than climbing through different bags at each step.
7. When the corner of the picture is completely laid out, you can separate the paper further and lay out the next fragment. And thus until the end of the work.
8. My painting is quite large, so it was divided into two parts by paper. First I laid out the top, then the bottom.
9. I bought a frame and inserted the finished work into it.
I just don’t know yet what to do with the remains of the diamond mosaic, but there are so many of them that I can post one or even two more pictures.
PS Then I noticed that diamond rhinestones can be used to decorate any surface: boxes, jars, pots, to make mini-paintings. And they are glued with double-sided tape.
Where to buy diamond mosaic sets inexpensively
Now I already know that diamond mosaics are sold in stores and departments for creativity, but at that time I wanted to buy it quickly, without leaving home, and I was not sure if they were in our stores, I had not seen them before or had not looked attention.
I looked at what online stores offer. I must say that the prices in most of them are steep; at least for someone starting an unknown business, I thought it was risky at such prices.
If you want to buy diamond mosaic inexpensively on the Internet, then go to Aliexpress, that’s exactly what I did.
The assortment there is huge, prices range from 300 rubles and above depending on the size of the work.
I looked at different options for a long time and chose a landscape; I immediately decided on a large diamond mosaic: 30x40 cm for 700 rubles.
The parcel arrived quite quickly, it seems around 2 weeks.
I’ve already made a lot of purchases on Aliexpress, I’ve always been happy with everything, they correspond to the description, the quality is good, and most importantly, I like the prices! There were never any misunderstandings.
When I opened the parcel, I was somewhat upset by the colors of the rhinestones; they did not match my idea seen in the photo. On the screen the picture was very bright and sunny, but the colors in the bags were a bit dark. But I worried in vain, as a result the picture turned out in such warm, deep colors and I really like it.
Besides, I didn’t expect the rhinestones to be so small! How can you even pick them up and see them? I was sure that my work would take at least half a year, or even more, but I completed it in 1.5 months.
Applying stones
Having come up with a unique version of the future masterpiece, we find the drawing we like and print it out. When printing out the diagram, make sure that it has checkered patterns, like cross stitch.
Prepare the gems and PVA glue. The printed drawing is placed under backlit glass, the base is placed on top and execution begins.
| Illustration | Step-by-step instruction |
| Take a syringe with a needle. The needle breaks off. | |
| The syringe is filled with PVA glue. | |
| Using a syringe, glue is applied to the gem. | |
| Using tweezers, place it and press lightly. | |
| We lay out each pebble until the selected masterpiece is ready. The finished product is framed with glass. |
We use rhinestones for paintings
Rhinestone embroidery demonstrates a distinct intended image and is used to create a variety of landscape themes for the interior, decorating clothes, bags, and wallets. Diamond handmade art is simple and extravagant, and the decor of things and any outfit will make it rich and unique.
The technique is quite simple. To get started you will need:
- color scheme
- rhinestones
- tweezers for easier work
Before we begin, we prepare all available materials for this labor-intensive process. Preparatory stages:
- Everything is laid out and the drawing is studied;
- If there are many colors, we decide which shade is more practical to start working with;
- If you have a base with glue, it is better to work from the corners so as not to sew pebbles in another area of the design;
Step-by-step process of gemstone mosaic
- remove the protective film coated with a special glue. The protective layer opens partially, as required. The glue does not dry out immediately - you can safely do interesting things without fear of rapid drying.
- Using tweezers, we carefully embroider the marked part of the future masterpiece with gems.
- Press the pebble with your finger and attach it to the desired place. The entire palette of rhinestone colors is numbered to simplify the embroidery hobby.
The stones should be laid out horizontally and vertically, aligned with a metal ruler. This method is also called mosaic - to lay precise rows, the pebbles are continuously leveled.
- The closed composition is trimmed along the edges with a metal ruler. The canvas is filled evenly, without gaps.
- An exclusive cut of stones will unusually decorate the picture, giving it a unique extravagance.
- Having finished the work, we trim the canvas.
The finished product is glued onto thin plywood and placed in a frame.
Tips for working with diamond embroidery
When doing needlework, we take into account all the subtleties when working with the material. Little secrets shared by experienced craftswomen:
- The crumpled material is ironed through gauze with an electric iron from the inside out.
Important! The electrical appliance heats up to 120 degrees.
- The second version - the embroidered base is rolled up with the adhesive side out and left for a couple of days.
- If the tweezers are inconvenient, then when finished, place the rubberized attachment on it.
- Unnecessary objects stuck to the diagram are treated with water and removed. Having dried the moisture, we continue to create.
- The frame glued with rhinestones is sealed with pieces of adhesive tape. The actions taken protect against a variety of dust and dirt. Upon completion of the manipulations, the frame is decorated.
- To facilitate the implementation of plans for creating pictures, accuracy and convenience, we adapt containers or free vials.
There is a certain methodology and techniques for creating paintings, which stand out in different ways in achieving the goal:
- The rows of stones in the picture are laid out in length. This method provokes rapid fatigue and difficulty in maintaining them when displaced.
- It is best to lay them out in strips or hearths. Laying out in places, the shades will suit the corresponding area, the rows will be laid out exactly. The site area should not be too wide.
When creating an icon, you can use a technique such as a checkerboard pattern, collecting pebbles according to the required shades. Using this technique, there is no displacement of the ornament, the picture looks proportional.
Needlewomen share detailed important information, rules and recommendations, taking into account their extensive experience and professionalism:
- The main advice for beginners is to peel off the adhesive film partially during the creative work. If necessary, twist the embroidery with rhinestones outward.
- Finished masterpieces can be steam ironed, this way all the stones will be better fixed. They should be ironed on both sides, placing a thin cloth underneath. Before ironing, check the composition at the tip.
- The composition will look neater if the finished places are pressed with weight - the stones will be smoother and fixed better.
- Durability, good fixation and a neat appearance will be achieved by coating with acrylic varnish.
- If there is a need to align rows of pebbles, we use a plastic card or a metal ruler.
- The damaged adhesive base is renewed with double-sided tape.
- The effectiveness and evenness of embroidery is improved by leveling with a rolling pin.
Creating diamond masterpieces is easy and fun. The results of fruitful, painstaking needlework are pleasing to the eye and engage the imagination if you followed all the tips when creating compositions.