Methods for securing a thread
First, secure the threads in any of 4 ways:
- Use a wide clip on cardboard, book or notebook.
- Using a regular pin, tying knots on it, and then attaching it to a pillow or any fabric.
- Tape it to a table or other hard surface.
- Using a special tablet with a clip (sold in stores).
It should be remembered that when fastening, the threads must be positioned according to the color scheme of the weave. When the floss is securely fixed, we begin to study the main knots.
Josephine
Its other name is bow. Consists of two intertwined loops and is usually part of a pattern.
- Take the bracelet cord and cut it in half. From the first fragment, make a loop with the running end thrown over, and place the second fragment on top of it.
- Pass the end of the second segment under the root end of the first and over its running end.
- Bring the running end of the second under the loop of the first fragment, and it should pass over the second fragment.
- Pull the loops and straighten the knot.
Technique for performing the main components
When weaving baubles, only four basic knots are used:
- main left;
- main right;
- half (left and right);
- flat (straight).
Baubles are very easy to make if you follow the weaving technique.
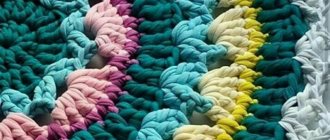
What is the art of macrame
Macrame is a knot weaving technique. This is an applied art that was originally purely practical in nature. At the dawn of its appearance, knot weaving made it possible to make gear, clothing and other useful things.
Over time, weaving develops from a routine into an art. Needlewomen are able to create masterpieces with minimal time investment. The technique also brings benefits to the body. It helps to concentrate and develops fine motor skills.
Bauble made of 2 threads
The simplest bracelet can be woven from two threads.
To make it easier to navigate and not confuse the sequence of steps, use 2 colors of floss thread, for example red and blue:
- Take 2 threads with a length equal to 3 wrist circumferences. They are tied together with a regular knot. Secure with a paper clip on a solid base (book).
- Make a main left knot. To do this, take a red thread, place the corner on the left above the right (blue) thread, bring the tip of the red thread inside the corner and tighten the knot.
- Perform the main right knot. Now the blue (right) thread is laid with a corner to the right above the red one, its tip is brought inside the corner and the knot is tightened. Alternate the knots until the bauble reaches the required length. The remaining ends of the threads are tied together, then connected to the knot made at the beginning of weaving the bracelet. Excess threads are cut off.
After you have learned how to weave floss baubles with two threads, you can move on to more complicated patterns. For beginners, it is worth mastering how to make a braided bauble from different numbers of threads.
Interesting facts from the history of the Shambhala bracelet
In the initial version, Shambhala is a bracelet made of 9 stone beads, which are connected to each other with a complex weave. It has long been worn on the right hand and made from various types of stones. The weaving of the Shambhala bracelet was also different.
Each nuance corresponded to a specific belief system. Some products brought health, others brought family happiness, others brought good luck, and others relieved ailments.
Initially, such bracelets were used by Buddhist monks. These products were analogous to rosary beads. While reciting mantras or meditating, Buddhists moved beads around their wrists. This helped them measure time and count how much had been done.
Then ordinary people began to use the bracelet. However, they also attached sacred meaning to it. The symbol was associated with the signs of the Zodiac and the teaching about the characteristics of stones. Also, the properties of the sign differed depending on people’s faith in talismans. As a result, only the original shape of the bracelet remained from Buddhism. The rest is layered traditions borrowed from eastern countries.
The bracelet began to be called Shambhala relatively recently because of its associations with a special place. This promised land is located in the mountains, and it has been searched for many years by people who are trying to find the truth in all its manifestations.
The history of the appearance of the bracelet is connected with Buddhist monks.
Braid of 4 strands or other even number
Weaving baubles with a braid from an even number and an odd number has slight differences.
First, it is important to disassemble the 4-strand braid pattern:
- Tie the ends of 4 threads and secure them with tape on any smooth surface (board, book, table)
- Thread 1 is thrown from left to right over thread 2 and under thread 3. They will be arranged in the following order - 2314.
- Thread 4 is placed from right to left under thread 1 and above thread 3. Their order becomes 2431.
- Repeat point 2, but now the outer thread 2 is thrown over 4 and under 3.
- Repeat point 3, only the rightmost thread 1 is thrown to the left under 2 and over 3.
- Continue weaving to the required length, at the end tie a regular knot and trim off the excess material.
For a 6-strand braid, the knitting sequence is the same as for 4:
- Tie the ends of 6 fibers in a knot and secure them with tape to the surface.
- The left outermost thread 1 is moved to the right above thread 2 and under the 3rd.
- The right extreme thread 6 is placed to the left under the 5th, above the 4th and under the 1st. Their order becomes 236145.
- The leftmost fiber 2 is shifted to the right above the 3rd and under the 6th.
- The rightmost fiber 5 is placed to the left under the 4th, above the 1st and under the 2nd. The fiber order becomes 365214.
- So continue knitting until the required length of the product. At the end, a simple knot is tied and the excess fibers are trimmed.
The principle of weaving a product from an even number of fibers is as follows: the leftmost fibers of the floss are placed to the right, first above the next fiber, and then under the next one. And the rightmost fiber is the opposite - first it is shifted to the left under the next fiber, and only then over the other. This weaving is used in the manufacture of wicker baskets.
Video master class
Weaving options
Double and triple weaving looks very attractive, but requires skill in manufacturing. For such products you will need to stock up on strong threads and beads.
Braid of 3 strands or other odd number
The easiest way to make a bauble is to weave a braid of 3 strands.
To do this, take 3 threads (can be of different colors):
- Tie the ends of the threads with a regular knot and secure them with tape on a hard surface (on a book, board). Let it be red A, blue B and yellow C.
- Throw red A over blue B, and yellow C over red A. Now the threads will have the arrangement: B-C-A.
- Continue in the same order: left thread in the middle, then right thread in the middle. Secure the pigtail with a knot.
Weaving jewelry from 7 threads:
- To weave a bauble with a braid of 7 strands, secure the tied ends with tape on a flat surface.
- The leftmost thread 1 is thrown first over thread 2, then under thread 3 and 4. The rightmost thread 7 is thrown over thread 6, then under thread 5 and 1 (which is in the middle). The thread order becomes 2347156.
To understand how to weave baubles from floss, you need to study the weaving pattern in detail. - Proceed to the next step, repeating point B, but the outer threads now become 2 and 6. So continue weaving to the required length. When finished, the braid is secured with a regular knot. The excess is cut off. This method can be used for any odd number of threads.
The principle of weaving baubles with a braid from an odd number of fibers is that the left and right outer threads are always first shifted in the opposite direction over the first nearest fiber, and then under the next two fibers.
Square knot for bauble
The easiest way to weave thread baubles is using a square knot. The famous Shambhala bracelet is based on a square knot. It is woven on four threads, where the two central ones are the warp, and the 1st and 4th are the working ones. A straight flat row is formed by changing left- and right-handed nodes. Unlike other types of weaving, straight knots are tightened evenly over both the first and second knots.
Figure No. 3. Square knot.
Weaving:
- The left thread is thrown over 2 strands of the warp.
- The far right one is placed on the left one, goes around the bottom of the base and is pulled through the loop formed by the left thread to the top.
- It drags on.
- The thread that has become the left one repeats its path in the reverse order through the bottom, and the right one passes under it, goes around the base from above and is passed through the loop with the left one, returning to its side.
- It drags on.
- Now the weaving begins on the right in a mirror image.
Large beads and crystals are woven into such bracelets. They are strung on warp threads and tied with several rows of square knots. Or small beads (large beads) are strung onto working threads before weaving begins. In this embodiment, they remain in the side parts of the node.
Straight weaving instructions
One of the popular ways to make baubles is direct weaving. With its help, interesting drawings, patterns, names and paintings are obtained. Straight weaving is a little more complicated than oblique weaving. However, this technique will more fully reveal the topic of how to weave baubles from floss for beginners. Some threads are selected for the background and others for a specific pattern.
At the beginning of the work, all other threads are tied in one direction and the other with the outer leading thread. It looks like zigzags. This is the background color.
When knitting a pattern, its thread ties the leading thread and goes in a different direction, while the leading thread is free.
It's best to start with a simple two-color design:
- Take 5 threads of floss of blue (or another) color for the pattern, one meter long, and one for the yellow background, 8 meters long. At a distance of 10 cm from the end, tie a knot and secure the short part of the fiber with tape to a smooth surface. The long yellow fiber should be in the bundle on the left.
- With the main left knot, yellow fiber 1 is braided in turn with all blue fibers (2, 3, 4, 5, 6) - this is how the first row is obtained.
- Second row: the same yellow fiber, only with the main right knot, is used to tie the first blue fiber on the right 6.
- Alternately, blue fibers 5, 4, 3 are tied to the yellow fiber with the main right knot. Finish the second row by braiding blue 2 with a yellow thread.
- The third row is led by the main left node. First, blue 2 is tied with a yellow thread, then blue 3 is tied to yellow. Again yellow blue 4, blue 5 yellow and yellow blue 6.
- The fourth row is performed in exactly the same way as the second row. The drawing cycle has ended.
- From the fifth row, all operations are repeated, starting from step 2.
The technique of oblique weaving floss baubles uses the same basic left and right knots.
Choosing material for weaving Shambhala
Initially, bracelets were made exclusively from stones. This material could easily be obtained by people who lived in mountain monasteries. This is where the Buddhist communities were located. In addition, the stones hardly wore out.
The beads, which were charged with energy, were used by entire generations of monks. To do this, it was enough to change only the thread braid.
Today, a Shambhala bracelet can be made with your own hands from a variety of materials. These include:
- Metals. Precious metals, ordinary iron or alloys are suitable for making jewelry. Beads have less mass than stone beads and heat up faster. At the same time, they also serve for quite a long time. It is important that the metal does not oxidize upon contact with the skin. Otherwise, it will quickly lose its attractiveness.
- Tree. There are quite a few types of wood that have different meanings. Oak serves to strengthen physical health, and birch helps to achieve success in the personal sphere. Of course, wooden beads are less wear-resistant. However, they are quite lightweight and affordable. In addition, wood can be carved or symbolized.
- Glass. Large glass beads last a long time and at the same time look very attractive. Today there are quite a few options - transparent, matte, multi-colored, plain. This allows you to choose the appropriate option depending on your preferences.
- Plastic. These beads imitate glass, wood or stone. However, they have many disadvantages - they wear out quickly and look less attractive. In addition, this material is of synthetic origin, and therefore it is devoid of sacred meaning. The main advantage of plastic is its affordable price.
- Stone. Beads can be made from different stones - precious, semi-precious or ordinary. It is important that they fit well and meet the needs of the owner.
The bracelet can be made from wooden beads.
When choosing a material for a woven bracelet with beads, you can pay attention to the following decorative details:
- Thread. Wooden elements may contain geometric patterns, flowers, and letters. The runes give the product sacred meaning.
- Painting. It not only gives a beautiful shade, but also serves to depict an ornament.
- Engraving or etching. The first method is used for metal, the second for stone or wood. Thanks to this technique, it is possible to change the shade and texture of the material. Such elements can have any shape.
Mirror beads and elements with glued rhinestones or cut out letters look very beautiful. These decorations can be used to weave a bracelet.
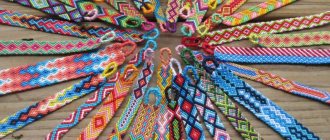
Oblique weaving instructions
Oblique weaving is considered classic. It most simply reveals the question of how to weave baubles from floss for beginners. There are 2 options for making oblique weaving.
First option
This weave includes only one basic knot - the main left or the main right. This knot is repeated on all rows until the end of the product. For clarity, it is worth considering oblique weaving with the main left knot. Take 2 threads, for example pink and blue, 100 cm long.
Weaving:
- First, tie all the threads into a knot and weave a regular braid 0.5 cm long. The end is secured with tape to a hard surface. Distribute 2 blue and 2 pink threads sequentially.
- The leftmost blue thread is the working thread. Use it to make the left corner above the right blue thread and bring it inside the corner, tighten the first knot. Repeat the actions.
- Using the same thread, the main left knot is performed alternately over the remaining two pink threads. Thus, the first blue thread becomes the rightmost one.
- The same actions are carried out with the next leftmost threads. The result is an alternation of 2 rows of blue bauble and two rows of pink. Tighten the knots carefully so that the rows are even.
- Having knitted the required length, finish the bauble with a braid, after which a knot is tied. They cut off the excess and get such a bauble.
Second option
The bauble is an arrow or “on the corner”, also known as “braid”. In this version of oblique weaving, both main knots are used - left and right. The result is an arrow-shaped pattern.
Weaving:
- Fasten the tied ends of six threads of 3 colors to the book with a paper clip. The colors are arranged in the following sequence: at the edges there are 2 blue, then 2 red and 2 yellow floss threads.
- The left extreme thread (blue) is braided with the left main knot in succession with the red and yellow threads on the left. The rightmost (blue) knot is tied with the right main knot, the right red and yellow threads. Knit two blue threads together using a left or right main knot. Now the blue fibers have become central, and the red fibers are outermost.
- Repeat all steps as in point B, only with the outermost leading fibers of red color. After this step, the red fibers become central.
- With the left extreme yellow thread, two threads on the left, blue and red, are knitted with the left main knot. The right extreme yellow thread is used to tie two threads on the right, blue and red. The yellow threads in the center are woven together using a left or right main knot.
This is how the bauble is sequentially knitted to the required length. At the end, tie a regular knot and remove it from the base. Connect the ends of the baubles together, and carefully trim off the excess material. The bauble has a pattern in the form of an arrow.
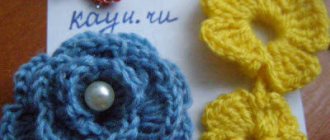
Macrame knots in baubles
Thread baubles are woven using not only the already listed macrame knots. The use of additional techniques from one of the oldest types of needlework allows fenco weavers to create airy and unusually beautiful decorations. For example, using air loops combined with tatting knots, you can create an openwork bracelet from threads.
Figure No. 4. Combination of air loops and tatting knots.
Weaving:
- Cut 2 threads of 50 cm and 2 threads of 1 m.
- Attach to the base.
- Knit the left-hand tatting on the left thread.
- Repeat with the right thread using the right-hand technique.
- At an equal distance from the warp threads, use pins to secure loops of the same size on each side.
- Knit the left-hand tatting, securing the air loop.
- Repeat on the right side on the right thread.
- Remove the pins and transfer to form air loops in the next row.
- Continue weaving, alternating sides until the end of the bracelet.
Two-color weave
Take an even number of meter threads of floss, 4 blue and 4 pink:
- At a distance of 8 cm from the edge, tie a knot and secure it to a hard surface with a wide paper clip.
- The threads are distributed in pairs: two blue and two pink.
- The weaving is not continuous, but paired with a flat knot. In the first row (and subsequently in all odd rows), the leftmost blue pair is knitted with a flat knot and set aside. Then the remaining 3 pairs are woven, putting them aside one by one.
- In the second row (hereinafter in all even rows) the first and last threads are not knitted, they are simply set aside. Weaving is done from left to right, also with a flat knot, putting the knitted pairs aside.
- The third and all subsequent odd rows are woven as the first row, the fourth and all even rows as row 2.
This version of two-color weaving from floss is very easy to do, because there is no need to count the number of knots. The bauble turns out dense. It can be used as a watch strap.
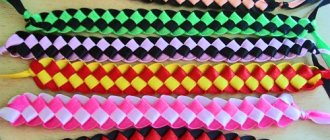
Multicolored for children
Children's jewelry can be woven from any materials, the main condition is that they should be bright and cheerful. A good addition would be letter beads, regular colored beads, animal figures or cartoon characters.
Tip: it’s best to make children’s lace bracelets together with your child, this will help develop fine motor skills and aesthetic taste.
The scheme is very simple:
Take any bright lace, maybe a shoe lace. Step back 2 cm from the edge and make a loop, placing the short edge on the long one. Make another one nearby, exactly the same, thread it into the first one and, holding the edge, tighten it. The entire row is done in the same way, to the desired length. Then pull the short end at the beginning of the product into the remaining loop and tighten it. Tie a knot at the top and cut off the line material. Burn the ends with a match or lighter.
How to weave baubles with names
Before you start weaving a bauble with a name, make a diagram. To do this, all the letters of the required name from the proposed letter schemes on the Internet are entered in a box on the sheet.
A cell corresponds to one node.
Weaving:
- The length of 8 yellow threads for the name is taken equal to three turns around the wrist and one thread for the purple base is 7 times longer than the yellow ones. Tie the threads in a knot at a distance of 8 cm from the end and secure with tape on the surface of the book.
- In the first and third rows, all yellow threads are tied with a purple thread with the left main knot. In the second and fourth rows - with the right main knot.
- In the fifth row, a yellow base is knitted with a purple thread using 7 main left knots. The beginning of the name (letter T), the eighth knot is braided with a yellow thread on the purple (working) thread and the row is completed by braiding the yellow thread with a purple thread.
- Using the direct weaving technique and knitting each name cell according to the pattern, they finish the bauble with four rows of purple.
- At the end of the weaving, all the threads are tied in one knot, connected to the beginning of the bauble, and the excess is cut off.
What threads are suitable for weaving
There are many options for threads for macrame. Each has its own characteristics. The choice is usually made based on the item that is planned to be made. You can see the popular types in the table below.
| Type of thread | Features of choice | What are they suitable for? |
| Waxed cotton cord | There are no difficulties with the choice, since cotton is a budget material, and it is not economically profitable to counterfeit products made from it. Any product on the market will do. | Used for weaving jewelry: earrings, bracelets, necklaces. Important: the end of the natural cord should not be secured with heat; it must be tied inward. |
| Threads "Floss" | The thread should be soft and pleasant to the touch. The less lint on the outside, the better the quality of the material, but the more expensive it usually costs. | Limited use - only suitable for creating baubles (bracelets that were popular among young people in the 80s). |
| Silk threads | Expensive material, which must be natural. Study the information on the packaging; if there are synthetic additives, it is better not to buy. | Clutches and handbags are made from this material. Considering the naturalness, the ends are tied with strong knots or treated with glue. Setting it on fire will not work. |
| For newbies | They appeared on the market recently and are specialized for teaching macrame techniques. The choice is not difficult, there are no fakes. Made on a synthetic basis. | Suitable for creating any product, from a pendant to a handbag. |
| Waxed thread | Made from nylon (100% composition). Therefore, if a different percentage is indicated on the package or label when choosing, it is better not to buy. | They are used to decorate finished products and create jewelry, including small ones, such as small pendants or earrings. |
| Jute rope | When choosing, you need to squeeze the cord between your fingers and drag it a little along the length of the rope. If the pile falls off, the product is of poor quality. | Ideal for creating carpets, flowerpots and panels. Thanks to its fleecy structure, it is soft, but at the same time provides the necessary strength. |
Bracelet with a pattern
When you have gained some skills in how to weave baubles from floss for beginners, you can begin to work on more complex weaving patterns.
First, you can make a bracelet with a simple pattern, for example, a two-color one with hearts:
- Study the weaving pattern.
- Take 4 threads of red and black, 1 meter long. Step back 8 cm from the end and tie a knot.
- Fasten the short part with a wide clamp on a flat surface. Arrange the fibers by color as shown in the diagram.
- Weaving is done in pairs. In the first row, the left half knot is made with the first black and second red threads. The black thread is placed with the left corner above the red thread, brought inside the corner and tightened the knot. Then the black thread is placed with the right corner over the red thread, brought inside the corner and tightened the knot. The pair are set aside.
- The second pair, black and red threads, are woven with a left knot (as indicated in the diagram). Set the pair aside.
- The third pair of red and black threads is woven according to the pattern with a right knot and also set aside.
- The fourth pair of red and black threads according to the pattern is made with a right half knot.
- Row 2. The black outer threads on the left and right are removed to the side. They are not woven, as in subsequent even rows of baubles. Red threads 2 and 3 are knitted with a left knot and set aside.
- Black fibers 4 and 5 are knitted with a left knot and set aside.
- Red fibers 6 and 7 are knitted with a right knot and set aside.
- Row 3. They also begin to knit from left to right. The first black and second red threads are knitted with a right knot and set aside.
- Red 3 and black 4 are knitted with the left knot and left.
- Black 5 and red 6 are tied with a right knot and set aside.
- Red 7 and black 8 are woven with a left knot and set aside.
Next, weaving is carried out according to the diagram. It is very important to monitor the tension of the knots. They need to be tightened tightly so that the design on the bauble does not twist and is clear.
Beginning of work. Fastening threads
Macrame for beginners (weaving patterns are not all that needs to be mastered) needs to be mastered in preparation for work.
Threads are sold in skeins. To work, they are cut into the required lengths. Then they are fixed on working tools (horizontal or vertical). Tip: It’s better to learn on large cords. They are easier to work with and the nodes are more clearly visible.
There are several simple ways to attach threads:
- they are folded in half and fixed with clubs (if the horizontal method is chosen for work);
- they are secured with tape (if they do not need to be folded in half);
- they are tied in a simple loop (if the vertical method is chosen for work);
- they are tied into a strong complex loop when it is planned to attach weights to the ends.
It is also better to immediately treat the ends of the threads with fire so that they do not fall apart during work. If the material is natural, you don’t need to do anything with it. At the end of the work, a strong knot is tied at the very end.
Weaving methods with rhinestones and beads
Any bauble will look more impressive if you decorate it with additional beads or rhinestones. The easiest way is to sew beads or rhinestones with matching threads to the finished bauble, as your imagination allows.
The second method is to weave beads into the process of making a bauble using a flat knot. As a warp, take 2 threads of the same color as the 2 leading threads.
Weaving:
- The first 3-4 cm of the bauble is woven with a flat knot without beads. Next, add 1 piece to each node. beads on each side of the base.
- The last 3-4 cm of baubles are made without beads.
- Fastenings are made with two simple braids.
Rhinestones, stones
We take a ready-made bauble and a chain of jewelry: rhinestones or stones on a sewn-on base. We use a needle with thread that matches the tone of the bracelet. Next you will need scissors and glue. Strips of rhinestones and stones are sewn onto the bracelet using small stitches.
What to do if the thread runs out
When weaving embroidery floss, one of the threads may break, or it may run out, and the work must continue.
In this case:
- Bring the finished thread to the wrong side.
- Take a thread of the same color and put it in place of the previous one.
- The upper end of the new thread is tucked into the wrong side and tied with two knots of the leading thread.
- On the wrong side, the old and new threads are tied in a knot.
- Continue weaving on the front side of the bauble according to the chosen pattern.
Summing up
It is worth noting that not only jewelry can be made from laces. They are used to make clothing accessories, children's toys, interior items and other stylish items. Many needlewomen have turned this hobby into a profitable business. And satisfaction from the work and the result obtained lifts your spirits for a long time.
Many people these days are interested in making crafts. After all, modern fashion tends to return to elegant simplicity. And it’s not difficult to master weaving bracelets from laces - the main thing is to have the desire.
How to make a clasp
There are several options for fastening baubles.
Option 1 - braided fastener:
- Thin braids are braided from both edges of the baubles.
- After 1 cm, the braids are connected, the fibers are divided into 3 bundles and the braid is braided.
- At the end the braid is tied with a knot. Get a noose.
- The braid of the other end of the bauble will be inserted into the finished loop and serve as a clasp.
Option 2 - tying the two ends of the braids with a separate thread:
- The braids of both ends of the baubles are temporarily secured together.
- These braids are tied in a square knot with a separate thread.
- Finish weaving the thread with a double knot.
- Remove the temporary fastening.
- To prevent the ends of the threads from unraveling, they are treated with transparent nail polish.
Option 3 - Velcro, button, button:
- After finishing weaving the bauble pattern, cut off the excess threads, leaving a small end.
- Glue it to the wrong side and sew on the selected fastener.
- Velcro and buttons sew one half to the front side and the other to the back side of the bauble.
Once the necessary basics have been mastered, it will not be difficult for beginners to weave simple baubles from floss, and you can also draw your own patterns of designs yourself. On the Internet you can find complex designs of baubles on various topics: emoticons, New Year, sweets, plants, Halloween, flags, etc.
Clasps for braided bracelets
Weaving baubles from threads is only part of the story. It is necessary to think over and create a clasp for them to wear on your hand. You can buy sets of jewelry clasps in the store, or you can weave ties for your thread masterpiece yourself.
This can be a “loop-button” fastener, “double loop-tie” or simply “tie”. For example: “fish tail”. It is woven like a regular braid, but with more threads. The threads are taken one at a time on each side and woven into one braid. This tie ends with a common knot. The ends of the threads are trimmed.