Photo: alltopcollections.com Any, even the most durable and expensive furniture, wears out over time and loses its aesthetic appeal. Quite often it is a pity to throw away such a thing, especially if warm memories are associated with it. We invite you to look at 14 easy but very beautiful ideas - how to decorate an old table with your own hands to breathe new life into it!
Decoupage
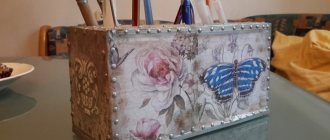
The simplest but most magnificent idea is the decoupage technique. To do this, you need to purchase napkins with patterns that will match the interior design. Multi-layer napkins need to be separated so that the material is as thin as possible.
The surface of the table, if it is wooden, must be thoroughly cleaned, sanded and made absolutely smooth. If the table is metal, it should be washed and degreased. Next, cover the surface with acrylic paint.
The design is applied quite simply: grease the tabletop with PVA glue, apply a napkin and smooth it, expelling any air bubbles that have formed. After finishing work, the table should dry well, then apply a protective layer of varnish, which will prolong its service life for a long time.
Photo: hsdeck.ru
Photo: sovkusom.ru
How to repaint?
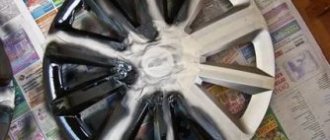
Painting a table is the most popular restoration method. What could be more laconic than a white table? Only black. Therefore, the choice of paint (acrylic or oil, enamel) is very important. How long the restored table will last depends on what kind of paint the repair was made, or rather on its characteristics.
To choose a paint, you need to understand where and how the table will be used, and what materials it is made of.
- Water-dispersed acrylic paint is suitable for heated rooms and withstands humidity well. Dries quickly. Can be washed off with water during application. But after drying it is not susceptible to water. Alkyd compositions are considered more reliable.
- Oil paints are losing their popularity due to unreasonably high consumption.
- Wood enamels attract with their glossy surface and high performance. Nitro-enamel paints also set quickly.
The paint has been selected and purchased; further repair of the table involves painting it.
The surfaces must first be pre-treated, cleaned, removed the old coating, remove scratches and chips, putty, prime, protect decorative inserts, for example, glass, with tape. And only after the primer has dried can you paint.
To give an even color, the paint is applied in several layers. The first layer is actually rubbed into the surface.
To apply an additional design to the tabletop, you can use pre-prepared stencils or the most common tulle. When the base color has dried, the tulle (or stencil) is fixed and the paint of the design is applied. You can do this with a brush, but it is better to use a sponge or a can of paint. To make the finished product more aesthetically pleasing and strengthen the surface, we coat it with varnish.
To create a graphic design (lines, zigzags, diamonds, squares), you can use tape. Mark the future design with adhesive tape and apply the first color with paint. If necessary, repeat the procedure with other colors. Varnish the finished tabletop.
If it is necessary to achieve the effect of aged wood, then first a special composition is applied to the treated surface (cleaned, sanded and primed).
Patination can be done with a dark stain. Then the first coat of paint is applied to the wood. Then a second layer of lighter and more liquid paint is applied. When the paint is dry, we go over the surface with sandpaper. The desired effect has been achieved.
Paint and stencils
Using paints, you can completely restore an old table, including the legs, which often have scuffs. If you are good with a brush, the work will be simplified - it will not be difficult for you to depict the desired design or pattern. If you have problems with drawing, use stencils that are easy to buy in craft stores.
First, you need to thoroughly clean the table, paint it with background paint and wait until it dries completely. Now you need to mark where the patterns will be located, you can also draw a light sketch with a pencil. Next, take stencils and apply images to your taste. When the decorated table is dry, cover it with a protective layer of varnish.
Another original solution for DIY decor is to use regular patterned tulle instead of a stencil: cover the tabletop with it, apply paint and then carefully remove it. You will get an original openwork table!
Photo: inrosstroy.ru Photo: verstakdoma.ru
Required Tools
The following tools are used to restore old furniture:
- screwdrivers of different sections;
- knives, chisels;
- screwdriver;
- Sander;
- stapler;
- tailor's scissors.
If the furniture is heavily worn or has lost its color, it is recommended to completely remove the varnish from the surface and sand it.
You must use a wood saw as a cutter; with its help, the size of the fitted parts will be accurate. You can also contact a specialized store, where they will make blanks according to your calculations.
Restoring old furniture with your own hands allows you to independently detect all the shortcomings that have arisen as a result of the use of the products.
The wardrobe or chest of drawers should be disassembled first.
Craquelure
If you want to give your table the look of an antique canvas, you should pay attention to a special cracking varnish - craquelure. It comes in two types: one-step and two-step.
One-step craquelure is used to add a vintage feel to plain tabletops without patterns. The varnish is applied in one layer and when dry it creates a “network” of cracks.
Two-step varnish helps create a stunning aged effect on the painting. Therefore, it should be used for a table surface with a pattern or made using the decoupage technique. In this case, two mixtures are used, which are applied one after the other. The desired effect manifests itself when they interact.
Photo: pinterest.com Photo: vsesamodelki.ru
Preparation
The process of preparing a table top or frame begins with determining the scope of work: what needs to be repaired or replaced. Detected cracks and defects in the wood (fallen knots) must be sealed with putty. At the end, everything is carefully sanded, using abrasives of different sizes, and then painting (varnishing) occurs.
Elimination of defects
Defects in the table are repaired by puttying and repairing elements using similar materials. This procedure must be carried out so that the table can be used like new. And this requires a complete restoration of the structure.
Repair
If the countertop is damaged, it must be repaired. Depending on the condition, inserts (for sliding tables) or the entire canvas can be replaced. The color, thickness of the material, and its texture (if you plan to varnish the countertop) are carefully selected.
Grinding
To level surfaces and eliminate minor deformations, wood sanding is used. Performed manually, with a power tool, at the choice of the artist.
putty
Pre-repaired, sanded elements are puttied. This is necessary before painting, as well as if minor damage to the wood is detected (delamination, cracks, increased gaps). After the putty has dried, it remains to be sanded with fine sandpaper.
Grinding, degreasing, impregnation
After all the basic procedures (repair, sanding and puttying) with wood are completed, proceed to the next stage. The table elements are inspected again to make sure everything is correct. And then they sand it again, but cleanly, with a fine abrasive.
All that remains is to prepare the table surfaces for painting (degreasing and treating with an antiseptic). If at the final stage other methods of decoration are used, then, in any case, it is necessary to carry out all the specified procedures.
Self-adhesive film
Another great solution is to decorate an old table with self-adhesive film. Moreover, the modern market has a huge assortment of it - from simple plain to mirrored, luminous and imitating natural textures.
To cut the film correctly, you need to use the centimeter markings located on the back side of it. It is important to thoroughly clean the surface of the table, since the self-adhesive will instantly reflect all the flaws.
Glue the film slowly, pressing it tightly and at the same time smoothing it with a soft towel so that no air bubbles form.
Photo: in.pinterest.com
Photo: styledegree.sg
10 cool ideas on how to decorate your apartment for the New Year
Table top decoration
Restoration and subsequent decoration of the table is a very long process. But the result is worth it, because you can get an exclusive designer item with which memories are already associated. Furniture decor can be completely original and at the same time fit very organically into the concept of using the item and the room.
A laconic design is suitable for a book-like or folding table. It can be painted in one or two colors. Or you can add nobility and emphasize the natural structure of the tree.
The sliding table can be decorated with drawings that can appear only when the tabletop is disassembled as much as possible. And of course, if this kind of table is used as a dining table, you can use a kitchen theme in its decor - images of food, fruits and vegetables, tableware. The kitchen table can be decorated with tiles and mosaics. This will be a very practical solution.
For a dressing table, due to its functionality, delicate pastel shades and light colors are suitable, as well as all kinds of “girly” prints (flowers, cosmetics, patterns).
The coffee table can be painted in a rich color or equipped with a bright pattern.
For a children's table you need to use only high-quality finishing materials. And you can decorate it with a variety of animals and cartoon characters.
A practical solution for a student would be to create a “cheat sheet” table, on the surface of which you can apply a variety of didactic materials (rules, diagrams, formulas).
Using a computer desk/stand requires high usage. Therefore, materials need to be selected appropriately – not easily soiled (the computer “attracts” dust), wear-resistant (especially to heat).
painting
Painting is one of the most popular techniques for decorating interiors and household items. There are several options for painting furniture: artistic painting with a thin brush, painting using a stencil (template), painting with stamps.
An excellent solution for a glass tabletop is bright and airy painting with stained glass paints.
Painting using tulle or any other lace looks very beautiful. To apply an openwork pattern to the surface of the table, you need to attach the tulle to the tabletop (it is advisable to secure it with tape on the back side).
We paint the table in the same way as with a regular stencil, using a sponge, roller or spray paint. We select the color of the enamel that contrasts with the color of the surface.
Glass table with stained glass painting.
Mosaic
We first lay out the frame elements of the mosaic using tile adhesive. We try to make the seams as uniform as possible. Then we begin laying out tiles (or pieces of tiles) from the center of the table. An interesting solution would be to lay tiles of different colors.
Covering the countertop with mosaic tiles.
Mosaic pattern made from pieces of tiles.
Ceramic tile
At the end of the renovation, there are often excess tiles left in the kitchen or bathroom, which can be safely used to decorate the table. In this way you can beautifully decorate an old dining table in the kitchen or on the open terrace.
Patchwork tiles in the patchwork style look great, as well as decorative tile panels and borders with patterns. No less impressive will be a tabletop made of tiles that imitate stone or expensive wood.
Photo: mebel-mart32.ru Photo: maiolichevietresi.com
Decor under glass
To decorate an old table using the following method, you will have to work hard, but the result will be well worth the effort!
If the wooden tabletop is thick, cut out a recess inside and fill it with themed decor. You can, for example, decorate the seabed by laying shells, pebbles, sand, artificial seaweed, or even colorful Christmas tree decorations for the Christmas holidays. Finally, the finished “filling” must be covered with transparent glass.
If the tabletop is thin, just fill the edges with bars and paint them the same color as the table, then lay down the decor and also cover with glass cloth.
Photo: pinterest.ru Photo: pinterest.ru
Reusing other old furniture
Before you throw unnecessary shelves, broken chairs, worn-out bedside tables into the trash, think carefully. Outdated furniture can still serve you well. Here are some more ideas:
- Unusual bench. Often, after several years, chairs from different sets remain in the house. You can repurpose them into a one-of-a-kind bench. Before you start, make sure they are the same height. Once you've sanded and painted the chairs to match, attach the foam and fabric-covered MDF board on top.
- Place for flowers. An old side table with a drawer can make an unusual home for colorful flowers in your garden. All it takes is a little sanding, painting, sealing and soil.
- Transformation of the bath. If you're a fan of Breakfast at Tiffany's, you may remember seeing a sofa bathtub in the movie. This is an interesting idea that however requires quite a lot of work. Be sure that you will not have time to cope with everything over the weekend. But the aesthetics of the finished product are worth the effort.
- Island adventure. If your kitchen doesn't have a built-in island, don't worry. You can make it from an old chest of drawers - there will be additional storage space, as well as a work surface.
- Swing from an old chair. Imagine the comfort of a rocking chair combined with the carefree fun of a swing. The concept for this fun addition to any backyard is simple - use a chair as a seat. In addition, you will need ropes, hooks, screws, sandpaper, paint and tools.
Photo collage
Select the best family photos, place them on the table and cover them with transparent glass. Such a photo collage will remind you of pleasant events in your life during a meal or tea party.
If you wish, you can change the selection of photos and add new interesting pictures. Pay attention to the glass - its edges must be sanded to avoid cuts.
Photo: ars.ru
Photo: kalbenimkalbimde.blogspot.com
Volume tabletop with various fillings
If you decide to take a thorough approach to table restoration, and you have some experience in repair work, this method is for you. The appearance of the furniture will change beyond recognition, the table will look respectable and exclusive.
For work you will need wooden slats, glass and filler. You can use spices, cereals, shells, dried flowers, beads, crystals and much more as fillers.
The volumetric tabletop is made as follows:
- Divide the tabletop into even sectors using slats.
- Glue the slats to the table, placing them on edge. The end result should be boxes of the same size.
- Place the filler in the boxes.
- Install glass on top of drawers.
This table will transform your dining area. It will become a special element of the kitchen interior.
Epoxy resin
The main secret of epoxy resin is that it hardens quickly in the open air, creating the effect of an icy or amber surface.
If your old table has deep cracks, fill them with resin - it will look amazing! You can also add some decorations, for example, shells or sea pebbles.
Sophisticated creatives sometimes go even further - they introduce luminescent powder into the liquid resin composition. What do you think is happening? Absolutely right, incredible luminous surface!
Photo: mebel-mart32.ru Photo: proraboff.rf
10 best ideas on how to decorate a room for the New Year
Covering with leather or dermantine
You can breathe a second life into an old coffee table, making it stunningly original, using regular leather or dermantine. Choose a material with large embossing, for example, crocodile leather or bright gold, which will certainly attract the eye.
Use a piece of dermantine to completely cover the top surface of the table top. The material should be pressed tightly and smoothed, getting rid of air bubbles. The final touch will be upholstering the sides of the table with nails with a wide head, which will be similar in color to leatherette.
Photo: pinterest.com Photo: stellag46.ru
twisted rope
This method of decorating an old tabletop is perfect for a round table. You will need any thick rope made of natural fabric (hemp, jute) and an adhesive gun.
Fix one end of the rope with glue in the center of the tabletop. Then, moistening the rope with adhesive, move around the circumference, winding circles around the center. Each next row should fit tightly to the previous one.
Photo: asusfone.ru
Photo: cpykami.ru
Chalkboard paint
The advantage of this wonderful coloring composition is that it creates a surface on which you can draw with crayons. Such table decoration can save your wallpaper and other furniture when the little artist in the child awakens.
Another secret - before covering the table with slate paint, apply a thin layer (2-3 mm) of magnetic primer. Sticky magnets will bring even more joy to your child.
Photo: tur.thehomelifemag.com
Photo: an-vn.ru
Mosaic
Decorating an old table with mosaics is not only a great way to make a tabletop incredibly beautiful and original with your own hands, but also a rather exciting process in which you can involve a child.
Mosaic elements can be bought in a store or made from scrap materials, for example, broken mirrors or tiles. Draw a sketch of the design on the tabletop, pick up some glue and start creating your masterpiece!
Photo: proffstroygroup.ru Photo: nashenasledie.livejournal.com
DIY decorative pillows (95 photos)
stain
A wooden table can be successfully decorated using stain. Using this tinting liquid, you can give the wood a new rich shade. It is noteworthy that after processing the wood texture is perfectly preserved. In addition, the tabletop will be protected from moisture and ultraviolet radiation.
The stain should be applied parallel to the grain. At the final stage, the surface must be covered with several layers of varnish.
Photo: leasary.com Photo: vortaro.ru
Multi-colored tape
You can make a fun table if you decorate it with decorative tape of different colors. The striped “thing” will instantly turn into an accent spot against the background of any interior.
The tape can be applied to any surface. The metal countertop needs to be thoroughly cleaned. If there are small areas of rust, try to get rid of them with vinegar or a special product - moisten the surface and then treat it with a scraper. It is also advisable to degrease the canvas with an alcohol solution. The wooden tabletop needs to be sanded thoroughly.
You can completely cover the surface of the table with ribbons of multi-colored tape. But if you avoid excessive diversity, then initially paint the table white, black or any other color, and then make a design with a ribbon of one contrasting color.
Photo: berkem.ru
Photo: trendodom.com
Stages of work execution
The result of table restoration depends on the thoroughness of execution and adherence to the sequence of actions. Only under this condition will it be possible to restore damaged furniture.
The work consists of the following steps:
- selection of tools and materials;
- inspection and initial repairs;
- cleaning surfaces from old coating, restoring wood;
- roughing;
- finishing, decoration.
If the table is badly damaged, the work plan will expand. Additional operations will be required. Their type is determined separately in each specific case.
Preparation
The initial stage of table restoration is an analysis of its condition. The inspection should begin with the structure: check the condition of the fastenings, stability, and whether there are any height differences. If necessary, the product is disassembled, marking the places of fastening with the base with a pencil, and circling small defects with a marker.
After the inspection, work to restore the integrity of the table parts: sealing holes, gluing dried elements. If the legs or tabletop cannot be repaired, they are replaced. Moving parts and mechanisms are cleaned of rust, lubricated with oil, if there are any breakdowns, they are repaired or new ones are installed. Poorly fastened parts are fixed with glue, liquid nails or screws.
If the table is varnished or painted, then the next step is to remove the old coating. You can clean it manually with a spatula, sandpaper, sanding machine, or wash it off with a solvent. When restoring a wooden table, mechanical removal must be carried out along the grain so as not to spoil the natural pattern.
Tips for making a computer desk with your own hands, stages of work
Inspect the table
Disassemble the product Mark the places of fastening with the underframe
Repair broken parts
Remove old coating Glue all parts
Primer and sanding
After eliminating structural defects and removing the old coating, it is necessary to remove dust from the surface. Then treat with an antiseptic and leave to dry for a day. This operation is necessary for products made from different materials: not only wood, but also MDF, chipboard.
The next stage is priming. The product is applied to the countertop and frame parts. The step-by-step process looks like this:
- Apply a small amount of product to a separate area, spread with a spatula as evenly as possible. Continue to the next section. It is recommended to carry out the work in small fragments to achieve a smooth surface. When priming, differences should not be allowed at the boundaries of areas.
- After the first layer has dried (1–6 hours), repeat priming. Subsequent operations are carried out with intermediate drying.
- Sanding primed surfaces by hand or with a sanding machine. The surface should be perfectly flat.
After this, putty is applied. The dried layer is sanded until smooth. The operation must be carried out as carefully as possible, since the quality of the rough finish determines how smoothly the paint or varnish will lie.
The furniture primer should match the tone of the paint you choose. If you plan to make a dark-colored wooden table, you should not use a light product and vice versa. Otherwise, it will be difficult to achieve uniform coloring.
Apply product
Sand the surfaces Apply putty and sand until smooth
Final coating
The choice of finishing depends on the design decision. The table can be glossy or matte, painted, slightly tinted or exposed varnish. The last technique is recommended for furniture made of wood with a spectacular grain pattern.
Painting is done with a brush, roller or spray in several stages, each time waiting for the previous layer to dry. If decoration is to be done with painting or other techniques that require a prepared surface, the operation is performed last. For example, they decorate the kitchen table top with drawings or do decoupage and then varnish it.
Making a table for a laptop with a cooling system with your own hands
The final stage is fixing the final coating. To do this, use varnish or wax. The first product is ideal for home furniture, the second is best used to protect tables that are often exposed to the sun, wind, and precipitation.
DIY old table decor - photos and ideas
Our photo gallery also presents many successful examples of decoration. Take any of them as a basis and, with a little imagination, turn your old table into a unique piece of furniture!
Photo: berkem.ru Photo: vse-otoplenie.ru
Photo: handmade.vospitatelyu.ru
Photo: museum-design.ru Photo: gidpokraske.ru
Photo: livemaster.ru
Photo: severdv.ru Photo: pinterest.com
Photo: motipdupli.ru
Photo: keywordbasket.com Photo: mebel-mart32.ru
Photo: pulse.mail.ru
Photo: pinterest.co.uk Photo: decoratorist.com
Photo: styleandinfluence.wordpress.com Photo: pinterest.ru Photo: realapex.ru
Photo: dekormyhome.ru
Photo: interior-experts.ru Photo: ikeahackers.net Photo: ideadigezt.com
Photo: inkwellinspirations.com Photo: luber-portal.ru
Photo: pinterest.ru
Photo: design-homes.ru
Photo: finance.yahoo.com
Photo: severdv.ru Photo: severdv.ru
Chair repair
It’s hard to imagine any home without chairs
Today it is such a commonplace item that few people pay attention to it. This can happen in two cases - either when the chair is properly designed as an interior item, or when it breaks.
We will look at how to get from the second option to the first.
An option for restoring old armchairs with covers in a vintage style
The chair consists of three main elements:
- legs;
- seats;
- backrests
All of them can fail sooner or later. If the breakage is caused by the legs, then they must be firmly secured, as otherwise the use of the chair becomes dangerous. If the seat is broken, it can be replaced by cutting out a corresponding piece from plywood or fiberboard. The same can be done with the back. You can also make the stool soft if desired. To do this, soft foam-based upholstery must be attached to the seat and backrest.
1 4