Stretching the canvas
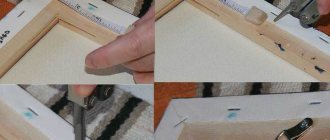
Any cotton fabric, for example, an old sheet, can play its role. You can even use colored ones; all excess colors will disappear during the preparation process. We cut the canvas to the size of the stretcher with an allowance of 3 centimeters on each side. Using a stapler, we fix it on the stretcher: fasten it on one side with 1 staple, then pull it on and fasten it on the other side, and so on one by one along each rail, along the entire perimeter. You need to tighten it so that the fabric does not sag, but does not crack, otherwise it will tear. At the corners: attach the fabric close to the corner of the stretcher, bend it over one of the ends, distribute the excess along the wrong side and staple it.
Before starting work
When choosing a material, it is very important to know how to properly prime the canvas so that the material adheres to the highest quality. If, after all, a novice artist wants to master all the basics of painting and decides to prime on his own, he needs to take into account that this is a very long and labor-intensive process. In addition to a lot of time, this will also require quite a lot of primer material, therefore, if the budget for the painting is relatively small, then it is better to buy a ready-made primed base, since purchasing material for self-priming will require a decent amount. It is very important to understand the following point. When buying a cheaper and not very high-quality primer, there is a risk of ruining the entire picture, since low-quality material will be its basis.
It is possible to prime canvas at home, and this option has several advantages over ready-made, factory-made primer. First of all, the artist himself can choose the shade that he wants to see as the basis; he can mix several tones at the same time and ultimately get something original and non-trivial. Apart from shades, there are no restrictions on the shape of the canvas of the future painting; it can be adjusted at your discretion. Another positive point is the primer layer. It is also controlled directly by the artist and selected in accordance with the necessary artistic goals. The main signs of proper application and quality of the soil are:
- The paint applied over the primer dries evenly.
- The primer completely covers all holes and minor defects in the material.
- With its help, the desired texture is created, which can be perfectly smooth, while maintaining the texture, or with various visual effects.
- The primer provides protection against paint getting directly onto the material.
- Using a primer, the surface of the painting should have maximum adhesion to any paints or other art materials used.
- High-quality soil provides guaranteed resistance to moisture. It also has antiseptic properties.
If the fabric is treated with a high-quality primer, it retains good elasticity for many years.
We impregnate the canvas
To glue the canvas you need to use gelatin. The size of the stretcher shown requires 2 bags. With a smaller or larger canvas size, the number of packages also changes. Soak the gelatin in water, leave for 10 to swell, then heat in the microwave until completely dissolved. Leave the dissolved gelatin to cool, but do not allow it to thicken. We coat the edges of the canvas with the liquid mixture. Pay special attention to the corners – where there are several layers of fabric. We tap the still wet corners with a hammer to remove excess fabric. We leave the canvas to dry and the gelatin to cool further. When it has already thickened, but is still easy to mix, apply it to the canvas. We do this in a circular motion, without rubbing, carefully. You can use a brush or foam sponge. If the back side is still dry, then you're doing it right. The procedure must be repeated 3 times, allowing the surface to dry.
Next comes the primer. To do this, we make a mixture of acrylic varnish and paint. The proportions are approximately 5:1 - 5 parts paint and 1 varnish. Cover the canvas with the resulting mixture. Don't forget to carefully go through the ends. After complete drying - approximately 12 hours, you need to repeat the procedure 1 or 2 times until it becomes completely white.
How to prime a canvas for oil
If you decide to figure out how to prime the canvas, before you start applying the oil primer, you must first fix it on a stretcher and prepare it. How to stretch the canvas onto a stretcher can be found below in the article. If the primer is applied independently, the material should be as dense as possible, with a minimum number of various defects.
First of all, before applying the first layer, you need to slightly moisten the canvas so that moisture does not seep through to the wrong side of the canvas. Moisture will expand the fibers, due to which the glue will practically not leak through during gluing. Also, if there are small knots or irregularities, you can sand the stretched canvas with pumice.
Applying glue will protect the canvas from impregnation with oil from paints. However, you should not apply the glue in too thick a layer; the fabric should retain its elasticity and natural texture. But there should be no holes or protrusions. Typically, the glue is applied in two stages in several thin layers with intermediate drying.
The most important and responsible is the first stage of applying glue, since it is necessary that a thin protective film is formed, and at the same time the glue itself does not leak through the canvas. For this, liquid glue at room temperature is most often used, which ensures uniform distribution throughout the entire canvas. And fast, reliable fastening. If the surface texture is quite rough, the glue should be of a thicker, jelly-like consistency. When applying such glue to the canvas, you should not press so that it does not become completely saturated. Repeated swabs on the same area should also be avoided. If the adhesive solution is liquid, it must be applied very quickly to avoid excess. After the first layer, you need to dry and sand the canvas. Then apply a couple more thin layers of glue, drying and sanding in between, and only after the sizing becomes uniform and the gaps between the fibers disappear, you can begin to apply the primer. To apply thick glue you need to use a palette knife or spatula, and for a liquid solution - hard and wide brushes.
What might you need to trim wood?
Among the tools for reducing the size of a door must be:
- chisel;
- jigsaw;
- hand saw.
It is advisable to have power tools in your arsenal, since the cuts after them do not require additional processing with a jigsaw.
In addition, for some work you will need:
- iron ruler, square;
- sharp construction knife;
- furniture tape;
- paint/varnish/anti-fungal solution.
Before you reduce the height of the existing canvas, consider what you will need during the trimming process.
What is the primer used for?
The primer is applied in an extremely thin layer. And only with a brush or palette knife. The principle of applying a primer is exactly the same as sizing the fabric. In order for the adhesion of the primer to the paint to be as effective as possible, the tint is added to the primer in stages, its content increasing in each new layer. Thanks to this technology, the surface of the canvas will become as elastic as possible, resistant to moisture and temperature fluctuations, as well as other external factors.
How should I dry and sand the canvas?
It is necessary to dry after each application of primer to the canvas. If you know how to prime canvas, drying it won't take much effort. The main thing is not to violate generally accepted technology, so as not to degrade the quality of the base. Depending on what kind of mixture is used, the drying time may vary. For example, adhesive primers take about five days to dry, and emulsions take up to two weeks; oil compositions take the longest to dry - from 2 to 10 months. It is very important that the soil dries evenly. And it was performed at room temperature. Drying the soil in the sun, near a radiator or in a draft is strictly prohibited.
After you have finished priming the canvas and the primer has dried, you need to sand the canvas before applying the final layer, since this removes various defects from the canvas and improves adhesion. Sanding is done using fine-grained sandpaper or pumice. The grinding itself should be as careful as possible to avoid damaging the soil texture. The final layer of soil usually cannot be treated. Only if there is a need to strengthen the adhesion of the paint.
How much does the fabric sell for?
Canvas is not the cheapest fabric, especially if we are talking about a completely natural material. Its price range ranges from 150 to 1200 rubles per linear meter, which directly depends on the composition and properties of the fabric.
When purchasing a special canvas for painting on a wooden backing, its price will be from 300 rubles per linear meter.
Modular pictures
Today, modular paintings are very popular - this is a composition of several paintings. It can be as one image on several canvases, or maybe as similar images in a certain location. If you are making a painting from a photograph, it will look just perfect in the form of a modular composition.
You just need to print several fragments of one photo or take several from one photo shoot. In this case, the paintings should be of different sizes and without frames. Location plays a major role here. You can see how beneficial modular paintings from photographs will look on the wall in the pictures below:
Please your loved ones with an unusual gift in the form of a painting from a photograph. They look great both in modular and simple versions. This work of art can be a great gift for any occasion (wedding, birthday, anniversary, etc.), and they don't take long to make and are very simple. You will forever leave in the memory of your loved ones their pleasant memories in the form of an ordinary masterpiece.
Related article: Patchwork for beginners: video by Irina Mukhanova
How to prime canvas for acrylic: preparation
As a primer for acrylic painting, primers based on acrylic itself are most often used. They are a special mixture with the same binder as the paint itself - an acrylic polymer emulsion. The composition of such primers also includes barite with magnesium and calcium carbonate, which create a certain texture of the primer. If the picture is painted with body paint, priming is not necessary at all. The only thing that is required is to form a continuous, solid film, onto which paint will then be applied. This is necessary to protect against soaking, since acrylic paints are water-based, and various types of cardboard are used for the canvas. For acrylic works, as well as for oil works, there is a special primed canvas on cardboard with an outline on sale. The outline will be needed in the future to frame the painting.
DIY canvas primer, boards and their primer
CONTENTS: Why high-quality soil? Preparation of boards for painting All adhesives for the primer Selecting the adhesive primer An ancient recipe for Benedictine glue Recipe from an old practitioner If you see a number next to a word, look in the notes
Why quality soil?
Having carefully chosen the means for painting, you also need to know what to paint on: the quality of canvases, boards, etc. is very important.
Each painting consists of three completely different elements. 1. The base or material on which the picture is painted, i.e. board, canvas, stone, paper, etc. 2. The primer with which this base is covered. 3. Painting that forms a successive series of layers of paint placed on the ground.
If the painting was executed in poor conditions and itself contains a source of future destruction, then, of course, neither a good base nor a strong primer will save the painting, and, on the contrary, the poor quality of these two factors is quite enough to spoil the most durable painting. Naturally, the best basis for the picture should be chosen; in addition, it can also be protected from atmospheric influences by covering the back with varnish and the sides with a special putty.
If, despite this, the base is destroyed, the restorer can transfer the painting to a new canvas or board, for which it is very important that the ground is well preserved. It is not difficult to verify this by examining old triptychs (foldings), where all three wooden doors are painted on the same boards, from the same wood and with the same soil, which provides an excellent case for comparison. Almost always the middle board in contact with the wall turns out to be rotten from dampness; the side flaps, to which there is free access to air, have been preserved.
Comparing the painting, we see that in good soils it was preserved equally on all panels of the triptych, while in bad soils the painting was damaged on rotten wood and survived on the side doors. In a word, the strength of the painting largely depends on the quality of the soil. It is not enough that it is only strong, like steel or diamond, but it is also necessary that it does not crack and does not turn into powder over time, along with which the painting crumbles. The primer, while strong, must be sufficiently elastic and elastic, which would allow, when the painting dries, to succumb to the resulting compression of the layers of paint and at the same time have sufficient resistance to protect it from too sudden movements of the base. In addition, the primer should absorb excess oil and varnish115 from the painting and retain everything that could penetrate into the painting from the side of canvas, wood, etc. Despite the importance of priming, it is often not done; in watercolors or pastels it is not necessary, but even in oil painting the paints are sometimes applied directly to the base. In this case, it is necessary to choose a base that satisfies the requirements that we place on the primer, i.e. it should slightly shrink and expand and not contain acids or other materials that have a harmful effect on paints; its surface should be fine-grained and with uniform porosity. If such a base absorbs paint strongly, it is good to first coat its surface with a small amount of retouch varnish, painting varnish, or a mixture of both.
The use of wooden boards survived in Italy - up to and including Raphael, and in the Netherlands for much longer - until Rubens.
Preparing boards for painting
was considered such a serious matter that the government of the Netherlands found it necessary to monopolize it and took over this concern: the best carpenters began making boards from immaculate and dry wood.
It was even forbidden, under threat of a fine, for anyone to write on boards not made in government workshops121. Here are the legislator’s motives explaining this measure: “The genius of an artist belongs to his fatherland. It is the duty of the fatherland to take care, as far as possible, to prolong the century of the best works. To achieve this, you need to take equal care of all paintings, simply because every famous artist begins from obscurity, or is still unknown due to his modesty, and therefore the artist, not knowing how his painting will be appreciated in the future, should not, through negligence or to save money, put your painting at risk.” This was a law that will make us smile in our time, and this law was strictly observed in the brilliant era of the heyday of the school of Dutch painting. Perhaps we owe to him the preservation of those wonderful examples of painting that we enjoy in the galleries of Europe122. When the boards were replaced with canvases, the primer of the latter was made the same as for the boards, i.e., from glue and chalk.
Over time, the primer was modified: the layer of glue and chalk was made thinner and thinner, then it began to be covered on top with another - made of oil and white lead, and in the end the glue stopped being used altogether123. The disastrous result, of course, was not long in coming to light: it was noticed that the canvas, in direct contact with oil, burned and became fragile124. Again they remember the glue and cover the canvas with it simply for insulation before priming with oil; but, using animal glue that is exposed to dampness, you get canvases that rot. Then they try to prime the back side of the canvas with a layer of glue, covering it on top with a second layer of oil primer, and pass the canvas between two shafts. Such a canvas completely lost its flexibility, and it was difficult to stretch it onto a stretcher. Then they return to the forgotten again: they cover the canvas with adhesive primer, and on top, layer by layer, apply oil primer. With this method, the weaving pattern of the canvas was completely lost and the surface was smooth, like a board.
But new inconveniences arose: drying the canvas required two to three years, to speed up which they mixed driers, turpentine, boiled oil with litharge, umber, a mixture of red ocher with white, or ocher alone into the oil. The demand for such a canvas, doomed to cracking by its very preparation, was very great: it was especially liked by those portrait painters who sought to imitate porcelain in their painting, the fragility of which also distinguished the canvas. Time has taken good revenge for the addiction to such methods, and now, probably, many owners of these canvases, not without bitterness, look at the cracked portrait of some ancestor, which has significantly lost its value because of this.
The disadvantages of fragile canvases forced the search to be directed towards the preparation of flexible and elastic canvases. Substances that give it flexibility are added to the glue, such as: mucous substances from flaxseed oil, mucus from snails, honey, fig milk, etc., as well as viscous rancid oil, in which acids have accumulated and which have lost the ability to dry125. Some manufacturers, in order to save money, add chalk, Spanish white, pipe clay, etc. to lead white, but all these products, which are calcium carbonate salts, although they help increase flexibility, when ground with oil, never dry completely ; remember the ordinary glass putty made from Spanish white in oil, which under the top dried layer remains soft for many years. It is clear that painting on such soils should crack, since the soil will continue to dry and shrink long after the drying process of the paints has ended. In our time, when railroads appeared and paintings often travel, it became necessary to roll and unfold them, and this forces the demand for even greater elasticity on canvases, which is what all the ingenuity of manufacturers is aimed at. The canvases that go on sale in France are prepared mainly in Holland, where labor is cheaper. At the factory, they try to roll up the prepared canvases as quickly as possible in order to prevent the oil from drying out and depriving it of light, making it rancid (in this form, the oil actually imparts flexibility to the canvas). These canvases are undoubtedly good... for traders! They are dirty yellow in color and will leave a black and cracked painting for posterity, but the manufacturers do not work for the future generation.
Choosing an adhesive primer
By comparing painted paintings and examining the materials on which they were painted, it is easy to see that works executed on adhesive soil are better preserved.
Of course, one cannot say that everything written on adhesive soil will be well preserved127. In general, this is true, but in particular, there may be other reasons for the damage to the painting, regardless of the soil, and, finally, the glue could have been of poor quality. It is necessary to use glue that is impervious to moisture, does not rot, is elastic and completely neutral in relation to paints.
The glue that meets these conditions isolates the painting from possible chemical effects of the base itself (canvas, wood, etc.); without shrinking, it does not cause cracks, and its flexibility allows you to follow the movements of wood and canvas; Meanwhile, oil-based soils self-oxidize, turn yellow, interact with some paints, dry out and ultimately become brittle.
The conclusion from all this is that you should abandon oil-based primers and be content with adhesive primers, provided you choose a good glue.
When starting to study adhesives, it is first of all natural to try to get acquainted with the old literature on this issue, but, unfortunately, practitioners who knew their business did not leave any books, and one inevitably has to understand the mass of manuscripts and recipes, sometimes indecipherable and mysterious. Often the recipes found are completely impossible to implement due to distortions introduced by a number of scribes and translators who write about all sorts of things, but do not understand them and do not work experimentally. That is why the greatest mistakes and stupidities throughout the centuries have been passed from book to book, like the words of the Gospel. If, however, anyone would like to look into these “primary sources,” then here is the necessary key to understanding them.
When recipes mention oyster shells, crayfish eyes, deer antlers, mother-of-pearl, pearls, know that we are talking about calcium carbonate, one of the types of which is chalk. When talking about crushed insects, the blood of pigs and other victims, about milk, fresh cottage cheese, egg yolk - all this is essentially casein, fibrin or vitellin, and the egg white is albumin. If you come across a proposal to use cow tails, old gloves and boots, legs of lamb, fish bladders and a stillborn kid, then take gelatin instead. All mealy substances - rye, wheat, cassava, rice, potatoes - are recommended as containing starch and gluten (gluten), and many exotic plants and trees with various Latin names are recommended as producing gums and resins. And if in any recipe there is an instruction to “burn a wax candle over a saucepan,” then the entire practical meaning of such a ritual is exhausted by the usefulness of the wax dripping from the candle. In the same way, you can successfully replace quicklime, camel urine and manure with ammonia, which act as alkalis.
Finally, you will often find advice to take fig milk, snail mucus, flaxseed, honey, which were used to give elasticity to the glue, but for this, of course, glycerin is more applicable128.
All adhesives
, discovered and described up to now (there are many of them), must be classified among the following eight basic materials, of which four are of animal origin and four are of plant origin.
Animals: Gelatin Albumin Casein (or fibrin or vitellin) Wax
Vegetable: Starch Gluten (glutin) Gums Resins
ancient Benedictine glue recipe
Using these materials and ammonia as an alkali, you can restore all the most complex antique adhesives with an admixture of glycerin (for elasticity).
Here, for example, is an ancient Benedictine recipe for glue taken from a manuscript for the parchment of liturgical books, on which well-known miniatures were written: “collect bees in the summer months, after vespers, crush them with milk of lime and then filter through a rag.” Analyzing this strange recipe, we will be convinced of its complete feasibility. In fact: bees contain a little gelatin, fibrin and, to a greater extent, wax and honey. The presence of milk of lime is necessary to mix the wax with water and convert the fibrin into glue. Straining is required to remove the remains of insects - legs, wings, etc. The advice of collecting bees on a summer evening is also not without practicality, since this provides a larger amount of wax and honey. It is not difficult, of course, by replacing fibrin with casein (a similar substance), honey with glycerin, lime with ammonia and adding wax and gelatins with water, to obtain Benedictine glue without any filtering. This glue is, indeed, excellent for this purpose, since it is completely impervious to moisture, does not rot, is flexible and perfectly preserves the pages of frequently read books129. Thus, science, which often requires so many sacrifices, saves the bees from the terrible crushing in the mortar and leaves them buzzing peacefully over the flowers!
By not limiting yourself to preparing adhesives according to old recipes, but by combining the above eight basic adhesive materials and knowing their properties, you can obtain a whole range of new adhesives for one purpose or another. It goes without saying that the prepared glue must be tested, i.e., monitor how it acts on various substrates (canvas, wood, paper, cardboard, etc.) and how it affects various types of painting in dampness, in a dry place, in the sun and in the dark. Conscientious testing, of course, will require many years. Let's see how each of the eight basic materials can turn into or resemble glue.
Gelatin , dissolved in water, forms glue, usually called flesh or skin; its adhesive ability is increased by adding quicklime, oil varnish or shellac (gum lac); the glue is kept liquid when cold by adding acetic acid; with an admixture of glycerin, calcium chloride and rubber, it acquires elasticity; and finally, by adding chromic acid, potassium dichromate130 and aluminum acetate, gelatin becomes, upon drying, insoluble in water. Albumin is obtained by beating egg whites into foam and collecting the liquid that separates an hour later; It is commercially available in dry form. This glue is also made elastic by the admixture of glycerin and, when heated to 100°, while still wet it becomes insoluble. Casein is sold in dry form in stores; can easily be obtained at home from cottage cheese. The addition of glycerin gives it elasticity
Wax is a natural product; You need to choose pure wax, without the lard that traders mix in. It dissolves in water with the help of alkalis (ammonia).
Starch and gluten are used in the form of paste, dextrin, etc.
Gum (gum arabic) is simply diluted in water. The addition of boric acid makes this glue last longer; Glycerin gives elasticity.
Resins dissolved in fatty oil (oil varnishes) or in essential oils are introduced into the adhesive in the form of an emulsion; some resins can be directly dissolved in water with the help of alkalis, such as shellac (gum lac), which dissolves in water in the presence of borax or ammonia and can be introduced into glue in this form
Based on these characteristics, everyone will find options suitable for various needs, but we limit ourselves to finding adhesives specifically for primers for oil painting. In our deep conviction, casein glue131 is the best for priming canvases, boards and cardboards; We recommend that you strictly follow the suggested method of preparing it to ensure good results.
(When the canvas is well primed on the front side, you need to pay attention to its back side: it also needs to be primed to make it impervious to moisture, which causes the fabric to rot, and to prevent the penetration of excess oil from the paints, which makes the fabric fragile.
In addition, the soil and the inside must be flexible so that the canvas can be rolled up. The following can be successfully used for this purpose: rubber dissolved in a petroleum solvent, wax, resins, and shellac. For small canvases, it is enough to cover the backside twice with watercolor fixative.
All the advice on how to protect paintings from fire by covering canvases with some kind of fire-resistant layer is unlikely to stand up to criticism in principle, since such a layer cannot be applied to the front side of the painting and it is not effective enough in the event of fire.
It might also be advisable to reinforce a metal mesh behind the picture with the help of hinges, stretched over a light stretcher that could be moved away at will. Such a metal mesh at a distance of two centimeters from the canvas would allow air to circulate freely and would protect the painting from shocks and from the touch of flame, which threatens more from behind than from the front, since, in most cases, art dealers and art lovers, filled with deep respect for paintings exhibited in museums, do not pay them the slightest attention when the paintings return to their homes; they drag them up ladders and pass lighted candles on the backs of piled-up paintings without taking any precautions.
You should, of course, try to look for new water-soluble adhesives in addition to those described. Perhaps chemistry will discover something better than casein glue, but for now the centuries during which it has withstood excellently speak for it.
Recipe from an old practitioner
If you trust an old practitioner who has devoted his whole life to the study of the medium of painting, and want to test it, then here is the ground that he offers and guarantees its merits.
Grind zinc white on gasoline and add equal amounts of retouching varnish and watercolor fixative; when the applied layer of such soil dries, and this will happen in a few minutes, it should be treated with glass paper. For all these preparations, you can paint with both oil paints and watercolors134. In conclusion, it remains to say a few words regarding the tone of the ground. We will say without hesitation: the soil should be completely white for many reasons. Firstly, this makes it possible to obtain transparent glazes without first covering the glazed areas with whitewash, which makes them wait a long time for drying and is associated with all the difficulties usual when working with oil-based primer; secondly, the soil is always slightly translucent, and over time it becomes more and more translucent, and this makes the use of colored soils undesirable, which, in the end, impart their tone to the picture, especially in thinly covered areas. Some paintings by Poussin and the French school of the 18th century, painted on red ground, convincingly confirm this. The paintings of those artists who primed with umber or black paint did not take even a century - their paintings after a short time became completely invisible in halftones.
In addition to all this, writing on white ground is involuntarily lighter, which is also very important;
The picture will always have time to darken later and quite quickly. ⚠ If you see a number next to a word, look in the notes. If you liked the free painting lessons, share on social networks
What are the benefits of canvases with ready-made sizing and primer?
In every specialized art store you can buy canvases already prepared for painting, for example, primed canvas in a roll for oil painting. Its purchase greatly facilitates the work of the master and significantly saves his time. Because oil-based primers take the longest to dry. However, primed canvas on cardboard is also available for sale for acrylic writing. Such canvases will not only save time spent on priming, but will also save the artist from various unpleasant nuances, such as the canvas leaking during glue impregnation or other issues. This is precisely the advantage of factory-made bases with a primer. They significantly save time, effort and, of course, money spent on preparatory materials. The most popular among canvases for acrylic painting is primed canvas on cardboard “Sonnet”.
Decoration methods
To make a truly beautiful door with your own hands, you will need additional decor. The door leaf can be processed as follows:
- paint;
- cover with wallpaper or self-adhesive film;
- open with stain and varnish;
- clad with veneer, laminate and similar materials;
- cover with plastic.
Varieties of door decoration methods
Interior wooden products can be decorated with a variety of creative techniques or you can style them yourself to suit a particular interior. For example, interior designs can be complemented with stained glass and patina for classics, baroque moldings or decoupage combined with craquelure and artificial scuffs for country and shabby. Hand painting deserves special attention. Acrylic paints are used for this. Glass is best treated with stained glass compounds. Additionally, you can use pieces of fabric, beads and rhinestones, as well as other small items at hand.
The metal sheet must be opened with paint. Enamels are best suited for this purpose. Also, such doors can be covered with plastic panels or MDF. Another option is soft lining; it allows you to create an additional layer for insulation and sound insulation. Dermantin is used for decoration. When making it yourself, the final appearance of the product depends only on your imagination and capabilities.
Which stretcher to choose for canvas?
Now a few words about the subframe. It can be purchased at the same art store or ordered to be made in a master’s workshop. Subframes are modular (prefabricated) and solid (non-removable). The most convenient to use is considered to be a modular subframe on wedges. Its advantages are that the tension of the canvas can be adjusted by tapping wedges. If the canvas sags in a blind, non-collapsible stretcher, then the situation can only be corrected by re-stretching it. And this is already problematic. Although it is quite possible to use it even if you are deaf. If the tension was initially good, then periodic sagging of the canvas occurs only due to increased air humidity. And the tension returns to normal as soon as the situation changes to a more favorable one.
How to choose the right wood?
Each variety has features and characteristics that are taken into account when choosing. This approach will allow you to avoid unpleasant phenomena such as subsidence, expansion and rotting of the door leaf. However, there is a set of recommendations that should be followed when choosing lumber for a door:
- the residual moisture content of wood for the canvas should not be within 12-15%;
- It is advisable that the boards be dried in a special chamber;
- lumber must be smooth;
- The width of the board should be within 25-30 millimeters.
Even if there is no preference for the type of wood, the above requirements must be taken into account when purchasing lumber!
Voted over 271 times, average rating 4.8
Comments
Unfortunately, there are no comments or reviews yet, but you can leave your...
Add a comment Cancel reply
We recommend reading
Miscellaneous How to choose the right door linings and install them yourself? When the renovation is completed, it still seems like something is missing. ...
Miscellaneous Color of the front door according to Feng Shui The question of choosing the color of the front door in the art of Feng Shui is highlighted ...
Miscellaneous Main types of GOST standards for entrance doors and requirements for door leaves The entrance door is the first thing you encounter on the way into the house. She …
Miscellaneous Basic parameters and additional functions of handles for a Chinese entrance door If the handle on a Chinese entrance door is broken, replace it with...


