How to make a foamiran panel quickly and cheaply
In order to make a panel from foamiran, you will not need a lot of expenses, and it will look simply excellent. Currently, a material such as foamiran, otherwise called “rubber paper,” is very popular among many who like to create with their own hands. This elastic material, similar to suede, is foam rubber, which, when heated, sometimes requires the warmth of human hands to change shape. It is easy to make a variety of three-dimensional figures from it, including using it to make paintings or panels from foamiran.
What is this
A painting made from foamiran is a real work of art, and it’s hard to argue with that. Externally, foamiran looks like paper and fabric at the same time. It is produced in the form of thick sheets of different colors. Glitter sheets interspersed with sparkles are available for sale.
Foamiran is also called revelour, foam and plastic suede. It is actively used in the manufacture of children's toys and jewelry. In fact, this material is obtained by foaming. Its properties resemble soft porous rubber. It is easy to process and is pliable to work with, especially after heat treatment. Foamiran is produced mainly in Iran, Korea, Turkey and China. It has amazing properties, which is why the material is so highly valued by handicraft lovers.
Spring apple tree branch
To make a wonderful panel with apple tree blossoms with your own hands, we will need:
Read also: How to find out the paint color of a car?
- foamiran;
- paints;
- glue "Moment";
- boulka (metal ball on a rod);
- molds (mold for veins);
- wire;
- frame.
First we need to take a regular photo frame. Remove the glass from it; it is not necessary. Next, cover the cardboard with blue gouache mixed with white paint. Make templates of flowers and leaves from paper.
Please note that we should get flowers of 5 petals, no more and no less.
Kinds
A painting made from foamiran yourself will fit perfectly into the interior of any room. If you want to start working with this material, pay attention to the different types.
- Iranian. It is obtained by foaming. Ideal for creating buds. The thickness of the Iranian foam sheet is 1 mm, the sheet parameters are 60x60 cm.
- Korean. High quality material, thin sheets. Korean foam holds its shape perfectly.
- Turkish. Sold in rolls and sheets. This species has well-finished edges.
In order to make a flower for a picture, it is better to use other types of this material: silk, glitter or marshmallow. Their main feature is aesthetics and small thickness. For example, marshmallow is ideal for creating a large picture. You can make beautiful transparent flower petals from foamiran with your own hands. This type is soft, pliable, airy. It does not need to be heated, and when stretched it quickly returns to its original state.
Flowers
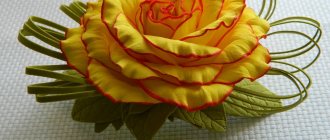
Flowers have become very common crafts made from foamiran. With the right shades and proper execution, they look great and attract attention with their special realism. The manufacturing process is very fascinating:
- Shades of material suitable for the specific type of flower are selected.
- The required number of petals is cut out.
- A flower is formed. To do this, the petals are glued together.
- The leaves are cut out separately. They also need to be glued to the flower.
In addition to the opened flowers, you can make beautiful buds by creating appropriate shapes. A bouquet consisting of several flowers, well chosen in color, will look very beautiful. A separate flower will also look impressive.
Specifics
It is not so difficult to make three-dimensional paintings from foamiran, given the pliability of the material. Thanks to the unique qualities of foam, the results are interesting and captivating in their beauty. So, what is its feature?
- The material can be shaped into any shape by hand. During compression and stretching, it heats up and becomes plastic.
- Foam stretches well.
- If the material is heated with an iron, it will gain volume.
- After cooling, the foamiran holds its shape perfectly.
- It is easy to cut with scissors.
- White material can be painted.
- Foamiran holds tightly to the glue.
Christmas angel from foamiran
For a long time, angels decorated the house at Christmas, and it was also customary to give them to mother, father, and all their loved ones. When we make crafts with our own hands, we put our soul into them, and therefore a hand-made angel will be dear to our hearts and will become a touching gift.
With the help of an angel made of foamiran, you can decorate your house for Christmas
To work you need to prepare:
- Handicraft kit;
- Foamiran is white, milky, gold with glitter shades;
- Foamiran is thin, light brown in color;
- Foam ball 4 cm;
- Glue Cosmofen SA-12;
- Pastel pencils;
- Markers, acrylic paints;
- Decor (rhinestones, lace, etc.);
- Toothpicks;
- Scissors;
- Iron.
The step-by-step master class is as follows. The first step is to make a pattern of all the parts and cut them out. White foamiran is used for the dress, milk foam for the arms, and the wings are made of gold fabric.
Since the gold fabric is covered with glitter only on the front side, two parts need to be cut out.
Light brown foamiran is used for bangs and hair. The hair must be cut from light brown fom, 0.5-0.7 cm wide, 30-35 cm long. To get curls, you need to twist the strip around the handle and heat it with an iron. For the hairstyle you will need at least 8 such curls. For the head, you need to cut out 2 squares of the same size 8x8 cm. The next step is to take a foam blank, heat the milk square and stretch it halfway over the future face. You need to do the same with the brown square. Then you need to glue the curls to the back of the head.
The next step is gluing the dress. We draw ears, eyes, nose and mouth with paints, apply blush with pastels. You can put a heart, cake or ice cream in the hands, or maybe there will be a beautiful star or candy there.
The master class is finished step by step, the original angel is ready and now you can safely give it to a loved one. A fairy, ballerina, snowman, Dunno, brownie, Malvina the clown, or Santa can be made in a similar way. If desired, you can create a whole finger theater using the kanzashi technique.
Features of work
Today, flower paintings are very popular among artists. It’s easy to make anything from foamiran with your own hands, because it’s comfortable to work with this material. It is delicate and soft to the touch, holds its shape well, and is flexible. It should be cut into small pieces and heated on an iron or in your hands. It all depends on the idea. Foamiran can be compressed and stretched, but not much. White sheets can be easily colored with special crayons or watercolors. The material is not afraid of water, so finished paintings can be wiped with damp wipes.
To create paintings, it is recommended to use thin foamiran. Don’t forget to stock up on the necessary materials and tools: sheets of foam of different colors, iron, scissors, strong adhesive, foil, wire, frame with canvas, ceramic molds. The latter are needed to give natural veins to the petals.
Postcard
When preparing for various holidays, I really want to please my loved ones with a good gift. You are invited to express your feelings with a gift made by yourself.
A familiar postcard will sparkle with new colors and turn into an exclusive work if you use foamiran and also dream up its creation.
To work, in addition to foamiran sheets, you will need:
- Multi-colored cardboard,
- Paper,
- Scissors,
- Glue.
The technology is extremely simple:
- The base is made from a cardboard sheet. Select the appropriate size. Originally cut edges in the form of waves will look beautiful.
- Balloons are cut out of multi-colored sheets of foamiran. They can come in different shapes and sizes. Next they are glued to the base.
- A string is glued to each ball. They are tied at the bottom with a beautiful bow.
- As an additional decoration, it is proposed to attach various elements cut out of colored paper. It could be a cake. Ribbons glued along the edges will be an interesting decoration. You can make bows out of them that look very elegant.
- At the end, you need to write congratulations, choosing pleasant words for the hero of the occasion.
Price
A painting made from foamiran will be an excellent gift for a birthday, anniversary, March 8th and even a wedding. If an amateur has achieved a certain skill in creating paintings from this material, it makes sense to go into business. You can buy foamiran in specialized stores and shopping centers. The price depends on the manufacturer. For example, marshmallow costs from sixty to eighty rubles, the sheet size is 50x50 centimeters.
Herringbone
In preparation for the holidays, it is proposed to make an unusual decoration for the interior - a Christmas tree, following the simple step-by-step instructions for making crafts from foamiran:
- You will need a sheet of green foamiran. Strips of small width are cut from it. They are fringed. It is better that the cuts are thin. This will make the Christmas tree look fluffier.
- The cardboard sheet is rolled into a cone. You will need a stapler to join the edges.
- Pre-cut sheets of foamiran are glued onto the cardboard base. It is necessary to gradually glue the required amount from bottom to top.
- At the end, if desired, the Christmas tree is further decorated. Beads or other decor are suitable for this.
With such New Year's interior decoration, the mood will immediately become festive. You can decorate it to your taste, bringing your existing creative ideas to life.
Advantages
A foamiran painting is no less valuable a work of art than painting. Especially if it is made with love. The main difference is the method of creation and material. In essence, foam is a soft synthetic material that resembles suede to the touch. Thanks to the variety of colors and material properties, the master is able to bring any idea to life. It is the texture of foamiran that allows you to create paintings. It fits perfectly into the frame and protrudes slightly, creating a 3D effect. In addition, the material has many similarities with paper and fabric. Foam is easy to paint, setting the tone for the whole picture.
The event component in the photo is a vector of creative thought
To ensure that the frame best suits your chosen photo, it is best to make it part of the image. Photo frames can be selected according to color or texture (wooden, plastic, cardboard), or according to the person or event depicted in the photo.
For example, if the photo concerns a trip to 1st grade or the last bell, it is better to decorate the frame with images of bells or letters, or an inscription related to the school.
Landscape compositions in the photo will look best in a frame decorated in a natural style - with green leaves, painted or real, dried, with flowers or pine paws.
A seaside holiday is ideally placed in a frame decorated with images of dolphins, sea waves, shells and small pebbles.
How to do
Is it easy to make paintings from foamiran? The master class will help beginning craftsmen master the technique of working with this unusual material. In fact, even the most complex, at first glance, picture does not require much effort or energy expenditure. Step-by-step instructions will be clear even to beginners. To create a picture with peonies, you will need foamiran of two colors - pink (for buds) and green (leaves), as well as glue, iron, scissors, foil and a ball, which will serve as a form for the buds. Several closed, half-open and open buds will look interesting in the picture.
- Step 1. Make templates for future leaves and petals from thick cardboard. The petals should be of different sizes up to 4 centimeters, round in shape with a cut off part on one side. For the smallest shape, cut out a small part in the shape of the letter V. The leaves should be of two shapes: oblong, pointed.
- Step 2. Cut out peony petals and two green leaves according to the template. The number of petals will depend on the size of the picture and the flower itself placed on it. Remember that the upper petals of the peony should be smaller than the lower ones. They can be made more natural if they are processed a little with scissors. It should appear that the petals are slightly torn.
- Step 3. It's time to use the foil. Roll it into a small ball - this will be the middle of the peony.
- Step 4. The petal must be heated with an iron and given a spherical shape. A plastic ball will help with this. The lower part of the petal should be collected with an accordion and twisted, then carefully unwound. The petal should be spherical and slightly crumpled. You need to make other petals and leaves in this way.
- Step 5. Using a toothpick, make veins on the leaves by preheating the material, or use a mold.
- Step 6. Take a ball of foil and place it on the wire. Then apply glue to the foil and cover the ball with petals.
- Step 7. Attach petals from small to large, moving layer by layer in a circle. The material needs to be slightly crumpled with your fingers to create a feeling of the naturalness of the bud.
- Step 8. Once the bud is assembled, start gluing the leaves.
- Step 9. For the picture you will need three to four buds of different sizes. Once they're ready, put the rest of the painting together. It all depends on the idea and imagination of the author.
Handicraft masters advise beginners to draw a sketch of a future painting on paper, come up with an idea in advance, and decide on the color of the canvas and materials.
Pencil case
Frame: Handmade Channel / YouTube
Pencil cases are needed not only by schoolchildren. Make a craft and collect your writing utensils in one place. This way they definitely won't get lost.
What you will need
- Pink, white and yellow matte foamiran;
- yellow, black and pink shiny foamiran;
- a simple pencil;
- scissors;
- paper;
- Velcro tape;
- Printer;
- templates;
- glue gun;
- marker.
How to do
Download and print the templates. Cut them along the outline.
Frame: Handmade Channel / YouTube
Transfer the shapes onto the foamiran using a pencil. For most of the ears, use black shiny material, for the middle part - matte white, for the small part - pink shiny material. The horn should be shiny yellow. The flowers are matte: two yellow, one white. Cut out the blanks.
Frame: Handmade Channel / YouTube
Take a sheet of pink matte foamiran. Turn it vertically. Bend the bottom part towards the center - you should get a pocket. Cover it with the top of the material. Iron the design with your hands to create folds.
Frame: Handmade Channel / YouTube
Unfold the workpiece. Apply glue to the left and right edges of the bottom.
Frame: Handmade Channel / YouTube
Fix part of the sheet so that you get a pocket again.
Frame: Handmade Channel / YouTube
Cut a small rectangle from the Velcro strip. It consists of two parts - with microhooks and microloops. Do not separate them, otherwise it will be difficult to place the clasp correctly. Simply attach the Velcro to the inside of the lid. After this, apply glue to the second side of the Velcro, close the future pencil case and press firmly.
Frame: Handmade Channel / YouTube
Prepare your ears. Attach white matte parts to the black ones, and pink ones on top. Fix your ears on the back of the pencil case.
Frame: Handmade Channel / YouTube
Use scissors to round the corners of the lid.
From foamiran, cut out two small pink circles and one yellow one. These are the cores of the flowers, secure them in the center. Glue the horn and other blanks to the craft.
Frame: Handmade Channel / YouTube
Make eyes from black shiny material. These are inverted arches, from the lower contour of which small curved triangles protrude - cilia. Glue the parts to the craft.
Make several horizontal strokes on the horn with a marker.
Frame: Handmade Channel / YouTube
If you have any questions, take a look at the video:
What other options are there?
Make a pencil case like this if you want to decorate your craft with butterflies and flowers:
This pencil case even has room for paper clips and sharpeners:
