Selection of materials and hook
Beads differ in manufacturers, sizes, shapes and colors. The best strands are made from round beads. In addition, this form is ideal for beginner craftswomen. The beads lie smoothly, and the product looks neat.
To determine the size of the beads, you need to remember that the smaller the number in the number, the larger it is.
For the first works, it is better to stop at size 8/0. It is not difficult to work with, and the decoration will look attractive. Experienced needlewomen choose sizes 10/0, 11/0 for plaits.
Beads made in Japan and the Czech Republic are suitable for jewelry. It is smooth and has a large color palette. The best option from a price-quality point of view is Czech Preciosa or Gamma beads. Japanese Toho and Miyuki are also suitable for knitting, but this is a more expensive option. Chinese beads are attractive in price, but poorly calibrated, so they are not recommended for work.
When choosing colors, you should keep in mind that the color of the beads in the bag may often not coincide at all with how it will look on the thread. This especially applies to transparent beads or those with a painted center. In the package it looks much darker than it actually is.
At first, it is recommended to use opaque beads with a matte, shiny or pearlescent surface.
Crochet bead strands (patterns can be simple or complex) are structurally different in the diameter of the cord and are divided into types:
| Types of harness | Number of beads in diameter, pcs. |
| Thick | 15-20 |
| Average | 8-10 |
| Thin | 4-6 |
Thin products are usually made long and made in one color or in a scattering of colors. For example, lariats are neck jewelry where the cord does not close into a circle. This allows you to get creative while wearing it, tying it in different ways.
Thick strands are painstaking work that requires professionalism and patience from the master. Such jewelry is distinguished by the complexity of the pattern, multi-color and detailed pattern. The most common type of tourniquet is medium. The average number of colors in them is 2-3.
There are most of these patterns on the Internet, and it is these that it is advisable for beginning needlewomen to learn from. Those who have taken up bead knitting for the first time are not recommended to use 1 color of beads in their work, as the rows will merge, which increases the likelihood of errors. Ideal to knit with 2 or 3 colors in contrasting colors.
The following threads are used to make bundles:
- Iris.
- Snowflake.
- Canarias.
- Violet.
- Monofilament.
Any sewing thread in a spool will also work. If they are too thin, then you can knit in several folds. The ideal option is when the color of the thread matches the main color of the beads.
But many people do not adhere to this rule, since a translucent contrasting thread can create interesting color effects. For beginners, it is better to choose light threads, for example, white or beige, since the loops on them are better visible and easier to knit.
The needle has an important function, since the right needle will greatly reduce the time when threading beads onto a thread. With the help of a long 10-centimeter needle, beads can be easily placed on a thread if the knitting is one color or a multi-colored scattering, when there is no need to follow the pattern.
If the beads are assembled according to a pattern, which means one piece at a time, then it will be inconvenient to work with a needle longer than 6 cm. Crochet bead strands, the diagrams of which are presented in the article, are crocheted No. 0.8 – 1. The size of this tool depends on the preferences of the needlewoman, the density of knitting, the thickness of the thread and the size of the beads.
Often the need to change the hook size is visible already at the beginning of the work, when there are large gaps between the beads, or, conversely, they are pressed too tightly against each other.
Fishing line, monofilament or nylon thread
The choice of material on which the beads are strung depends on their size and the technique of making the decoration. It will be more convenient to weave the first cord on a fishing line with medium, not small, beads.
Thin needle and hook No. 1 or No. 2. In another way, such a needle is called a bead needle. The product can be made entirely with its power or crocheted.
In the photo of bead strands you can see the basic manufacturing techniques
- Crochet. When creating decorations, columns and half-columns are used.
- Mosaic. There is an odd number of beads in each turn, and the next row is attached to the previous one alternating.
- Square. It is assembled using a needle and an equal amount of beads of the same diameter along the edges; in cross section it looks like a square. Quite a complex scheme.
- Flat. It is created similarly to the knitted version, but around the elastic band, due to which, in cross-section during operation, it looks more like a flattened oval than a circle.
- Openwork. Excellent for a set of thick cord, from different types of beads. It turns out airy and soft - there are small gaps between some beads.
- American. It is easy for beginners and is especially beautiful when using at least two different colors. As a result, two beaded ribbons appear to be intertwined, enveloping each other.
- Turkish. A simple option, it differs from other methods by the presence of glass beads and elongated beads. Created by crochet.
Master class on how to crochet a simple rope of beads
For beginning needlewomen, making a rope should be as easy and understandable as possible, so you should choose 2 colors of beads that contrast with each other. Size – 8/0.
Other required materials:
- Iris threads,
- hook,
- scissors,
- needle,
- clip.
Stages of work:
- First of all, you need to calculate the required number of beads and the length of the thread. To do this, you need to decide on the length of the rope and the number of beads in its diameter.
For the master class, a tourniquet 7 cm long was chosen, having 7 pieces. beads in diameter. This diameter will correspond to 10 mm. Therefore, the final length of the thread is:
7 cm * 7 pcs. = 49 cm.
- Next, you need to add 49 cm of beads onto the thread. The pattern is as simple as possible - alternating green and white rows. This means that you should select beads alternately: 7 green, then 7 white, then green again, then white.
Before casting on, it is advisable to measure 49 cm of thread and secure it to the ball with a paper clip. This will allow you to make a neat bead thread.
After casting, you need to remove the paperclip, additionally measure about 0.5 m of thread and secure it with a paperclip again, and move the beads closer to the skein, leaving only 10 or 15 beads at the beginning of the thread for knitting the first rows. As you knit, you will always need to hold about 15 beads in your palm.
- The tourniquet in this master class is made in half columns. The row begins with an air loop. When knitting the second loop, you should grab 1 bead and knit it. The remaining green beads are also knitted.
The result should be a chain of 7 beads. After this, the chain must be closed into a ring. If everything is done correctly, the beads will be on the outside of the ring, and the thread base will be on the inside.
- For the second row, 7 white beads must be “prepared” in the palm. They need to be knitted in half columns.
To do this, insert the hook from the wrong side under the green bead, push one white bead with your finger and grab the thread behind it, pull the thread first under the beads of the first row, and then through the loop on the hook. Thus, there should be 1 loop left on the hook.
The remaining loops of the row should be knitted in the same way, making sure that the wrong side consists only of threads, and the face is made of beads. It is also important to control the thread tension. If the tension is incorrect, the beads will either fall out of the total mass or, on the contrary, fall inside the strand.
- The third and subsequent rows are knitted in accordance with the description of the second row. You should try to lay the beads evenly one above the other. In this case, in the process of knitting a row, the beads will be positioned vertically, and in already knitted rows - horizontally. The quality of the finished work depends on attention to these details.
- After reaching the required length of the rope (7 cm), you need to knit the last row with half-columns, but without beads. This is done so that the beads in the penultimate row are “laid” horizontally.
Next, the thread is tightened and cut. And the product, depending on its purpose, is decorated with the necessary fittings. In the process of working on simple patterns, and even more so on complex ones, errors may be made related to counting beads.
Below are ways to fix them:
- Removing beads from a chain. This situation can arise if there is a mistake in color while casting according to the pattern, or if in the middle of knitting it turns out that the bead is uneven or of poor quality.
- You can remove unnecessary beads by crushing them with pliers, and in order not to accidentally touch or cut the thread, you should first insert a needle into the bead.
- Add the missing bead. If the beads were missed or removed due to an erroneous set, then the desired bead should simply be sewn onto the finished strand. To do this, in the place where it will be sewn, you need to knit a loop without beads, thus leaving free space.
Step-by-step knitting of a rope with your own hands
- Decide on the length of the finished product. For beginners, it is better to start with a short tourniquet exactly around the neck - 40-44 cm.
- Select a pattern and count the number of beads you will need for the desired length.
- Place beads on a fishing line or thread in strict accordance with the diagram. If a mistake is made in color and only once, it will not be noticeable, but if a bead is missed, the entire pattern may “float”. Therefore, be extremely careful at this stage.
- Weave a cord.
- Secure and decorate the ends of the accessory with caps or huggers, and attach fasteners to them. Ready!
Single crochet harness
To make a spotted rope in red you will need:
- beads No. 10 – 4 colors,
- thread,
Crochet bead strands: single crochet weaving patterns
- hook 0.75 mm thick,
- needle,
- scheme,
- accessories for the finished product (clasp, rings, caps, pins, large beads).
Harness diagram:
- The diagram shows rapport (repeating pattern). The number of repeats will depend on the intended length of the harness.
- This spotted cord should be 39 cm long. According to the diagram, this corresponds to 7 repeats. One row – 25 beads.
Stages of work:
- It is necessary to string beads onto a thread, taking into account the pattern and number of repeats.
- You should start knitting by knitting a chain with air loops. Total - 25 loops.
- The first 3 rows must be knitted without beads. Subsequently, they will be needed to secure the harness to the fittings. The 2nd and 3rd rows should be knitted with single crochets.
- Next, you need to complete a row, knitting beads in single crochets. To do this, move the beads close to the hook and loop, grab the thread with the hook through the loop of the bottom row and pull it through. In this case, the bead will already be fixed. The two loops formed on the hook should be knitted.
- In the same way, you need to perform the remaining loops of the row. The 25th bead will end the row. Moreover, it should not be above the 1st bead, but next to it.
- Work should continue according to the scheme until the length of the tourniquet becomes 39 cm.
- The last 2 rows need to be knitted in single crochets without beads and at the end fasten and cut the thread.
In order for the harness to turn into a stylish decoration, the necessary accessories should be attached to it:
- It is necessary to process the edges of the tourniquet. To do this, place a pin in the bead and carefully sew up the ends.
- Then you need to put the fastening cap on the pin. Part of the wire must be removed using wire cutters, leaving a tip sufficient to round it into a ring.
- Lastly, the lock should be secured to the harness.
Master class on rope weaving using mosaic technique
From theory to practice. Let's try together to weave a mosaic strand of beads, which will become an excellent basis for a necklace. It can be worn with light summer dresses, evening dresses, or with anything! It looks very impressive.
To work you need:
- bead thread of any color (one of the main weaving colors);
- needle and scissors;
- beads of two colors - black, dark red, blue (3 colors 10/0 and 2 colors - red and blue - 6/0);
- accessories – 2 pins, 2 end switches, lock.
Weaving algorithm:
- We take blue beads 10/0. We put 12 beads on a thread and close the weaving into a ring. He strings one bead at a time, weaving them into the beads of the first row during the weaving process, i.e. ring. That is, we do everything according to the mosaic weaving standard. We skip one bead of the bottom row and use a needle to come to the next one. And so on. We continue this weaving to the desired length, this is one half of the strand.
- Now you can proceed to the spiral part of the harness. You need to weave it according to a different pattern. The number of beads in a row does not change, but their color and size change. You need to weave beads of different colors and sizes one by one, this leads to their displacement, due to which the spiral shape of the strand is achieved. We weave this part according to the pattern; we determine its length ourselves.
- Then we weave according to the previous one, but take only blue beads. This is how the third part of the product begins - the final one.
- When the harness is braided, we attach a pin to its ends. Using a tool, we create a large hook from a pin. We hook the pin to the weaving, fix it and put on the hat. To secure it, we create a ring at the end of the cap on which the clasp will be attached. And decorate the other end in the same way: pin, cap, ring, clasp.
The tourniquet is done! The spiral part will be its main part, and the blue even fragments will be its frame. To weave your rope, you can use beads of any color, but they must also be large beads, without them it is impossible to create a spiral.
From the description of this MK it is clear that even a novice needlewoman can perform it. In weaving, only 2 patterns are used, which are almost identical to each other, only the colors and sizes of the beads change.
You will find a more detailed description of the work in this video.
Tourniquet in a column
Crochet strands of beads (patterns are shown using crochet and half-stitch crochet) differ not only in the technique of execution, but also visually.
For example, this is expressed in the tilt of the beads on the finished strand. The column is characterized by a diagonal arrangement. When knitting in a half-stitch, the beads lie horizontally.
Coiled cord
A beaded bracelet made from a spiral cord looks extraordinary on the wrist. The rope is made in a spiral from beads and glass beads, which perfectly emphasizes the smooth transitions of the pattern. This decoration will not leave any girl indifferent.
Necessary for work
To create a spiral of beads you will need:
- Beads No. 10 of any desired color.
- Green glass beads.
- Beading line.
- Base for a bracelet.
- Lighter.
- Scissors.
- Beading needle.
After preparing the material, we begin weaving the cord.
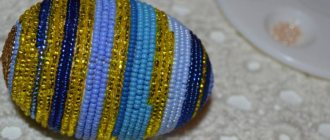
Beaded monochromatic rope
Crocheted strands of beads of the same color do not require the use of a pattern, so there is less chance of getting confused and making mistakes during work. To make such strands, you should take a thread that matches the color of the beads. The circumference of the product is usually medium or thin, so the best knitting option is to use half-stitches.
Single-color strands can be used to make bracelets and necklaces, but more often they are used to make lariats.
The difficulty in working on a lariat is that it is usually long (up to 1.5 m), so you need to string a large number of beads. It is difficult to move meters of beads along the thread during work.
Experienced craftswomen recommend placing the beads evenly on the thread and only then twisting it into a ball. In this case, you will not have to move large volumes of beads over long distances. Another problem is that a long knitted cable gets twisted and interferes with further work.
There are two ways out of this situation:
- Tie the tied end into a knot. In this case, after untying there is a risk of creases appearing.
- Periodically unwind the tourniquet in the opposite direction. This is less convenient, but there is no risk of deforming the product.
Video with master class lessons
In this collection of videos you will find many useful lessons that will teach you how to weave strands of beads using various techniques.
- Video for beginners about crocheted bead strand patterns.
- Video with a master class lesson on bead weaving for beginners, in which you will learn how to make a rope.
- Video with a lesson on drawing up patterns and weaving a rope of beads.
- Video with a detailed description of the weaving pattern of a beaded rope for 10 beads.
- Video tutorial on how to weave a beaded necklace using a square strand of beads.
- Video on how to make a knitted rope using the example of several beaded jewelry.
- Video with a master class lesson that explains in detail the pattern of crocheting thick strands of beads with ornaments.
- In this video you will learn how to weave an American or twisted rope from beads.
- In this video you will see how you can weave a beautiful rose from beads, which can become one of the elements of your decoration.
- If you want to decorate your rope with flowers, we suggest watching this video to learn how to make an orchid from beads.
- A video with a selection of photos of bead strands and a description of their weaving pattern.
We hope that we managed to captivate you with this interesting bead weaving technique, and you will create beautiful sets of jewelry with necklaces and bracelets woven with rope. Agree that such jewelry will be an excellent gift and will appeal to every woman. Share in the comments your recommendations, tips and reviews about what strands you use to create jewelry.
Sources
- https://zhenskie-uvlecheniya.ru/osnovy-texniki-vyazaniya-kryuchkom-s-biserom-kak-nauchitsya-sozdavat-shedevry-iz-melochej.html
- https://podelkiruchkami.ru/vyazanie-biserom/
- https://handsmake.ru/zhguty-iz-bisera-kryuchkom-shemy.html
- https://needlewoman.org/22-zhgut-iz-bisera.html
- https://sdelatlegko.ru/zhgut-iz-bisera/
- https://domigolki.ru/zhguty/zhgut-iz-bisera-vjazanie-krjuchkom/
- https://masteridelo.ru/remeslo/rukodelie-i-tvorchestvo/biseropletenie/kak-plesti-zhgut-iz-bisera.html
- https://handmade-milota.com/pletenie-zhguta-iz-bisera/
- https://masterbisera.com/zhguty/dvuhcvetnyj-zhgut-iz-bisera/
- https://www.joxin.club/rukodelie/biser/zhgut.html
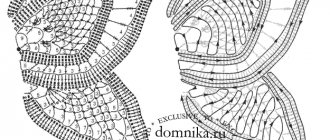
Patterned strand of beads
The plaits can have either simple patterns alternating 2-3 colors or complex ones. To make such decorations, you need to be able to read pattern diagrams. There are several programs in which you can make patterns yourself, count beads and threads. They all make similar designs. Therefore, as an example we can cite, for example, the DB-Bead program.
This diagram allows you to see (from left to right):
- The first drawing is the author's design, from which the program generates a diagram.
- Next comes the diagram itself, which you need to focus on when knitting. This is an unfolded tourniquet.
- The following picture shows what the harness will look like when finished.
- The colored squares in all 3 pictures are a pattern. This pattern shows that the pattern needs to be repeated every 20 rows.
Patterned crocheted bead strands: diagrams
- In the upper right corner the necessary numerical information is indicated: the number of beads in a row (7 pcs.), the number of beads in a pattern (140 pcs.), the number of rows (20).
- The multi-colored columns below are the order in which colored beads are placed on a thread. You should start the set from the top left square and move down, then move to the column to the right.
Reading the schematic
A strand of beads is crocheted according to a pattern, and at first glance it may seem that it is quite difficult to understand the pattern. However, if you once understand the principle of reading a diagram, this process will not cause difficulties in the future.
To obtain a design, beads are strung on a thread in a certain sequence. The diagram will help with this.
The information on the first line is the number of beads in the row. Here the strand consists of 12 beads.
The next line is the number of beads in the pattern. This parameter determines whether the tourniquet will be thin or thick.
Color schemes:
- draft – the position of the beads during the weaving process;
- corrected – reversal of the tourniquet;
- simulation – a type of finished decoration.
The squares on the right - information about how many beads in what sequence need to be placed on the thread to get the desired pattern. The beginning of the set is the left column, from top to bottom.
Bead strand in half-columns and columns
Sometimes the insufficiently neat appearance of the plait is associated with the wrong choice of the type of knitting (stitch or half-stitch). Beginners, in order not to make mistakes, should strictly follow the diagram and description of the manufacture of the tourniquet.
Experienced craftswomen can already take into account several factors to choose the right type of knitting, such as the diameter of the rope, the size of the beads and thread. Stitch knitting is used on strands of thick diameter and allows you to make complex patterns.
When choosing stitch knitting on small diameters, there will be a large space left between the beads, which, of course, should not be allowed. In this example, both strands are connected with the same threads and beads and have the same diameter, consisting of 10 beads. But the upper sample is made with half-columns, and the lower one with columns.
If you are in doubt about how to knit a product, it is recommended to make a small sample up to 5 cm long before starting work.
Preparing for work
Before you start making strands of beads, purchase everything you need. The most important component is beads - this is the material on which you do not need to skimp.
The better the beads, the brighter and prettier they will look when finished.
You also need to buy special threads or fishing line, needles for beading, all kinds of fasteners for necklaces and bracelets.
One of the weaving methods is to simply string beads in a certain order according to patterns. According to the patterns, you can weave both plain and multi-colored strands.
- First, string 4 beads one by one, then pass the needle into the first bead;
- Then the next 3 beads, then insert the needle into the 3rd bead of the first circle;
- Then 3 more, at this time the needle is pulled through 1 bead of the second circle;
- String 2 more beads, balancing the edge of the rope;
- Then again 3 beads and continue weaving in the same way.
Half-column bead strand
As the level of skill in knitting ropes increases, there is a desire to master new techniques and original effects in order to make more interesting products. One such useful skill is increasing and decreasing the diameter of the cord.
The increase is performed by knitting two loops in one loop of the previous row. In this case, the hook should be passed under the two threads of the bottom loop. Both half columns must be made with beads.
When decreasing, two loops of the previous row need to be knitted with one half-column with a bead. If the pattern is simple and the expansion is small, then it is enough to ensure that the added and decreased loops are symmetrical.
In other cases, in order not to make a mistake, it is recommended to mark on the thread with beads attached the places where there will be contraction or expansion. This can be done using small pieces of paper.
Twisted tourniquet for beginners
We present another option, suitable for beginners. To do this, you need to familiarize yourself with weaving patterns. What will you need for needlework?
For this use:
- Beads in beige color;
- Metal fasteners;
- Monofilament;
- Scissors.
Cut the fishing line to the required size. Next, let's start the workflow. It consists of the following points:
- We collect four beads. We pass one end of the fishing line through 1 post. It consists of 2 parts. This way we get a small square;
- Add two more beads. We pass the end of the fishing line through the second post;
- We perform the third row according to the same principle. We collect a column of 2 beads and thread the fishing line through the 3rd column;
- The fourth row is performed by connecting 4 columns. To do this, you need to thread the end of the fishing line through the first post, as shown in the diagram;
- For the fifth row, you need to collect two beads and lower the end of the fishing line on the fourth row;
- The sixth row is made by turning the cord over and placing one bead upward;
- Next, turn the cord over again and collect 2 beads.
- Now you need to lower 1 bead down. To do this, we thread the thread through two beads on the previous row.
Embroidery of a strand of beads on a rope - African technique
Crochet bead strands, patterns for which today can be easily found in any variations, require craftswomen to know the basics of knitting. The African method of making jewelry is easier to make, but the result is also impressive.
The essence of the technique is to tightly stitch beads onto a regular cord or thick rope using a needle.
Unlike previous works, here there is no need to first place the beads on the thread according to the pattern, which means there is less chance of error.
To make a necklace you need:
- beads,
- rope,
- thread or fishing line,
- needle,
- accessories for jewelry.
An important nuance is the choice of rope. Preferably the diameter is between 5 and 8 mm. A smaller diameter will complicate the work and a gap will be visible between the beads. A larger diameter is suitable for those who love massive jewelry.
In terms of material, it is better to choose a cord that has a cotton braid. It is easier to embroider with this braid – the beads lie more evenly. In addition, upon completion of the work there will be no difficulties in securing the ends and fittings.
Stages of work:
- First of all, you should secure the thread on the cord in any convenient way. Next, beads are strung on a thread. This can be several beads or a chain of beads that will make several turns around the rope. It must be remembered that the fewer beads are sewn at a time, the better the quality of the work will look.
- The bead chain should be wrapped tightly around the rope. To secure the chain, you need to grab it in several places with thread. To do this, the needle is stuck into the cord and removed through the last few beads. Then you need to make a cross stitch, thus sewing the thread to the braid.
This fastening must be repeated along the entire length of the sewn chain from end to beginning.
- After the wrapping is sewn, you should return to the place where the work stopped, namely, first bring the needle a couple of beads to the end. And then pass the needle through these beads, sewing them to the braid.
- Next, you need to continue embroidering along the rope, alternating between setting beads on a thread and securing the resulting chain of beads to the surface of the cord.
- After the harness has reached the required length, the work must be completed. To do this, the core of the rope needs to be cut 1-2 cm from both ends of the bundle. Tuck the braid into the resulting void and tighten the end with thread. The tourniquet is ready. All that remains is to fasten the clasp on it
Openwork plait
This technique is usually used if it is necessary to create a thick tourniquet. Unlike square, openwork can be woven from both an odd and even number of beads.
Materials and tools
To create a decoration you need to prepare:
- fishing line or thread;
- beads (1 or several colors, depending on the weaving pattern);
- bead needle;
- scissors;
- rug.
Operating procedure
The patterns of bead strands for making an openwork cord are quite simple. All products of this type are woven according to the same principle.
14 beads are collected on the thread. The needle is inserted into the first one and the thread is pulled through. Complete the first row this way.
String 3 beads and pull the thread through the fifth element of the first row. Collect 3 more beads and insert the needle into the ninth bead. Having strung 3 more, pull the thread through hole 13 of the beads.
The third row begins by putting 3 beads on a thread and pulling the needle through the second bead of the second row. Further work is simple: there is no need to calculate the numbers of beads. Having threaded three new ones onto the needle, the thread is pulled through the central bead of an element consisting of 3 beads.
Continue weaving until the simple openwork strand of beads becomes long enough. Afterwards all that remains is to secure the ends of the threads and secure the fittings to the ends.
Video on how to make an openwork plait
Other patterns for weaving strands of beads
Among other popular models of knitted harnesses, you can o.
Knitting should be done as for a regular braid, but to get “fur” between the loops you need to knit a long loop. Any number of beads or beads are strung on this loop. Everything is limited only by the imagination of the needlewoman.
A wide variety of patterns among strands braided with a needle:
- "Mosaic".
- "Square".
A strand of beads is a modern and original decoration, created by the skilled hands of a craftswoman, as well as with a crochet hook or a needle. You can create harness diagrams in special programs, or work with ready-made diagrams that needlewomen share on the Internet.
Author: Vorobyova Nadezhda
Article design: Natalie Podolskaya
Types of tourniquets
A harness is a hollow cord with a clasp. According to the technique of execution, they are:
- knitted (crocheted from thread with stringed beads);
- braided (braided with beaded fishing line).
By appearance, the bundles can be distinguished:
- dense;
- mosaic;
- square;
- openwork (American);
- Turkish;
- shaggy (fluffy or fluffy).
American tourniquet
Experienced connoisseurs of needlework among themselves call this technique openwork; many beginners also know it by this very word. It all lies in the appearance of the finished accessory; it is never perfectly even and symmetrical.
- The relief and volume add special beauty to the product; the decoration visually literally captivates the eye.
- Beginners really like to make models using American technology; the diagrams are quite simple, and judging by numerous reviews, they are easier to read than others.
- Guided by your imagination, you can create individual patterns by selecting shades and images; crafts in an ethnic design style look no less impressive.
It is not necessary to settle on a twisted form; it is worth trying yourself in work that involves creating an acute angle or a twisted structure.
How to read the diagram correctly?
In the diagram at the very top, the line indicates the name of the resulting work. Reading the diagram is not that difficult. Each block in it has its own meaning .
For example, the most “modest” number in the second line means the number of beads in a row. Or in simple words - the width of the harness. The next two numbers display the repeat data: how many multi-colored beads it will contain and how many rows it will require. The first stripe indicates which pattern the artist chose, and it is displayed in a flat surface.
Next is the transformation for the spiral, and after that there is a part of the spiral that can be seen from one angle, without turning the canvas.
The most important ones will be thin columns of one square . These are the colors of the beads and the sequence in which you will need to place them on the fishing line. There is a number next to each square - this means how much of that color is needed.
Tips from experienced craftsmen
When asked what is needed to make a harness, professionals answer without hiding details, trying to help beginners implement their planned actions.
The bead size with indicators 8/0 will be the most successful option for beginning craftsmen; having mastered the basics of needlework of this type, you can move on to 10/0 and 11/0.
The thread should be selected carefully; if you buy a low-quality product, the created item will be fragile; with minor physical impact, any specimen will crumble.
Popular companies include:
- Canaris.
- Snowflake.
- Iris.
- Violet.
Thin threads will have to be constantly folded in several layers, which will bring a lot of inconvenience, so this important point should be taken into account at the stage of preparation for the process.
Advice! If you choose the right needle for the job, you can significantly reduce the time it takes to make a craft, the material will be more convenient to pick up; the best version is considered to be a 10 cm copy.