DIY crafts can look beautiful and unusual. Such creativity is especially impressive when the simplest objects are used, which many always have at hand. Crafts made from toothpicks are among such masterpieces of home art. Don’t think that you can do something incredible right away, because such needlework requires a lot of perseverance and concentration. Start with simple things, and then, having gained enough experience, move on to more complex things, which, by the way, can be a wonderful interior decoration.
Children's crafts
Working with toothpicks is a great fine motor practice at any age. And for kids, this is also a wonderful exercise for developing associative thinking. Of course, it is worth taking care of the safety of little artists, because careless manipulations with toothpicks, which have very sharp ends, can be dangerous.
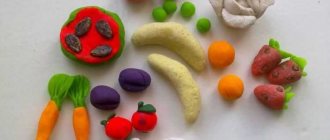
When choosing crafts made from toothpicks as a creative debut for children, pay attention to the first way of working with them, which involves sticking pointed sticks into a three-dimensional base. In this capacity, you can use figures made of foam plastic, plasticine, clay or salt dough, natural material (nuts, pods, cones, etc.) and even fresh vegetables, fruits and berries.
Dollhouse
Previously, such crafts made from matches were very popular. Nowadays, more and more craftsmen prefer toothpicks, which are easier to work with than matches. In this case, a cardboard base is used, on which the toothpicks will be glued.
Work on the house begins with creating a frame. After this, each part is glued with toothpicks. Finally, everything is assembled into a single structure, which can be painted or varnished. Such houses look very beautiful and will decorate the room.
The whole family can work on the house. For beginners, it is better to choose simple huts, and then move on to more impressive objects. You can use toothpicks to create not only houses for children, but also real castles.
Plasticine base
When talking about plasticine base, as a rule, we mean all types of plastic masses - ordinary or polymer clay, salt dough, etc. Of course, it should be noted that figures made with toothpicks should not be exposed to very high temperatures, which means that the clay product cannot be fired. And products made from polymer, self-hardening clay and salt dough can be painted after complete drying.
Organizing work on crafts made from plasticine and toothpicks for the little ones is, first of all, the responsibility of an adult, parent or teacher. Carefully consider the sequence of actions and prepare the required amount of material. You need to take more toothpicks than you need for the craft, since naughty little fingers can drop this small stick, and you shouldn’t interrupt the creative process with a long search for the part.
The basis of such a craft is, as a rule, the torso. Take a piece of plasticine of the desired color, knead it well and give it the appropriate shape:
- round - for hedgehog fish, octopus, satellite, sun or star
- elongated, drop-shaped - for a hedgehog, peacock, dinosaur or dragon
Outline a muzzle or face, but do not do so, so as not to smear it in the process of sticking toothpicks: for now this is just a guide.
Decorate the craft with toothpicks. If they serve as sun rays or a peacock's tail, arrange them in a circle or semicircle in the same plane. Toothpicks are stuck along the back or around the head if they are making a dinosaur or a dragon. The satellite and the octopus will have from 3 to 8 sticks placed on one side. The surface of the starfish, hedgehog fish or forest hedgehog will be studded with them quite densely: toothpicks or their fragments can cover them quite densely over the entire area.
Next, you can begin to design the face and other elements - wings, paws, ears, etc. Toothpicks can also be further decorated, for example, by sticking small multi-colored plasticine balls on the peacock’s tail.
This type of crafts also includes 3D models - volumetric and semi-volume figures, the parts of which are held together using small plasticine balls. In this way, you can make a person or an animal, or build a house, a rocket, or create an original polyhedron - a pyramid, cube, dodecahedron (dodecahedron), etc.
Match chair
Miniature chairs are made from matches and toothpick sticks, which will be a cute addition to the interior or a cute gift.
We list the order of work:
- First you need to place 2 matches on a uniform surface parallel to one another.
- Then they take a pointed stick, cut it in half and place both pieces between the matches.
- The next step is to cut another one and place it exactly in the middle of 2 matches.
- Then the base is made from matches, which will serve as a seat, as well as the front legs.
Next you will need to assemble all the parts. At the final stage, the seat is made and secured to the base.
Foam base
This option is also good as a toothpick craft for beginners. The easiest ideas to implement here are stars, snowflakes and a Christmas tree. The basis for the first and second crafts will be a foam ball, and for the third - a cone.
To consolidate the color, the base must first be painted with gouache or acrylic paints. The toothpicks themselves are painted the same color: for a snowflake - white, for a star - gold or silver, for a Christmas tree - green, blue-white or silver.
An adult craftsman can use aerosol paint by spraying it onto the finished product. But it is better for children under a certain age not to have anything to do with this substance due to its toxicity.
When making a snowflake or star, toothpicks are stuck across the entire surface of the foam ball. The snowflake can be further decorated by pinning small pieces of foam, plasticine or foil on the upper ends of the toothpicks. Ready-made crafts will be a wonderful decoration for the New Year's interior: they can be hung on a Christmas tree, on a chandelier, or hung from the ceiling.
In the same way, you can make a dandelion or an aster, imitate the umbrella of a blooming or dried hogweed - such art objects also fit perfectly into the design of the premises.
When working on a Christmas tree, toothpicks need to be stuck in rows, in a circle, gradually reducing their size. If this is a New Year's toy, you need to insert one toothpick vertically into the top of the cone - it will serve as the basis for attaching decorations (stars, icicles, etc.).
Photo frame made of skewers
Pointed sticks and skewers are used to make cute photo frames (you will need to lay them in several layers for a beautiful effect). In addition to them, thick cardboard, glue, varnish with an acrylic base and a ribbon for decoration are useful for this. First, estimate the number of toothpick sticks, then coat them with varnish. This is done before assembling the frame to ensure that the painting is uniform.
Further sequence of actions:
- The skewers are cut to the required length and carefully filed.
- Then they take a cardboard and form a base from it.
- Next, the skewers are fixed to the cardboard with glue.
The last step once dry is to take some decorative ribbon and secure it to the inside and outside edges of the frame.
Natural materials
Numerous photos of crafts made from toothpicks clearly demonstrate the ardent love of craftsmen of various levels for elements made from natural materials. Getting to know them begins in kindergarten. There they will tell and show how to make a funny figure of a person or animal from nuts, cones, acorns and shells using toothpicks.
So, using the chestnut fruit as a basis, you can make a cheerful spider.
- Flatten a small plasticine ball and fix the chestnut on it.
- Insert 8 toothpick halves at an angle into the plasticine base - 4 on each side - so that they are adjacent to the fruit.
- Attach another 8 halves of toothpicks to the already secured 8 using small plasticine balls, also at an angle, but in the opposite direction.
- Roll up a small ball-head, attach it to the craft, and decorate it with eyes made from plasticine or small seeds.
Zoo
This is a simple option that requires fruits, vegetables, chestnuts or acorns and a little imagination.
Animal figures are assembled from materials; toothpicks can play the role of different parts of the body, such as legs, or needles.
On a sheet of cardboard, using toothpicks, a fence and pens are created for each animal.
Table decoration
Having mastered working with toothpicks and natural materials, it is easy to make a hedgehog from an onion, a lion from new potatoes, and a porcupine from beets. The next step using this technology could be the design of holiday dishes.
- An original addition to an exotic fruit salad will be berry canapés in the shape of funny ostriches.
- But charming pear hedgehogs carry ripe grapes or strawberries on their needles
- Here, cheese boats raise ham sails over toothpick masts.
Creating delicious crafts from toothpicks and various products is so exciting that ideas will not keep you waiting long, and the holiday table will surprise you every time with an unusual design solution, adding fun and joy to the celebration.
Paper flags
For a birthday or a themed meeting with friends, you can prepare colorful paper flags. They decorate a table or a birthday cake. Sometimes different symbols are drawn on them, painted, or stenciled.
There are also many templates on the Internet, just print them out, cut them out and glue them to sticks. The standard shape of flags is often replaced with flowers, hearts or animals. In addition, you can look online at how to make an umbrella out of paper and decorate glasses with cocktails with such crafts.
For home, for family
You can make crafts from toothpicks with your own hands that are not only decorative, but also useful, using both the first and second methods. That is, both by sticking into a volumetric or flat base, and by gluing to the selected surface.
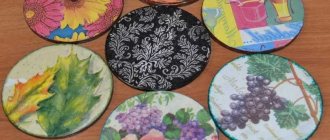
So, when making a charming box, toothpicks are stuck into the cardboard bottom of the chosen shape (circle, square, diamond, heart, etc.) and fixed with glue for strength. Then they are braided with threads, twine, braid or ribbons, the ends of which are also fixed with glue. The design can be complemented with beads, which are strung on toothpicks and braided with the main material. The edges of the finished product are decorated with lace or openwork braid.
Another option for decorating the box involves lining a box made of durable cardboard with toothpicks. In the same way, you can make a photo frame, decorate a sketchbook, notepad, or family photo album. Cover a tin or glass jar with toothpicks and you will have a container for bulk products. Using toothpicks pre-painted with paint or stain or parts of them of different lengths, placing them at different angles, you can lay out a real patterned mosaic. Such beauty is pleasant in any home!
Frame
A sheet of colored cardboard is folded in half. The back side is completely covered with a layer of toothpicks. Front - only along the contour of the pasted photograph.
The blank, in an L-shaped position, is attached to a second sheet of cardboard using glue. The uncovered base is also lined with toothpicks.
All that remains is to cut out two triangles to fit the sides, cover them with toothpicks and place them in place. The resulting base can be left in its original state, or use one of the options:
- Paint, in one color, or apply a drawing;
- Lay out three-dimensional patterns with toothpicks.
The pinnacle of excellence
It is quite logical to believe that complex structures made from toothpicks are direct descendants of matchbox houses, towers and palaces, which enjoyed fabulous popularity in the 80s of the last century. However, the technique for working with toothpicks is still different, in particular due to the fact that the matches are thicker and have a square cross-section.
At the initial stage of mastering “toothpick architecture,” you can use the second method of making crafts from toothpicks: cut out elements from thick but thin cardboard, paste them with toothpicks, trim off their sharp ends, and then assemble and glue the finished structure. The third method - gluing toothpicks together - is more complex and requires maximum concentration and precision of movements.
To understand how to make a craft from toothpicks, you need to carefully study the step-by-step instructions, examine the finished model from all angles, make drawings, calculate all the dimensions, and stock up on a large amount of material and glue that ensures instant gluing.
Current model
The product can serve as a toy if it is equipped with movable parts: the swing will swing on chains, the carousel will rotate, and the well will be equipped with a movable rotator.
- When making a well, toothpicks with cut ends are glued together in the form of a square so that one end of each of them protrudes 2 - 3 mm.
- The next layer is made in the same way, gluing prepared toothpicks to the previous layer, leaving small protrusions in those places where there was an even joint. You can first make all the square modules and then glue them together sequentially.
- Having folded the base in this way, make supports for the brace by gluing together 3 cut toothpicks in a row (the toothpick located in the middle should be shorter than the others). Glue the supports to the opposite walls of the well.
- The brace is made from a toothpick, slightly trimmed at one end. A broken L-shaped toothpick (fix the break with glue!) is glued to the cut side at a right angle. A thread is fixed next to the sharp end, on which a decorative bucket will then be hung. The thread is wound tightly around the toothpick. The rotor is placed on supports.
- To make the roof of the well, glue 2 triangles from cut toothpicks and glue them to the supports from the inside. Cover the roof slopes with toothpicks, fitting them tightly together.
Buildings and structures
It is almost impossible to make a house in this way without a drawing: the slightest mistake will lead to a violation of the geometry and the inability to assemble the structure correctly.
- After drawing a drawing on a sheet of paper, place toothpicks on top of it and carefully glue them together. Do not let glue get on the paper! Trim the resulting wooden wall with scissors or a stationery knife, cutting off the sharp ends.
- Glue the other walls in the same way. To make a doorway, carefully break or cut off the part of the wall where you want to cut the door along the glue line. Cut in the center, across the section, a segment equal to the width of the door. Glue narrowed sections along the edges of the entire upper part of the wall, forming a doorway.
- Window openings are made in the same way, but in this case the wall canvas is divided into 3 parts, and a window is formed in the central one, and then all parts are glued together again.
- Glue the walls. Form the joints by gluing vertical posts made from cut toothpicks.
- You can also use toothpicks to decorate a doorway, or to form frames in windows.
- The roof is glued using the same method.
- The house can be decorated by adding a veranda, balcony and other decorative elements.
More complex, openwork designs are often made by assembling them from numerous modules. In this way you can create fairytale castles, ships, birds and amazing fantastic creatures. Go for it! Make your wildest dreams come true!
Caskets
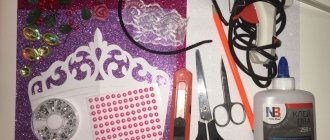
A great gift for March 8th is a homemade box. Materials required:
- toothpicks;
- chains;
- rhinestones;
- foil;
- glue;
- scissors;
- beads.
We cut out the two shapes we need from cardboard:
- square;
- heart-shaped;
- round;
- oval;
- free form.
We make holes along the edges with an awl or a sharp object at a distance of approximately 1 cm. We thread toothpicks into the holes. We thread chains and twine between the toothpicks, put beads on the toothpicks, glue each layer with PVA glue and apply the next one.
You can decorate with rhinestones, fabric and foil designs. The lid for the box can be made from the second mold. We glue toothpicks onto it close to each other, wrap it up, or cover the edges with fabric, cut off the excess, and decorate it as desired.
Photos of crafts made from toothpicks
Thread butterflies
To create small butterflies from toothpick sticks, you will also need knitting threads, superglue, floral paper cord and beads. To begin, fold 2 sticks crosswise and tie them with threads.
Then they continue to wrap them around the corner formed by toothpicks. When the first wing is ready, the thread is fixed. Then they move on to the second wing.
Next, they begin to wind the middle with the same thread lengthwise and crosswise, stretching the threads that form the wings.
They also cut a piece of paper cord and form the head and antennae. Beads are glued to the tips of the wings and a thread of a different color is added for decoration. It is used to make patterns on the wings.
New Year's crafts (Christmas tree, snowflakes)
There will always be original ideas for the New Year, because some people really like to decorate the Christmas tree in unusual ways, and prefer toys that are always made with their own hands. We bring to your attention a snowflake toy that will fit perfectly into any festive interior.
Prepare:
- 8 toothpicks;
- knitting thread (preferably with glitter);
- glue gun;
- marker.
Progress:
- Take 9 toothpicks and make 2 squares. Moreover, the squares should look such that their edges extend beyond the square.
- Use a felt-tip pen to mark the joints.
- Disconnect the structure.
- Apply glue where you marked it and assemble everything into a square again.
- Make the 2nd geometric figure using the same principle.
- Where there are joints, wrap the prepared thread in several layers to achieve volume.
Advice! You can also apply glue under the thread so that it does not fidget, but holds tightly. The end of the thread can also be coated with glue. - When both structures are well dry, attach them to each other, and also apply glue between them. Turn only one square to form a diamond, and leave the second square in a flat position.
- So that the toy can be hung, build a small loop.
An unusual snowflake can be made in another way:
- Find or make a foam ball.
- Insert a large number of toothpicks into the ball.
- You can give the toy the desired color using paint or nail polish.
- Afterwards, immediately sprinkle everything with glitter (this is not necessary if you are using glitter polish).
- When everything is ready, attach a beautiful thread or thin ribbon and decorate the interior.
You can make a Christmas tree out of many of these prickly balls, but in this case you will need to paint them green or silver.
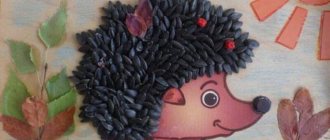
Cute hedgehog made of cones
While walking among the coniferous trees, collect several cones that will be useful to you to create your next hedgehog. The child will also like this idea. This means you can safely begin to implement your plans. For this you will need: black and beige plasticine (or polymer clay), an open medium-sized cone, black beads, PVA glue, toothpicks, a brush and blush.
You can watch a video of a detailed master class on how to make a beautiful hedgehog on the Internet or use our tips for step-by-step implementation of the craft:
- brown plasticine needs to be kneaded thoroughly, since it is easier to work with plastic material;
- then form a ball and secure it in a cone shape on the flat bottom of the cone in the form of a muzzle, and the cone will be a body. Pull the pointed edge of the muzzle cone slightly up and attach a small black ball to the tip to make the nose funny;
- Next you need to make ears and paws using brown plasticine. Grooves made with a toothpick will help make the paws and ears more realistic. Fix the paws securely, because the stability of the craft depends on this;
- draw a mouth with a toothpick, rouge the cheeks to make the hedgehog come to life;
- Attach a plasticine mushroom or a juicy apple, an acorn or a yellow leaf to the needles.
What parts are needed?
Of course, it is possible to strictly use toothpicks, threads and cardboard, but if you want to further decorate the box and also get a higher quality product, then you will additionally need to take:
- heat gun;
- colored paper;
- PVA glue;
- decorative decorations.
note
For decoration, options such as sparkles, beads and much more can be used.
How to create the most delicate box from cardboard, toothpicks and thread
In order to make a beautiful box that will delight with its aesthetics, it is necessary to use a small amount of the most affordable components. Namely, the next option is a combination of toothpicks, cardboard and thread.
It would seem like very ordinary components, but in reality they can provide an exciting combination; you just need to know how to connect all the elements.
- What parts are needed?
- Carrying out the box
- Individual finishing crafts
Safety precautions
First of all, you need to choose a suitable workplace.
It should be comfortable for the child, well lit, and there should be enough space to arrange all the tools and materials.
It is better to remove all foreign objects so as not to distract the child and not spoil them during work.
It’s good if mom or dad can sit nearby, help the baby, give him hints and just enjoy the joint activity.
A toothpick is a fairly sharp object, so you need to make sure that the child does not get hurt during the process. The same goes for scissors and other tools.
Before getting started, parents should talk to their child about how to properly handle these items. Particularly complex and traumatic operations are best performed by an adult.
It is better to cover the working surface with oilcloth or newspaper; this will prevent it from becoming dirty, and cleaning will take much less time.
Master class “Box for small items” (from waste material)
Vera Andreevna Sukhanova
Master class “Box for small items” (from waste material)
Hello, dear colleagues! Congratulations on the upcoming holiday - Preschool Worker's Day!
It's time to think about gifts. And the best gift is the one made by yourself. I was going to make a box for small things , but in the end I made two of them, because my sister worked in preschool education all her life, and I will give the second box to a friend .
For production we will need:
Cardboard from technology boxes
Cardboard from candy boxes (for lids)
Twisted colored paper sticks