How to make a rose from maple leaves with your own hands step by step: master class
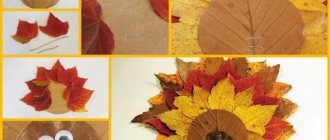
For those who love roses and crafts made from natural materials, tips on creating artificial bouquets from maple leaves . Their shape and structure lends itself perfectly to work. In addition, you can collect leaves completely free of charge in the park with your children - this is interesting and useful for spending time together.
For work, both fallen yellowed and still green leaves will be useful. You can twist them into such a beautiful bouquet that its beauty can outshine even real roses. In addition, a bouquet of leaves is durable . We can safely say that such a craft breathes “second life” into dry foliage.
Maple foliage is an ideal material for creating bouquets
Work step by step:
- Take a nice, smooth, clean sheet, place it in front of you and fold it in half. (see photo No. 1)
- Roll half the leaf into a tube. This should not be done too tightly, because the flower needs to be lush and voluminous. (see photo No. 2)
After the core of the flower is ready, you need to start creating petals from other leaves.
Work step by step:
- Take the second maple leaf
- Place the core inside the sheet
- Alternately fold the sharp edges of the leaf so that when folded you get petals (see photo No. 1)
- After you have completely rolled the sheet, you can secure it with thread. (see photo No. 2)
- In order for you to get a voluminous and lush rose, you will need to roll about five or six maple leaves into one flower. (see photo No. 3)
- Secure each new rolled leaf with regular sewing thread, and make several flowers for the bouquet. (see photo No. 4)
Step-by-step rolling of roses from maple leaves
To make a flower wrapper, wrap the bouquet in several maple leaves so that their sharp edges stick out in a circle.
Tube (wrapper) for a bouquet of roses made of maple leaves
Bouquet with three roses from maple leaves
Fourth method
It is most likely suitable for joint creativity with a child, because it is very simple and does not require special skills.
Material and tools:
- leaves (children will have fun collecting them with you);
- thin branches for the stem;
- cardboard;
- PVA glue;
- green paint, preferably acrylic, but gouache and watercolor are also suitable;
- brush;
- half-liter glass jar;
- piece of fabric;
- rubber;
- satin ribbon.
We glue the leaves onto a piece of cardboard in a circle, overlapping them, and choose the largest ones.
We take a little smaller leaves for the next row and place them in a checkerboard pattern relative to the previous ones.
The third, and for our example the last, row can be made of three small leaves, or we can take petals of dried flowers.
We can cover the middle with a bead or rhinestone, or we can glue a very small sheet and paint it. A piece of fabric is used here.
While our flowers are drying (choose the quantity yourself), we paint the branches green.
When all the parts are dry, attach the flowers and individual leaves to the branch.
Now let's take care of the jar. We decorate it with fabric, securing it at the neck with an elastic band, and covering the fastening with a satin ribbon.
We place our flowers in a transformed jar. Although, if desired, it can be replaced with a beautiful vase.
As you can see, there is a ton of potential in fall foliage. You can create amazing bouquet arrangements by adding additional decor in the form of berries, dry herbs, pine cones, etc.
How to make a bouquet of roses from maple leaves with your own hands?
Maple leaves in the autumn season are distinguished by a variety of rich color shades:
- green
- yellow
- orange
- brick
- burgundy
- red
- brown
- brown
The more colorful foliage you use to create a bouquet, the brighter and more beautiful your bouquet will turn out.
You can stick to one shade of foliage to get. For example, only yellow or red roses. But it is much more interesting to work with completely different marbled leaves.
Yellow roses from maple leaves:
- Take a small leaf and fold it in half
- Gently roll the sheet into a tight tube
- Take a large maple leaf and place a curled leaf in its center.
- Turn the big sheet back
- Start rolling the leaf so that voluminous petals grow around the core.
- Secure the product with thread
- Roll a large number of roses into a bouquet
- Wrap the entire bouquet with wedge foliage to make the product more luxurious.
Step 1: Rolling up the center of the bud
Step 2: Rolling the sheets around the core
Step 3: Rolling the Petals
Step 4: Adding Volume to the Flower
Step 5: Secure the Rose with Thread
Step 6: Creating roses for the bouquet
Step 7: Adding splendor to the bouquet
Another variant
This option also consists of roses, but the folding of the leaves is different.
Here's what we need:
- 10 maple leaves of different sizes and colors per flower. They should be slightly dry, even freshly fallen, as they will be more plastic;
- right there in the forest you can pick up twigs, they will go into stems;
- green tape;
- scissors.
We take the smallest leaf and turn it with the inside facing us. Folding the tops, wrap them into a roll. We get the middle of the flower, as shown in the photo.
Related article: Jute filigree: patterns, manufacturing technology for beginners
We take the second leaf, bend the middle top and apply it to the bud. Then, bending the edges of the sheet one by one, we wrap it.
This way we attach the leaves. It is better to apply them in order of increasing size and overlap.
We can secure the finished flower with thread. We attach a twig to it, wrap it with tape from the base of the flower and along the entire length of the stem.
We combine all the resulting flowers into a bouquet. We can decorate at our discretion.
How to make flowers from maple leaves with your own hands?
The soft maple leaf lends itself perfectly to rolling. You can use it to make a lush rose or a thin bud.
Ideas for creativity, folding flowers from maple leaves:
Roses from maple leaves, option No. 1
Large round roses made of maple leaves, option No. 2
Red roses with a green stem of maple leaves, option No. 3
Multi-colored roses made from colorful maple leaves
How to make a bouquet of flowers from maple leaves with your own hands?
The secret of an elastic flower from maple foliage is soft leaves that have not yet dried out so much that they break and burst. Fresh green leaves also roll very well.
Maple leaves that are harvested in November are good for crafts - high air humidity and frequent precipitation do not allow the leaves to dry out.
Each leaf that you roll to make rose petals should be secured . This is done with ordinary thin sewing thread or tape . Just pull it tight without tying it in a knot.
Bouquets of maple leaves:
Colorful bouquet of maple leaves and barberry
Bouquet with lush roses from maple leaves
A bouquet of a large number of roses made from maple leaves. A bouquet of dry maple leaves.
Arrangement of bouquets with vegetables and fruits
Carefully select neat, not very large fruits, stock up on skewers.
Use of fruits
- Take tangerines, mount them on skewers, add rowan berries. Decorate with floral ribbon.
- Apple bouquet flavored with asters, bird cherry, rowan in a birch bark stand.
- A lush composition of rowan, coniferous paws, connected into a bouquet.
- By covering the apples with gold, we add chic to the bouquet.
- The combination consists of fruits, berries, cones, set in a pumpkin (zucchini will do).
- The bouquet included our leaf roses and apples.
Vegetable bouquets
Even from two garden beauties - pepper and garlic - with the help of imagination it is not difficult to make attractive crafts. The picture shows the result.
The free space is masked with rowan berries. Want to keep it in style? Limit yourself to cabbage and succulents.
Here is a kind of backing made of rolled leaves, complemented by earrings bent down. Here the beauty and liveliness were provided by painted spikelets.
Pumpkins make more than just a carriage
We are not wizards, but pumpkin is perfect for us to create a vase. Flowers will last a long time in such a vessel with water, but they need to be strengthened. A floral sponge or a smaller container placed in the vegetable will help.
The pumpkin is freed from the pulp, a sponge is installed in its place and filled with water. The base for the bouquet is ready. It is useful not only for fresh flowers, but will support any composition. Color-matched ribbons and braid will add elegance.
Any craft will bring pleasure in the creative process and joy from the skills acquired. All invented, created bouquets, selections, compositions will decorate any room, turning it into a cozy corner. The most beautiful handicrafts and fantasies can act as gifts.
How to save maple leaves for crafts?
The well-known method of preserving a maple leaf by putting it in a book , unfortunately, is not suitable for preparing material for creating flowers. In this way, the leaf dries out and makes it quite brittle.
There are other ways to preserve maple leaves:
- Leaves can be waxed . To do this, melt the wax of one candle on the stove or in the microwave. After this, the sheet is dipped alternately into hot wax on both sides.
- The paraffin sheet should be left on the newsprint to dry and absorb excess wax.
- The sheet may darken, but will retain its softness, which is very useful for crafts.
- You can also “bathe” the leaf in a glycerin solution. To do this, dissolve half a glass of glycerin in a glass of water.
- The leaves are completely dipped and then tied and hung to dry. The sheet should be dried for about four days.
Features of creating paintings
Creating compositions from dried flowers belongs to the decorative style of floristry. This does not require special skills or expensive materials. The raw materials will be gifts of nature that fit on a flat surface. These can be dried plants, seeds, flowers, petals, stabilized moss.
The panel assembly process is very simple. Dry plants are laid out on canvas or paper, forming a harmonious composition. For fixation, glue is used, in some cases double-sided tape. This picture is left to dry. After which it is placed in a frame under glass to extend its service life and prevent the accumulation of dust on the inflorescences. Despite the simplicity of working with dried flowers, the technique of creating oshibana panels has some secrets.
