New Year's holidays are ahead and it's time to start decorating. You can make decorations for the New Year from a variety of materials, such as paper, beads, pine cones, and even old CDs. But in this article we will talk about New Year’s crafts made from satin ribbons. Crafts can be simple or made using a special Japanese technique - kanzashi.
Herringbone
Let's start our crafts according to tradition with the symbol of the New Year - the Christmas tree. Some people prefer to put up a large Christmas tree, while for others such a pleasure is an unaffordable luxury (pets or small children consider it their duty to knock over a forest beauty decorated with lanterns and New Year’s garlands). It’s okay, you can decorate your apartment with a miniature Christmas tree, which can be made from satin ribbons.
#1 Making a Christmas tree from ribbons with children
If there are small residents in the house, they must participate in the decorating process. Plus, creating together is a great time! Every child can make such a simple Christmas tree from a dry stick and various ribbons.
#2 Miniature Christmas tree made of ribbons
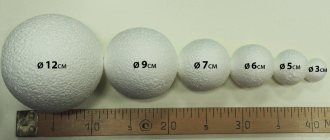
And here is a more complex version of the Christmas tree made from ribbons. This craft can be used to decorate not only your home, but also, for example, your desktop. To make it you will need ribbons, a foam cone, a lot of safety pins and a bow for the top. See the picture below for a step-by-step master class.
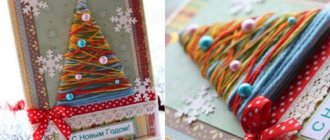
#3 Christmas tree made of ribbon and beads
You can make a Christmas tree from ribbon, combining it with large beads. This craft can be hung on a real Christmas tree or given to someone as a souvenir. See step-by-step photo instructions below.
#4 Christmas tree in kanzashi style
And here is a mini Christmas tree made using the kanzashi technique. You will have to tinker with such a craft, because Japanese technology is for patient needlewomen. This craft will take a lot of effort and time, but the result will be truly impressive! Petals made from satin ribbons are glued onto a paper cone using glue. Additionally, the finished tree can be decorated with beads. By the way, the Christmas tree does not have to be monochromatic; you can combine colors to your taste.
#5 Christmas tree made of flowers using the kanzashi technique
But here is a very similar craft to the previous one, but there is only one difference: Christmas tree No. 4 is made from individual petals, and this Christmas tree is made from flowers. First you need to make petals from ribbons, then glue the flowers (5 petals each), and only then glue the flowers to the paper cone. See step-by-step instructions with photos below.
#6 Christmas tree hairpin using kanzashi technique
Using the kanzashi technique, you can make various decorations, in particular hair clips. For such a hairpin you will need: hairpin, ribbons, beads. See below for how to make a hairpin.
#7 Herringbone ribbon hairpin
Here is another original way to decorate a hair clip with ribbons. The result is a miniature Christmas tree that will perfectly complement the New Year's image. How to make a hairpin, see the picture below.
#8 Herringbone hairpin
You can also decorate a hairpin in this simple way: with an ordinary narrow ribbon and a star-shaped bead. It’s so easy to make ordinary hair accessories truly festive, and our step-by-step master class will help you with this.
#9 Kanzashi Christmas tree made from ribbon - a souvenir for the New Year
#10 Christmas tree made of ribbons
Look for more Christmas trees:
DIY ribbon Christmas tree
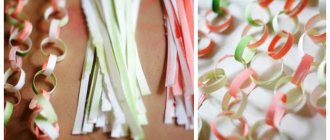
To create such luxurious voluminous miniature Christmas trees to decorate your home interior for the New Year, you will need: ribbons, scissors, a cone made of polystyrene foam or floral foam (you can make a cone out of cardboard), pins and scissors.
Cut the ribbons into small pieces of equal size and wrap them in a loop. Now, starting from the very bottom of the cone, begin to create a lush crown of the Christmas tree.
You can use ribbons of the same color or combine different colors, thereby creating unique and interesting patterns.
Snowflakes
From ribbons, especially using the kanzashi technique, incredibly beautiful snowflakes are obtained. You can decorate not only a room with such a craft; a snowflake made from ribbons can be hung on a New Year tree or used as a decoration.
#1 Simple snowflake using kanzashi technique
It is best to start your creative journey in Kanzashi with simple crafts, such as this snowflake. You can master two types of sharp petals without much difficulty. By the way, you can glue the petals in your own way. Well, look at the author’s version on the step-by-step MK.
#2 Another simple kanzashi snowflake
And one more option for a not-so-complicated snowflake using the kanzashi technique. By the way, such a craft can be attached to a headband or hairpin and complement the New Year's image with an unusual handmade decoration.
#3 Snowflake kanzashi on the headband
Need to complete the look of a little snowflake? A snowflake using the kanzashi technique on the headband will cope with this task with a bang. Step-by-step MK in the picture below.
#4 Snowflake using kanzashi technique with several types of petals
This craft is more suitable for experienced needlewomen. To make a snowflake, a large number of petals are used, the production of which requires special skills. Well, if you are confident in your abilities, then watch MK and create!
#5 Snowflake made of ribbons and beads
And here is a version of a kanzashi snowflake with bead decoration. In addition to painstaking work with ribbons, you will also have to work with beads and weave a small flower. Please note that this craft includes several types of petals, each of which has special manufacturing features. See the picture below for a step-by-step master class.
#6 DIY snowflake made from ribbons
Snowflakes made using the kanzashi technique look unique, but a snowflake made from pieces of ribbon looks no less impressive. To make it you will need tape and a lighter (you can use a candle) to solder the parts.
#7 Christmas tree toy Kanzashi Snowflake
#8 Double-sided Snowflake made of narrow satin ribbon
#9 New Year's snowflake kanzashi with curls
#10 Headband Snowflake kanzashi made of satin ribbons
For more snowflakes, see the article:
Master class on making a kanzashi Christmas tree. 1st option
To make it you will need:
- fabric glue;
- tweezers;
- a sheet of cardboard for the cone;
- satin ribbons for creating petals;
- beads for decoration;
- candle or lighter.
Find out how to decorate your home for the New Year 2022, in what colors to set the festive table and how to decorate the Christmas tree for the holiday.
Read about Christmas toys made of felt in this article: Christmas tree decorations and simple gifts can be made with your own hands even from very small scraps of fabric.
When you have prepared all the necessary materials, you can begin to get creative.
Photos of making various necessary elements using the kanzashi technique
Step one. Make the base for the Christmas tree . To do this, roll a cone and a base out of cardboard, securing it with glue.
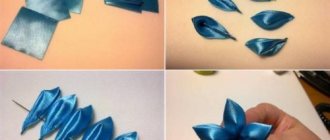
Step two. Start making two types of petals - narrow and round. To do this, take a green satin ribbon 3 cm wide. In general, the color is not important; you can experiment by creating an avant-garde Christmas tree of any color.
Step three. Cut the ribbon into squares.
Example of a narrow petal [ads-mob-3][ads-pc-3]
Step four. Creating narrow petals. Fold the square in half, then in half again, and in half again so that all the raw edges end up at one point. Now you can solder them using a candle or lighter. The narrow petal is ready! Having created a sufficient number of them, you can begin making round petals.
An example of making a round petal
Step five. Creating round petals. Fold the square in half, and then fold the corners of the resulting triangle towards the middle. Turn the petal over with the back side facing you, and fold the corners towards the center again. Fold the petal in half and seal the ends.
When creating the petals, remember to ensure that all the raw ends are always at the same point. Then you will definitely succeed!
The number of petals will depend on how tall you are going to make the Christmas tree.
Step six. When you have made enough petals, you can start gluing the petals to the cone, starting from the base, alternating between sharp and round petals .
It is better to decorate the very last row only with narrow petals.
Step seven. Christmas tree decoration . When all the petals are glued on, decorate the Christmas tree to your taste. To do this, you can use beads, round buttons, sparkles or any other decorative elements. The top of the head can be decorated with a star.
Step eight. Making a stand for the Christmas tree . For it, you can use a plastic cup or a round plastic bottle of shampoo or shower gel. Cut it to the desired size and cover it with fabric or colored paper of your choice. You can cover the stand with decorative cord.
Instead of a star, you can put a bow on the Christmas tree
You can create such a tree together with your children by taking on the job of soldering the ends . Trust them to roll the petals. Even if they are still far from ideal, such a Christmas tree will become an invaluable souvenir. It can be presented to grandparents or godparents. Believe me, they will be very pleased!
See what kind of Christmas tree decorations you can make from felt: any, even the smallest pieces and remnants of fabric are suitable for making.
A detailed article and MK on kanzashi snowflakes is here - a detailed technique of implementation, with video instructions and clear photographs.
Find out what Christmas tree decorations you can make with your own hands at:
[ads-mob-4][ads-pc-4]
Wreath
The Christmas or New Year's wreath is an exclusively Western tradition that came to our homes from Hollywood films. Well, for those who accept Western values, we have prepared several master classes on creating wreaths from ribbons.
#1 New Year's wreath made of bows
A very simple ribbon wreath for the lazy. To make it you will need a base and ribbons of different colors. Tie the ribbons into bows around the base and the wreath is ready!
#2 Braided ribbon wreath
You can weave a wreath from ribbons. This product looks very impressive, but in fact there is nothing complicated in its manufacture. Follow the step-by-step instructions and you will succeed!
#3 Miniature New Year wreath using kanzashi technique
A mini wreath can be made from kanzashi petals. You need to make basic petals from ribbons, glue them in threes and connect them into a circle. The finished wreath can be decorated with a miniature bow.
#4 Miniature wreath made of ribbon and beads
A miniature wreath made of ribbon and beads can be hung on a Christmas tree as a decoration, or you can give it to someone as a handmade New Year's souvenir. To make it you will need fishing line, ribbon and beads. You can also use additional decorative elements, such as a pendant and a bow.
#5 Ribbon wreath for kids
Surely in kindergarten they gave me the task of doing some kind of New Year's craft with the children. Take note of this simple Christmas wreath. You will need: a base for a wreath, many pieces of different ribbons, glue.
#6 Christmas wreath of satin flowers
And here is a version of a New Year's wreath made of satin flowers. The flowers turn out to be very realistic and it seems that making such a wreath will take a lot of time. Actually this is not true. Making such a craft from ribbons is quite simple. You can verify this through MK.
#7 Ribbon wreath: making New Year’s crafts with children
Here’s another great option for a New Year’s craft that kids can handle. You will need: a base, many ribbons of different colors and sizes, scissors. Cut the ribbons into strips of equal length and tie in knots around the base. The wreath is ready!
#8 Simple wreath made of satin ribbons
a very simple wreath made of satin ribbons. To make it you will need: a foam base, tape, safety pins or glue. Wrap the piece with ribbon and decorate it as you wish: with a bow, a snowflake, or leave it like that.
#9 Christmas Wreath Kanzashi
#10 New Year’s wreath “Snowman” made of ribbons
You'll like it:
Decoration for a small Christmas tree in the form of a snowflake
Before the New Year, all houses will definitely have decorated Christmas trees, decorated with garlands, toys, streamers and tinsel. Some people prefer to buy a large tree, the length of which reaches the ceiling, while others modestly place a small artificial tree on the table to bring a touch of holiday to their room. And you definitely need to put something under the Christmas tree, that’s the custom. Usually these are figures of Father Frost and Snow Maiden, or snowmen. We offer another option - a snowflake on a stand, which will perfectly complement the interior of a winter fairy tale. Let's take a closer look at how to make a beautiful snowflake. The accessory can also become a decoration for the Christmas tree, if you do not use a stand, but attach a loop of lace.
Let's look separately at the list of accessories that will be needed for the stand and for the snowflake top.
Materials for the stand:
- 1 piece of blue grosgrain ribbon - 2.5*19 cm;
- 1 piece of openwork lace “Mesh” white – 2*19 cm;
- foam reel from tape;
- 2 circles of silver glitter foamiran;
- blue tire.
For a delicate snowflake:
- 6 pieces each of blue satin and silver brocade - 5*5 cm;
- 30 pieces of white satin ribbon - 2.5 * 2.5 cm;
- 6 pieces of blue satin ribbon - 2.5 * 2.5 cm;
- silver hugger - 1.8 cm in diameter;
- blue half bead - 8 mm in diameter.
Modeling a snowflake is demonstrated using an elegant blue and white color scheme. Although you can make beautiful winter products using other ribbons. If your plans include creating a Christmas tree decoration, then there is no need to make a stand, then simply ignore the first part of the list of accessories, instead add a piece of silver cord or a thin satin ribbon.
Snowflake Kanzashi step by step
1. To make the drum stand, use a foam spool, silver glitter foam, and a compass or circle template. Cut out 2 sparkling circles of the same size. You can attach the foam cylinder itself to the sheets and circle it twice so as not to blindly select the diameter.
2. Glue silver circles on both sides of the cylinder. Prepare a blue rep ribbon and a white “Mesh” strip. The dimensions indicated in the list are selected so as to cover the side wall of the drum without gaps. Also cut 2 pieces of the blue tire.
3. Glue the blue rep on the side wall first, then the mesh. Improve the junction at the top and bottom with a tire. Trim off the excess. The stand is ready.
4. To make snowflakes you need to make beautiful petals. The central ones are sharp double ones, modeled from blue ribbon and silver brocade. In large petals you need to insert triple parts in the form of small white petals. Additional blue and white shamrocks would also work as an outer layer. Fold large 5 cm blue and silver squares in half twice.
5. Combine triangles of different colors in pairs and curl them into a petal, leaving the silver inside. Trim the bottom.
6. Use small white 2.5cm squares to make small sharp pieces. Glue them 3 pieces together. In total, you will need 6 of these parts, the same number as the silver-blue main petals.
7. Glue the white structures inside the main petals. And also glue the main part of the snowflake.
8. And another portion of shamrocks will be made from white and blue small petals. Collect triple fragments, placing the blue color in the center.
9. Glue a hug with a blue half-bead to the center of the beautiful design. Cut out a circle from felt.
10. Glue the circle underneath. Insert beautiful blue and white trefoils into the grooves between the large rays. The snowflake is ready. If you have prepared a lace, it is better to glue it under the white felt.
11. If you made a stand, then glue your product on top of it. Nothing more is needed.
New Year's fantasies are inexhaustible. You don’t need to wait for a fairy tale; you can start creating it with your own hands today. Preparing for the winter holiday is the most enjoyable time.
Balls and other Christmas decorations
Ribbons make very beautiful Christmas tree decorations, for example, balls, bells, cones, lanterns and more. We have found simple and complex MKs for you, with which you can create the Christmas tree of your dreams!
#1 Simple New Year's ball made of ribbons
To create such a Christmas ball you will need: ribbons, safety pins, foam blank. Roll the ribbons into a ring and secure them to the workpiece with a pin. Continue until the entire ball is decorated with ribbon rings.
#2 Christmas ball made of satin ribbons
To make such a ball you will need: a foam blank, tape cut into strips slightly larger than the diameter of the blank, two safety pins.
#3 New Year's ball made of ribbons using the artichoke technique
And here is a slightly more complex version of the craft. The whole difficulty actually lies in the fact that you will have to spend your time. You can arrange the colors to your taste, and you can learn the secrets of the “artichoke” technique from the step-by-step MK.
#4 Christmas ball made of ribbons
Here is another option for decorating a blank with a narrow ribbon. This MK uses glue instead of safety pins, and there is no need to cut the tape itself into pieces. The tape is wound obliquely through two points on the surface of the ball. Each time you pass the tape through one of these points, drop a drop of glue and secure a new layer. Step-by-step photo instructions are given below.
#5 Artichoke style cone
From ribbons you can make not only a ball, but a cone, for example. To do this, you will need a special blank, ribbons of a suitable color and safety pins in large quantities. Cut the ribbons into equal squares, wrap them into a triangle and secure them to the workpiece with a pin.
#6 Ribbon cone
And here is another version of a ribbon cone, only easier to make, but no less effective. To make it you will need a cardboard blank, a narrow ribbon of a suitable color and glue. The step-by-step process of making the craft is shown in the photo below.
#7 Icicle for Christmas tree made from ribbon
A very simple craft. To make such an icicle you will need a narrow ribbon, a pencil and thread. Wrap the tape around the pencil, secure it and leave it overnight. In the morning, remove the ribbon, sew on a thread and you can decorate the Christmas tree!
#8 Bell and lantern made of ribbons
#9 Kanzashi lanterns
#10 Kanzashi Christmas tree cones
#11 Christmas balls for the Christmas tree made of narrow ribbon
#12 Kanzashi Christmas balls without base
#13 New Year's ball kanzashi
See more ideas for New Year's balls:
Christmas tree ball made of sharp kanzashi petals
Kulikova Anastasia suggests making a New Year's ball from sharp kanzashi petals from satin and brocade ribbons 2.5 cm wide. The decoration is as follows. Sharp petals are made from satin and brocade ribbons; on a base with a diameter of approximately 6 cm, you will need 24 brocade petals and 100 pieces of satin ribbon. Having secured the mount to the base, you can begin gluing the petals. They are placed in rows with a slight offset, this creates a spiral effect.
Angels
Angels for the New Year also came to us from the West. However, the New Year holidays are followed by Christmas, and if your family is one of the believers, then why not make a craft for the future, especially since the ribbons make very cute angels.
#1 Simple angel made from ribbons
If you do handicrafts with children, especially those of preschool or primary school age, then be sure to take note of this simple but completely original craft made from ribbons. You will need tape, a stapler and beads.
#2 Angel for the Christmas tree or for table decoration
Here’s another very interesting craft that can be hung on a Christmas tree or decorated with a Christmas table. You will need a wide ribbon, a bead, a piece of wire (for the halo) and decorative elements.
#3 Angel using kanzashi technique
#4 New Year's Angel
#5 Mini Christmas Angel Kanzashi
History of kanzashi technique
Homemade Christmas tree made from ribbons, decorated with bows.
The kanzashi technique came to us from Japan. Initially, this technique was used to make hair jewelry worn by Japanese and Chinese women. Sometimes such decorations turned into real works of art.
Photos of multi-colored Christmas trees in kanzashi style
Due to the fact that Japanese traditional attire did not allow any bracelets or necklaces, hair ornaments played a very important role. Sometimes the cost of decorating a hairstyle was equal to the cost of an expensive silk kimono.
This technique is still popular today. With its help, they create both simple decorations and entire flower arrangements. Very beautiful and...
The tsumami kanzashi technique has also found application in the creation of New Year's accessories, Christmas tree decorations and, of course, a decorative mini-Christmas tree. It attracts the eye with its precision, accuracy and beauty.
Bow
What's New Year without gifts? What is the most important thing in a gift? Well, of course attention and packaging! A beautifully wrapped trinket will bring much more pleasure! A chic bow, which you can make yourself from ordinary ribbons, will help complete the gift wrapping.
#1 Christmas ribbon bow
A variation of the classic Christmas bow made from thin ribbons. This bow will be a great addition to any gift. How to tie a Christmas bow from ribbons, see the photo instructions.
#2 Double ribbon bow for gift wrapping
Or here is another original version of a double bow. It’s quite simple to tie, but it makes a lasting impression! You will find a step-by-step MK below.
#3 Bow flower
A delicate bow in the shape of a flower will be an excellent addition to a gift for a loved one: mother, sister, best friend. You will need a satin ribbon, a needle and thread and a bead for the core. See below for how to make a bow.
#4 Large ribbon bow
And here is a big bow to decorate a massive gift. This bow can be used to decorate absolutely any gift, for example, for a loved one or a work colleague. It looks cool and is very easy to do. Step-by-step photo instructions are given below.
#5 Flower bow made from narrow ribbon
You can make a charming flower bow from a narrow ribbon using glue and a button. The perfect addition to a gift for your best friend, sister or daughter.
#6 DIY voluminous bow
Here is a version of a universal bow that can be used to decorate any gift. You will need tape and our master class.
#7 How to tie a simple bow
#8 How to tie a fancy ribbon bow
You will also like New Year's packaging ideas:
Delicate snowflake
Of course, the New Year is not complete without the Kanzashi snowflake, which is the main decoration and symbol of this holiday. You can make it for the New Year with your own hands, which will double the New Year's spirit. Such snowflakes are made both plain and multi-colored. The main thing is not to be afraid to experiment.
This master class entails the purchase of some accessories:
- ribbons of white and sky shades;
- scissors;
- lighter;
- beads;
- thick fabric;
- glue gun or glue.
We cut light ribbons into squares, five centimeters in size. Now, you need to make rounded petals from them, twelve in number. For the technique of their creation, look at the video that can be found on the Internet. A petal with a pointed end is made from ribbons of a heavenly shade. You can also watch how to make it using video materials and previous master classes. There should be thirty of them.
From a dense fabric, cut out a circle with a circumference of 3 cm and glue 6 round and light petals onto it.
To make a decoration in the shape of a snowflake, make 6 blanks with your own hands, consisting of one round petal and two elements with sharp ends. Connect them with glue as shown in the photo.
Glue each three-ended element to the white flower by applying a little glue to the edges of the round petals, holding the design with your hands.
While your New Year's kanzashi decoration is drying, make pointed petals, three pieces in one element, numbering 6 blanks. Attach them to the snowflake in the same way as the previous petals, in the kanzashi style.
At the end, completing the New Year's master class, decorate the snowflake with white beads, which are glued to the middle and along the edges.
Such wonderful New Year's kanzashi decorations will become an indispensable attribute of your holiday.
Other crafts
You can make an incredible number of different crafts from ribbons and collecting them all in one place is simply impossible. But we tried to find as many different options as possible so that you can get inspired and create your own masterpieces. And next year, perhaps your master class will be on our website!
#1 Crown
Crowns for little snowflakes and princesses can be made from ordinary ribbons. The crown can be made using the kanzashi technique (for more experienced craftswomen) or a simpler technique.
#2 Crown made of ribbons and tulle
#3 Kanzashi crown made of narrow ribbon
#4 DIY New Year's crown, tiara made from bias tape
#5 Postcard
You can make a New Year's card from ribbons. For example, folding a narrow ribbon in the shape of a Christmas tree. You can decorate with beads or colored buttons.
More New Year cards:
Christmas ball made of ribbons
In every home, the New Year tree is always decorated with multi-colored balls. This master class, which is suitable for beginners, tells how to make a ball using the kanzashi technique. To do this, you will need the following accessories:
- colored sections of satin ribbons;
- pins;
- matches;
- needle and thread.
Before starting the master class, decide which ball you will take. It can be a tennis ball or a ping-pong ball, or you can sew it yourself from fabric filled with padding polyester. We cut eight squares, scale 5 by 5, and sixteen more elements. Fold all the pieces in half and iron them, this will help to sew them correctly.
With your own hands, find the poles of the ball and pin squares to it, as shown in the photo.
The ironed elements are folded into a triangle and pinned with sharp edges in the central part. Do these manipulations on both sides at once.
Sew all the corners with a needle and thread, masking them with a bead. Then, sew all the other edges as shown in the photo.
In the same way, pin a ribbon of a different color to the New Year's ball. First of all, the corners are attached, and then everything else, in the end, should look like an asterisk.
We sew the corners again and hide them under the bead, and then sew the edges so that the fabric does not stick out when the ball is hung on the tree. The third tier is already being done by inertia. Cut a strip of fabric to mask all the side irregularities. It needs to be sewn on so that it does not move out.
Take the golden braid and attach it around the entire circumference of the craft and ribbon. Make several loops in the upper part until a bow is formed on which the ball will be hung. Look at the decoration on the Christmas tree, we got it. Such a ball can even be hung on doors and chandeliers to give the atmosphere a New Year's mood.
DIY New Year cards: 30+ cool ideas
Published: December 20, 2017
The best gift for the New Year is, of course, a gift made with your own hands. And if socks or a sweater are not an option for you at the moment, then even a child can handle a postcard. A DIY New Year's card is suitable as a gift for absolutely everyone: friends, relatives, dearest and closest people. New Year's cards can be complicated […]
#6 Candy
As a mini souvenir for the New Year, you can make candies from ribbons. You will need a narrow ribbon of two or more colors, and then it’s a matter of technique!
#7 New Year's garland of ribbons
You can use ribbons to make a cool New Year's garland for room decor. To create this you will need wide ribbons of different colors and thick thread. Finished flags can be glued to a thread or sewn on. But sewing by hand takes a long time, so if you have a sewing machine, be sure to take advantage of its capabilities.
You may be interested in:
DIY ribbon Christmas tree
To create such bright and unusual New Year's beauties, you will need a piece of wood, polystyrene foam or floral foam (for the stability of the craft), one wooden skewer, decorative ribbons, and thin wire.
First of all, we create the basis for the future Christmas tree. We stick a wooden skewer into a stand (foam, floral foam or wood).
Now we cut the ribbons into small pieces, glue a thin wire to the center of each piece of ribbon (you can also grab it with threads if there is no glue). We cover the wire with pieces of ribbon (they can be sewn, glued with glue or with double-sided tape). It is recommended to heat the edges of the tape to make them look neater.
You can also replace satin ribbons with decorative tape.
Now we tie the finished ribbons with wire inside onto the base of the future miniature Christmas tree.
The top can be decorated with a large bead, brooch or Christmas tree toy.
Using the same principle, you can make Christmas tree decorations in the shape of a Christmas tree. To do this, take a neat dry twig as the basis for the Christmas tree and tie pieces of ribbon onto it.
For aromatic connoisseurs, the regular branch can be replaced with cinnamon sticks.
You can make amazingly beautiful Christmas tree decorations in the form of a Christmas tree from ribbons if you have beautiful beads available. String beads and ribbons onto a thick thread, following a certain pattern that creates an exquisite pattern (see photo).
DIY Christmas garlands: 60+ ideas on how to make a garland
Published: November 10, 2017
New Year is the most beloved holiday, associated with miracles and magic. Celebrating the new year is characterized by folk festivals and joyful meetings. It is impossible not to love this time of year, when everything around is transformed, and every house or storefront becomes like the scenery of a fairy tale. Everyone wants to participate in this transformation, and therefore they try to decorate their homes […]
Help us improve: if you notice an error, select a fragment and press Ctrl+Enter.
How to create a miracle?
No magic wand required. All you need is a needlework kit. You will need ribbons of all calibers and varieties, braid and cords. There should be a lot of thread (including floss and iris). Shiny pebbles, glass beads, and sequins are vital. Sew-on snowflakes, stars, sparkles and other decorations are definitely included in the list. Always keep needles, a stapler, and multifunctional glue at hand.
Advice from the Snow Maiden: add a good mood, Christmas music and helpers from among family members to the above. Inspiration and flights of fancy are strictly required.
Simple Christmas tree bow made of satin ribbons
This Christmas tree bow is very easy to make, so even a child can do it. The main thing is to prepare blanks from the material before work, and then several dozen pieces of such decorations can be made in 1 hour.
For the Christmas tree bow you will need:
- satin ribbon white or other color;
- golden-colored garter thread;
- sequins, beads;
- scissors;
- lighter;
- sewing supplies.
Execution order:
- Measure the tape 55 cm long, fold it in half, cut it off.
- Treat the ends with a lighter.
- Fold the cut into a bow.
- Sew a thread through its center and pull it together.
- Separately prepare a square of 5*5 cm ribbon.
- Go around the edges with a lighter.
- Fold in half, stitch along the edge, turn inside out.
- Wrap the resulting strip around the center of the bow and sew it at the back.
- Decorate with beads and sequins.
- Make a fastening loop and sew on the back.
Advice! To make such a bow for the Christmas tree, it is best to use a satin ribbon 5.5 cm wide, and its color can be red, golden or white.
How to make a bow for a Christmas tree in the shape of a flower
This option can be made from ribbons that are used to decorate gifts. They can be selected in different colors or in one tone. For a Christmas tree bow, you need to prepare textured material, rhinestones and standard tools.
Execution order:
- Cut seven equal parts, their length depends on the size of the bow.
- Fold each lengthwise and cut at an angle.
- Finish the edges with a lighter.
- Thread the folded ribbons onto a needle in the center.
- Pull the thread to make a bow.
- Tie in the center with a thin satin ribbon and sew it at the back.
- All that remains is to make a loop.
Advice! These flower bows can be attached to the Christmas tree using metal clothespins.
Chic bow made of satin ribbons
You will need: red ribbon 5 cm wide, white ribbon 2.5 cm wide, white ribbon 0.5 cm wide, needle, thread, lighter, scissors.
Master Class
- Prepare 2 pieces of the same size in each color.
- Fold in half and cut ends diagonally.
- Melt the ends of the strips using a lighter.
- Fold the ribbons in a cross and sew them in the center.
- Tighten the thread, wrap it around the center and secure.
- Prepare a thin piece of ribbon and decorate the center.
- Prepare a piece of ribbon and sew it as a pendant of the length you need.
Classic bow made of satin ribbons for the Christmas tree
Classic bows look elegant and neat.
Forest beauty, decorated with handmade crafts, creates a feeling of comfort and security.
Materials:
- tape 50 mm wide;
- thin cord pendant.
How to make it yourself:
- Cut two ribbons 22 cm long. Finish the edges with a lighter.
- Fold the ribbon in half. Apply glue to the bend. Fold the edges of the strip to the center and glue.
- Glue the center of the product and gather it into a bow.
- Perform the same manipulations with the second workpiece. Glue the bows together.
- Cut a 16 cm strip. Fold it in half and cut.
- Fold the strip lengthwise, cut off the edge (as shown in the picture). Scorch the workpiece so that it does not crumble.
- Glue.
- Using glue, attach the ribbons to the bow.
- Cut the lace up to 15 cm long. Form a loop from it. Cut a thin strip, wrap it around a bow, and glue it on.
Such an accessory, attached to a forest cone, will decorate not only the tree, but also a New Year's outfit or table.
Original ribbon bow
You will need: textured ribbons of two colors of the same size, scissors, lighter, thread, needle.
Masterpieces from rep
These tapes are denser and heavier. However, they hold their shape well and are often used in decoration. Here's the diagram:
- Prepare a skein of 20-25 cm (preferably in a non-standard color, for example, polka dots or snowflakes).
- Fold it three times and tie it with monofilament.
- Use cuts of the same texture, 15 cm and 10 cm (for example, orange and light green), do the same actions with them as with the first.
- You will get three layers. Place the large one underneath, behind it, the middle one, and the small one on top. Sew and add swirls from colorful scraps or fringe.
Christmas ball using kanzashi technique
An excellent gift and decor for a New Year's room is a shiny, original handmade ball. The combination of bright colors in the New Year's ball will be remembered by every guest. Even a beginner can create such a decoration. In this master class I will write in detail all the materials used and a description of the work.
For the original New Year's ball we will need:
Styrofoam ball with a diameter of 10 cm; White satin ribbon with gold lurex – 1.2 cm* 7 m; Gold brocade – 4 pieces 0.5*15 cm; Gold brocade – 1 piece 0.5*20 cm (for a rope); 44 mother-of-pearl half-beads with a diameter of 6 mm; Gold tire – 4 stripes; A gold-colored hug (at the bottom of the ball) with a diameter of 2 cm.
For the flower arrangement we will need:
23 pieces of red satin ribbon – 2.5*2.5 cm; 23 pieces of white satin ribbon – 2.5*2.5 cm; 13 pieces of green satin ribbon – 2.5*2.5 cm; White felt base with a diameter of 2 cm (under the central flower); 3 gold huggers with a diameter of 2 cm; 2 yellow dew half-buins with a diameter of 1 cm; 1 yellow half bead with a diameter of 1.4 cm; 6 double-sided stamens, white with sparkles.
For the bow on the balloon we will need:
4 pieces of red satin ribbon – 5*10 cm; 4 pieces of gold brocade – 4*10 cm; 4 pieces of New Year's plaid – 2.5*10 cm; 4 pieces of red satin ribbon – 5*11 cm; 4 pieces of gold brocade – 4*11 cm; 4 pieces of New Year's plaid - 2.5 * 11 cm; 2 pieces of red satin ribbon - 1.2*12 cm; Gold colored rhinestone tire.
Step-by-step description of the work.
1. First we need to prepare the New Year's ball itself. We will need a foam blank in the form of a ball with a diameter of 10 cm and a satin ribbon (Photo 1).
2. Using a pen, mark the top and bottom of the ball. We begin to wrap it in a circle clockwise. We fasten the tape with hot glue on both sides of the ball (Photo 2).
3. Mentally divide the ball into four sectors. And glue on narrow gold brocade (Photo 3).
4. Now we begin to glue the mother-of-pearl half-beads onto the gold brocade. I got 11 pieces on each strip (Photo 4).
5. Let's start with the bow. On one side the bow will be full of six petals, on the other - two. We cut the red ribbon, gold brocade and plaid into pieces of 10 and 11 cm (4 pieces each). We connect the three ribbons together, soldering the ends with fire (Photo 5).
6. Fold the pieces in half and make a fold on one side and the other (Photo 6).
7. Glue the small petals together in twos. One blank will go on a large bow, and the second on the back side of the ball. We glue the remaining 4 large blanks together in the shape of a bow (Photo 7).
8. Glue the two blanks together. Then we wrap a red ribbon around the bow and glue a gold tire of two stripes (Photo 8).
9. Glue a narrow piece of gold brocade on top of the ball (Photo 9).
10. Glue a large bow at an angle on the front side and a small one on the back (Photo 10).
11. Let's take care of the green leaves. We will need 13 of them, two branches of 5 petals and single ones. Making a simple sharp petal. We fold a piece of 2.5 * 2.5 cm twice diagonally, connect the ends together and solder it with fire. We trim the bottom of the petal a little and also treat it with fire (Photo 11).
12. Glue the petals into branches with hot glue (Photo 12).
13. Now let's move on to the flowers. There will be 3 of them: one of 9 petals and 2 of 7 petals. The flowers consist of double sharp petals. You will need a ribbon of two flowers: red and white. The petal is made like a simple sharp petal, but we fold two triangles together (Photo 13).
14. Cut out a circle with a diameter of 2 cm from felt and glue 9 petals onto it. We glue the half-bead with the hugger and connect it with the flower (Photo 14).
15. Glue a flower to the center under the bow. We collect the remaining petals on a thread, 7 pieces each, and glue the centers (Photos 15 and 16).
16. Glue the other two flowers and green twigs (Photo 17).
17. Glue single green petals and 4 bunches of stamens, 3 each. And the final touch, glue a golden tire in the middle of the sectors. Our New Year's decoration is ready.
How to decorate a Christmas tree with ribbons
Ribbons are effectively adjacent to the bows on the spruce tree. They can match or differ. The easiest way is to go down diagonally, in a circle or in a zigzag. Diamond weaving will require dexterity and skill. Small ribbons are often knitted at one end, and natural materials such as pine cones, cinnamon and nuts are attached to the other. Small trees are often decorated with ruffles and lace.
There is one “but”: beloved pets, as a rule, are not indifferent to such luxury.