It's safe to say that everyone has dreamed of taking a closer look at the stars. You can use binoculars or a spotting scope to admire the bright night sky, but you are unlikely to be able to see anything in detail through these devices. Here you will need more serious equipment - a telescope. To have such a miracle of optical technology at home, you need to pay a large sum, which not all lovers of beauty can afford. But don't despair. You can make a telescope with your own hands, and for this, no matter how absurd it may sound, you don’t have to be a great astronomer and designer. If only there was a desire and an irresistible craving for the unknown.
Why should you try making a telescope?
We can definitely say that astronomy is a very complex science. And it requires a lot of effort from the person doing it. A situation may occur that you purchase an expensive telescope, and the science of the Universe will disappoint you, or you simply realize that this is not your thing at all.
In order to figure out what’s what, it’s enough to make a telescope for an amateur. Observing the sky through such a device will allow you to see many times more than through binoculars, and you will also be able to figure out whether this activity is interesting to you. If you are passionate about studying the night sky, then, of course, you cannot do without a professional apparatus.
Cardboard binoculars
Not a single brave traveler and fearless explorer of the seas and oceans will go on a trip around the world without a telescope or binoculars. Likewise, your child, playing captain or pirate, will be happy with such a detail as a magnifying device. It will be doubly pleasant for the child if he makes this toy himself with the help of adults.
For the craft you will need:
Progress
The binoculars are ready! And your young explorer can set off to discover new countries and continents.
What can you see with a homemade telescope?
Descriptions of how to make a telescope can be found in many textbooks and books. Such a device will allow you to clearly see the lunar craters. With it you can see Jupiter and even make out its four main satellites. The rings of Saturn, familiar to us from the pages of textbooks, can also be seen using a telescope made by ourselves. In addition, many more celestial bodies can be seen with your own eyes, for example, Venus, a large number of stars, clusters, nebulae.
What is the device used for?
In principle, the main purpose of any microscope is to magnify an object by several tens or hundreds of times. The presented devices are used not only in biology lessons at school, but also in medicine, electronics and other fields. For example, thanks to a digital microscope, it is possible to repair very small microcircuits, mobile and computer boards.
The most convenient is the electronic device, since it is capable of magnifying the object very much. It should be noted that building a microscope with your own hands is not difficult. You just need to know its structure and also collect the necessary materials.
A little about the telescope design
The main parts of our unit are its lens and eyepiece. With the help of the first part, the light emitted by celestial bodies is collected. How distant bodies can be seen, as well as the magnification of the device, depends on the diameter of the lens. The second member of the tandem, the eyepiece, is designed to enlarge the resulting image so that our eye can admire the beauty of the stars.
Now about the two most common types of optical devices - refractors and reflectors. The first type has a lens made of a lens system, and the second has a mirror lens. Lenses for a telescope, unlike a reflector mirror, can be found quite easily in specialized stores. Buying a mirror for a reflector will not be cheap, and making one yourself will be impossible for many. Therefore, as has already become clear, we will be assembling a refractor, and not a reflecting telescope. Let's finish the theoretical excursion with the concept of telescope magnification. It is equal to the ratio of the focal lengths of the lens and eyepiece.
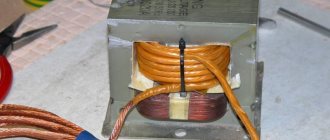
Step 9. Programming the motor controller
Having finished with the mechanical part of the project, you will need to program and connect the Arduino Uno, as well as connect the controller to the motor. Since my drive train has a 3:1 ratio, the motor must spin at three revolutions per minute for the camera to complete a full rotation in one day.
I also decided to make a calibration knob to fine-tune the rotation speed if necessary. The source code for Arduino is very simple:
===================================================== ================= int val = 0; // Stores the value of the potentiometer knob for calibration int trim_enable = 0; // Stores the values of the calibration switch on/off void setup() { pinMode(8, OUTPUT); pinMode(9, OUTPUT); digitalWrite(8, HIGH); digitalWrite(9, LOW); } void loop() { digitalWrite(9, HIGH); // Starts sending the next step request pulse to the controller delayMicroseconds(6250 + val); //Waits 6.25ms + calibration value if enabled digitalWrite(9, LOW); // Stops sending a pulse to the controller delayMicroseconds(6250 + val); //Waits 6.25ms + calibration value if enabled trim_enable = analogRead(1); // Reads the value of the calibration on/off switch if (trim_enable > 10) // If calibration is enabled... { val = analogRead(0) - 512; // Adjusts the delay duration using the value generated by the potentiometer } else { val = 0; // Do not change the default delay length of 12.5 ms } } ==================================== ================================
How to make a telescope? We select materials
In order to start assembling the device, you need to stock up on a 1-diopter lens or its blank. By the way, such a lens will have a focal length of one meter. The diameter of the blanks will be about seventy millimeters. It should also be noted that it is better not to choose spectacle lenses for a telescope, since they generally have a concave-convex shape and are poorly suited for a telescope, although if you have them on hand, you can use them. It is recommended to use long-focal lenses with a biconvex shape.
As an eyepiece, you can take a regular magnifying glass with a thirty-millimeter diameter. If it is possible to get an eyepiece from the microscope, then it is certainly worth taking advantage of. It is also perfect for a telescope.
What should we make the housing for our future optical assistant from? Two pipes of different diameters made of cardboard or thick paper are perfect. One (the shorter one) will be inserted into the second, with a larger diameter and longer. A pipe with a smaller diameter should be made twenty centimeters long - this will ultimately be the eyepiece unit, and it is recommended to make the main one a meter long. If you don’t have the necessary blanks at hand, it doesn’t matter, the body can be made from an unnecessary roll of wallpaper. To do this, the wallpaper is wound in several layers to create the required thickness and rigidity and glued. How to make the diameter of the inner tube depends on what kind of lens we use.
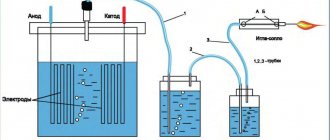
How to make lenses for binoculars?
The basic element of our design will be a plano-convex collecting lens, which we will obtain from an ordinary burnt-out incandescent light bulb.
To avoid injury, hands must first be protected by wearing gloves. Carefully, so as not to break our template and avoid injury, use an awl to remove the substance from the base of the light bulb that secures the central contact in the light bulb. Remove the entire core from the flask and you will get a blank for your future lens.
Secure or hang the resulting flask by the base. Slowly and carefully pour clear nitro glue into the flask. It should fill the bottom of the flask approximately 15 - 20 millimeters from the bottom of the flask. If you don’t have nitro glue, you can find a replacement for it in the form of plexiglass glue, and someone may also have a transparent varnish on their household. If old photographic film has been preserved, it can also be used by first removing the emulsion from it, using acetone to dissolve it. You need to pour it gradually, adding the selected filler several times, each time allowing it to completely drain down the walls of the flask. This is necessary to prevent the formation of an arched surface.
Read also DIY night vision device
After the filler has completely hardened, the flask will form a lens, flat on one side and convex on the other side. The quality of the lens is greatly influenced by the quality of the glass. Light bulbs with rough glass bulbs or bulbs deformed during casting are unsuitable. It is also necessary to completely remove all writing on the glass. There is an option to pour the filler not onto the bottom of the flask, but onto its spherical side surface. As a rule, there are no inscriptions and a more regular spherical shape. Using scrap glass, you need to gradually break off the edges of the flask until you get a lens and carefully sand the flat surface of the lens with slow circular movements with fine sandpaper. The degree of transparency of the lens depends on the thoroughness of processing. Do not pour too much filler into the flask. The amount of filler should be limited as much as possible within reasonable limits. This is due to the fact that, having different thermal expansion, the connected surfaces may later warp and collapse.
It is necessary to make two plano-convex lenses of equal size. Next, you need to fold them together, turning the flat sides towards each other. Secure the lenses in this position using paper coated with glue wrapped around the circumference of the lenses, metal circular clamps, and even tape or electrical tape. By securing the lenses in this position, we get the biconvex collecting lens we need for the lens. Due to the relatively small convexity of the shape of the light bulb, the resulting lens will have a large focal length.
We will do the same procedure using smaller light bulbs. Bulbs from car headlights work very well. We will get two plano-convex lenses of smaller diameter. Assemble a lens from these lenses. But remember that we need a biconcave lens, unless, of course, you want to observe inverted images. To do this, assemble the small lenses together with their curved sides inward and secure them in this position. This way we will already have a lens. Again, due to the smaller bulb diameter of the original bulb, this lens will have a shorter focal length.
Read also Surefire M720V replica review
Telescope assembly
The lens for the lens is fixed in a small tube with its convex outward. It is recommended to fasten it using a frame, which is a ring similar in diameter to the lens itself. Directly behind the lens, further along the pipe, it is necessary to equip a diaphragm in the form of a disk with a thirty-millimeter hole exactly in the middle. The purpose of the aperture is to eliminate image distortion caused by the use of a single lens. Also, installing it will affect the reduction of light that the lens receives. The telescope lens itself is mounted near the main tube.
Naturally, the eyepiece assembly cannot do without the eyepiece itself. First you need to prepare fastenings for it. They are made in the form of a cardboard cylinder and are similar in diameter to an eyepiece. The fastening is installed inside the pipe using two disks. They are the same diameter as the cylinder and have holes in the middle.
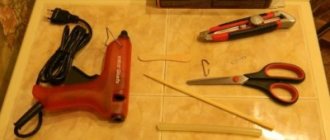
We make the device from scratch: necessary materials and tools
In order to make a microscope with your own hands without ready-made instruments, you will need the following equipment:
Glass tube. Its length should be approximately 20 cm and its diameter up to 6 mm.
Several plates (preferably copper). The thickness of the metal should not be large (about 1 mm). As for the overall dimensions of the plates, they are 3*6 cm.
Several small pieces of glass.
Small diameter drill.
Gas-burner.
Hammer.
Screwdriver.
Nuts and screws.
If you do not have metal that will serve as a base for the structure, you can use thick cardboard. However, keep in mind that in this case the device will not be durable and will not last for a long time.
Setting up the device at home
The image must be focused using the distance from the lens to the eyepiece. To do this, the eyepiece assembly moves in the main tube. Since the pipes must be well pressed together, the required position will be securely fixed. It is convenient to perform the tuning process on large bright bodies, for example, the Moon; a neighboring house will also work. When assembling, it is very important to ensure that the lens and eyepiece are parallel and their centers are on the same straight line.
Another way to make a telescope with your own hands is to change the size of the aperture. By varying its diameter, you can achieve the optimal picture. Using optical lenses of 0.6 diopters, which have a focal length of approximately two meters, you can increase the aperture and make the zoom much closer on our telescope, but you should understand that the body will also increase.
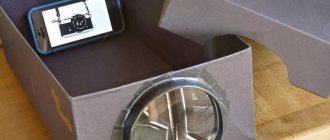
Camera as a webcam
Of course, you can make a webcam from an old camera, but not from any model. Some cameras already have a built-in Webcam function that allows you to use the device for these purposes. Therefore, to start communicating online, just connect it to your PC via a USB connector and install the drivers.
Cameras that do not have a Webcam function are divided into 2 groups:
- devices that can work as a webcam, but this requires special software and cables for transmitting video signals;
- devices that cannot stream video.
To determine which group your camera belongs to, connect it to the TV via a cord that has a plug for connecting to the camera on one side, and one USB plug and 2 tulips on the other.
When connected to a TV through the yellow tulip, you will see on its screen an image coming from your camera in real time. There is no need to enable viewing of photos or videos on the camera. Live video streaming from the camera means that such a device can be used as a webcam, you just need to configure the software.
Important! In order for the webcam from the camera to start working with the computer, it must have a video capture device (TV tuner, video card or special adapter) that has a socket for connecting a tulip. You need to connect the yellow plug of the cable coming from the camera to it.
To make the webcam from your camera work with your computer, do the following.
- Install the necessary drivers for the camera
. You should also install some program to control the webcam (SplitCam, ManyCam or WebCam). - Disable the camera's idle power off feature. If possible, connect the camera to a power supply to avoid draining the batteries.
- Turn off your computer and connect the yellow tulip cable to it.
- Turn on your computer and launch the video capture program
. In its window you will see the image transmitted by the camera. - Open the utility settings (File > Video Source) and assign your device as a video source.
Also assign signal parameters. If the Internet speed is low, you should reduce the video quality. - Now you can test the camera in action. Open Skype and go to the program settings. Indicate in it that the source of the video signal will be the installed and configured utility, and then make a call to someone.
Advice! It should be remembered that for the camera to work correctly as a webcam, you first need to launch the utility that controls the video stream, and then Skype.
Hello, habra users! This post will show you how to make one out of an old webcam
high quality
microscope
. It's really easy to do. If you are interested, continue under the hack.
Step 1: Required Materials
- Actually, the webcam itself
- Screwdriver
- Super glue
- Empty box
- Brain and some free time
Step 2: Opening the webcam
First, open up your camera.
But be careful not to damage the CMOS sensor. You need to extend the capture button wires to get still images. I also took out the LED on/off wires. They were gray and yellow (yours may vary).
Step 3: Working with the Lens
Now we need to flip the lens over the CMOS sensor. Place it 2-3 mm from this sensor and secure it (for example, with superglue).
Step 4: Assembling the Camera
After turning the lens over, put the camera back together. It is now ready to use as a microscope.
Step 5: Final Stage
Now you need to attach the camera to the box, as shown in the photo. Now she is ready to receive images! You can also put a mirror so that the light spreads throughout the “object of study” and under it. Now our microscope is completely ready!
Several pictures taken with this webcam/microscope
Enjoy! 
Before you make a microscope with your own hands, you should understand what it can be used for, as well as what materials will be required for this. It should be noted right away that you can build such a structure yourself, and you do not need any expensive elements.
Watch out - Sun!
By the standards of the Universe, our Sun is far from the brightest star. However, for us it is a very important source of life. Naturally, having a telescope at their disposal, many will want to take a closer look at it. But you need to know that this is very dangerous. After all, sunlight, passing through the optical systems we have built, can be focused to such an extent that it will be able to burn through even thick paper. What can we say about the delicate retina of our eyes?
Therefore, you need to remember a very important rule: you cannot look at the Sun through zooming devices, especially a home telescope, without special protective equipment. Such means are considered to be light filters and a method of projecting an image onto a screen.
What if you couldn’t assemble a telescope with your own hands, but you really want to look at the stars?
If for some reason it is impossible to assemble a homemade telescope, then do not despair. You can find a telescope in a store for a reasonable price. The question immediately arises: “Where are they sold?” Such equipment can be found in specialized astro-device stores. If there is nothing like this in your city, then you should visit a photographic equipment store or find another store that sells telescopes.
If you are lucky - there is a specialized store in your city, and even with professional consultants, then this is definitely the place for you. Before going, it is recommended to look at an overview of telescopes. First, you will understand the characteristics of optical devices. Secondly, it will be more difficult to deceive you and slip you a low-quality product. Then you will definitely not be disappointed in your purchase.
A few words about buying a telescope through the World Wide Web. This type of shopping is becoming very popular nowadays, and it is possible that you will use it. It’s very convenient: you look for the device you need, and then order it. However, you may come across the following nuisance: after a long selection, it may turn out that the product is no longer in stock. A much more unpleasant problem is the delivery of goods. It is no secret that a telescope is a very fragile thing, so only fragments can be delivered to you.
It is possible to purchase a telescope by hand. This option will allow you to save a lot of money, but you should be well prepared so as not to buy a broken item. A good place to find a potential seller is astronomer forums.
Traveler attributes made from disposable cups
Young adventurers will be happy to receive a whole traveler's kit as a gift - homemade binoculars and a compass. In just 20 minutes you will be able to make an interesting toy set that even the most picky kid will not refuse to play with. Taking a couple of ordinary paper cups with coffee lids, you can easily create irreplaceable travel accessories.
Work process
Playing with homemade toys for kids is much more interesting and fun than with factory-made ones. It is valuable that loving parents made such fun individually for their child, taking into account his desires and needs. It is also important that when working together with children, adults not only give them the opportunity to develop children’s creative potential, but also understand that the child’s hobby is not indifferent to them. Children will highly appreciate the fact that their parents spend time playing with them and encourage their interests. And for adults it will be useful to return to carefree childhood at least for a few hours and feel like a child.
Source
Price per telescope
Let's look at some price categories:
• About five thousand rubles. Such a device will correspond to the characteristics of a telescope made with your own hands at home.
• Up to ten thousand rubles. This device will certainly be more suitable for high-quality observation of the night sky. The mechanical part of the body and equipment will be quite poor, and you may have to spend money on some spare parts: eyepieces, filters, etc.
• From twenty to one hundred thousand rubles. This category includes professional and semi-professional telescopes. Surely a beginner will have no need for a mirror camera with an astronomical cost. This is simply, as they say, a waste of money.
What can the device be made from?
Naturally, you can construct a microscope with your own hands from scratch. However, often those people who understand electronics, computer technology and optics make the presented device based on other units: cameras, binoculars, web cameras.
Before starting to manufacture a structure, it is necessary to accurately determine its functions and select the necessary elements. It is also advisable to make a drawing of the device on paper. Naturally, all the necessary calculations are made.