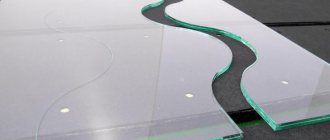
Decorated container for storage or planting
Making crafts from trash with your own hands is a successful creative activity for summer residents. A flowerpot, a leaky bucket or an old pan that has lost its attractiveness can be restored to its aesthetic appearance.
To do this, the outside of the container must be decorated. For the transformation, they use an interesting looking trifle:
- Coins;
- Pebbles;
- Beads;
- Buttons;
- Pieces of broken glass.
The desired picture is formed from decorative elements.
- You can glue them in disarray, which will also become a definite design move.
- If you try, you can get a real masterpiece.
- The decorated vessel is often not used for its original purpose.
Typically, the container becomes a flower pot, an urn, or storage for various items.
Other materials
Other materials may include:
- cones (they make pretty baskets);
- twine (rugs, vases, cat scratching posts, lampshades);
- food (this includes sweet and beer bouquets, fruit and snack baskets);
- plastic (souvenirs made from this material will delight mainly summer residents);
- candles (they can be unusually decorated with lace with beads or decorated using decoupage technique).
In general, almost anything can be used to create unusual gifts.
DIY Easter souvenirs and crafts for any other holiday will never go out of fashion and for a long time will delight their owners with the warmth of manual labor and the warmth of the soul of the manufacturer.
Landscape decor from tires, plastic bottles
To decorate the area, you can make crafts for your dacha from trash. Perfect for this purpose:
- Used tires and rims;
- Old buckets and other containers;
- Plastic bottles;
- Scraps and debris of building materials;
- Various textiles.
It is easy to assemble all kinds of figures from the available materials. These can be cute animals or cool stuffed animals.
Beautiful products can be assembled from any seemingly unusable things. It’s enough to dream up and think through your project better.
Interesting crafts for the New Year
Crafts for the New Year are customary in many families. This is a great way to spend time together and make something interesting to decorate your home.
Christmas tree made of pine cones
One of the most popular options for New Year's crafts is a Christmas tree made from pine cones. You can even decorate a holiday table with it.
Tools:
- cardboard;
- scissors;
- glue gun;
- cones;
- spray paint.
Manufacturing:
- You need to cut out a template from cardboard, which then needs to be folded into a cone, gluing the edges. The color of the cardboard should be chosen carefully, as the paper can be seen through the bumps.
- For making crafts, fir cones of different sizes are suitable, but intact, without damage or chips. You need to attach them to the base using a glue gun. The lower tier will contain larger cones, and the top should be laid out with smaller specimens.
On a note!
To make the craft look more elegant, you can spray the cones with aerosol paint.
Snowmen made from cotton pads
For the New Year, you can make funny snowmen from cotton pads, and then decorate your desktop with them and display them on the Christmas tree.
These products can be given to friends as a fun souvenir. Tools:
- cotton pads;
- glue;
- ice cream sticks;
- multi-colored felt.
Manufacturing:
- Cotton pads need to be fastened together to create the shape of a snowman. To do this, 3 disks must be glued together, placing them under each other.
- From felt you should cut out a nose in the form of an orange triangle, eyes, a hat, and a scarf. All parts must be glued to the workpiece.
- On the back side you need to attach an ice cream stick, put another cotton pad on top and seal everything.
On a note!
You can also attach a card with wishes to the stick.
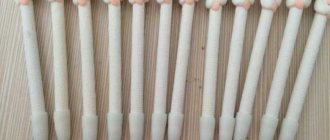
A small art object made from old brushes
Successfully made crafts from unnecessary trash can wonderfully decorate any area. An interesting option can be made from old paint brushes. Take specimens of different sizes.
- Imitations of faces and figures are painted on the shaft.
- The pile, cast in different colors, will be an excellent hairstyle.
- A set decorated in this way will make a good family.
Such an unusual art object will be an excellent colorful decoration for a room, gazebo or space near the front door.
Cans
Such jars can be used entirely, grouping them in the desired order, or various parts can be cut out of them. An important advantage of this ornamental material is the ability to cut with simple scissors and a knife. The following ideas are suggested:
- Lamps. A hole is made in the bottom for the wire and mounting the cartridge. The top part is carefully cut off, revealing the cylinder. The main work involves cutting out patterns on the walls. First, a drawing is applied. Tin cans can be easily cut with a mounting knife, but the risk of pushing through when cutting should be eliminated. To do this, place a cylinder inside the jar while cutting. After the pattern is formed, the lamp is painted.
- Decorating inserts. Tin figures, painted in different colors, look beautiful on the surface of various objects. For example, you can use scissors to cut out lovely butterflies that will decorate any interior.
- Organizer. Juice or beer cans require virtually no modification when used as cups for pens and pencils. Moreover, they have such an interesting pattern that it will fit into the modern style of decorating the room without painting.
Home craftsmen are able to assemble large, fairly strong structures from cans. The photo shows an example of making country furniture. You can build an armchair, tables and even a sofa. The cans are grouped into blocks in a vertical position and secured with tape or wire. The blocks are then assembled into a specific structure. High-quality superglue is used for the vertical posts of a table or chair.
Useful things for home and garden
Crafts that give a second life to trash can be not only beautiful, but also useful. Using outright garbage, it is easy to build things necessary for the household.
Such products can be used both on a summer cottage and in a house, as well as a city apartment.
Unusual pendant or keychain
For such a product, it is best to use a transparent container. You can place a variety of objects inside the bubble - beads, a piece of a broken chain, pebbles, shells, sparkles and other pleasant little things. You can also place a note with a prediction or wish that will come true. If you fill a medicine bottle with water, then you should add glycerin to it.
In order to clean a jar of unpleasant odors, you should pour boiling water into it for a few minutes and then drain the liquid. To remove the label, the jar must be kept in hot water.
If there is no opportunity or desire to reuse medicine containers, it is worth finding a company that accepts glass containers of non-standard sizes.
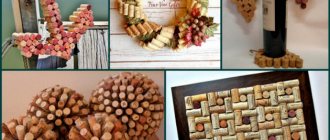
Wine cork rug
The cork rug is a real find. It is beautiful, environmentally friendly, and convenient.
- Any caps from alcohol bottles will work.
- They can be used as is or cut as appropriate.
- The elements are laid out in the required form.
- All components must be glued together.
- Corks can be laid vertically or horizontally.
The rug can be flat or raised. High variations are best done with sides. It is advisable to place bath mats on a waterproof base.
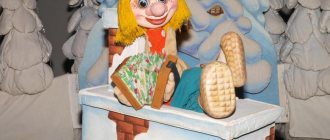
Broom
An old broom can also be used. Since ancient times, mysterious powers have been attributed to the broom, and therefore the craft in the form of a talisman is still popular, especially in private homes. The craft is made as follows. A gauze cover is put on the broom, which is painted to create a general background. The handle is wrapped with tape. The bottom is edged with braid.
The main goal is to attach various symbols to the broom. So, at the base you can place dough figures symbolizing a married couple. A head of garlic should repel evil spirits. Walnuts and bay leaves are believed to bring health and success. Various properties are attributed to cones and various plants, fruits, and flowers. Such symbols in different sets are attached to the broom using threads, wires, paper clips or glue.
Furniture made from pallets or plastic bottles
Useful and interesting crafts made from junk are things made from pallets. You can create various interior items from outright garbage. These are not only banal shelves and tables, but also large things:
- Sofa,
- Bed,
- Closet.
Such furniture is readily used not only in the garden and country house. Often items made from pallets fit well into urban interiors. There are usually no difficulties in creating such things.
If the items are intended for the garden, then they can even be made from plastic bottles.
To create an item, containers are stacked and fastened. For convenience, it is additionally better to use a frame. You can also create furniture from various leftovers and fragments of building materials or old things. Each idea is thought through separately.
Bead decoration
If you answer the question - which crafts are the most interesting, then we can safely say that these are decorations. To create a bracelet or necklace from beads, you should prepare any beads you like, a thread or chain for them, as well as a clasp for decoration.
This craft is very easy to create and looks incredibly stylish, reflecting the tastes of its creator.
Vertical flowerbed from an old cart, chest of drawers, bags
If old useful things cannot be put to good use in the house, then you can do it outside. For example, a worn chest of drawers can be used to make an excellent vertical flower bed.
- It is enough to install the item in the right place.
- The drawers are pulled out to different levels. Soil is poured into the resulting trays.
- All that remains is to plant the plants.
You can do the same with a cart. Using the same pattern, it’s easy to use an unnecessary stepladder. You will get an interesting flower garden if you use old bags as flowerpots.
They fill them with soil and plant plants. Handbags can be placed around the area or hung on a base.
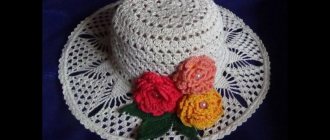
Flower wreath
Flower wreaths are very beautiful and feminine; both little girls and adult representatives of the fair sex like them. Making such a wreath with your own hands is not difficult. As a basis, you need to take the simplest hoop.
You need to prepare artificial flowers, a heat gun and fabric. The hoops need to be wrapped in fabric and glued tightly. Then the flowers themselves are glued to the top of the hoop, depending on the taste of the artist himself.
Possibilities for children's creativity from trash
Various junk art crafts for children are popular. The material is available, it is not a pity if the child trains for a long time to achieve the desired result. You can work with various raw materials. Often the choice falls on the following things:
- disposable tableware;
- containers for detergents;
- toilet paper rolls;
- kraft packaging.
To obtain an aesthetic result, various stationery and decorative elements are additionally used. A child can show imagination or work strictly under the guidance of adults. If you can’t come up with an idea on your own, you can always borrow it from the Internet.
Crafts from various trash are a great way to give trash a new lease of life. From unnecessary things you can make excellent, beautiful, useful things that will save money and also increase the level of comfort.
Crafts for the holidays
There are a huge number of different holidays for which it is customary to give gifts. A gift made with your own hands is always a winner and not expensive.
Various photos of the most interesting crafts will allow you to see how much you can do yourself without much effort. For March 8, you can make a unique postcard, or decorate the Easter table with decor made with your own hands and with soul.
Photos of crafts made from trash
Mosaic bottles
With the help of a glue gun, all kinds of fragments of old dishes, broken mirrors and aquarium stones, any bottle can be turned into an amazing stained glass mosaic. The main thing is to sand all the edges of the fragments well so that you can’t get hurt on them. These bottles will decorate the interior on their own or make a wonderful gift.
Photo: pinterest.ca
Wooden stand for stationery
The most unassuming piece of wood can be made into a delightful holder for pencils, art supplies or makeup brushes. Vary the diameter of the holes using different drill attachments. The main thing is that the thickness of the wood is sufficient for stability, and that the cuts are smooth and polished.
Photo: videohandmade.ru
7 easy patterns on how to make a paper butterfly
Products with ponds
Epoxy resin not only makes it easy to imitate a pond or vessel with water. Such installations, if not the most numerous, are popular.
- Firstly, epoxy resin in its original form has the same optical properties as water. It is colorless and transparent, so, strictly speaking, there is no need to invent anything.
- Secondly, all that remains is to emphasize the theme and introduce a certain decor in order to turn the “lifeless” substance into an underwater kingdom.
Passing through the water column, the sun's rays are scattered so that the red part of the radiation spectrum is cut off and predominantly short-wave radiation enters our eyes. That’s why we see water as blue, and in our paintings we paint in blue tones. At the same time, it does not lose its transparency. Another trick to make resin water is to add blue dye.
You can often observe the sea or ocean during periods of roughness. During a storm, powerful waves are thrown ashore, which, when broken, turn into foam, which can also be captured. Drawing skills, white paint and a hair dryer will help. The highest aerobatics are considered to be works in which natural foam is present (individual sections of the resin are foamed). There are a few more techniques that highlight the water theme, but they will be revealed a little later. For now, we should focus on which resin products contain bodies of water.
Transparent epoxy can only be used when creating small volumes. What we mean here is that lenses, pendants, and pendants are made from such material, inside which shells, algae or fish are frozen. It is also appropriate to use transparent resin if you need to make a mini pond. It is placed in the tabletop, on a separate panel, on the bar counter, in the seat of a chair or stool. In a word, everything depends on the master’s plan.
If water is just a decoration, that is, an additional attribute, then it is imitated in an accessible way in any epoxy product. If imitation of water from epoxy resin is an end in itself, then paintings and decorative panels are chosen for creativity, and many people pour the pond into a special ceramic dish and leave the frozen resin in this form.
Tinted resin is more suitable for pouring countertops. On large areas you can create entire dioramas. Natural materials (stone, sand, shell rock) are used as decoration.
A separate category is represented by tabletops with river imitation. Painting with epoxy resin often comes down to creating abstractions, since it is very difficult to manipulate the layers of resin. In this abstraction, the marine theme takes a premium place. Any combination of white and blue already gives associations associated with the seas and oceans.
Mini fish pond
This product is extremely popular. Moreover, this popularity is growing both among buyers and among the craftsmen themselves. Let's give an example that allows you to implement one of the ideas. The main difficulty that the master will have to face is that it is necessary to create a three-dimensional figure of the fish. There are two fundamental approaches here. The first involves drawing, and the second involves gluing ready-made pictures. The algorithm itself remains virtually unchanged.
Useful to know > What jewelry and accessories are made from epoxy resin
- First, the first layer of resin is poured. Pebbles, shells, sand, vegetation and other similar decor are placed in it.
- To make or draw a fish in three-dimensional form, you need to mentally “dissect” it with horizontal planes at different heights. For example, the first section is performed at the level of the pelvic fins, the second at the level of the lateral line, and the third at the level of the dorsal fin. Each section is drawn in a separate layer of resin. First, the pectoral and ventral fins are drawn. In order for them to take their place, it is necessary to mark their location using a pre-prepared fish-shaped template. Then a layer of resin 0.5-1 mm thick is poured on top.
- After the layer hardens, the body, head and tail are drawn. The layer is filled again. The tail and dorsal fin can be drawn in the top layer. There is no clear division here. It is necessary to understand that the more sections are made, the better the quality of the volumetric figure will be. If some fish begin to form from the second layer, others from the third or fourth, then the illusion will arise that they are swimming at different depths.
Unfortunately, not everyone has artistic talent, however, fish in epoxy resin is a craft that is accessible to everyone. You can order blanks in the form of stickers from the online store and start pouring. These stickers are already cut out along the outline. All that remains is to form the layers of resin.
Lenses with water
Here are a few examples of how masterpieces are created. This is not a master class, but just an overview, therefore, despite the apparent simplicity of doing the work, it is very difficult to do creativity with epoxy. Many people prefer to buy ready-made masterpieces. In this section we will look at a number of crafts, the creation principle of which involves pouring transparent resin into a silicone mold.
The main task of the master is to select the appropriate decor and place it inside the lens. Marine-themed elements such as pebbles, shells or plastic fish in liquid resin will settle to the bottom, so during the pouring process they try to keep them floating in various ways.
If pebbles and shells should be at the bottom, then sea inhabitants (artificial, of course) create the effect of floating. This will require layer-by-layer filling.
Clay figurines
It is very difficult to make such souvenirs yourself. This is because for high-quality work, the master must have excellent skills in working with clay and have sufficient experience in this matter.
If all this is missing, the figure may simply not work out. However, there is a way out; you can complete short-term courses that will help you gain initial skills in this interesting business.
- It’s not enough to mold a clay figurine; it also needs to be properly dried and hardened so that it is durable.
- Next, it is also processed and polished so that there are no irregularities or sharp edges on it, if this is not provided for by the design.
- After all this, the figurine also needs to be painted; the colors can be virtually anything.
- After painting, a layer of protective varnish is applied to prevent the figurine from fading.
The easiest option in this direction would be to make a small clay jug, painted in one of the Russian styles.
Gzhel is very popular because it is unmistakably recognized all over the world. You can also make plates, mugs and small decorative coasters.
Method No. 2: imitation of water from a transparent candle gel.
Main advantages:
- hardens quickly;
- non-toxic;
- you can use the same gel more than once;
- you can change the composition along with the gel without spoiling the vase and flowers.
How to use candle gel?
- It is necessary to melt the gel in a steam bath, the temperature should not exceed 90 degrees so that the gel does not become cloudy.
- Prepare the vase in advance; it should be clean and dry.
- The gel must be melted to a homogeneous liquid mass without lumps.
- Place flowers in a vase.
- Pour the liquid gel over the knife at the lowest possible height from the bottom of the vase to avoid the formation of air bubbles.
- Hardening time 2 hours.
Important! Do not allow water to enter. Do not bring to a boil. Before starting to work with the gel, you need to open it for 1.5-2.0 hours at room temperature to evaporate moisture.
Questions and answers:
- How many times can the same gel be used? — You can melt the same volume 5-6 times.
- How to remove dust from gel? — Dust from the gel can be removed with alcohol, not water.
- Does rust appear in the gel when it comes into contact with a metal stem? — The basis of the candle gel is mineral oil, which itself is neutral. Does not cause corrosion upon contact with metal.
- How does it behave at sub-zero temperatures and in hot weather, at what temperature does it melt? — Initial melting temperature + 65-70 degrees. At -30 degrees it does not change its physical properties (tested).
- How quickly does the gel harden? — A standard liter at room temperature begins to thicken after half an hour, completely hardens after 1.5-2 hours.
Price: guideline 200 grams 100 rubles, packaging 200/500/1000 grams 1 gram of gel = 1.25 ml
If you want to get the contact information for a candle gel supplier, write to us!
Source
Table-river
This technique is implemented in the manufacture of tabletops. Its principle is that the base of the tabletop is made up of two slabs, that is, a longitudinal cut of a tree trunk, which are laid at some distance from each other. The space between the slabs is filled with blue-tinted resin. The final filling is done with transparent epoxy.
The slabs imitate the banks, and the blue layer imitates the river. For a more colorful look, the edges of the slabs are decorated with sand or shells. There are many variations in this regard. Stagnant bodies of water are created in the same way. If you add vegetation, you can get pictures of lakes and ponds.
Compositions depicting the depths of the sea should also be included in the considered category of products. The principle remains the same, but a certain variation allows you to radically change the visual presentation. The bottom line is that wood cuts or plywood sheets are laid out in layers so that each upper layer is smaller in area than the previous lower one. Thus, a kind of sea canyon is formed.
The resin is poured in separate portions. The greater the simulated depth, the darker the shade should be. The result is similar to the picture of depth distribution in geographical maps, but artificial canyons add realism to the composition.
Paintings
You can create real works of art from epoxy resin. Resin Art, known as epoxy resin painting, allows artists to express their creativity. When using a more viscous material, the artist can apply layers of resin of different colors without fear of mixing the border areas. Such properties of the compound prompted the idea of creating paintings.
Often, image formation does not require special artistic skills. You just need to understand the combination of colors.
The image itself turns out to be abstract, but there are also paintings that are quite realistic. Marine themes in Resin Art have become a dominant trend.
The sea is filled with epoxy resin, tinted blue. The shore is filled with fine sand with shells. Imitation of waves near the shore is achieved by applying streaks of white paint or foaming resin in certain areas. More professional craftsmen create relief paintings. They not only depict waves, but also their shape is visible on the surface. A handy tool for drawing pictures is a hairdryer. A stream of hot air heats the resin and simultaneously sets the colored layers in motion. By matching one color to another, you can get different effects.
How to make a waterfall in your country house?
Step-by-step instructions and photo illustrations will help you understand the principle of its structure. The list of necessary items will facilitate the task of independently selecting information. To make this work use:
- sand;
- pebbles;
- quartzite;
- cement;
- granotsev;
- PVC film or fiberglass;
- reinforcing mesh;
- water pump;
- rubber hose.
Make a pit of sufficient depth. If you want to subsequently breed fish there, then it should be at least a meter wide so that the water does not freeze in winter.
If you want the lower part of the waterfall to have a strong film that won’t tear, then place a reinforcing mesh here and place a concrete solution 12–15 cm high on top. Let the bowl of the lake dry thoroughly.
Now look at how the water system will be arranged.
To do this, lay flat sandstone and pebbles in the form of a slide. This is what a beautiful cascading waterfall turns out to be.
If you don’t want to lay a film on the bottom of the trench or concrete the bowl, then use a ready-made container for ponds.