A funny and cute sheep, beautiful flowers and New Year's decorations - all this can be easily and without special skills made from cotton swabs. Everyone will definitely have this unusual material for crafts, as it is a common cosmetic accessory.
All family members, without exception, will enjoy creating crafts from sticks, especially kids. Joint creativity between children and parents brings people together and creates a friendly atmosphere in the house.
Now let's talk about what crafts you can make from cotton swabs with your own hands.
Crafts from cotton swabs for children
At an early age, a child begins to develop creative abilities. Crafts will help him show his imagination and thinking, diversify his leisure time and surprise him in kindergarten, because using such an ordinary object, you can make amazing things. DIY crafts made from cotton swabs will teach your child to handle objects carefully and appreciate their work.
They can also be used to create a greeting card or gift for family members and friends. The child will be pleased to hear praise for his work. Below are crafts made from cotton pads and sticks with their step-by-step production
The benefits of crafts
It doesn’t matter what kind of crafts your child will do, the most important thing is what benefit they bring. When creating crafts, fine motor skills, imagination, and thinking develop. A child will not be able to come up with a masterpiece the first time; he needs time.
It is better to start making simpler crafts and gradually increase the complexity. Start with large elements, gradually increasing their complexity and decreasing their size. At first glance, a simple children's activity, but it has hidden benefits in the development of the child.
Application "Little Snowman"
You will need: cotton pads, cardboard, colored paper, scissors, glue. We form snowdrifts from cotton pads and glue them to the bottom of a sheet of cardboard. We use two disks to create a snowman, and cut out a hat, scarf, hands, eyes, nose and mouth from colored paper. We glue everything.
We recommend reading:
- Crafts from isolon - a manufacturing master class, nuances of working with the material and step-by-step instructions on how to make a craft (85 photos)
- Crafts from saw cuts: stylish and beautiful options for decorating the garden and interior with your own hands (130 photos)
- Crafts from toothpicks - interesting ideas, manufacturing examples and the best crafts for children (120 photos)
Fluffy dandelion
A beautiful fading dandelion or decorative onion will be made from sticks stuck into the base. A foam ball will perfectly serve as the base part.
Handicraft stores sell ready-made molds. Remove the soft tips from one side of the cotton swabs. The resulting “bare” tops are stuck into a foam base. The elements are distributed evenly over the entire surface.
If you plan to get not a dandelion, but a colored salsify, then the cotton tips are pre-colored and dried. To do this, the soft tops are dipped into a dye solution of the desired color.
A stem is mounted at the bottom of the flower. Such products look colorful in a vase as an interior decoration.
Application "Sheep"
You will need: cotton swabs, cotton pads, cardboard, 2 black beads, 1 white button, colored paper, paints, glue, scissors. We cut out grass, flowers, clouds from paper and glue everything onto cardboard.
The disk will be the sun, paint it yellow, dry it and glue it. If you wish, you can paint everything with paints. We make a sheep from the discs, using cotton swabs to create the legs. The two black beads are the eyes, and the button is the nose. Eyes can also be cut out of paper and glued or simply drawn.
Herringbone
Another option is the original white Christmas tree. If desired, it can be painted green or blue.
You will need the following:
- cotton buds;
- cardboard;
- watercolor;
- PVA;
- various beads and ribbons.
A Christmas tree is drawn on cardboard, and the ends of cotton swabs are prepared. They are sequentially pasted onto the drawing with a certain ornament. At the end, the winter beauty is painted with gouache or left unchanged in white.
After the paint has dried, beads, sequins and sparkles are glued onto the tree. You can tie a ribbon to the finished Christmas tree and use it as a New Year's toy. You can make a three-dimensional Christmas tree and put it on the table. To do this, the paper cone is covered with cotton swabs.
There are many ideas for working with cotton swabs. Be sure to create all crafts together with your children. There are many advantages to such activities. Firstly, kids will be happy to spend time together with their mother or other close relatives, and secondly, such children's crafts develop creative thinking and fine motor skills of their fingers, which contributes to better mental development. And finally, you instill aesthetic taste in your children, which is also important in their development as individuals.
Application "Bear"
You will need: cotton swabs, stencil, paints, cardboard, colored paper, scissors, glue. Using a stencil, draw a bear on cardboard.
We paint cotton swabs, dry them and cut off the soft ends. Fill the bear with cotton wool blanks and glue them. We cut out the eyes from colored paper and also glue them on. You can make any animal using this principle. Below are photos of animal crafts made from cotton swabs.
Preparing for creativity
First you need to choose which cosmetic sticks and discs you will use. It is better to take cheaper sticks, since the plastic is softer and will be easier to cut and bend.
And you need to choose discs that are sewn together, so they will not delaminate. They are usually more expensive than regular ones, but also more convenient.
A couple of life hacks to make your work easier:
- If you need to glue a small number of parts, then the glue must be applied to cotton wool. And if there is a lot, then it is better to apply the glue to the base, so the cotton wool will not absorb it, which means less glue will be needed.
- In order for the cotton swabs to stick well, you need to press them for 15-20 seconds and then leave them under pressure for a couple of minutes.
- You can also use plasticine instead of glue.
- To paint cotton wool, you can dip them in liquid with paint, or use a very wet and wide brush to apply paint. You can use watercolors, diluted gouache, or even food coloring as paint.
The complexity of such crafts varies from the simplest to the most difficult. Here are a couple of craft options made from cotton swabs and disks.
Volumetric flowers
You will need: cotton swabs, foam balls, paints, green colored paper, skewers, glue, scissors.
We color the cotton swabs, dry them and cut off the soft tip on one side. We insert sticks and a skewer into the foam ball, having previously painted it green. Cut out a piece of paper and glue it onto a skewer.
Peacock
To make a bright and incredibly beautiful bird, in addition to the same materials, you will need 20-25 simple plastic spoons:
- From cardboard you need to cut out a circle and a blank in the shape of a head, turning into a long neck.
- Next, decorate the spoons yourself or with your children in two or three bright colors, but so that they are the same. The paint will adhere better to the surface if you mix it with PVA glue.
- Now the spoons need to be glued like a fan to the prepared circle.
- Cotton swabs are also colored. Blue paint is used. After they dry, you need to cut off the cotton ends. The peacock's head and neck are filled with them.
- Connect two pieces of cardboard with glue. The peacock is ready!
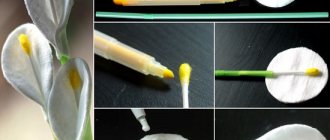
Vase with callas
You will need: cotton swabs, cotton pads, green cocktail straws, yellow paint, tape, a vase, scissors.
Paint the sticks yellow, dry and insert into cocktail tubes. Wrap the resulting stems in two discs in turn and secure with tape. The number of flowers is limited by desire and the size of the vase.
We recommend reading:
- Crafts from natural materials - a step-by-step master class on creating original crafts for children and adults (100 photos)
- Wood crafts - the best craft options, instructions for beginners and ideas for making wooden crafts (85 photos)
- Fabric crafts - the best ideas and the most practical crafts and toys made from various types of fabrics
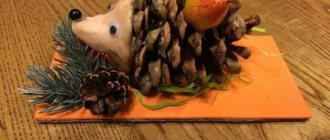
Hedgehog
Here you will need modeling dough or plasticine. Otherwise there are no differences.
- First, the children need to sculpt the body and face of the hedgehog.
- Afterwards, cotton swabs are immersed in the body in a loose manner, maintaining intervals.
- The eyes and nose are made from the tips of sticks or from plasticine.
- The eyes and nose should be black, and the improvised needles can be decorated as you like. A hedgehog doesn't have to be gray and inconspicuous.
Roses
You will need: cotton pads, PVA glue, paints. We form the center of the rose from the disks, coat it with glue and glue several more cotton disks sheet by sheet, depending on the required size.
It is important to seal the edges of the disc well. This will prevent the formation of lint. After complete drying, the rose needs to be painted and dried again.
The finished flower is usually used to create bouquets, wreaths, baskets and voluminous cards.
How to make a Christmas tree
The simplest thing is to make some kind of New Year's toy from these materials. For example, a Christmas tree.
- cotton pads (preferably with a relief pattern);
- a cone made of thick paper or cardboard;
- watercolor or acrylic paints;
- decorative glitter;
- brushes;
- glue.
The number of disks required to make a Christmas tree depends on its height. If the tree is planned to be small, then one package is enough. Mugs with an embossed pattern will make the product more original, but ordinary ones will also do.
It is preferable to use watercolor paints. They look softer. PVA is most suitable as glue; it leaves no traces after drying.
So, the process of creating a New Year's masterpiece is as follows:
- We glue a cone of the required height from thick paper or cardboard.
- Using paints, we give the edges of each disk a soft blue tint.
- Decorate with glitter glue and sparkles. It is better to apply paints with glitter only to half of the circle. Let the workpieces dry thoroughly.
- We glue the painted discs over the entire height onto the cone.
- The bottom of the product can also be painted and decorated with glitter. The Christmas tree is ready.
Christmas tree
You will need: cardboard, cotton pads, glue, scissors, stapler, various decorative elements for decoration. We roll the cardboard into a cone and secure it with a stapler.
Fold the disk in half twice to form a sector. Gradually moving from bottom to top in a circle, we cover the entire tree with sectors. For decoration you can use beads, rhinestones, ribbons, stickers, cones, buttons.
It is important to remember that when making crafts with your own hands, you can use a wide variety of materials and not be limited to found templates.
Spectacular dahlias
Since there are over 40 species of this plant, it is worth deciding on the color in advance and stocking up on at least 30 cotton pads per flower:
- Cotton pads are painted in the desired color. You don't have to do this if you like white dahlias.
- A circle with a diameter of 4 cm is cut out of one cotton pad as a base. From the rest, 10 volumetric petals are cut out, measuring 4.5 cm, 3.5 cm and 2.5 cm.
- Overlapping petals are attached to the base from the edge to the center in order from large to small. The outer row should protrude halfway.
- The stamens are made from pieces of cotton wool or replaced with matching beads.
Photos of crafts made from cotton swabs
0
2
New Year's house made of cardboard box
You can make beautiful versions of New Year's houses from various unnecessary boxes. We will use boxes of all sizes.
Square box
Open the lid and bottom of the cardboard box. We cut off the excess from the side parts to make triangles. Cut off the bottom. We make a roof from the lid and fill it with the remaining cardboard. We cut out the windows and door. We cover the walls with self-adhesive paper with a pattern of bricks and boards. We attach shutters to the windows. We decorate the house with a mailbox and a number. We place a battery-powered candle or garland inside. The New Year's house-candlestick made of corrugated cardboard is ready.
Milk packaging
Cute houses can be made from tetra packs. The box can be painted with gouache and windows and doors can be drawn or glued on. Or you can cut holes for windows and doors, then you will get a kind of flashlight, inside of which you can place an electric candle or a garland.
City skyscrapers
Let's make New Year's houses from milk cartons. Making such crafts is not difficult, so it is suitable for children. We cover the boxes with white paint. To prevent the paint from showing through, you can cover them in several layers. We paint the roofs with different colors. We draw windows and doors. We outline them with a black marker and add partitions. Drawing tiles. Mini houses are ready.
Gingerbread houses
From the same boxes you can make openwork houses. We cover the boxes with parchment or craft paper. Cut out small windows and doors. We outline them with a white marker. We place battery-powered candles inside. The result is very beautiful New Year's crafts with lighting.
Box from Raffaello
Carefully open the package. Cut out two triangles from embossed cardboard. Glue them onto the lid and cut off the excess. We make a border around the edges. We attach the roof itself, decorated with a red ribbon. We make windows and place flowers. You can put sweets inside the box and give the house as a New Year's gift.
Tea box
Cut off the top of the tea box. Cover the entire surface with burlap. We make a cardboard roof and wrap it with twine. We decorate the house with vegetation, beads and coffee beans. A do-it-yourself house is suitable for a kindergarten.
Cereal box
To make these New Year's houses, we will need cereal boxes. Carefully open them and place the inside side towards you. Draw a line along the box. We make cuts along the side bends to this line. We push through the bends and cut off the lid. Glue the box together. We connect the side parts to form a pitched roof. We cut the remaining parts to height. We leave valves on the side to connect all the elements. Glue the side edges, placing the flaps inside. All that remains is to cover the houses with colored paper.
Layout and plot
Cotton swabs are good for both simple crafts and large, “serious” compositions. Almost any plot can be invented and brought to life, if only there was time and material.
For the production of complex applications, models, drawings, together with the main material, use:
- ribbons;
- matches;
- plasticine;
- ice cream sticks;
- blanks, character figures, equipment, etc.
- sheet;
- buttons;
- wires;
- cotton pillows;
- beads;
- twigs;
Making a craft with your child for a children's competition, as a gift, or as a decoration is interesting, educational and exciting. Any result will please its creators.
To create quickly and not overload your child with complex work, you need to use simple material. A convenient base in this regard will be cotton swabs - a safe and convenient raw material for future masterpieces. After all, it’s always interesting to create something extraordinary from the most ordinary things.
Whatever your heart desires
Cotton swabs are a simple, affordable and versatile material for crafts. They are easily and harmoniously combined with various raw materials for creativity, so you can get interesting and sometimes stunning masterpieces:
- Sun;
- boat;
- bench;
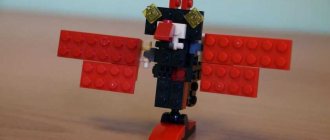
- airplane;
- all kinds of application abstractions.
- mushroom;
- bin;
- car;
- rainbow;
- heart;
What can be created from simple cotton wool?
In addition to cotton pads, children come up with crafts made from simple cotton wool. The safety and softness of such material will allow the child to work with it with pleasure.
For example, the “Poodle” picture is very easy to make. To do this, the following steps are taken:
- On a rectangular sheet of colored cardboard (preferably a bright color) paste a contour cut out of white cardboard with the image of a dog.
- Then very small balls are rolled out of cotton wool. Next, they are glued onto images of a poodle. It gives the impression of voluminous fur. The balls are not glued to the entire dog, but, like a poodle, to part of the head, tail, paws, and chest.
Execution order
Take a sheet of colored paper or make the tone you need on a landscape sheet (preferably blue).
First, draw snowflakes of the size and pattern you need with a pencil.
Now stick cotton swabs onto the diagrams of your snowflakes.
For a more lacy snowflake, where you need to glue small rays, cut the cotton swabs in half.
Making a house from scrap materials
We'll show you a few more options for making New Year's houses made from scrap materials.
New Year's house made of cookies
This gingerbread house will decorate any New Year's table. You need to prepare cookies, icing and candies for decoration. Mix all the ingredients for the glaze and place it in a pastry bag. Cut off the tip of the bag. Cut off the top of two cookies. From another cookie we make two triangles and connect them to the rectangles using icing. We connect three cookies together. We glue two walls with triangular tops to them. Glue the roof. We coat it with glaze and decorate it with sweets. Gingerbread houses can be placed on a plate with powdered sugar and Christmas trees. The result was beautiful, and most importantly, delicious New Year's houses.
Matchbox house
We cover match boxes in any color. Inside we draw miniature rooms and paint them. We finish drawing the bricks and windows. We glue the boxes together and put residents in them.
Chocolate house - step-by-step MK with photos
Cut out the details from chocolate. To hold two tiles together, you can slightly heat the joints. We connect all the tiles. Decorate the sweet craft with marmalade, marshmallows or candies. If you sprinkle a New Year's house with powdered sugar, you will get a snow house.
Making a house with your own hands from salt dough
Roll a small cylinder out of foil. Wrap it in a layer of salted dough. We cut rectangles and form the front door. We cover the entire surface of the house with pebbles made from dough balls. We place the craft on a stand with the same stones. We decorate it with flowers. For the roof we will use the top part of the bottle, wrapped in foil. Cut out flowers with a cookie cutter. Make a round hole in the middle to separate all the petals. Cover the bottle with petals. We fashion a tail on top. We press out the veins on all the petals. Drying the craft. We paint the sunflowers yellow, the base brown, and the house itself red-brown. The voluminous house can be varnished.
DIY plasticine house
Redraw the drawing onto paper and cut it out. Cover the entire surface with plasticine. To make your home seem more interesting, you can use several shades of brown. Also, there is no need to try to make the coating even - the walls should be embossed. Next, we complement the walls with windows and doors. Carefully connect the walls of the house. We roll thin strands into spirals and decorate the corners with them. Cut the cardboard roof to size. We make identical leaves and cover the cardboard with them. We attach it to the top of the house. We complement the craft with grass and a figurine in the shape of a cat. Such a New Year's house can be made from clay.
We have looked at various options for New Year's crafts, the making of which will take all family members. Making such crafts is quite simple and economical, because most of them use unnecessary materials. If you show your imagination, you can come up with even more original New Year's ideas.