Plastic pipes for heating are convenient in any processing. A strong and very reliable connection is ensured by accessories, which are abundantly available on the market (corners, splitters, clamps, clamps, couplings, etc.). In addition to its direct purpose, PVC pipes can be used to make a variety of products that will be useful in everyday life. For example, assemble a clothes and linen dryer as a “constructor set”.
In fact, there are many options for dryers made of polypropylene PVC pipes: stationary, portable (folding), multi-level, hanging on a radiator or on a wall. Let's look at a couple of examples step by step.
How to carefully bend a PVC pipe
If the pipe is simply heated and bent, a crease will form. A beautiful bend is made in different ways. The simplest: heat and bend slightly. Let it cool, heat it up again, bend it a little more, and so on until the desired bend is obtained.
Second method: seal the end with tape, fill the pipe with sand, seal the other end. Heat and bend. Sand will prevent the pipe from breaking at the bend.
How to make electric dryers
To create an electric dryer we will need the following.
- 2 computer coolers.
- 12 volt power supply.
- On/off button
- Cardboard box.
- Wires.
- Pencils for glue gun.
- Corrugated pipe 2 m.
- Scotch.
- Sewer plastic couplings.
We also need such tools.
- Jigsaw.
- Glue gun.
- Scissors.
Manufacturing
- Remove the lid from the box and make two holes in it the same size as the coolers.
- Use hot glue to securely secure the coolers to the lid.
- Connect the cooler wires in parallel. That is, plus to plus and minus to minus, in this case we will not lose the power of the coolers.
- Also make a small hole in the lid and install a button.
- Make a hole in the bottom of the box and insert the wire from the power supply. Be sure to seal the hole.
- Now you need to connect the electrical circuit. One lead of the cooler is routed through the button. In this case, it will be possible to turn the dryer on and off.
- At this point, test the circuit and plug the power supply into an outlet. If air is expelled from the box, then you need to change the polarity of the power supply connection.
- Make 2 holes in the side wall and use hot glue to fix the sewer couplings in them.
- Cut the corrugated pipe in half and then use tape to attach the pipe sections to the couplings.
Now our dryer is ready for use! The power supply needs to be plugged into the outlet, then install the pipes in the shoes and turn on the power button . Air will be forced into the box and blown out of the pipes, thereby quickly drying wet shoes.
From our article you learned different ways to make dryers with your own hands. We wish you success in production!
How men are led away with a button: superstitions
How to make shoe insoles with your own hands
Docking
Cuttings of different lengths are joined using couplings, angles and tees. All connecting elements are sold in plumbing stores and are not expensive. For plumbing, pipes are soldered using a special electric curling iron. A clothes dryer does not require sealed joints. The corners can simply be heated, and the end of the pipe will easily fit into the widened hole. This is how simple and complex frames are assembled. You can use glue.
Designs of homemade dryers.
- frame;
- consoles;
- racks;
- stairs;
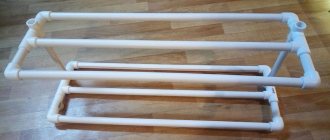
Installation of a simple dryer on a heating radiator
This homemade product is simple and suitable for those who want to try their hand at assembling products from polypropylene tubular material.
The table provides step-by-step assembly instructions:
For assembly you will need four pieces of plastic tube with a diameter of 25 mm, four corners suitable for the selected diameter (25 mm), two M8 bolts (110 mm long), as well as two nuts for the same thread (M8). In addition, it is advisable to have two washers and a heat-shrink tube for the bolts so as not to scratch the radiator (not shown in the photo)
Using a pipe cutter, cut two pieces of tubular material 60 cm long and two pieces 70 cm long. To fit the angle tightly onto the pipe, use a PVC pipe soldering iron. The angle and pipe are heated by the device, then removed from the metal heaters and immediately connected to each other. This ensures a tight connection
The result should be a rectangular outline
In one of the 70 cm long tubes, drill two holes with a diameter of 8.5 mm. If you want the structure to stay on the radiator more firmly, you can drill three holes. Insert the bolts into them so that the heads are inside the outline
Place washers on the threaded side of the bolts and tighten the nuts. Then put on the heat shrink tubing (if you have one) and heat it with a hairdryer until it fits tightly around the bolts
In both tubes, which are shorter (60 cm), drill 5 holes with a diameter of 3-4 mm
Pull a laundry cord through the holes in the tubes, as shown in the photo. To keep it well, tie a double knot on one side. Once the cord is fully stretched, secure it with the same knot at the other end. This completes the process of making a simple clothes dryer
After watching this video, readers will be able to familiarize themselves in detail with the process of making a clothes dryer:
Frame
You will need 4 pipe pieces and 4 angles. The frame is attached to the wall with hooks or hinges, in the bathroom or on the balcony. Stretch ropes across the frame - you can simply tie them. Or make a series of holes in the pipes and secure the ends of the rope in them.
The frame hangs on the wall. To dry clothes, it must be raised to a horizontal position. Support the free end with a stand, tie it to the ceiling or wall - as convenient for the hostess.
You can make any number of cross members in the frame using tees. It is more convenient to hang things on them than on ropes.
Features of working with polypropylene pipes
Plastic tubes of different diameters are easy to process. A reliable connection is ensured by accessories that are also on sale - corners, splitters, clamps, clamps and others.
Any product can be made from pipes, like a “construction set”. Then, if necessary, it can be easily disassembled for transportation or storage. And when needed, it can be easily reassembled. One of the main tools that you will need to purchase for the job is a pipe cutter (see photo below).
In addition, a special soldering iron for plastic pipes will be useful, with the help of which tight connections of parts with corners, tees (fittings) and other accessories are obtained.
Before you make a clothes dryer with your own hands from plastic pipes, you need to prepare a sketch, accurately calculating the dimensions of the product and the pipes from which it will be assembled. Then you should take measurements with a tape measure, make marks with a pencil and cut off the required pieces of material.
Racks
Before you begin assembling a more complex structure, you need to make a drawing or sketch. So as not to make a mistake with the number of corners and tees. On the sketch it is easy to calculate the length of all horizontal and vertical pipe cuts, taking into account the dimensions of the joints.
The simplest stand is a parallelepiped. It can be supplemented with any number of longitudinal and transverse jumpers. Place the rack near the radiator, hang small things on top, and put shoes underneath to dry.
A large rectangular sheet drying rack requires additional supports in the middle. It will be more stable if the sides are made in the shape of a trapezoid.
DIY clothes dryer made from plastic pipes
Interesting!
Astronauts, while in Earth orbit, solve the problem of dirty things using an original method. Clothes are dropped from the spacecraft and burn up in the upper atmosphere.
Washing machines have something to do with the origin of the expression “money laundering.” In the 1930s, American gangsters used a network of laundries as a cover for their illegal activities. By passing off the proceeds of crime as proceeds from cleaning clothes, they turned “dirty” money into “clean” money.
For washing small items on the road or in a hotel, it is convenient to use a regular plastic bag. Socks or tights are kneaded inside a tied bag along with water and a small amount of detergent. This method allows you to pre-soak things and wash them without damaging the fabric or wasting a lot of powder and water.
The first officially patented washing machine was made of wood and was a box with a frame, half filled with wooden balls. Laundry for washing and detergent were loaded inside and the frame was moved using a lever, which, in turn, made the balls move and grind the laundry.
There is a washing machine “for bachelors”. Linen washed in such a unit does not need to be ironed at all! The thing is that the device does not have a drum: some things can be placed inside the container directly on hangers (for example, jackets and shirts), and smaller things (for example, underwear and socks) can be placed on special shelves.
History knows the fact that a kitten fell into the drum of a washing machine and, after going through a full wash cycle on the “Wool” program, got out of the unit unharmed. The only trouble for the pet was an allergy to washing powder.
In the 19th century, washing ladies' toilets took a lot of time. The dresses were first ripped open, and then each part was washed and dried separately so that the fabric did not become deformed. After washing, the clothes were sewn again.
Washing machines equipped with the “No Iron” or “Easy Iron” functions can wash clothes with little to no wrinkling. This effect is achieved through a special approach to spinning - it is performed at low speeds, with long pauses, and a small amount of water is retained in the tank.
There are a variety of balls that are used in the washing machine. Antistatic ones will prevent the fabric from sticking to the body after washing, balls with special loops will “comb” the lint and prevent the appearance of pills, and silicone ones with pimples will prevent fluff from matting when washing outerwear.
Calculations and drawings
You can design a chair from pipes on a piece of paper or a personal computer. There is no need to make complex calculations, since the products have a simple design.
When planning your work, you should consider the following nuances:
- Using the curvature factor. Curved fragments look more interesting and attractive than straight links. A chair with a sloping back will fit better into any interior. You can give the workpiece a curved shape by slowly heating it over an open flame. Then it is carefully bent and fixed until it cools completely. Another way is to use factory-made contours.
- The length of the pipes is selected taking into account the fact that part of the workpiece will be immersed in the fitting. This distance is 20-50 mm depending on the type of plastic pipes. Before drawing up the drawing, you need to experimentally measure how far the links fit into the coupling opening.
- It is better to take a sample that is comfortable to sit on as a basis for the project. You can supplement it with your own ideas. Please note that plastic bends under pressure. To increase the strength of the finished product, transverse ties are provided on the legs and seat. Reinforced plastic is much more practical than analogues without aluminum inserts.
- The diagram is drawn to scale with an accuracy of 1 mm. It displays all the details, places and order of joining of workpieces to each other, couplers and partitions. An option is provided for cutting blanks, in which the amount of waste will be minimal.
- If the workpieces are joined without glue or soldering, then the joint must be strengthened. To do this, screws are used, which are screwed in so that they tighten and fix both fragments. It is better to screw hardware on the underside of the pipe and from the back. This way they will be practically invisible.
The finished diagram is the basis for carrying out calculations of building materials.
Coffee table
Don’t think that this item in the interior will look ridiculous or massive. If you assemble it correctly, add decorative elements, and paint it in one or more colors, then this attribute will fit into any design.
Use your imagination and look for non-trivial approaches.
At the first stages of drawing up drawings, you need to decide on the material for the countertop. It can be plastic, tempered glass, wood, steel. You can use the old surface of a disused table.
A glass tabletop is usually attached to the top of the plastic frame.
After this, the pipes are cut and connected using fittings. If you include jumpers in the design, this will make the coffee table more durable. The tabletop can be secured with self-tapping screws. A great idea is to attach wheels to the legs of furniture fittings. This will make this product mobile.
Carefully consider the size and design of the future piece of furniture.