In winter, one of the most significant holidays of the year is celebrated - New Year. The celebration stretches over several days, extending into the Christmas holidays. By this time, every person strives to decorate their apartment or private house using festive illumination.
It is absolutely not necessary to buy lamps in a store: you can make an LED garland yourself, and we are talking about autonomous devices that are powered by batteries, or more demanding industrial ones connected to a 220 V AC electrical network. A product made with your own hands will seem much more attractive and brighter, so it will become the main New Year's decoration in the house.
LED garlands are not too expensive, but it is still much more pleasant to enjoy your own creation. In addition, you can create a light source that fully satisfies individual needs. Finally, the cost of homemade products will still be several times less.
Features of installing a garland with your own hands
First, let's figure out how the garlands are arranged and what are the main differences. The main fundamental difference is the scheme used, depending on which the garlands are divided into several types:
- classic garland-thread;
- net;
- a curtain;
- icicle;
- duralight (a type of LED strip);
- keeplight;
- Strobe light with unique flickering.
Important! You should pay attention to the power of the LED diodes used. Products used outside have a higher efficiency, since almost all the energy is converted into glow, and not heat, as happens with conventional garlands, and is most clearly noticeable when using an incandescent lamp.
These devices are protected from various negative factors, including precipitation, extremely low or high temperatures, strong gusts of wind, and moisture.
Is it worth it or not to redo it?
There will be a question about price. Yes, it rose during the remodeling process. But almost all homemade products are more expensive than the originals. The main thing that distinguishes homemade products is their originality. And you can’t buy one like yours in the store. The garland works. Can be hung on a Christmas tree, on a window, on a shelf. Take it with you to nature, to a party, to the street. The result was not a large mobile universal garland.
This and other garlands can be bought in this online store, and using the promotional code OZON0KCH5H, you will receive a 300 ruble discount on your purchases. Come in and buy gifts for yourself and your friends and family. Goods arrive quickly.
That's all. Write comments, read other articles on my website.
To Home Page.
Selection of necessary materials and components
To make your own LED garland, you will need the following tools, materials and components:
- soldering iron with rosin and solder;
- insulating tape;
- heat-shrinkable casings that increase insulating properties;
- LEDs;
- resistors.
LEDs can be obtained by disassembling non-working computer accessories - keyboards and mice. The correct functionality of a homemade garland depends on the quality of the selected components and connections and the reliability of the operating scheme.
When diodes are connected in series, they will work, but the voltage will increase significantly, which will increase the amount of heat generated, and ultimately lead to failure of the device. This is the main reason for the use of resistors, which reduce the voltage and change other input current characteristics, due to which the color changes when the sources glow.
LED selection
The main elements of the garland are LEDs. The main technical and operational parameters are considered to be operating voltage and current flowing in the forward direction. Both characteristics will be needed to calculate the electrical circuit and electricity consumption.
On average, an LED operates at a current of 20 mA. To reduce the amount of electricity consumed, resistors are used, and the resistance value of this element depends on the parameters of a particular LED diode. You can find many calculators on the Internet that allow you to perform a simple and quick calculation of the resistor for the selected LED.
The supply voltage of the element indicates the moment when the voltage drops at the pn junction, which occurs due to the internal resistance of the product. In other words, if we are talking about a 12 V power supply and 3 V LEDs, then no more than four of these devices can be connected in series, since each of them reduces the supply voltage (12 V) by the value of its own (3 V). If you add a fifth element to the circuit, it will practically not glow.
The voltage depends on the specific manufacturer and LED colors. For example, diodes with blue, white and green crystals have an operating voltage of 3 V, yellow and red - 1.5-2.5 V. The power consumption of diodes is calculated according to one of Ohm’s laws: P = U * I, where P is power , U and I are voltage and current, respectively.
If we consider the values given above, then when we substitute them into the formula we get the following value: 3 (V) * 0.02 (A) = 0.06 W. When 4 LEDs are connected in series, this characteristic will increase to 0.06 * 4 = 0.24 W. When a limiting resistor is connected in series, the voltage will increase by another 0.06 W, so the total power consumption will be 0.30 W. If you use several groups of 3 LEDs that are connected in parallel, then this value must be multiplied by their number.
Important! These are not the main characteristics of LEDs. It is also important to consider luminous output, beam angle and color temperature. Light output can be calculated depending on the dimensions of the product: for elements with a diameter of about 5 mm, this value is 1-5 lm. White and blue crystals shine much brighter than colored ones. They even come in super-bright colors.
The luminous intensity of a red 1.8 V LED diode is 0.2-2.0 cd, white - 10-20 cd. However, these characteristics do not make any adjustments to the calculation scheme and are selected solely based on the purposes of further operation of the device.
Resistor selection
When choosing resistors, you need to focus on power and resistance. The second parameter depends on the number of LEDs connected in series to the circuit and their operating voltage, the power depends on the current value. Using a 0.125 W resistor will almost always be sufficient.
When operating 3 V LEDs, it is customary to use resistors with the following resistance depending on the number of elements:
- 1 LED – 470 Ohm;
- 2 – 300 Ohm;
- 3 – 150 Ohm;
- 4 – 1 Ohm.
If you plan to operate diodes with a voltage of 2.1 V, then the relationship will be as follows:
- 1 LED – 510 Ohm;
- 2 – 390 Ohm;
- 3 – 300 Ohm;
- 4 – 180 Ohm;
- 5 – 75 Ohm.
Selecting a power supply
In the case of an LED garland, a 12 or 24 V power supply with a reserve of output power (approximately 25% on top of the total power consumed by the circuit) must be used. The choice of a specific block depends on the number of LEDs - for a circuit with 7 or more elements, it is advisable to use a 24 V product.
The 24 W unit allows you to switch 11 series-connected 2.1 V diodes or 6 3 W diodes. It will almost always be enough to use a small power supply with a voltage of 24 V and a current of 0.5 A with an output power of 12 V.
What models are there and how do they differ?
As already written above, fringe garland models differ in the type of design (degree of tightness), the number of LEDs used (garland length), as well as the type of light sources used (LEDs).
Here are some popular models of garlands of this type among users:
"Icicle" or "Icicle".
The model simulates icicles of different lengths hanging from the main wire laid horizontally.
Product Specifications:
| Length, mm | Number of vertical threads | Number of operating modes | Glow color | Degree of protection | Number of LEDs | Electrical power, W |
| 2400 | 24 | 1 | white | IP44 | 88 | 5,5 |
“Icicle” can be used indoors or as an outdoor “fringe” garland, which is possible due to the appropriate degree of protection. The supply voltage for this model is 220 Volts.
As of the second quarter of 2022, the average cost of Icicle is 1,500.0 rubles.
"RGB Chameleon Rich LED 5x0.7."
This model uses RGB LEDs, which makes this garland in demand when decorating an area in color. The color of the LEDs changes dynamically for 4 minutes, after which the cycle repeats again. The product is supplied with a connecting cord, with which you can connect two garlands together. If it is necessary to install a larger number of products (up to 6 pieces), an additional power supply will be required to ensure normal operation of the assembled structure (model RL-220AC/DC-10A-ARGB or similar). Supply voltage – 220 Volts.
Model specifications:
| Length, mm | Number of vertical threads | Operating mode | Glow color | Degree of protection | Number of LEDs | Electrical power, W |
| 5000 | – | glow with dynamics | RGB | IP54 | 198 | 23,0 |
As of the second quarter of 2022, the average cost of this model is 6,000.0 rubles.
"Melting Icicles"
Garlands such as “Clip Light Spider Melting Icicles” (“LED ClipLight”) are also very popular when decorating outdoors. As a rule, LED ClipLight garlands are hung on trees and serve as decorative elements in parks and squares. The supply voltage for such products is 12 (24) Volts, and a special power supply is used to connect to the electrical network.
The length of the main wire and the number of icicles may vary in different configurations.
The technical characteristics of one of the configuration options are presented in the table below:
| Length, mm | Number of icicles | Number of operating modes | Glow color | Degree of protection | Number of LEDs | Electrical power, W |
| 10000 | 10 | 1 | white | IP54 | 800 | 8,2 |
As of the second quarter of 2022, the average cost of this modification is 7,000.0 rubles.
Currently, the illuminated advertising market is dominated by Chinese-made models, so when choosing an LED garland, you should study the reviews of experienced users that can be found on the Internet, so as not to make a mistake when choosing a product.
In addition, the following video will help a potential buyer:
Previous LED How to choose an LED lamp for your home Next Garlands How to make a retro garland from light bulbs and LEDs
Thank you, it helped! It didn’t help
Calculation of connection diagram
Even series-connected LEDs must contain a current-limiting resistor in the circuit:
- red elements with a voltage drop of 1.5-2 V - a resistor with a resistance of 420 Ohms;
- green and blue at 3-3.2 V - 82 and 75 Ohms, respectively.
You can use a standard 220 V controller for RGB technology with a common anode: “minus” is supplied to all channels, and “plus” is supplied to the common cable.
Simple option
Before starting work, you need to prepare the tool. To work you will need: pliers, soldering iron, scissors, tape measure, screwdriver, electrical tape, power supply, 10 LEDs, wire and plug for connecting to the power supply
Particular attention should be paid to the wire. For 10 LEDs, you need to purchase a 6-meter wire
It is recommended to use twisted wire as it is the most visually attractive.
At the next stage, a diagram of the garland is drawn up, in accordance with which further work is carried out. Afterwards, you need to cut the wire into 9 identical parts of 50 cm each and 1 part 150 cm long. After that, you need to strip the ends of the wires. If you have a tool at hand for cleaning cables from insulation, then it is better to use it, since in this case the wire cores will definitely not be damaged.
Next, you need to connect the wires using a soldering iron. The best option would be a parallel connection. In this case, if one LED unit fails, the entire garland will continue to function. Even the brightness of the remaining light sources will remain at the same level.
Do not forget that to connect the garland to a 220 volt network, you must use a power supply that converts the measured network voltage into direct voltage. After all connections are completed, all that remains is to connect the device to the network. In this simple way, the device for decorating your home and creating a festive atmosphere is ready.
It is worth noting that the LED garland can also have a serial connection, but in this case there is one important nuance. If one of the LEDs fails, the entire garland will be inoperable.
Making a garland of LEDs
With LEDs connected in series, you can create a flickering garland. Its creation will take a minimum of time, and almost anyone with basic electrical knowledge can cope with the task. The most important thing in this case is to strictly follow the instructions.
To assemble an LED garland yourself, you need to follow the steps in the following order:
- Decide on the desired distance between adjacent sources (diodes).
- After unwinding the wire, use a marker of any color to make the appropriate marks on the places where the LEDs will presumably be installed. Ideally, the distance between them should be 200-250 mm.
- At those points where marks were left, remove the insulation from the wire, creating “bare islands” 20-30 mm long. You need to act carefully so as not to damage the cable itself. This will simplify the process of future diode mounting.
- To such areas you need to apply rosin and solder.
- Attach the LEDs to the resulting nodules by connecting their legs to the wire with a soldering iron. Please note that this fastening option will be less reliable, so you will have to use reinforcing clamps, which will also cover the exposed parts of the garland.
- Cut the narrow tape into different pieces 30-40 mm long, then use it as insulation for diodes. As a result of these steps, each LED should be located in a “pocket” that holds it firmly to the cable. You need to wrap all the light sources on the wire.
- Then you need to ensure the top of the “pocket” is sealed. For this purpose, silicone sealant is suitable, which not only increases the strength of the structure, but also improves the glow.
- All that remains is to connect the resistor and power supply to the circuit, and then test the operation of the homemade equipment.
Note! This type of garland is not afraid of the cold, so it can be used in external illumination systems. In this case, it is recommended to use 8-12 V power supplies. To check the performance of the product, you can use a smartphone battery or a power supply from charging the phone.
Preparing to create a battery-powered LED garland
An LED garland connected to batteries looks no less beautiful. In addition, such a product will be as safe as possible for children. This type of illumination is used as an external light source. When moving in the air, a bright multi-colored trail will remain, which designers often use to create various patterns in space. The product must be protected from wind, precipitation and low temperature.
To produce a battery-powered garland you will need:
- LEDs with a diameter of 10 mm of different colors with a scattering effect;
- magnets with a diameter of 1.3 and a thickness of no more than 30 mm;
- electrical tape or narrow tape;
- lithium battery (for example, CR2032 3V);
- epoxy adhesive.
The process of making a garland using lithium batteries
To create a bright shimmering garland you will need to perform high-quality soldering. There is no need to rush while completing the work. Be patient, be careful and attentive, follow the steps:
- Test the LEDs to see their light levels. Connect the components to the lithium battery one by one (connect one longer leg to the “plus”, the other short leg to the “minus”).
- Fix the position of the diodes, then wrap each element along with the battery with adhesive tape or electrical tape in 2 layers.
- Align the magnet with the positive contact of the battery, fixing it.
- Each part of the structure must be installed on a thin wire. Check the functionality of the product!
Using resistors in pairs
In this case, you can reduce the cost of the product by making it more economical, but remember: it is much better from the point of view of electrical safety and equipment durability to connect each LED with its own resistor. Plus, the latest components are cheap.
I was absolutely delighted when I found out why she put the Christmas tree garland in a plastic bottle.
DIY decorative crafts are always a very exciting activity. And most importantly, you can create completely unique things without spending huge amounts of money. We want to share holiday decoration ideas with you and tell you how to create a very stylish and multi-functional stand. It can be used to store accessories and other things, as a candle holder or simply to decorate a dressing table.
New Year is just around the corner, and we decided to offer a couple of holiday decor options.
1.Get pine cones and small plant pots or silicone muffin tins. Secure each pine cone into the container with glue. Paint the cone with green paint and decorate the edges with glitter or silver paint. Attach a star to the top. The mini-Christmas tree is ready!
You can place it in your car or simply place these Christmas trees around the house.
2.Make a super cute garland: attach small pine cones to string or thin strips of fabric bag. You can add beads or other shiny objects. The garland will create a very cozy homely atmosphere.
3.Use cinnamon sticks to make a natural scented candle. Place a regular candle in a tall glass or small glass vase. Place cinnamon sticks around it. To make the mood even more festive, you can add pieces of orange zest.
4. Here's another awesome idea.
YOU WILL NEED
center>
- leg-split
- PVA glue
- balloons
- scissors
- big needle
- spray paint
- beads or other items for decoration
PROGRESS
Inflate the balloon. Keep in mind that the volume of the future stand is half a ball.
Insert one end of the twine into the eye of a gypsy (large) needle. Next, pierce the bottle of PVA glue and pull the twine through it, as shown in the picture. You won't need a needle anymore.
Wrap the ball with thread and glue. The density of the layers depends on the desired result. Leave the ball for a while until the glue dries. Then pierce the ball with a needle and remove it through the hole.
Cut the resulting ball in half. The threads that will stick out must be carefully removed or tucked inside.
Decorate the stand with beads or other items. A simple version of the stand is ready. It is perfect for storing jewelry. For a more stylish and festive option, paint the item with silver or gold spray paint. This option creates a romantic atmosphere and is perfect as a stand for a candlestick. It will be very beautiful if you place a stand near the Christmas tree.
For the New Year, everyone strives to create a festive atmosphere in their home. And creative ideas on decor are a dime a dozen now. A wide variety of materials are used. We want to share another great idea on how to make a decorative lantern from a plastic bottle and garland. It will look very cute on a windowsill or chest of drawers...
It's the details that make the atmosphere! In addition, recycling plastic will benefit the environment.
MATERIALS
- plastic empty 2 liter bottle
- electric LED garland
- parchment or wax paper
- colored paper for creativity
- stationery knife
- scotch
Attention! Before you start creating a lantern, make sure the garland is safe! Be very careful when choosing an electrical device! Garlands with low-voltage miniature LED bulbs are considered safe. They are economical, emit a lot of light and practically do not heat up.
Pay attention to the package. In addition to the garland itself, the box must contain a transformer. This device reduces the voltage from the mains.
Cut off the top of the bottle.
Closer to the bottom of the bottle, make a hole with a knife through which bring the plug and part of the cord out.
center>
Insert the garland into the bottle.
Cut out a rectangular piece of parchment paper so that you can wrap it around the bottle.
Secure the edges with tape.
On a piece of colored craft paper, cut out windows of any shape you like.
Wrap the bottle in colored paper and also secure with tape.
Find a place in your home for this wonderful bottle lantern and enjoy the holiday!
As a bonus, we are giving you a video in which you will also see a wonderful idea for decorating a photo frame.
takprosto.cc
How to make a garland of light bulbs with “running lights”
To create a festive illumination with “running lights” you will need at least 3 garlands, and each of them should consist of several groups of parallel connected “flashlights”. To recreate such a glowing effect, you will need a three-phase multivibrator with transistors, which are designated VT1, TV2 and VT3. A 0.1 µF capacitor is installed in the arm of the second transistor, which greatly simplifies the launch of the product.
You will need a two-half-wave rectifier to power the machine. We are talking about rectifier diodes VD1, VD2, VD3 and VD4. Do not confuse them with LEDs!
This option will allow you to create a wide variety of shapes - from a circle, triangle or square to a heart and thematic figures (snowman, Santa Claus, Snow Maiden, deer in harness).
What types of luminous Christmas tree decorations are there?
New Year's designs sparkling with lights for decorating a thorny tree are sold in a wide variety.
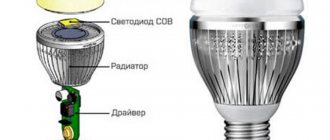
The peculiarity of modern lighting is the use of special lighting devices - these are tiny LEDs, which are distinguished by a number of positive qualities:
- low power consumption;
- long service;
- low heating temperature;
- resistance to mechanical damage and temperature changes.
But if ordinary LED illumination is no longer a curiosity, then battery-powered street lighting structures are not yet so common. By the way, this is a very convenient and practical solution.
It will be especially appreciated by residents of private houses who, for one reason or another, cannot count on connecting to the power grid. They will hang the wires along the branches of the forest beauty with their own hands, and then simply turn on the button on the block where the batteries are inserted. The Christmas tree will blink with cheerful lights, even if there is no light in the house.
Also, a Christmas tree LED garland is convenient if there are frequent power outages. It looks impressive, especially since there are no extension cords or wires attached to it: only tiny flickering lights are visible to the eye, and nothing superfluous.
It is also rightly called mobile: you can place a New Year’s tree in any corner of the yard and even move it from place to place, without worrying about connecting to the network.
Model overview
Among the variety of models of solar-powered garlands for the garden, the most popular among users are the following models:
"Butterflies Start Garden 24led."
The body of the garland lampshades, in which the LEDs are placed, is made in the shape of butterflies. At night it runs on one AA battery and has the following technical characteristics:
| Material | LED type | Battery capacity, mAh | Number of operating modes | Length, mm | Operating time on one charge, hours | Degree of protection |
| plastic | RGB | 600 | 1 | 6014 | 10 | IP44 |
The average cost of a garland as of the second quarter of 2022 is 600.0 rubles.
"Uniel USL-S-128-PT9900 Rosa."
This is a linear garland, its technical characteristics:
| Material | LED type | Battery capacity, mAh | Number of operating modes | Length, mm | Operating time on one charge, hours | Degree of protection |
| plastic/metal | RGB | 600 | 1 | 9900 | 8 – 10 | IP44 |
The average cost of the model as of the second quarter of 2022 is 850.0 rubles.
"Camelion SGD-10 "Garland".
The model is also linear, its technical characteristics:
| Material | LED type | Battery capacity, mAh | Number of operating modes | Length, mm | Operating time on one charge, hours | Degree of protection |
| plastic | white | 1200 | 2 | 8000 | 8 – 10 | IP44 |
Camelion SGD-10 costs on average 950.0 rubles (as of April 2019).
"Uniel USL-S-126-PT4000 Bulbs."
A special feature of this model is the lampshades, made in the form of a regular incandescent lamp, and LEDs are placed in them.
Technical characteristics of the garland:
| Material | LED type | Battery capacity, mAh | Number of operating modes | Length, mm | Operating time on one charge, hours | Degree of protection |
| plastic/metal | RGB | 600 | 1 | 4000 | 8 – 10 | IP44 |
The average cost of the model as of the second quarter of 2022 is 900.0 rubles
The bulk of garlands presented on the domestic market are made in China. Therefore, when purchasing, you should choose models from the most well-known brands that monitor the quality of their products.
The following video will tell you about one of the modifications of a solar-powered outdoor garland made in China and purchasing it via the Internet:
Previous GarlandsHow to make a retro garland from light bulbs and LEDs Next GarlandsHow to choose a “LED curtain” garland and use it correctly?
Thank you, it helped! It didn’t help