Don't throw away boxes; craftsmen use them to create beautiful and functional objects. To make sure all tubes, lipsticks, and shadows can be easily found, there are special organizers on sale.
They are expensive, so it is better to make an organizer for cosmetics from boxes with your own hands. First of all, they think through all the details. There are many options for this product.
They create stationary models for home use. They are placed on the dressing table, bedside table, chest of drawers. You can opt for a wall-mounted version.
Craftswomen also create travel cases. They are made of fabric, so the products are easy to roll. This roll is ideal for travel. It takes up little space in your luggage.
Organizer made from boxes
The base of the product will be a simple box. It can accommodate many containers of different sizes. A DIY cardboard cosmetics organizer should be wrapped in paper. Glue or a stapler is suitable for these purposes.
Cups are made from dense material. You should measure the main container to calculate how many modules will fit in it. Each element is also covered with paper. Then they are all placed inside the base.
Step-by-step instruction
The process will take no more than 2 hours. This can be done much faster if you have already gotten your head around and sewed more than one organizer. So, the course of action is as follows:
- Make a pattern on graph paper or other suitable paper. The scheme is as follows: for the base, draw a rectangle measuring 40x20 cm (standard for brushes). For small instruments – drawing 30×15 cm, for large ones – 40×10. Cover for the case – 30×10 cm.
- Transfer the pattern to the selected material. You will need 2 bases, 1 compartment for small tools, 1 for large ones and 2 covers.
- Cut out the outlined elements.
- Start stitching or gluing the pieces. To begin, connect the two lids using thread, glue or tape. Edge 3 out of 4 sides with bias tape.
- Make a hole in one of the bases for the fastener. Dimensions – 1.5x18 cm. Fasten the zipper in the fabric.
- Sew a “small” compartment to the base and make seams along the width of the tools, the distance between them is 3-4 cm.
- Attach the “large” section to the “small” section, making seams at a distance of 4-5 cm.
- Sew the two bases and separate the pocket with the zipper using a special seam.
- Attach the lid to the base.
- Finish the free edges with bias tape.
- Sew a lace in the center and add details to the product if desired.
Ready! Now your tool kit will get damaged in one place and it will be difficult to lose your tools.
Cardboard tubes
After using cling film, cardboard tubes remain.
They are suitable for creating an original product. You can use toilet paper rolls. The bottom of any box will serve as the base. Cardboard tubes are placed in it, which are attached to the bottom of the container.
The box is covered with wallpaper and colored paper. It is decorated with rhinestones, ribbons, and other decor.
This option is great for storing paintbrushes, pencils, and brushes. For tubes, jars, and bottles, it is better to choose a different type of system.
Pencil case made from a plastic container
A suitable container with a lid (this can be either a food container, a juice/water container or a liquid soap container)
Decorative paper (or thick construction/wrapping paper).
1. Cut the required piece from colored paper.
2. Using a brush, apply PVA glue to the container.
3. Glue a piece of colored paper and, while the glue is still wet, adjust it so that everything is even.
The pencil case is ready, but you can decorate it with glitter, stickers and other details.
Wall organizer
It is made from thick fabric. To do this, you should provide many pockets for different products. This option will save space on the dressing table. It can be decorated to match the style of the interior of the room.
A DIY fabric cosmetics organizer will help you maintain order. Each tool will have its place.
Wall craft pockets come in different sizes depending on what item is being stored in them. The model looks original with elements from different fabrics.Travel case
It is convenient to store such a mobile product in a rolled up state. It will take up minimal space in your travel bag.
The organizer is used if necessary. The canvas with different pockets and sections is suitable for storing lipsticks, creams, powders and other products.
To get the job done, you should use step-by-step instructions for creating a do-it-yourself cosmetics organizer. For storage, the product is tied with a ribbon. At home it can be mounted on the wall.
Special cases and suitcases for storing cosmetics
For the laziest, go to the store and buy a ready-made case for storing cosmetics. Here are a few examples of successful options, using which you won’t have the desire to turn everything upside down and quickly find the right shadows.
We make it ourselves
If you like creating things with your own hands, this is a great opportunity to get creative.
Cosmetics painting
You can make a picture on a metal base and place cosmetics on it (by gluing magnets to each box in advance).
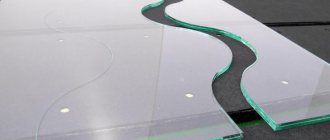
Decorative vase for brushes
And to store cosmetic brushes, you can make a beautiful decorative glass. You can decorate it with applique or wrap it in foil.
If you have a beautiful glass container, you can also use it to store brushes by filling it with bulk material. These can be purchased decorative stones, glass or beads.
Or, as an option, coffee beans, coarse sand, coarse brown sugar or colored sea salt.
Homemade chest drawer organizers
When you want to keep cosmetics out of sight, a dresser drawer is the best choice. But if you just put everything there, you might end up breaking your head while searching for it. With a little creativity, you can make cute pockets and compartments to make it easier to find the box you need.
Let's get inspired
If you’re too lazy to make pockets and compartments on the shelf yourself, we use ready-made options - from special IKEA ones to any that we can find on sale.
Here are some interesting solutions for storing cosmetics that I could find on the Internet. Get inspired!
PS
I hope this publication was useful and helped you decide how best to store cosmetics and toiletries.
How do you store cosmetics and what tricks do you know?
Source: https://blondnotes.ru/shkatulka/xranenie-kosmetiki-interesnye-idei-i-foto.html
Product made of fabric and cardboard
Textiles are used to sew a convenient storage system. You should place parts made of thick cardboard inside to give the organizer the desired shape.
Products are often complemented with pockets on the inside and outside. You should definitely decide what size the organizer for cosmetics you create yourself should be.
Then fabric and cardboard are selected. You can use a ready-made scheme developed by experienced craftsmen.For vegetables
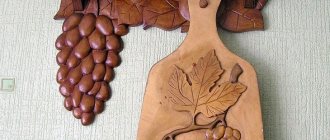
A cardboard box can also be used in the kitchen. It is useful for storing vegetables. It is enough to simply decorate it on the outside, and make dividing partitions for each type of product inside. This way you can store not only vegetables, but even pasta.
Plastic storage system
Make a model from office paper trays. The multi-tiered option will allow you to accommodate a lot of cosmetics.
Finding the right product will take a minimum of time if transparent plastic containers were used for the product. They are purchased at office supply stores.
Wooden model
They create durable and stylish organizers for storing cosmetics with their own hands from wood. This type of work requires certain skills and knowledge. But the result is worth it.
The result will be a system with many departments for storing all kinds of funds. The mini-dresser consists of a body, internal dividers and drawers.
The shape of the model and the number of departments are selected in accordance with personal preferences.
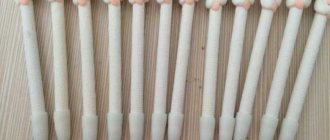
Cutting the product
I cut the organizer for eleven brushes. It’s so convenient for me because it holds everything I need from cosmetics. And when folded, it becomes very compact (this allows me to quickly collect everything I need before an urgent trip, etc.). If you plan to stack more items, make it larger. This is especially suitable for those who want to use an organizer for storing construction tools (for example, drills, all kinds of keys, files, etc.). After you decide on the dimensions, start building the drawing. For the zipper pocket, you need to cut one back panel from the outer material, then the same part from the lining. In the same quantity and similar dimensions, make the top outer layer and the lining, which must be cut vertically in order to insert the zipper. For the main panel, you need to cut out the outer layer, the lining, the visor from two layers (it covers the tassels), as well as a rectangular strip from which the cells will be sewn. You also need a piece of edging, the size of which is equal to the perimeter of the product, as well as ribbons for tying.
Smooth and fresh skin: dermaplaning, or why a woman needs to shave her face
If there is little snow, there will be no harvest: December 16 is Ivan the Silent Day
Women's jeans: before you buy them, you need to pay attention to one detail